
1. 總覽
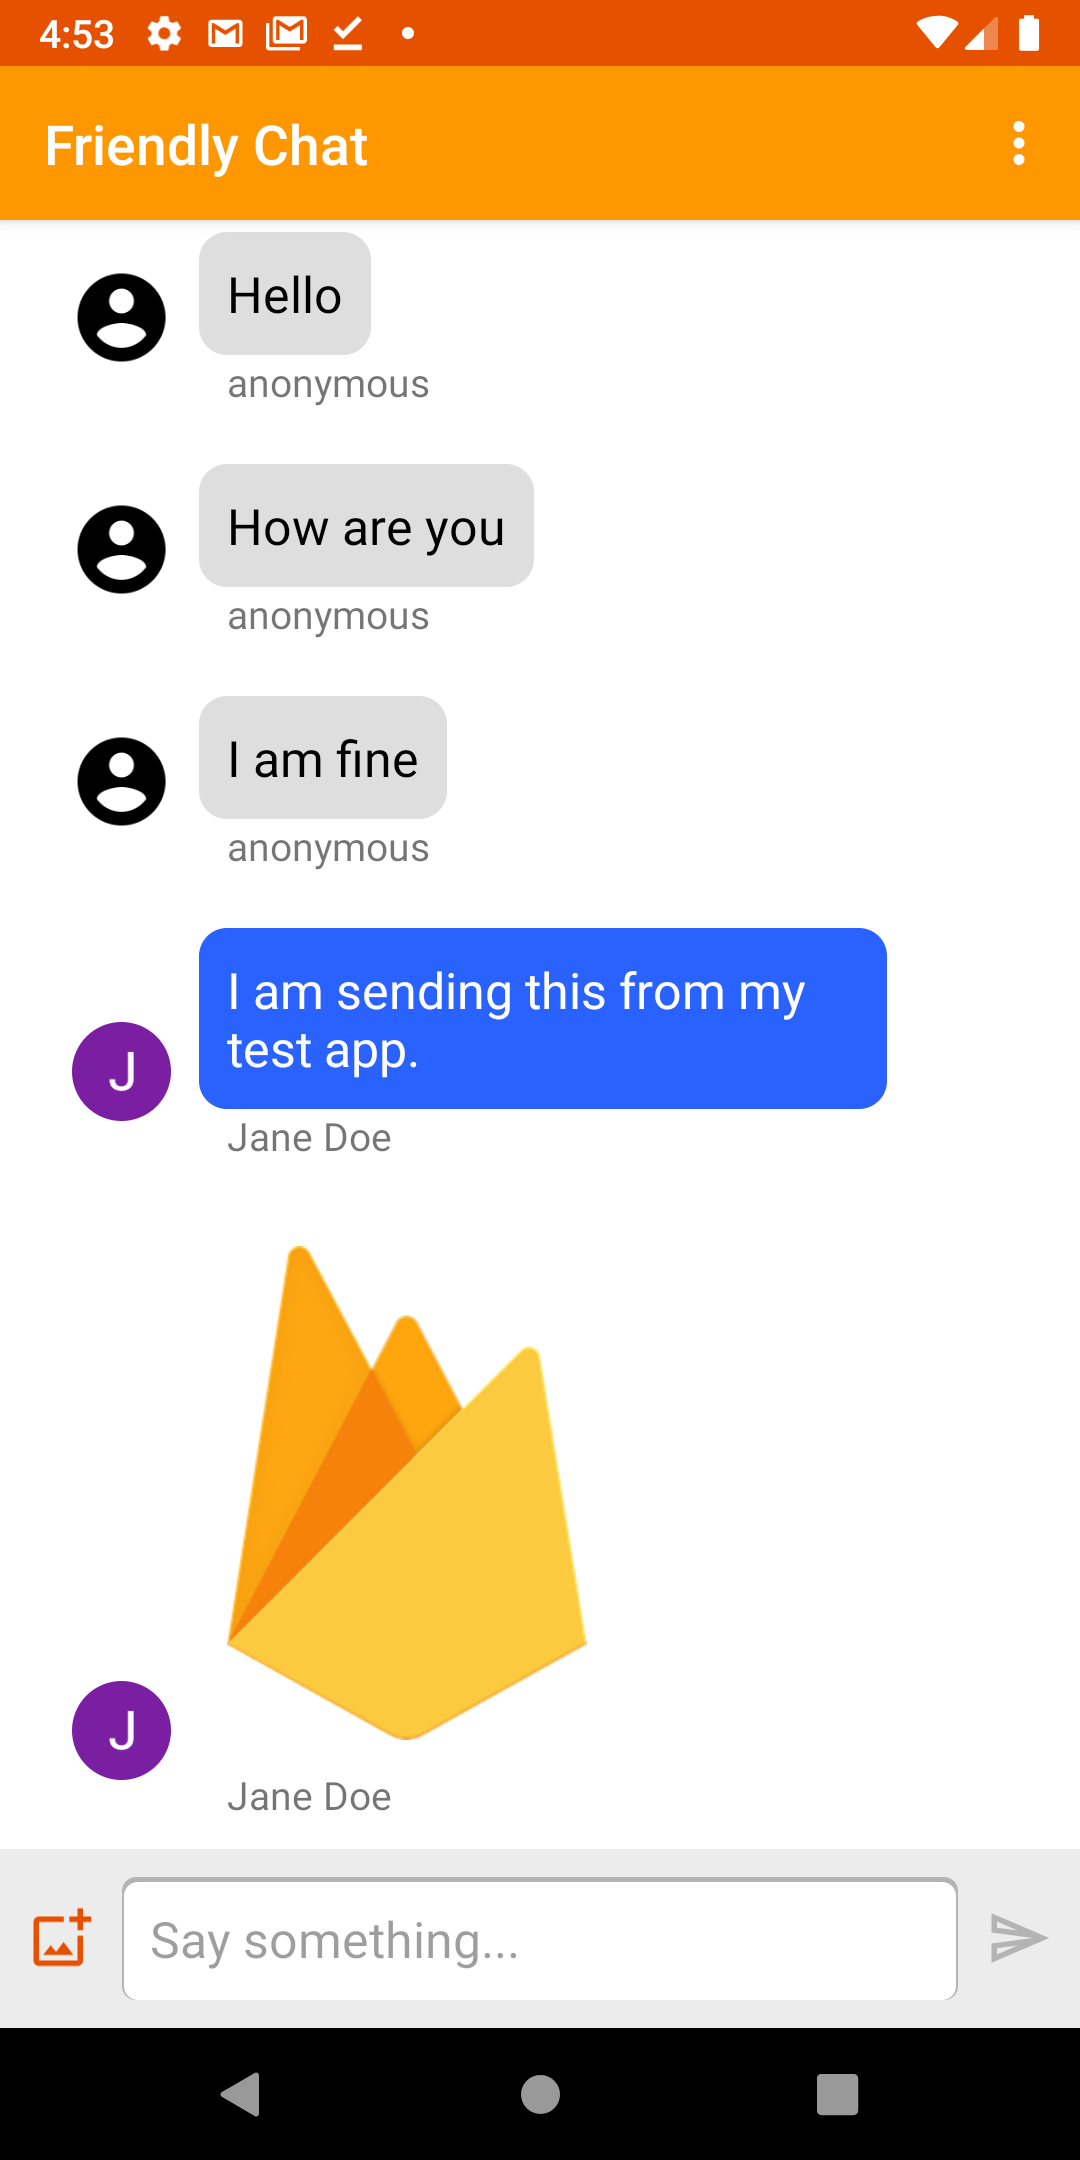
圖片:運作中的 Friendly Chat 應用程式。
歡迎參加 Friendly Chat 程式碼研究室。在本程式碼研究室中,您將瞭解如何使用 Firebase 平台在 Android 上建立即時通訊應用程式。
課程內容
- 如何使用 Firebase 驗證功能,允許使用者登入。
- 如何使用 Firebase 即時資料庫同步處理資料。
- 瞭解如何在 Cloud Storage for Firebase 中儲存二進位檔案。
- 如何使用 Firebase 本機模擬器套件,透過 Firebase 開發 Android 應用程式。
事前準備
- 最新版 Android Studio。
- 搭載 Android 5.0 以上版本的 Android Emulator。
- Node.js 10 以上版本 (使用模擬器套件)。
- Java 8 以上版本。如要安裝 Java,請按照這些指示操作;如要檢查版本,請執行
java -version。 - 熟悉 Kotlin 程式設計語言。
2. 取得程式碼範例
複製存放區
從指令列複製 GitHub 存放區:
$ git clone https://github.com/firebase/codelab-friendlychat-android
匯入 Android Studio
在 Android Studio 中,依序選取「File」 >「Open」,然後從下載範例程式碼的目錄中選取 build-android-start 目錄 (  )。
)。
現在應該已在 Android Studio 中開啟 build-android-start 專案。如果看到有關缺少 google-services.json 檔案的警告,請別擔心,我們會在後續步驟中新增這項資訊。
檢查依附元件
在本程式碼研究室中,您所需的所有依附元件都已新增完畢,但瞭解如何將 Firebase SDK 新增至應用程式非常重要:
build.gradle.kts
plugins {
    id("com.android.application") version "8.0.0" apply false
    id("com.android.library") version "8.0.0" apply false
    id("org.jetbrains.kotlin.android") version "1.8.20" apply false

    // The google-services plugin is required to parse the google-services.json file
    id("com.google.gms.google-services") version "4.3.15" apply false
}
app/build.gradle.kts
plugins {
    id("com.android.application")
    id("kotlin-android")
    id("com.google.gms.google-services")
}

android {
    // ...
}

dependencies {
    // ...

    // Google Sign In SDK
    implementation("com.google.android.gms:play-services-auth:20.5.0")

    // Firebase SDK
    implementation(platform("com.google.firebase:firebase-bom:32.0.0"))
    implementation("com.google.firebase:firebase-database-ktx")
    implementation("com.google.firebase:firebase-storage-ktx")
    implementation("com.google.firebase:firebase-auth-ktx")

    // Firebase UI Library
    implementation("com.firebaseui:firebase-ui-auth:8.0.2")
    implementation("com.firebaseui:firebase-ui-database:8.0.2")
}
3. 安裝 Firebase CLI
在本程式碼研究室中,您將使用 Firebase 模擬器套件,在本機模擬 Firebase 驗證、即時資料庫和 Cloud Storage。這項工具提供安全、快速且免費的本機開發環境,方便您建構應用程式。
安裝 Firebase CLI
首先,您需要安裝 Firebase CLI。如果您使用 macOS 或 Linux,可以執行下列 cURL 指令:
curl -sL https://firebase.tools | bash
如果是 Windows,請參閱安裝說明,取得獨立二進位檔或透過 npm 安裝。
安裝 CLI 後,執行 firebase --version 應會回報 9.0.0 以上版本:
$ firebase --version
9.0.0
登入
執行 firebase login,將 CLI 連結至 Google 帳戶。系統會開啟新的瀏覽器視窗,讓你完成登入程序。請務必選擇先前建立 Firebase 專案時使用的帳戶。
4. 連線至 Firebase 模擬器套件
啟動模擬器
在終端機中,從本機 codelab-friendlychat-android 目錄的根目錄執行下列指令:
firebase emulators:start --project=demo-friendlychat-android
您應該會看到類似這樣的記錄。這些連接埠值是在 firebase.json 檔案中定義,該檔案包含在複製的程式碼範例中。
$ firebase emulators:start --project=demo-friendlychat-android
i  emulators: Starting emulators: auth, database, storage
i  emulators: Detected demo project ID "demo-friendlychat-android", emulated services will use a demo configuration and attempts to access non-emulated services for this project will fail.
i  database: Database Emulator logging to database-debug.log
i  ui: Emulator UI logging to ui-debug.log

┌─────────────────────────────────────────────────────────────┐
│ ✔  All emulators ready! It is now safe to connect your app. │
│ i  View Emulator UI at http://localhost:4000                │
└─────────────────────────────────────────────────────────────┘

┌────────────────┬────────────────┬────────────────────────────────┐
│ Emulator       │ Host:Port      │ View in Emulator UI            │
├────────────────┼────────────────┼────────────────────────────────┤
│ Authentication │ localhost:9099 │ http://localhost:4000/auth     │
├────────────────┼────────────────┼────────────────────────────────┤
│ Database       │ localhost:9000 │ http://localhost:4000/database │
├────────────────┼────────────────┼────────────────────────────────┤
│ Storage        │ localhost:9199 │ http://localhost:4000/storage  │
└────────────────┴────────────────┴────────────────────────────────┘
  Emulator Hub running at localhost:4400
  Other reserved ports: 4500

Issues? Report them at https://github.com/firebase/firebase-tools/issues and attach the *-debug.log files.
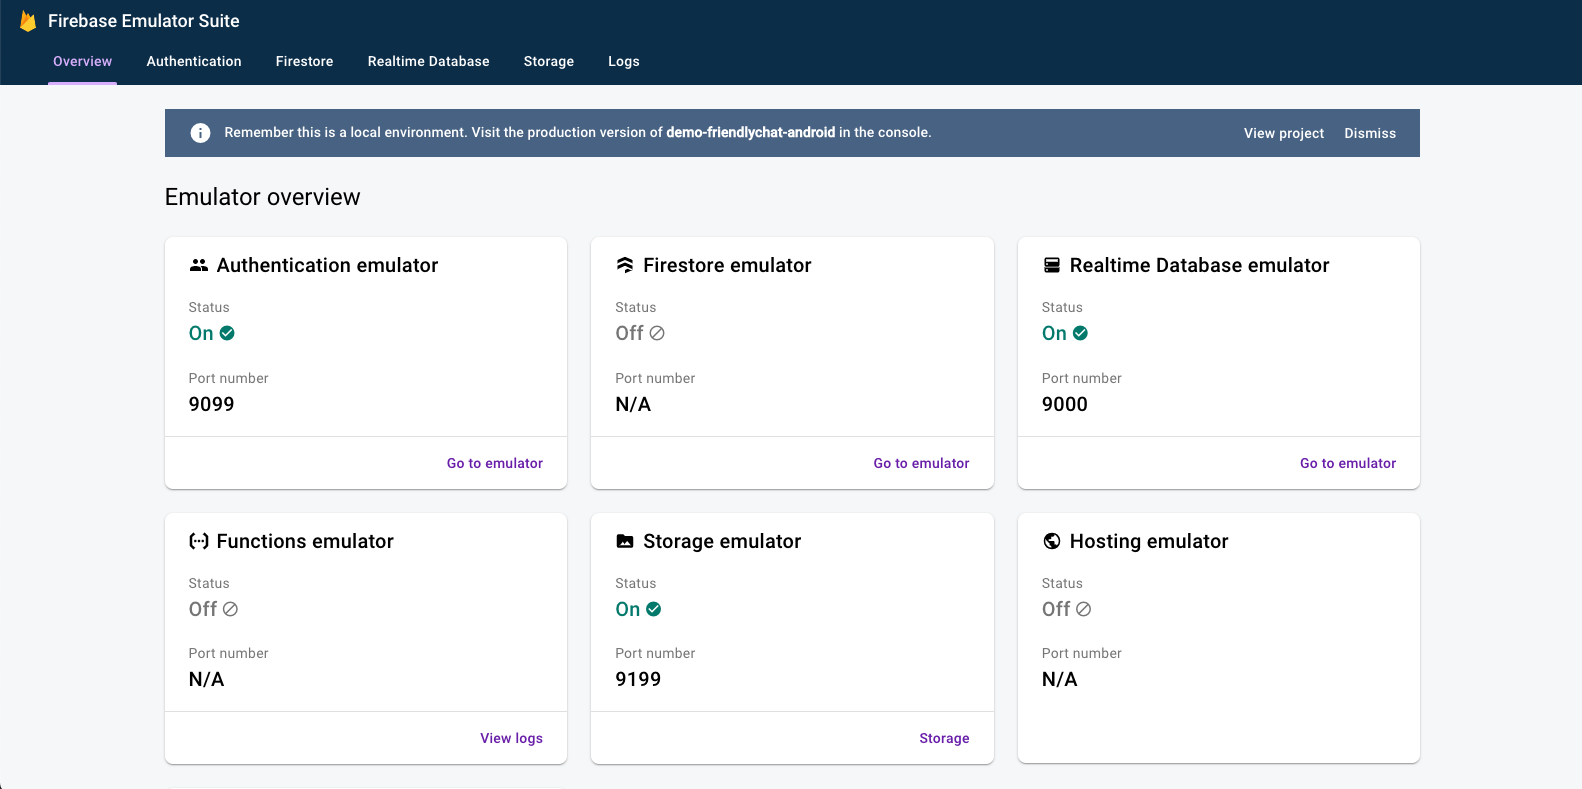
在網路瀏覽器中前往 http://localhost:4000,即可查看 Firebase 模擬器套件 UI:
在程式碼研究室的其餘部分,讓 emulators:start 指令繼續執行。
連結應用程式
在 Android Studio 中開啟 MainActivity.kt,然後在 onCreate 方法中加入下列程式碼:
// When running in debug mode, connect to the Firebase Emulator Suite.
// "10.0.2.2" is a special IP address which allows the Android Emulator
// to connect to "localhost" on the host computer. The port values (9xxx)
// must match the values defined in the firebase.json file.
if (BuildConfig.DEBUG) {
    Firebase.database.useEmulator("10.0.2.2", 9000)
    Firebase.auth.useEmulator("10.0.2.2", 9099)
    Firebase.storage.useEmulator("10.0.2.2", 9199)
}
5. 執行範例應用程式
新增 google-services.json
如要讓 Android 應用程式連線至 Firebase,您必須在 Android 專案的 app 資料夾中新增 google-services.json 檔案。在本程式碼研究室中,我們提供模擬 JSON 檔案,讓您連線至 Firebase Emulator Suite。
將 mock-google-services.json 檔案複製到 build-android-start/app 資料夾,並命名為 google-services.json:
cp mock-google-services.json build-android-start/app/google-services.json
在本程式碼研究室的最後一個步驟中,您將瞭解如何建立實際的 Firebase 專案和 Firebase Android 應用程式,以便使用自己的設定取代這個模擬 JSON 檔案。
執行應用程式
將專案匯入 Android Studio 並新增 Firebase 設定 JSON 檔案後,您就可以首次執行應用程式。
- 啟動 Android Emulator。
- 在 Android Studio 中,按一下工具列中的「Run」 (
 )。
)。
Android Emulator 應會啟動應用程式。此時,您應該會看到空白的訊息清單,且無法傳送及接收訊息。在本程式碼研究室的下一個步驟中,您將驗證使用者身分,讓他們可以使用 Friendly Chat。
6. 啟用驗證功能
這個應用程式會使用 Firebase 即時資料庫儲存所有即時通訊訊息。不過,在新增資料前,我們應確保應用程式安全無虞,且只有經過驗證的使用者可以發布訊息。在這個步驟中,我們會啟用 Firebase 驗證,並設定即時資料庫安全規則。
新增基本登入功能
接下來,我們會在應用程式中新增一些基本的 Firebase 驗證程式碼,偵測使用者並實作登入畫面。
檢查目前使用者
首先,將下列執行個體變數新增至 MainActivity.kt 類別:
MainActivity.kt
// Firebase instance variables
private lateinit var auth: FirebaseAuth
現在,請修改 MainActivity,讓使用者在開啟應用程式但未通過驗證時,一律前往登入畫面。binding 附加至檢視區塊後,將下列內容新增至 onCreate() 方法:
MainActivity.kt
// Initialize Firebase Auth and check if the user is signed in
auth = Firebase.auth
if (auth.currentUser == null) {
    // Not signed in, launch the Sign In activity
    startActivity(Intent(this, SignInActivity::class.java))
    finish()
    return
}
我們也想在 onStart() 期間檢查使用者是否已登入:
MainActivity.kt
public override fun onStart() {
    super.onStart()
    // Check if user is signed in.
    if (auth.currentUser == null) {
        // Not signed in, launch the Sign In activity
        startActivity(Intent(this, SignInActivity::class.java))
        finish()
        return
    }
}
接著實作 getUserPhotoUrl() 和 getUserName() 方法,傳回目前已通過驗證的 Firebase 使用者相關資訊:
MainActivity.kt
private fun getPhotoUrl(): String? {
    val user = auth.currentUser
    return user?.photoUrl?.toString()
}

private fun getUserName(): String? {
    val user = auth.currentUser
    return if (user != null) {
        user.displayName
    } else ANONYMOUS
}
然後實作 signOut() 方法來處理登出按鈕:
MainActivity.kt
private fun signOut() {
    AuthUI.getInstance().signOut()
    startActivity(Intent(this, SignInActivity::class.java))
    finish()
}
現在我們已備妥所有邏輯,可在必要時將使用者導向登入畫面。接下來,我們需要實作登入畫面,以便正確驗證使用者。
實作登入畫面
開啟 SignInActivity.kt 檔案。這裡使用簡單的「登入」按鈕啟動驗證。在本節中,您將使用 FirebaseUI 實作登入邏輯。
在 // Firebase instance variables 註解下方的 SignInActivity 類別中新增 Auth 執行個體變數:
SignInActivity.kt
// Firebase instance variables
private lateinit var auth: FirebaseAuth
接著,請編輯 onCreate() 方法,以與 MainActivity 相同的方式初始化 Firebase:
SignInActivity.kt
// Initialize FirebaseAuth
auth = Firebase.auth
在 SignInActivity 中新增 ActivityResultLauncher 欄位:
SignInActivity.kt
// ADD THIS
private val signIn: ActivityResultLauncher<Intent> =
        registerForActivityResult(FirebaseAuthUIActivityResultContract(), this::onSignInResult)

override fun onCreate(savedInstanceState: Bundle?) {
    // ...
}
接著,請編輯 onStart() 方法,啟動 FirebaseUI 登入流程:
SignInActivity.kt
public override fun onStart() {
    super.onStart()

    // If there is no signed in user, launch FirebaseUI
    // Otherwise head to MainActivity
    if (Firebase.auth.currentUser == null) {
        // Sign in with FirebaseUI, see docs for more details:
        // https://firebase.google.com/docs/auth/android/firebaseui
        val signInIntent = AuthUI.getInstance()
                .createSignInIntentBuilder()
                .setLogo(R.mipmap.ic_launcher)
                .setAvailableProviders(listOf(
                        AuthUI.IdpConfig.EmailBuilder().build(),
                        AuthUI.IdpConfig.GoogleBuilder().build(),
                ))
                .build()

        signIn.launch(signInIntent)
    } else {
        goToMainActivity()
    }
}
接著,實作 onSignInResult 方法來處理登入結果。如果登入成功,請繼續執行MainActivity:
SignInActivity.kt
private fun onSignInResult(result: FirebaseAuthUIAuthenticationResult) {
    if (result.resultCode == RESULT_OK) {
        Log.d(TAG, "Sign in successful!")
        goToMainActivity()
    } else {
        Toast.makeText(
                this,
                "There was an error signing in",
                Toast.LENGTH_LONG).show()

        val response = result.idpResponse
        if (response == null) {
            Log.w(TAG, "Sign in canceled")
        } else {
            Log.w(TAG, "Sign in error", response.error)
        }
    }
}
任務完成!您只透過幾次方法呼叫,就使用 FirebaseUI 實作了驗證功能,完全不需要管理任何伺服器端設定。
測試作品
在 Android Emulator 上執行應用程式。系統應會立即將你導向登入畫面。輕觸「使用電子郵件登入」按鈕,然後建立帳戶。如果一切實作正確,系統應該會將你導向訊息畫面。
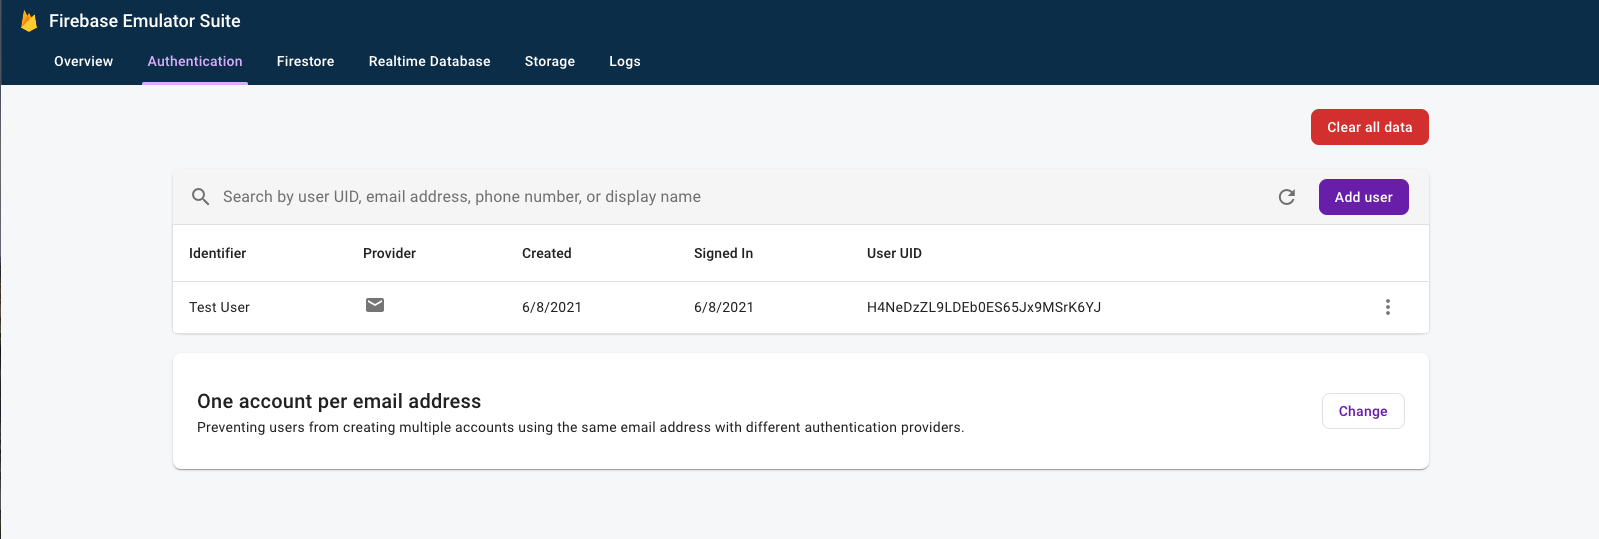
登入後,在瀏覽器中開啟 Firebase Emulator Suite UI,然後按一下「驗證」分頁,即可查看這個首次登入的使用者帳戶。
7. 朗讀訊息
在這個步驟中,我們會新增功能,讀取並顯示儲存在即時資料庫中的訊息。
匯入範例訊息
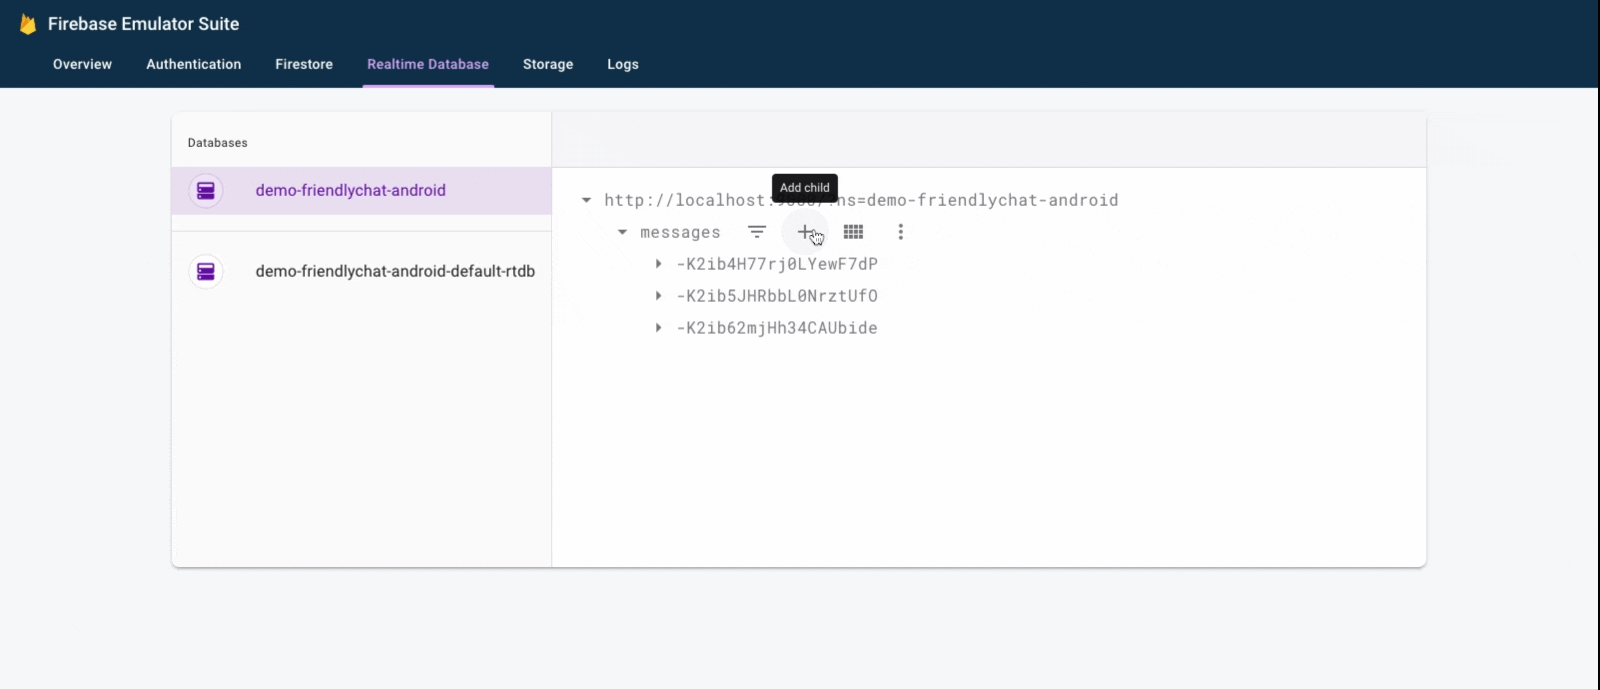
- 在 Firebase 模擬器套件 UI 中,選取「Realtime Database」分頁標籤。
- 將
initial_messages.json檔案從 Codelab 存放區的本機副本拖曳到資料檢視器。
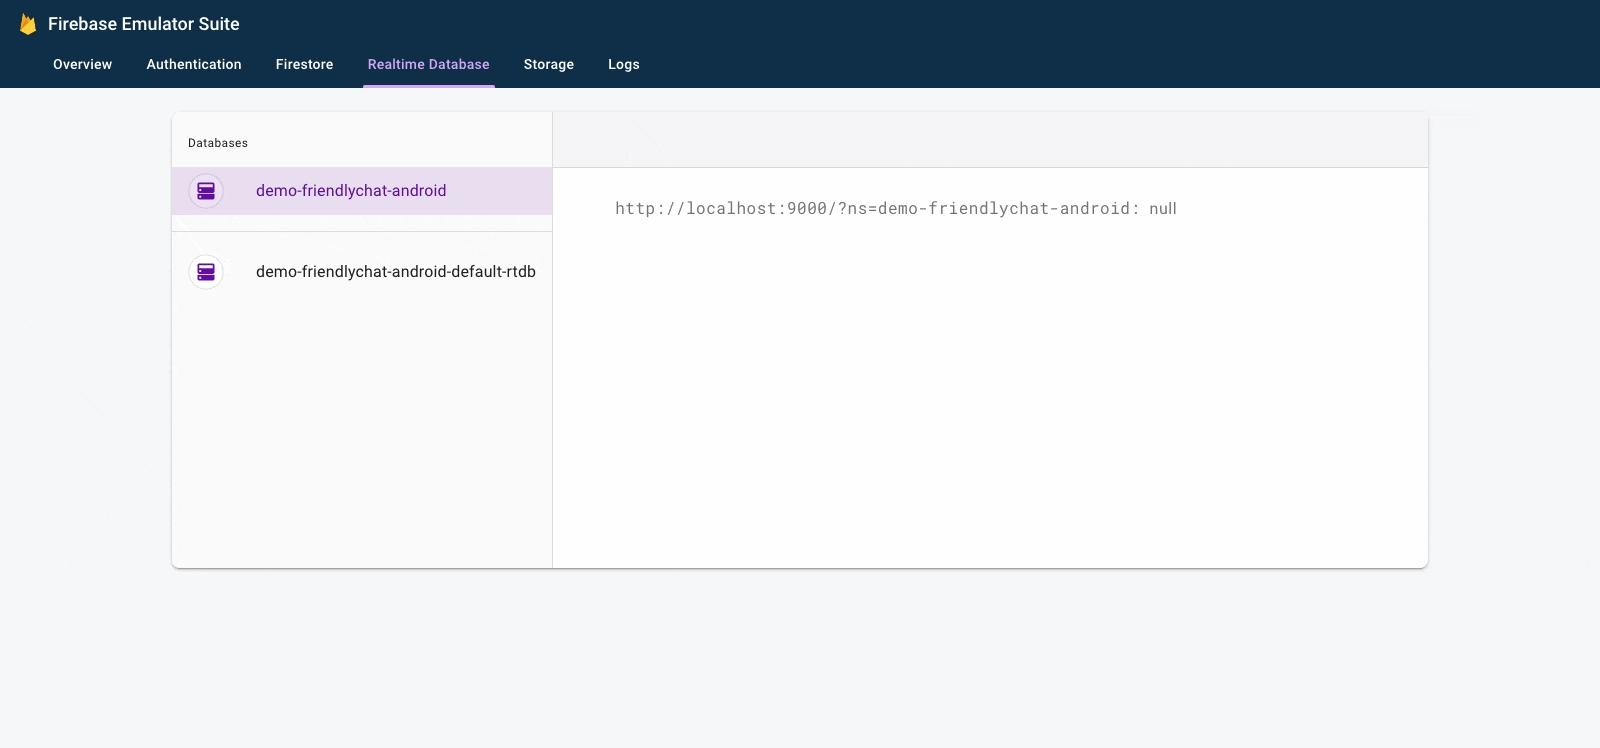
現在,資料庫的 messages 節點下應該會有幾則訊息。
讀取資料
同步處理訊息
在本節中,我們會新增程式碼,透過下列方式將新加入的訊息同步到應用程式 UI:
- 初始化 Firebase 即時資料庫,並新增監聽器來處理資料變更。
- 更新
RecyclerView轉接程式,以便顯示新訊息。 - 在
MainActivity類別中,將資料庫執行個體變數與其他 Firebase 執行個體變數一起新增:
MainActivity.kt
// Firebase instance variables
// ...
private lateinit var db: FirebaseDatabase
private lateinit var adapter: FriendlyMessageAdapter
在註解 // Initialize Realtime Database and FirebaseRecyclerAdapter 下方,使用下列程式碼修改 MainActivity 的 onCreate() 方法。這段程式碼會新增即時資料庫中的所有現有訊息,然後監聽 Firebase 即時資料庫中 messages 路徑下的新子項。這項功能會在每個訊息的 UI 中新增元素:
MainActivity.kt
// Initialize Realtime Database
db = Firebase.database
val messagesRef = db.reference.child(MESSAGES_CHILD)

// The FirebaseRecyclerAdapter class and options come from the FirebaseUI library
// See: https://github.com/firebase/FirebaseUI-Android
val options = FirebaseRecyclerOptions.Builder<FriendlyMessage>()
    .setQuery(messagesRef, FriendlyMessage::class.java)
    .build()
adapter = FriendlyMessageAdapter(options, getUserName())
binding.progressBar.visibility = ProgressBar.INVISIBLE
manager = LinearLayoutManager(this)
manager.stackFromEnd = true
binding.messageRecyclerView.layoutManager = manager
binding.messageRecyclerView.adapter = adapter

// Scroll down when a new message arrives
// See MyScrollToBottomObserver for details
adapter.registerAdapterDataObserver(
    MyScrollToBottomObserver(binding.messageRecyclerView, adapter, manager)
)
接下來,在 FriendlyMessageAdapter.kt 類別中,於內部類別 MessageViewHolder() 內實作 bind() 方法:
FriendlyMessageAdapter.kt
inner class MessageViewHolder(private val binding: MessageBinding) : ViewHolder(binding.root) {
    fun bind(item: FriendlyMessage) {
        binding.messageTextView.text = item.text
        setTextColor(item.name, binding.messageTextView)

        binding.messengerTextView.text = if (item.name == null) ANONYMOUS else item.name
        if (item.photoUrl != null) {
            loadImageIntoView(binding.messengerImageView, item.photoUrl!!)
        } else {
            binding.messengerImageView.setImageResource(R.drawable.ic_account_circle_black_36dp)
        }
    }
    ...
}
我們也需要顯示圖片訊息,因此請在內部類別 ImageMessageViewHolder() 中實作 bind() 方法:
FriendlyMessageAdapter.kt
inner class ImageMessageViewHolder(private val binding: ImageMessageBinding) :
    ViewHolder(binding.root) {
    fun bind(item: FriendlyMessage) {
        loadImageIntoView(binding.messageImageView, item.imageUrl!!)

        binding.messengerTextView.text = if (item.name == null) ANONYMOUS else item.name
        if (item.photoUrl != null) {
            loadImageIntoView(binding.messengerImageView, item.photoUrl!!)
        } else {
            binding.messengerImageView.setImageResource(R.drawable.ic_account_circle_black_36dp)
        }
    }
}
最後,回到 MainActivity,開始及停止監聽 Firebase 即時資料庫的更新。在 MainActivity 中更新 onPause() 和 onResume() 方法,如下所示:
MainActivity.kt
public override fun onPause() {
    adapter.stopListening()
    super.onPause()
}

public override fun onResume() {
    super.onResume()
    adapter.startListening()
}
測試訊息同步
- 按一下「執行」 ( )。
- 在模擬器套件 UI 中,返回「Realtime Database」分頁,然後手動新增訊息。確認訊息是否顯示在 Android 應用程式中:
恭喜,您已在應用程式中新增即時資料庫!
8. 傳送訊息
實作傳送簡訊功能
在本節中,您將新增讓應用程式使用者傳送簡訊的功能。下列程式碼片段會監聽傳送按鈕上的點擊事件,使用訊息欄位內容建立新的 FriendlyMessage 物件,並將訊息推送至資料庫。push() 方法會將自動產生的 ID 新增至推送物件的路徑。這些 ID 是連續的,可確保新訊息會加到清單結尾。
在 MainActivity 類別的 onCreate() 方法中,更新傳送按鈕的點擊事件監聽器。這段程式碼已位於 onCreate() 方法底部。更新 onClick() 主體,使其符合以下程式碼:
MainActivity.kt
// Disable the send button when there's no text in the input field
// See MyButtonObserver for details
binding.messageEditText.addTextChangedListener(MyButtonObserver(binding.sendButton))

// When the send button is clicked, send a text message
binding.sendButton.setOnClickListener {
    val friendlyMessage = FriendlyMessage(
        binding.messageEditText.text.toString(),
        getUserName(),
        getPhotoUrl(),
        null /* no image */
    )
    db.reference.child(MESSAGES_CHILD).push().setValue(friendlyMessage)
    binding.messageEditText.setText("")
}
實作圖片訊息傳送功能
在本節中,您將新增功能,讓應用程式使用者傳送圖片訊息。如要建立圖片訊息,請按照下列步驟操作:
- 選取圖片
- 處理圖片選取作業
- 將臨時圖片訊息寫入即時資料庫
- 開始上傳所選圖片
- 上傳完成後,請將圖片訊息網址更新為上傳圖片的網址
選取圖片
本程式碼研究室使用 Cloud Storage for Firebase 新增圖片。Cloud Storage 是儲存應用程式二進位資料的理想位置。
處理圖片選取作業,並撰寫臨時訊息
使用者選取圖片後,系統會啟動圖片選取 Intent。這項功能已在 onCreate() 方法結尾的程式碼中實作。完成後,系統會呼叫 MainActivity 的 onImageSelected() 方法。使用下方的程式碼片段,您將撰寫含有暫時圖片網址的訊息到資料庫,指出圖片正在上傳。
MainActivity.kt
private fun onImageSelected(uri: Uri) {
    Log.d(TAG, "Uri: $uri")
    val user = auth.currentUser
    val tempMessage = FriendlyMessage(null, getUserName(), getPhotoUrl(), LOADING_IMAGE_URL)
    db.reference
            .child(MESSAGES_CHILD)
            .push()
            .setValue(
                    tempMessage,
                    DatabaseReference.CompletionListener { databaseError, databaseReference ->
                        if (databaseError != null) {
                            Log.w(
                                    TAG, "Unable to write message to database.",
                                    databaseError.toException()
                            )
                            return@CompletionListener
                        }

                        // Build a StorageReference and then upload the file
                        val key = databaseReference.key
                        val storageReference = Firebase.storage
                                .getReference(user!!.uid)
                                .child(key!!)
                                .child(uri.lastPathSegment!!)
                        putImageInStorage(storageReference, uri, key)
                    })
}
上傳圖片並更新訊息
將 putImageInStorage() 方法新增至 MainActivity。系統會呼叫此函式,啟動所選圖片的上傳作業。onImageSelected()上傳完成後,請更新訊息,使用適當的圖片。
MainActivity.kt
private fun putImageInStorage(storageReference: StorageReference, uri: Uri, key: String?) {
    // First upload the image to Cloud Storage
    storageReference.putFile(uri)
        .addOnSuccessListener(
            this
        ) { taskSnapshot -> // After the image loads, get a public downloadUrl for the image
            // and add it to the message.
            taskSnapshot.metadata!!.reference!!.downloadUrl
                .addOnSuccessListener { uri ->
                    val friendlyMessage =
                        FriendlyMessage(null, getUserName(), getPhotoUrl(), uri.toString())
                    db.reference
                        .child(MESSAGES_CHILD)
                        .child(key!!)
                        .setValue(friendlyMessage)
                }
        }
        .addOnFailureListener(this) { e ->
            Log.w(
                TAG,
                "Image upload task was unsuccessful.",
                e
            )
        }
}
測試傳送訊息
- 在 Android Studio 中,按一下「Run」按鈕。
- 在 Android 模擬器中輸入訊息,然後輕觸傳送按鈕。新訊息應會顯示在應用程式 UI 和 Firebase Emulator Suite UI 中。
- 在 Android 模擬器中,輕觸「+」圖片,從裝置選取圖片。新訊息會先顯示預留位置圖片,圖片上傳完成後,就會顯示所選圖片。您也應該會在 Emulator Suite 使用者介面中看到新訊息,具體來說,就是 Realtime Database 分頁中的物件,以及 Storage 分頁中的 Blob。
9. 恭喜!
您剛才使用 Firebase 建構了即時通訊應用程式!
您學到的內容
- Firebase 驗證
- Firebase 即時資料庫
- Cloud Storage for Firebase
接下來,請嘗試運用在本程式碼研究室學到的知識,將 Firebase 新增至自己的 Android 應用程式!如要進一步瞭解 Firebase,請前往 firebase.google.com。
如要瞭解如何設定實際 Firebase 專案,並使用實際 Firebase 資源 (而非示範專案和僅模擬的資源),請繼續下一個步驟。
注意:即使您已設定實際的 Firebase 專案,尤其是在開始建構實際應用程式時,我們仍建議使用 Firebase 本機模擬器套件進行開發和測試。
10. 選用:建立及設定 Firebase 專案
在本步驟中,您將建立實際的 Firebase 專案和 Firebase Android 應用程式,以搭配本程式碼研究室使用。您也會將應用程式專屬的 Firebase 設定新增至應用程式。最後,您會設定要與應用程式搭配使用的實際 Firebase 資源。
建立 Firebase 專案
- 使用 Google 帳戶登入 Firebase 控制台。
- 按一下按鈕建立新專案,然後輸入專案名稱 (例如
FriendlyChat)。
- 按一下「繼續」。
- 如果系統提示,請詳閱並接受 Firebase 條款,然後按一下「繼續」。
- (選用) 在 Firebase 控制台中啟用 AI 輔助功能 (稱為「Gemini in Firebase」)。
- 本程式碼研究室不需要 Google Analytics,因此請關閉 Google Analytics 選項。
- 按一下「建立專案」,等待專案佈建完成,然後按一下「繼續」。
升級 Firebase 定價方案
如要使用 Cloud Storage for Firebase,Firebase 專案必須採用即付即用 (Blaze) 定價方案,也就是連結至 Cloud Billing 帳戶。
- Cloud Billing 帳戶需要付款方式,例如信用卡。
- 如果您剛開始使用 Firebase 和 Google Cloud,請確認是否符合 $300 美元抵免額和免費試用 Cloud Billing 帳戶的資格。
- 如果您是在活動中進行這項程式碼研究室,請詢問主辦單位是否有可用的 Cloud 抵免額。
如要將專案升級至 Blaze 方案,請按照下列步驟操作:
- 在 Firebase 控制台中,選取「升級方案」。
- 選取 Blaze 方案。按照畫面上的指示,將 Cloud Billing 帳戶連結至專案。
如果你在升級過程中需要建立 Cloud Billing 帳戶,可能需要返回 Firebase 控制台的升級流程,才能完成升級。
將 Firebase 新增至 Android 專案
在 Firebase 控制台中,按照下列步驟將 Android 專案註冊至 Firebase 專案:
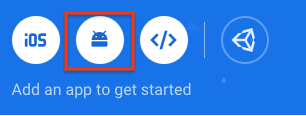
- 在新的專案總覽畫面中,按一下 Android 圖示來啟動設定工作流程:
- 在下一個畫面中,輸入
com.google.firebase.codelab.friendlychat做為應用程式的套件名稱。 - 按一下「註冊應用程式」,然後按一下「下載 google-services.json」,下載 Firebase 設定檔。
- 將
google-services.json檔案複製到 Android 專案的app目錄。 - 略過控制台設定工作流程中顯示的後續步驟 (這些步驟已在
build-android-start專案中為您完成)。 - 將專案與 Gradle 檔案同步,確保應用程式可使用所有依附元件。在 Android Studio 工具列中,依序選取「File」 >「Sync Project with Gradle Files」。您可能也需要執行「Build/Clean Project」和「Build/Rebuild Project」,才能套用設定變更。
設定 Firebase 驗證
應用程式必須先啟用 Firebase 驗證和您要在應用程式中使用的登入供應商,才能代表使用者存取 Firebase 驗證 API。
- 在 Firebase 控制台中,從左側導覽面板選取「Authentication」。
- 選取「登入方式」分頁標籤。
- 按一下「電子郵件/密碼」,然後將切換鈕設為啟用 (藍色)。
- 按一下「Google」,然後將切換鈕設為啟用 (藍色),並設定專案支援電子郵件。
如果在本程式碼研究室的後續步驟中發生錯誤,並收到「CONFIGURATION_NOT_FOUND」訊息,請返回這個步驟,仔細檢查您的工作。
您可能需要指定應用程式的 SHA 指紋,才能使用「使用 Google 帳戶登入」功能。您可以在 Firebase 控制台的「設定」頁面執行這項操作。如要瞭解如何取得應用程式的 SHA 指紋,請參閱「驗證用戶端」。
設定即時資料庫
本程式碼研究室中的應用程式會將即時通訊訊息儲存在 Firebase 即時資料庫。在本節中,我們將建立資料庫,並透過名為 Firebase 安全性規則的 JSON 設定語言設定資料庫安全性。
- 在 Firebase 控制台的左側面板中,展開「Build」,然後選取「Realtime Database」。
- 按一下 [Create database] (建立資料庫)。
- 選取資料庫位置,然後按一下「下一步」。
如果是實際應用程式,建議選擇靠近使用者的位置。 - 按一下「以測試模式啟動」。請詳閱安全性規則免責事項。
在本程式碼研究室的後續步驟中,您將新增安全性規則,確保資料安全無虞。請勿在未為資料庫新增安全性規則的情況下,公開發布或公開應用程式。 - 點選「建立」。
- 建立資料庫執行個體後,請選取「規則」分頁,然後使用下列規則更新設定:
 {
   "rules": {
     "messages": {
       ".read": "auth.uid != null",
       ".write": "auth.uid != null"
     }
   }
 }
如要進一步瞭解安全性規則的運作方式 (包括「auth」變數的說明文件),請參閱即時資料庫安全性說明文件。
設定 Cloud Storage for Firebase
- 在 Firebase 主控台的左側面板中,展開「Build」,然後選取「Storage」。
- 按一下「開始使用」。
- 選取預設 Storage bucket 的位置。
位於US-WEST1、US-CENTRAL1和US-EAST1的 bucket 可享有 Google Cloud Storage 的「一律免費」方案。其他所有位置的值區均適用 Google Cloud Storage 定價和用量。 - 按一下「以測試模式啟動」。請詳閱安全性規則免責事項。
在本程式碼研究室稍後的步驟中,您將新增安全性規則來保護資料。請勿在未為儲存空間 bucket 新增安全規則的情況下,公開發布或公開應用程式。 - 點選「建立」。
連結至 Firebase 資源
在本程式碼研究室的稍早步驟中,您已將下列項目新增至 MainActivity.kt。這個條件式區塊會將 Android 專案連結至 Firebase Emulator Suite。
// REMOVE OR DISABLE THIS
if (BuildConfig.DEBUG) {
    Firebase.database.useEmulator("10.0.2.2", 9000)
    Firebase.auth.useEmulator("10.0.2.2", 9099)
    Firebase.storage.useEmulator("10.0.2.2", 9199)
}
如要將應用程式連結至新的正式 Firebase 專案及其正式 Firebase 資源,您可以移除這個區塊,或在發布模式下執行應用程式,讓 BuildConfig.DEBUG 為 false。