
1. Başlamadan önce
Bu codelab'de, Android ve iOS için Flutter mobil uygulamaları oluşturmak üzere Firebase'in bazı temel özelliklerini öğreneceksiniz.
Ön koşullar
- Flutter hakkında bilgi
- Flutter SDK'sı
- Seçtiğiniz bir metin düzenleyici
Neler öğreneceksiniz?
- Flutter ile Android, iOS, web ve macOS'te etkinlik LCV'si ve konuk defteri sohbet uygulaması oluşturma
- Kullanıcıların kimliklerini Firebase Authentication ile doğrulama ve verileri Firestore ile senkronize etme
|
|
|
|


Gerekenler
Aşağıdaki cihazlardan herhangi biri:
- Bilgisayarınıza bağlı ve geliştirici moduna ayarlanmış fiziksel bir Android veya iOS cihaz.
- iOS simülasyon aracı (Xcode araçları gerektirir).
- Android emülatörü (Android Studio'da kurulum gerektirir).
Ayrıca şunlara da ihtiyacınız vardır:
- Google Chrome gibi istediğiniz bir tarayıcı.
- Android Studio veya Visual Studio Code gibi Dart ve Flutter eklentileriyle yapılandırılmış, tercih ettiğiniz bir IDE veya metin düzenleyici.
- Flutter'ın en son
stablesürümü veya risk almayı seviyorsanızbetasürümü. - Firebase projenizi oluşturmak ve yönetmek için bir Google Hesabı.
FirebaseCLI, Google Hesabınızda oturum açmış olmalıdır.
2. Örnek kodu alın
Projenizin ilk sürümünü GitHub'dan indirin:
- Komut satırından GitHub deposunu
flutter-codelabsdizinine klonlayın:
git clone https://github.com/flutter/codelabs.git flutter-codelabs
flutter-codelabs dizini, bir dizi codelab'in kodunu içerir. Bu codelab'in kodu flutter-codelabs/firebase-get-to-know-flutter dizinindedir. Dizin, projenizin her adımın sonunda nasıl görünmesi gerektiğini gösteren bir dizi anlık görüntü içerir. Örneğin, ikinci adımda olduğunuzu düşünelim.
- İkinci adım için eşleşen dosyaları bulun:
cd flutter-codelabs/firebase-get-to-know-flutter/step_02
İleri sarmak veya bir adımın ardından nasıl görüneceğini görmek istiyorsanız ilgilendiğiniz adımın adını taşıyan dizine bakın.
Başlangıç uygulamasını içe aktarma
flutter-codelabs/firebase-get-to-know-flutter/step_02dizinini tercih ettiğiniz IDE'de açın veya içe aktarın. Bu dizin, henüz işlevsel olmayan bir Flutter buluşma uygulamasından oluşan codelab'in başlangıç kodunu içerir. Uygulamayı IDE'nizde açtığınızda, derleme süresi hataları olduğunu fark edeceksiniz. Bu hatalar 4. adımda düzeltilecektir.
Üzerinde çalışılması gereken dosyaları bulma
Bu uygulamadaki kod birden fazla dizine yayılmış durumda. Bu işlev ayrımı, kodu işlevselliğe göre gruplandırdığı için çalışmayı kolaylaştırır.
- Aşağıdaki dosyaları bulun:
lib/main.dart: Bu dosya, ana giriş noktasını ve uygulama widget'ını içerir.lib/home_page.dart: Bu dosya, ana sayfa widget'ını içerir.lib/src/widgets.dart: Bu dosya, uygulamanın stilini standartlaştırmaya yardımcı olacak birkaç widget içerir. Bu widget'lar, başlangıç uygulamasının ekranını oluşturur.lib/src/authentication.dart: Bu dosya, Firebase e-posta tabanlı kimlik doğrulaması için oturum açma kullanıcı deneyimi oluşturmaya yönelik bir dizi widget ile kimlik doğrulamanın kısmi bir uygulamasını içerir. Kimlik doğrulama akışıyla ilgili bu widget'lar henüz başlangıç uygulamasında kullanılmamaktadır ancak yakında eklenecektir.
Uygulamanın geri kalanını oluşturmak için gerektiğinde ek dosyalar eklersiniz.
lib/main.dart dosyasını inceleyin
Bu uygulama, Roboto'yu uygulamanın tamamında varsayılan yazı tipi yapmak için google_fonts paketinden yararlanır. fonts.google.com adresini ziyaret edebilir ve burada keşfettiğiniz yazı tiplerini uygulamanın farklı bölümlerinde kullanabilirsiniz.
lib/src/widgets.dart dosyasındaki yardımcı widget'ları Header, Paragraph ve IconAndDetail biçiminde kullanırsınız. Bu widget'lar, HomePage bölümünde açıklanan sayfa düzenindeki dağınıklığı azaltmak için yinelenen kodu ortadan kaldırır. Bu, tutarlı bir görünüm ve tarz da sağlar.
Uygulamanızın Android, iOS, web ve macOS'teki görünümü:
|
|
|
|


3. Firebase projesi oluşturma ve ayarlama
Etkinlik bilgilerinin gösterilmesi konuklarınız için harika bir özellik olsa da tek başına pek kullanışlı değildir. Uygulamaya bazı dinamik işlevler eklemeniz gerekiyor. Bunu yapmak için Firebase'i uygulamanıza bağlamanız gerekir. Firebase'i kullanmaya başlamak için bir Firebase projesi oluşturup ayarlamanız gerekir.
Firebase projesi oluşturma
- Google Hesabınızı kullanarak Firebase konsolunda oturum açın.
- Yeni bir proje oluşturmak için düğmeyi tıklayın ve ardından bir proje adı girin (örneğin,
Firebase-Flutter-Codelab).
- Devam'ı tıklayın.
- İstenirse Firebase şartlarını inceleyip kabul edin ve Devam'ı tıklayın.
- (İsteğe bağlı) Firebase konsolunda Yapay Zeka Desteği'ni etkinleştirin ("Firebase'de Gemini" olarak adlandırılır).
- Bu codelab için Google Analytics'e ihtiyacınız yoktur. Bu nedenle, Google Analytics seçeneğini devre dışı bırakın.
- Proje oluştur'u tıklayın, projenizin hazırlanmasını bekleyin ve ardından Devam'ı tıklayın.
Firebase projeleri hakkında daha fazla bilgi edinmek için Firebase projelerini anlama başlıklı makaleyi inceleyin.
Firebase ürünlerini ayarlama
Uygulama, web uygulamalarında kullanılabilen aşağıdaki Firebase ürünlerini kullanır:
- Kimlik doğrulama: Kullanıcıların uygulamanızda oturum açmasına olanak tanır.
- Firestore: Yapılandırılmış verileri buluta kaydeder ve veriler değiştiğinde anında bildirim alır.
- Firebase Güvenlik Kuralları: Veritabanınızı korur.
Bu ürünlerden bazıları özel yapılandırma gerektirir veya Firebase konsolunda etkinleştirmeniz gerekir.
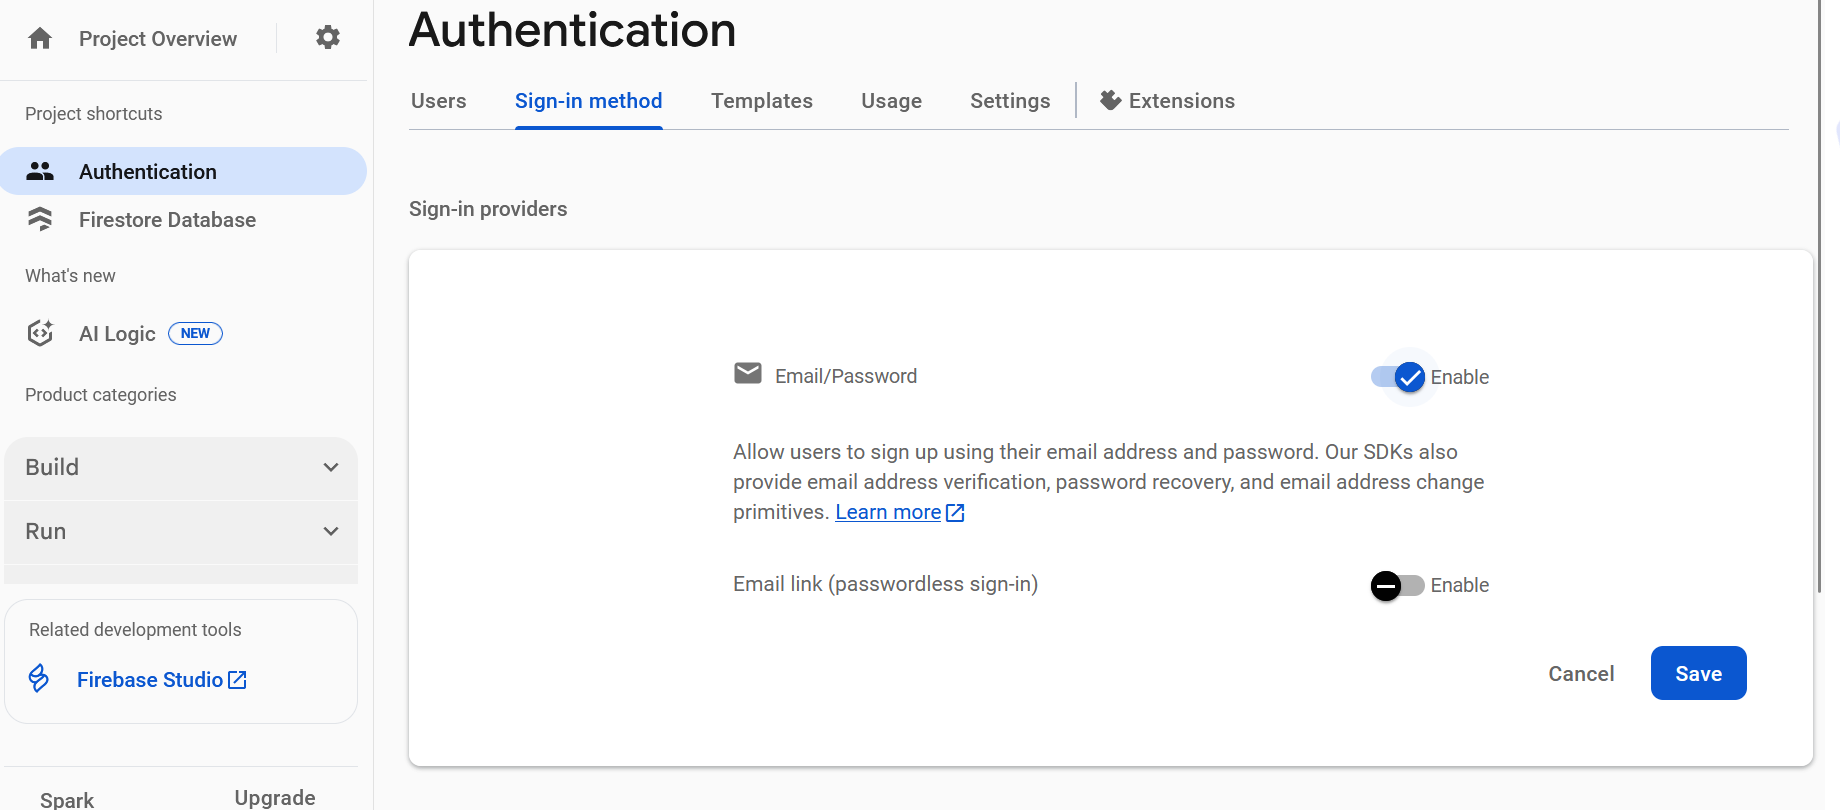
E-posta ile oturum açma kimlik doğrulamasını etkinleştirme
- Firebase konsolunun Proje genel bakışı bölmesinde Oluştur menüsünü genişletin.
- Kimlik doğrulama > Başlayın > Oturum açma yöntemi > E-posta/Şifre > Etkinleştir > Kaydet'i tıklayın.
Firestore'u ayarlama
Web uygulaması, sohbet mesajlarını kaydetmek ve yeni sohbet mesajları almak için Firestore'u kullanır.
Firebase projenizde Firestore'u nasıl ayarlayacağınız aşağıda açıklanmıştır:
- Firebase konsolunun sol panelinde Build'i (Oluştur) genişletin ve Firestore database'i (Firestore veritabanı) seçin.
- Create database'i (Veritabanı oluştur) tıklayın.
- Standart sürümü seçin ve İleri'yi tıklayın.
- Veritabanı Kimliği'ni
(default)olarak bırakın. - Veritabanınız için bir konum seçin ve Sonraki'yi tıklayın.
Gerçek bir uygulama için kullanıcılarınıza yakın bir konum seçmeniz gerekir. - Test modunda başlat'ı tıklayın. Güvenlik kurallarıyla ilgili sorumluluk reddi beyanını okuyun.
Bu codelab'in ilerleyen bölümlerinde, verilerinizi güvence altına almak için güvenlik kuralları ekleyeceksiniz. Veritabanınıza güvenlik kuralları eklemeden uygulamayı herkese açık şekilde dağıtmayın veya herkese açık olarak kullanıma sunmayın. - Oluştur'u tıklayın.
4. Firebase'i yapılandırma
Firebase'i Flutter ile kullanmak için Flutter projesini FlutterFire kitaplıklarını doğru şekilde kullanacak şekilde yapılandırmak üzere aşağıdaki görevleri tamamlamanız gerekir:
- Projenize
FlutterFirebağımlılıklarını ekleyin. - Seçilen platformu Firebase projesine kaydedin.
- Platforma özel yapılandırma dosyasını indirin ve koda ekleyin.
Flutter uygulamanızın en üst düzey dizininde, sırasıyla iOS ve Android'e özel yapılandırma dosyalarını içeren android, ios, macos ve web alt dizinleri bulunur.
Bağımlılıkları yapılandırma
Bu uygulamada kullandığınız iki Firebase ürünü (Authentication ve Firestore) için FlutterFire kitaplıklarını eklemeniz gerekir.
- Komut satırından, uygulamanızın kökünden (
.../firebase-get-to-know-flutter/step_02) aşağıdaki bağımlılıkları ekleyin:
$ flutter pub add firebase_core firebase_auth cloud_firestore provider firebase_ui_auth
Firebase'i Flutter uygulamanızda kullanmak için birkaç özel paketi birleştirmeniz gerekir:
firebase_corepackage: Bu, temel başlangıç noktasıdır. Flutter için diğer tüm Firebase araçları bu pakete bağlı olduğundan bu paketi kullanmanız gerekir.firebase_authpackage: Bu paket, kullanıcı hesaplarını işlemek için kullanılır. Kaydolma, giriş ve çıkış gibi özellikler eklemenize olanak tanır.cloud_firestorepaketi: Uygulamanızı Firestore veritabanına bağlamak için bu paketi kullanın. Böylece uygulamanızın verilerini kaydedebilir ve bunlara erişebilirsiniz.firebase_ui_authpackage: Bu paket, kimlik doğrulama ayarlarının çok daha hızlı yapılmasını sağlar. Her şeyi sıfırdan oluşturmak zorunda kalmamanız için kullanıma hazır widget'lar (ör. önceden oluşturulmuş giriş ekranları) sunar.providerpaketi: Durum yönetimi için popüler bir seçenektir. Uygulamanızın bilgileri (ör. kimin oturum açtığı) takip etmesine ve bu verileri ihtiyaç duyulan tüm farklı ekranlarda kullanılabilir hale getirmesine yardımcı olur.
Gerekli paketleri eklediniz ancak iOS, Android, macOS ve Web runner projelerini de Firebase'i uygun şekilde kullanacak şekilde yapılandırmanız gerekir. Ayrıca, işletme mantığının görüntüleme mantığından ayrılmasını sağlayan provider paketini de kullanırsınız.
FlutterFire CLI'yı yükleme
FlutterFire CLI, temel Firebase CLI'ye bağlıdır.
- Henüz yapmadıysanız makinenize Firebase CLI'yi yükleyin.
- FlutterFire CLI'yı yükleyin:
$ dart pub global activate flutterfire_cli
Yüklendikten sonra flutterfire komutu dünya genelinde kullanılabilir.
Uygulamalarınızı yapılandırma
CLI, belirli bir platform için tüm yapılandırmayı oluşturmak üzere Firebase projenizden ve seçilen proje uygulamalarından bilgi ayıklar.
Uygulamanızın kök dizininde (flutter-codelabs/firebase-get-to-know-flutter/step_02) configure komutunu çalıştırın:
$ flutterfire configure
Yapılandırma komutu aşağıdaki işlemleri yapar:
.firebasercdosyasına veya Firebase konsoluna göre bir Firebase projesi seçin.- Android, iOS, macOS ve web gibi yapılandırma platformlarını belirleyin.
- Yapılandırmanın çıkarılacağı Firebase uygulamalarını belirleyin. CLI, varsayılan olarak Firebase uygulamalarını mevcut proje yapılandırmanıza göre otomatik olarak eşleştirmeye çalışır.
- Projenizde
firebase_options.dartdosyası oluşturun.
macOS'i yapılandırma
macOS'te Flutter, tamamen korumalı alan uygulamaları oluşturur. Bu uygulama, Firebase sunucularıyla iletişim kurmak için ağ ile entegre olduğundan uygulamanızı ağ istemcisi ayrıcalıklarıyla yapılandırmanız gerekir.
macos/Runner/DebugProfile.entitlements
<?xml version="1.0" encoding="UTF-8"?>
<!DOCTYPE plist PUBLIC "-//Apple//DTD PLIST 1.0//EN" "http://www.apple.com/DTDs/PropertyList-1.0.dtd">
<plist version="1.0">
<dict>
	<key>com.apple.security.app-sandbox</key>
	<true/>
	<key>com.apple.security.cs.allow-jit</key>
	<true/>
	<key>com.apple.security.network.server</key>
	<true/>
  <!-- Add the following two lines -->
	<key>com.apple.security.network.client</key>
	<true/>
</dict>
</plist>
macos/Runner/Release.entitlements
<?xml version="1.0" encoding="UTF-8"?>
<!DOCTYPE plist PUBLIC "-//Apple//DTD PLIST 1.0//EN" "http://www.apple.com/DTDs/PropertyList-1.0.dtd">
<plist version="1.0">
<dict>
	<key>com.apple.security.app-sandbox</key>
	<true/>
  <!-- Add the following two lines -->
	<key>com.apple.security.network.client</key>
	<true/>
</dict>
</plist>
Daha fazla bilgi için Flutter'da masaüstü desteği başlıklı makaleyi inceleyin.
5. LCV işlevselliği ekleme
Firebase'i uygulamaya eklediğinize göre artık LCV düğmesi oluşturabilirsiniz. Bu düğme, kullanıcıları Authentication ile kaydeder. Android native, iOS native ve Web için önceden oluşturulmuş FirebaseUI Auth paketler vardır ancak bu özelliği Flutter için oluşturmanız gerekir.
Daha önce aldığınız proje, kimlik doğrulama akışının büyük bir bölümü için kullanıcı arayüzünü uygulayan bir dizi widget içeriyordu. Kimlik doğrulama özelliğini uygulamaya entegre etmek için işletme mantığını uygularsınız.
Provider paketiyle iş mantığı ekleme
Uygulamanın Flutter widget'ları ağacında merkezi bir uygulama durumu nesnesi kullanılabilir hale getirmek için provider paketini kullanın:
- Aşağıdaki içeriğe sahip
app_state.dartadlı yeni bir dosya oluşturun:
lib/app_state.dart
import 'package:firebase_auth/firebase_auth.dart'
    hide EmailAuthProvider, PhoneAuthProvider;
import 'package:firebase_core/firebase_core.dart';
import 'package:firebase_ui_auth/firebase_ui_auth.dart';
import 'package:flutter/material.dart';

import 'firebase_options.dart';

class ApplicationState extends ChangeNotifier {
  ApplicationState() {
    init();
  }

  bool _loggedIn = false;
  bool get loggedIn => _loggedIn;

  Future<void> init() async {
    await Firebase.initializeApp(
        options: DefaultFirebaseOptions.currentPlatform);

    FirebaseUIAuth.configureProviders([
      EmailAuthProvider(),
    ]);

    FirebaseAuth.instance.userChanges().listen((user) {
      if (user != null) {
        _loggedIn = true;
      } else {
        _loggedIn = false;
      }
      notifyListeners();
    });
  }
}
import ifadeleri Firebase Core ve Auth'u kullanıma sunar, uygulama durumu nesnesini widget ağacının tamamında kullanılabilir hale getiren provider paketini çeker ve firebase_ui_auth paketindeki kimlik doğrulama widget'larını içerir.
Bu ApplicationState uygulama durumu sınıfının bu adımda temel olarak bir sorumluluğu vardır: Widget ağacını kimliği doğrulanmış bir durumda güncelleme yapıldığı konusunda uyarmak.
Yalnızca kullanıcının oturum açma durumunu uygulamaya iletmek için bir sağlayıcı kullanırsınız. Kullanıcının oturum açmasına izin vermek için firebase_ui_auth paketi tarafından sağlanan kullanıcı arayüzlerini kullanırsınız. Bu, uygulamalarınızdaki oturum açma ekranlarını hızlı bir şekilde başlatmanın harika bir yoludur.
Kimlik doğrulama akışını entegre etme
lib/main.dartdosyasının üst kısmındaki içe aktarmaları değiştirin:
lib/main.dart
import 'package:firebase_ui_auth/firebase_ui_auth.dart'; // new
import 'package:flutter/material.dart';
import 'package:go_router/go_router.dart';               // new
import 'package:google_fonts/google_fonts.dart';
import 'package:provider/provider.dart';                 // new

import 'app_state.dart';                                 // new
import 'home_page.dart';
- Uygulama durumunu uygulama başlatma ile bağlayın ve ardından kimlik doğrulama akışını
HomePage'ya ekleyin:
lib/main.dart
void main() {
  // Modify from here...
  WidgetsFlutterBinding.ensureInitialized();

  runApp(ChangeNotifierProvider(
    create: (context) => ApplicationState(),
    builder: ((context, child) => const App()),
  ));
  // ...to here.
}
main() işlevinde yapılan değişiklik, sağlayıcı paketinin ChangeNotifierProvider widget'ı ile uygulama durumu nesnesinin oluşturulmasından sorumlu olmasını sağlar. Uygulama durumu nesnesi, ChangeNotifier sınıfını genişlettiği için bu belirli provider sınıfını kullanırsınız. Bu, provider paketinin bağımlı widget'ları ne zaman yeniden görüntüleyeceğini bilmesini sağlar.
FirebaseUItarafından sağlanan farklı ekranlara gezinmeyi işlemek için uygulamanızı güncelleyin. Bunun içinGoRouteryapılandırması oluşturun:
lib/main.dart
// Add GoRouter configuration outside the App class
final _router = GoRouter(
  routes: [
    GoRoute(
      path: '/',
      builder: (context, state) => const HomePage(),
      routes: [
        GoRoute(
          path: 'sign-in',
          builder: (context, state) {
            return SignInScreen(
              actions: [
                ForgotPasswordAction(((context, email) {
                  final uri = Uri(
                    path: '/sign-in/forgot-password',
                    queryParameters: <String, String?>{
                      'email': email,
                    },
                  );
                  context.push(uri.toString());
                })),
                AuthStateChangeAction(((context, state) {
                  final user = switch (state) {
                    SignedIn state => state.user,
                    UserCreated state => state.credential.user,
                    _ => null
                  };
                  if (user == null) {
                    return;
                  }
                  if (state is UserCreated) {
                    user.updateDisplayName(user.email!.split('@')[0]);
                  }
                  if (!user.emailVerified) {
                    user.sendEmailVerification();
                    const snackBar = SnackBar(
                        content: Text(
                            'Please check your email to verify your email address'));
                    ScaffoldMessenger.of(context).showSnackBar(snackBar);
                  }
                  context.pushReplacement('/');
                })),
              ],
            );
          },
          routes: [
            GoRoute(
              path: 'forgot-password',
              builder: (context, state) {
                final arguments = state.uri.queryParameters;
                return ForgotPasswordScreen(
                  email: arguments['email'],
                  headerMaxExtent: 200,
                );
              },
            ),
          ],
        ),
        GoRoute(
          path: 'profile',
          builder: (context, state) {
            return ProfileScreen(
              providers: const [],
              actions: [
                SignedOutAction((context) {
                  context.pushReplacement('/');
                }),
              ],
            );
          },
        ),
      ],
    ),
  ],
);
// end of GoRouter configuration

// Change MaterialApp to MaterialApp.router and add the routerConfig
class App extends StatelessWidget {
  const App({super.key});

  @override
  Widget build(BuildContext context) {
    return MaterialApp.router(
      title: 'Firebase Meetup',
      theme: ThemeData(
        buttonTheme: Theme.of(context).buttonTheme.copyWith(
              highlightColor: Colors.deepPurple,
            ),
        colorScheme: ColorScheme.fromSeed(seedColor: Colors.deepPurple),
        textTheme: GoogleFonts.robotoTextTheme(
          Theme.of(context).textTheme,
        ),
        visualDensity: VisualDensity.adaptivePlatformDensity
      ),
      routerConfig: _router, // new
    );
  }
}
Her ekran, kimlik doğrulama akışının yeni durumuna bağlı olarak farklı bir işlem türüyle ilişkilendirilir. Kimlik doğrulama işlemindeki çoğu durum değişikliğinden sonra, ana ekran veya profil gibi farklı bir ekran olmak üzere tercih ettiğiniz ekrana yeniden yönlendirme yapabilirsiniz.
HomePagesınıfının build yönteminde, uygulama durumunuAuthFuncwidget'ıyla entegre edin:
lib/home_page.dart
import 'package:firebase_auth/firebase_auth.dart' // new
    hide EmailAuthProvider, PhoneAuthProvider;    // new
import 'package:flutter/material.dart';           // new
import 'package:provider/provider.dart';          // new

import 'app_state.dart';                          // new
import 'src/authentication.dart';                 // new
import 'src/widgets.dart';

class HomePage extends StatelessWidget {
  const HomePage({super.key});

  @override
  Widget build(BuildContext context) {
    return Scaffold(
      appBar: AppBar(
        title: const Text('Firebase Meetup'),
      ),
      body: ListView(
        children: <Widget>[
          Image.asset('assets/codelab.png'),
          const SizedBox(height: 8),
          const IconAndDetail(Icons.calendar_today, 'October 30'),
          const IconAndDetail(Icons.location_city, 'San Francisco'),
          // Add from here
          Consumer<ApplicationState>(
            builder: (context, appState, _) => AuthFunc(
                loggedIn: appState.loggedIn,
                signOut: () {
                  FirebaseAuth.instance.signOut();
                }),
          ),
          // to here
          const Divider(
            height: 8,
            thickness: 1,
            indent: 8,
            endIndent: 8,
            color: Colors.grey,
          ),
          const Header("What we'll be doing"),
          const Paragraph(
            'Join us for a day full of Firebase Workshops and Pizza!',
          ),
        ],
      ),
    );
  }
}
AuthFunc widget'ını örneklendirir ve Consumer widget'ına sararsınız. Consumer widget'ı, uygulama durumu değiştiğinde ağacın bir bölümünü yeniden oluşturmak için provider paketinin kullanıldığı normal yöntemdir. AuthFunc widget'ı, test ettiğiniz ek widget'lardır.
Kimlik doğrulama akışını test etmek için uygulamayı çalıştırın

- Uygulamada,
SignInScreenbaşlatmak için LCV düğmesine dokunun.

- E-posta adresi girin. Daha önce kaydolduysanız sistem sizden şifre girmenizi ister. Aksi takdirde sistem, kayıt formunu doldurmanızı ister.

- Hata işleme akışını kontrol etmek için altı karakterden kısa bir şifre girin. Kayıtlıysanız bunun yerine şifre formunu görürsünüz.
- Hata işleme akışını kontrol etmek için yanlış şifreler girin.
- Doğru şifreyi girin. Kullanıcıya çıkış yapma olanağı sunan oturum açma deneyimini görürsünüz.

6. Firestore'a mesaj yazma
Kullanıcıların geldiğini bilmek güzel ancak konuklara uygulamada yapabilecekleri başka bir şey sunmanız gerekiyor. Örneğin, konuk defterine mesaj bırakabilirler. Katılmaktan neden heyecan duyduklarını veya kimlerle tanışmayı umduklarını paylaşabilirler.
Kullanıcıların uygulamaya yazdığı sohbet mesajlarını depolamak için Firestore'u kullanırsınız.
Veri modeli
Firestore bir NoSQL veritabanıdır ve veritabanında depolanan veriler koleksiyonlara, belgelere, alanlara ve alt koleksiyonlara ayrılır. Sohbetteki her iletiyi üst düzey bir koleksiyon olan guestbook koleksiyonunda doküman olarak saklarsınız.

Firestore'a mesaj ekleme
Bu bölümde, kullanıcıların veritabanına mesaj yazma işlevini eklersiniz. Önce bir form alanı ve gönder düğmesi ekler, ardından bu öğeleri veritabanına bağlayan kodu eklersiniz.
guest_book.dartadlı yeni bir dosya oluşturun, mesaj alanı ve gönderme düğmesinin kullanıcı arayüzü öğelerini oluşturmak içinGuestBookdurum bilgisi olan bir widget ekleyin:
lib/guest_book.dart
import 'dart:async';

import 'package:flutter/material.dart';

import 'src/widgets.dart';

class GuestBook extends StatefulWidget {
  const GuestBook({required this.addMessage, super.key});

  final FutureOr<void> Function(String message) addMessage;

  @override
  State<GuestBook> createState() => _GuestBookState();
}

class _GuestBookState extends State<GuestBook> {
  final _formKey = GlobalKey<FormState>(debugLabel: '_GuestBookState');
  final _controller = TextEditingController();

  @override
  Widget build(BuildContext context) {
    return Padding(
      padding: const EdgeInsets.all(8.0),
      child: Form(
        key: _formKey,
        child: Row(
          children: [
            Expanded(
              child: TextFormField(
                controller: _controller,
                decoration: const InputDecoration(
                  hintText: 'Leave a message',
                ),
                validator: (value) {
                  if (value == null || value.isEmpty) {
                    return 'Enter your message to continue';
                  }
                  return null;
                },
              ),
            ),
            const SizedBox(width: 8),
            StyledButton(
              onPressed: () async {
                if (_formKey.currentState!.validate()) {
                  await widget.addMessage(_controller.text);
                  _controller.clear();
                }
              },
              child: Row(
                children: const [
                  Icon(Icons.send),
                  SizedBox(width: 4),
                  Text('SEND'),
                ],
              ),
            ),
          ],
        ),
      ),
    );
  }
}
Burada dikkat edilmesi gereken birkaç nokta var. Öncelikle, iletinin gerçekten içerik içerdiğini doğrulayabilmek ve içerik yoksa kullanıcıya hata mesajı gösterebilmek için bir form oluşturursunuz. Bir formu doğrulamak için GlobalKey ile formun arkasındaki form durumuna erişirsiniz. Anahtarlar ve nasıl kullanılacakları hakkında daha fazla bilgi için Anahtarların Ne Zaman Kullanılacağı başlıklı makaleyi inceleyin.
Ayrıca widget'ların yerleşim şekline de dikkat edin. Row, TextFormField ve StyledButton ile birlikte kullanılıyor. StyledButton ise Row içeriyor. Ayrıca, TextFormField öğesinin Expanded widget'ı içine yerleştirildiğini ve bu nedenle TextFormField öğesinin satırdaki fazladan alanı doldurmak zorunda kaldığını unutmayın. Bunun neden gerekli olduğunu daha iyi anlamak için Kısıtlamaları anlama başlıklı makaleyi inceleyin.
Kullanıcının Misafir Defteri'ne eklemek üzere metin girmesini sağlayan bir widget'ınız olduğuna göre, şimdi bu widget'ı ekrana getirmeniz gerekiyor.
HomePagegövdesini düzenleyerekListViewöğesinin alt öğelerinin sonuna aşağıdaki iki satırı ekleyin:
const Header("What we'll be doing"),
const Paragraph(
  'Join us for a day full of Firebase Workshops and Pizza!',
),
// Add the following two lines.
const Header('Discussion'),
GuestBook(addMessage: (message) => print(message)),
Bu, widget'ı görüntülemek için yeterli olsa da yararlı bir işlem yapmak için yeterli değildir. Bu kodu kısa süre içinde güncelleyerek işlevsel hale getireceksiniz.
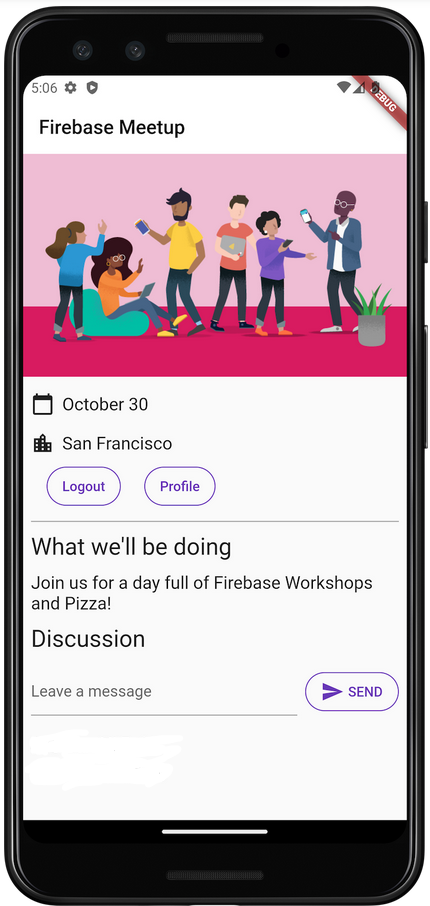
Uygulama önizlemesi
|
|
|
|


Kullanıcı GÖNDER'i tıkladığında aşağıdaki kod snippet'i tetiklenir. Bu işlev, ileti giriş alanının içeriğini veritabanının guestbook koleksiyonuna ekler. Daha net bir ifadeyle, addMessageToGuestBook yöntemi, ileti içeriğini guestbook koleksiyonunda otomatik olarak oluşturulan kimliğe sahip yeni bir belgeye ekler.
FirebaseAuth.instance.currentUser.uid, kimlik doğrulama hizmetinin oturum açmış tüm kullanıcılar için verdiği otomatik olarak oluşturulan benzersiz kimliğe referans verir.
lib/app_state.dartdosyasındaaddMessageToGuestBookyöntemini ekleyin. Bu özelliği sonraki adımda kullanıcı arayüzüne bağlarsınız.
lib/app_state.dart
import 'package:cloud_firestore/cloud_firestore.dart'; // new
import 'package:firebase_auth/firebase_auth.dart'
    hide EmailAuthProvider, PhoneAuthProvider;
import 'package:firebase_core/firebase_core.dart';
import 'package:firebase_ui_auth/firebase_ui_auth.dart';
import 'package:flutter/material.dart';

import 'firebase_options.dart';

class ApplicationState extends ChangeNotifier {

  // Current content of ApplicationState elided ...

  // Add from here...
  Future<DocumentReference> addMessageToGuestBook(String message) {
    if (!_loggedIn) {
      throw Exception('Must be logged in');
    }

    return FirebaseFirestore.instance
        .collection('guestbook')
        .add(<String, dynamic>{
      'text': message,
      'timestamp': DateTime.now().millisecondsSinceEpoch,
      'name': FirebaseAuth.instance.currentUser!.displayName,
      'userId': FirebaseAuth.instance.currentUser!.uid,
    });
  }
  // ...to here.
}
Kullanıcı arayüzünü ve veritabanını bağlama
Kullanıcının Misafir Defteri'ne eklemek istediği metni girebileceği bir kullanıcı arayüzünüz ve girişi Firestore'a ekleyecek kodunuz var. Şimdi yapmanız gereken tek şey ikisini bağlamak.
lib/home_page.dartdosyasında,HomePagewidget'ında aşağıdaki değişikliği yapın:
lib/home_page.dart
import 'package:firebase_auth/firebase_auth.dart'
    hide EmailAuthProvider, PhoneAuthProvider;
import 'package:flutter/material.dart';
import 'package:provider/provider.dart';

import 'app_state.dart';
import 'guest_book.dart';                         // new
import 'src/authentication.dart';
import 'src/widgets.dart';

class HomePage extends StatelessWidget {
  const HomePage({super.key});

  @override
  Widget build(BuildContext context) {
    return Scaffold(
      appBar: AppBar(
        title: const Text('Firebase Meetup'),
      ),
      body: ListView(
        children: <Widget>[
          Image.asset('assets/codelab.png'),
          const SizedBox(height: 8),
          const IconAndDetail(Icons.calendar_today, 'October 30'),
          const IconAndDetail(Icons.location_city, 'San Francisco'),
          Consumer<ApplicationState>(
            builder: (context, appState, _) => AuthFunc(
                loggedIn: appState.loggedIn,
                signOut: () {
                  FirebaseAuth.instance.signOut();
                }),
          ),
          const Divider(
            height: 8,
            thickness: 1,
            indent: 8,
            endIndent: 8,
            color: Colors.grey,
          ),
          const Header("What we'll be doing"),
          const Paragraph(
            'Join us for a day full of Firebase Workshops and Pizza!',
          ),
          // Modify from here...
          Consumer<ApplicationState>(
            builder: (context, appState, _) => Column(
              crossAxisAlignment: CrossAxisAlignment.start,
              children: [
                if (appState.loggedIn) ...[
                  const Header('Discussion'),
                  GuestBook(
                    addMessage: (message) =>
                        appState.addMessageToGuestBook(message),
                  ),
                ],
              ],
            ),
          ),
          // ...to here.
        ],
      ),
    );
  }
}
Bu adımın başında eklediğiniz iki satırı tam uygulama ile değiştirdiniz. Uygulama durumunu oluşturduğunuz ağacın bölümünde kullanılabilir hale getirmek için tekrar Consumer<ApplicationState> kullanırsınız. Bu sayede, kullanıcı arayüzüne mesaj girip veritabanında yayınlayan bir kullanıcıya tepki verebilirsiniz. Sonraki bölümde, eklenen mesajların veritabanında yayınlanıp yayınlanmadığını test edersiniz.
Mesaj göndermeyi test etme
- Gerekirse uygulamada oturum açın.
Hey there!gibi bir mesaj girin ve GÖNDER'i tıklayın.
Bu işlem, iletiyi Firestore veritabanınıza yazar. Ancak, verilerin alınmasını uygulamanız gerektiği için mesajı gerçek Flutter uygulamanızda görmezsiniz. Bu işlemi bir sonraki adımda yapacaksınız. Ancak Firebase konsolundaki Database kontrol panelinde, eklediğiniz mesajı guestbook koleksiyonunda görebilirsiniz. Daha fazla ileti gönderirseniz guestbook koleksiyonunuza daha fazla doküman eklenir. Örneğin, aşağıdaki kod snippet'ine bakın:

7. Mesajları okuma
Konukların veritabanına mesaj yazabilmesi güzel bir özellik ancak bu mesajlar henüz uygulamada görünmüyor. Şimdi bu sorunu düzeltme zamanı.
İletileri senkronize etme
Mesajları görüntülemek için veriler değiştiğinde tetiklenen dinleyiciler eklemeniz ve ardından yeni mesajları gösteren bir kullanıcı arayüzü öğesi oluşturmanız gerekir. Uygulama durumuna, uygulamadan yeni eklenen iletileri dinleyen kod eklersiniz.
- Yeni bir dosya
guest_book_message.dartoluşturun ve Firestore'da depoladığınız verilerin yapılandırılmış görünümünü göstermek için aşağıdaki sınıfı ekleyin.
lib/guest_book_message.dart
class GuestBookMessage {
  GuestBookMessage({required this.name, required this.message});

  final String name;
  final String message;
}
lib/app_state.dartdosyasına aşağıdaki içe aktarma işlemlerini ekleyin:
lib/app_state.dart
import 'dart:async';                                     // new

import 'package:cloud_firestore/cloud_firestore.dart';
import 'package:firebase_auth/firebase_auth.dart'
    hide EmailAuthProvider, PhoneAuthProvider;
import 'package:firebase_core/firebase_core.dart';
import 'package:firebase_ui_auth/firebase_ui_auth.dart';
import 'package:flutter/material.dart';

import 'firebase_options.dart';
import 'guest_book_message.dart';                        // new
- Durumu ve alıcıları tanımladığınız
ApplicationStatebölümüne aşağıdaki satırları ekleyin:
lib/app_state.dart
  bool _loggedIn = false;
  bool get loggedIn => _loggedIn;

  // Add from here...
  StreamSubscription<QuerySnapshot>? _guestBookSubscription;
  List<GuestBookMessage> _guestBookMessages = [];
  List<GuestBookMessage> get guestBookMessages => _guestBookMessages;
  // ...to here.
ApplicationState'nın başlatma bölümüne, bir kullanıcı oturum açtığında doküman koleksiyonuyla ilgili bir sorguya abone olmak ve çıkış yaptığında aboneliği iptal etmek için aşağıdaki satırları ekleyin:
lib/app_state.dart
  Future<void> init() async {
    await Firebase.initializeApp(
        options: DefaultFirebaseOptions.currentPlatform);

    FirebaseUIAuth.configureProviders([
      EmailAuthProvider(),
    ]);

    FirebaseAuth.instance.userChanges().listen((user) {
      if (user != null) {
        _loggedIn = true;
        // Add from here...
        _guestBookSubscription = FirebaseFirestore.instance
            .collection('guestbook')
            .orderBy('timestamp', descending: true)
            .snapshots()
            .listen((snapshot) {
          _guestBookMessages = [];
          for (final document in snapshot.docs) {
            _guestBookMessages.add(
              GuestBookMessage(
                name: document.data()['name'] as String,
                message: document.data()['text'] as String,
              ),
            );
          }
          notifyListeners();
        });
        // ...to here.
      } else {
        _loggedIn = false;
        // Add from here...
        _guestBookMessages = [];
        _guestBookSubscription?.cancel();
        // to here.
      }
      notifyListeners();
    });
  }
Bu bölüm, guestbook koleksiyonu üzerinde sorgu oluşturduğunuz ve bu koleksiyona abone olma/abonelikten çıkma işlemlerini gerçekleştirdiğiniz yer olduğundan önemlidir. Yayın dinlenir. Bu sırada, guestbook koleksiyonundaki iletilerin yerel bir önbelleği yeniden oluşturulur ve daha sonra aboneliği iptal edebilmeniz için bu aboneliğe bir referans depolanır. Burada çok şey oluyor. Bu nedenle, ne olduğunu incelemek ve daha net bir zihinsel model oluşturmak için hata ayıklayıcıda keşfetmeniz gerekir. Daha fazla bilgi için Firestore ile anlık güncellemeler alma başlıklı makaleyi inceleyin.
lib/guest_book.dartdosyasına aşağıdaki içe aktarma işlemini ekleyin:
import 'guest_book_message.dart';
GuestBookwidget'ında, bu değişen durumu kullanıcı arayüzüne bağlamak için yapılandırmanın bir parçası olarak ileti listesi ekleyin:
lib/guest_book.dart
class GuestBook extends StatefulWidget {
  // Modify the following line:
  const GuestBook({
    super.key,
    required this.addMessage,
    required this.messages,
  });

  final FutureOr<void> Function(String message) addMessage;
  final List<GuestBookMessage> messages; // new

  @override
  State<GuestBook> createState() => _GuestBookState();
}
_GuestBookStateiçinde, bu yapılandırmayı göstermek içinbuildyöntemini aşağıdaki şekilde değiştirin:
lib/guest_book.dart
class _GuestBookState extends State<GuestBook> {
  final _formKey = GlobalKey<FormState>(debugLabel: '_GuestBookState');
  final _controller = TextEditingController();

  @override
  Widget build(BuildContext context) {
    // Modify from here...
    return Column(
      crossAxisAlignment: CrossAxisAlignment.start,
      children: [
        // ...to here.
        Padding(
          padding: const EdgeInsets.all(8.0),
          child: Form(
            key: _formKey,
            child: Row(
              children: [
                Expanded(
                  child: TextFormField(
                    controller: _controller,
                    decoration: const InputDecoration(
                      hintText: 'Leave a message',
                    ),
                    validator: (value) {
                      if (value == null || value.isEmpty) {
                        return 'Enter your message to continue';
                      }
                      return null;
                    },
                  ),
                ),
                const SizedBox(width: 8),
                StyledButton(
                  onPressed: () async {
                    if (_formKey.currentState!.validate()) {
                      await widget.addMessage(_controller.text);
                      _controller.clear();
                    }
                  },
                  child: Row(
                    children: [
                      Icon(Icons.send),
                      SizedBox(width: 4),
                      Text('SEND'),
                    ],
                  ),
                ),
              ],
            ),
          ),
        ),
        // Modify from here...
        const SizedBox(height: 8),
        for (var message in widget.messages)
          Paragraph('${message.name}: ${message.message}'),
        const SizedBox(height: 8),
      ],
      // ...to here.
    );
  }
}
build() yönteminin önceki içeriğini bir Column widget'ı ile sarmalarsınız ve ardından Column'nin alt öğelerinin sonuna collection for ekleyerek ileti listesindeki her ileti için yeni bir Paragraph oluşturursunuz.
HomePagegövdesini,GuestBooköğesini yenimessagesparametresiyle doğru şekilde oluşturacak şekilde güncelleyin:
lib/home_page.dart
Consumer<ApplicationState>(
  builder: (context, appState, _) => Column(
    crossAxisAlignment: CrossAxisAlignment.start,
    children: [
      if (appState.loggedIn) ...[
        const Header('Discussion'),
        GuestBook(
          addMessage: (message) =>
              appState.addMessageToGuestBook(message),
          messages: appState.guestBookMessages, // new
        ),
      ],
    ],
  ),
),
Mesaj senkronizasyonunu test etme
Firestore, verileri veritabanına abone olan istemcilerle otomatik olarak ve anında senkronize eder.
Test mesajı senkronizasyonu:
- Uygulamada, daha önce veritabanında oluşturduğunuz mesajları bulun.
- Yeni mesajlar yazabilirsiniz. Anında görünür.
- Çalışma alanınızı birden fazla pencerede veya sekmede açın. Mesajlar, pencereler ve sekmeler arasında gerçek zamanlı olarak senkronize edilir.
- İsteğe bağlı: Firebase konsolundaki Veritabanı menüsünde iletileri manuel olarak silin, değiştirin veya yeni iletiler ekleyin. Tüm değişiklikler kullanıcı arayüzünde görünür.
Tebrikler! Uygulamanızda Firestore belgelerini okuyabilirsiniz.
Uygulama önizlemesi
|
|
|
|


8. Temel güvenlik kurallarını ayarlama
Başlangıçta Firestore'u test modunu kullanacak şekilde ayarladınız. Bu nedenle, veritabanınız okuma ve yazma işlemlerine açık. Ancak test modunu yalnızca geliştirmenin ilk aşamalarında kullanmalısınız. En iyi uygulama olarak, uygulamanızı geliştirirken veritabanınız için güvenlik kuralları oluşturmanız gerekir. Güvenlik, uygulamanızın yapısı ve davranışı için ayrılmaz bir parçadır.
Firebase Güvenlik Kuralları, veritabanınızdaki dokümanlara ve koleksiyonlara erişimi kontrol etmenize olanak tanır. Esnek kurallar söz dizimi, tüm yazma işlemlerinden veritabanının tamamına ve belirli bir belgedeki işlemlere kadar her şeyi eşleştiren kurallar oluşturmanıza olanak tanır.
Temel güvenlik kuralları oluşturun:
- Firebase Console'un Develop (Geliştirme) menüsünde Database > Rules'u (Veritabanı > Kurallar) tıklayın. Aşağıdaki varsayılan güvenlik kurallarını ve kuralların herkese açık olmasıyla ilgili uyarıyı görmeniz gerekir:

- Uygulamanın veri yazdığı koleksiyonları belirleyin:
match /databases/{database}/documents bölümünde, güvenliğini sağlamak istediğiniz koleksiyonu belirleyin:
rules_version = '2';
service cloud.firestore {
  match /databases/{database}/documents {
    match /guestbook/{entry} {
     // You'll add rules here in the next step.
  }
}
Her konuk defteri belgesinde kimlik doğrulama UID'sini alan olarak kullandığınız için kimlik doğrulama UID'sini alabilir ve belgeye yazmaya çalışan herkesin eşleşen bir kimlik doğrulama UID'sine sahip olduğunu doğrulayabilirsiniz.
- Okuma ve yazma kurallarını kural grubunuza ekleyin:
rules_version = '2';
service cloud.firestore {
  match /databases/{database}/documents {
    match /guestbook/{entry} {
      allow read: if request.auth.uid != null;
      allow write:
        if request.auth.uid == request.resource.data.userId;
    }
  }
}
Artık yalnızca oturum açmış kullanıcılar misafir defterindeki mesajları okuyabilir. Mesajları ise yalnızca mesajın yazarı düzenleyebilir.
- Beklenen tüm alanların belgede yer aldığından emin olmak için veri doğrulama ekleyin:
rules_version = '2';
service cloud.firestore {
  match /databases/{database}/documents {
    match /guestbook/{entry} {
      allow read: if request.auth.uid != null;
      allow write:
      if request.auth.uid == request.resource.data.userId
          && "name" in request.resource.data
          && "text" in request.resource.data
          && "timestamp" in request.resource.data;
    }
  }
}
9. Bonus adım: Öğrendiklerinizi uygulama
Katılımcının LCV durumunu kaydetme
Şu anda uygulamanız yalnızca etkinlikle ilgilenen kullanıcıların sohbet etmesine izin veriyor. Ayrıca, birinin gelip gelmediğini yalnızca sohbetten öğrenebilirsiniz.
Bu adımda, düzenlemeleri yapıp kaç kişinin geleceğini bildirirsiniz. Uygulama durumuna birkaç özellik ekleyin. İlk olarak, oturum açmış bir kullanıcının etkinliğe katılıp katılmayacağını belirtme özelliği. İkincisi ise kaç kişinin katıldığını gösteren bir sayaçtır.
lib/app_state.dartdosyasında, kullanıcı arayüzü kodunun bu durumla etkileşime geçebilmesi içinApplicationStateöğesinin erişimciler bölümüne aşağıdaki satırları ekleyin:
lib/app_state.dart
int _attendees = 0;
int get attendees => _attendees;

Attending _attending = Attending.unknown;
StreamSubscription<DocumentSnapshot>? _attendingSubscription;
Attending get attending => _attending;
set attending(Attending attending) {
  final userDoc = FirebaseFirestore.instance
      .collection('attendees')
      .doc(FirebaseAuth.instance.currentUser!.uid);
  if (attending == Attending.yes) {
    userDoc.set(<String, dynamic>{'attending': true});
  } else {
    userDoc.set(<String, dynamic>{'attending': false});
  }
}
ApplicationState'nıninit()yöntemini aşağıdaki şekilde güncelleyin:
lib/app_state.dart
  Future<void> init() async {
    await Firebase.initializeApp(
        options: DefaultFirebaseOptions.currentPlatform);

    FirebaseUIAuth.configureProviders([
      EmailAuthProvider(),
    ]);

    // Add from here...
    FirebaseFirestore.instance
        .collection('attendees')
        .where('attending', isEqualTo: true)
        .snapshots()
        .listen((snapshot) {
      _attendees = snapshot.docs.length;
      notifyListeners();
    });
    // ...to here.

    FirebaseAuth.instance.userChanges().listen((user) {
      if (user != null) {
        _loggedIn = true;
        _emailVerified = user.emailVerified;
        _guestBookSubscription = FirebaseFirestore.instance
            .collection('guestbook')
            .orderBy('timestamp', descending: true)
            .snapshots()
            .listen((snapshot) {
          _guestBookMessages = [];
          for (final document in snapshot.docs) {
            _guestBookMessages.add(
              GuestBookMessage(
                name: document.data()['name'] as String,
                message: document.data()['text'] as String,
              ),
            );
          }
          notifyListeners();
        });
        // Add from here...
        _attendingSubscription = FirebaseFirestore.instance
            .collection('attendees')
            .doc(user.uid)
            .snapshots()
            .listen((snapshot) {
          if (snapshot.data() != null) {
            if (snapshot.data()!['attending'] as bool) {
              _attending = Attending.yes;
            } else {
              _attending = Attending.no;
            }
          } else {
            _attending = Attending.unknown;
          }
          notifyListeners();
        });
        // ...to here.
      } else {
        _loggedIn = false;
        _emailVerified = false;
        _guestBookMessages = [];
        _guestBookSubscription?.cancel();
        _attendingSubscription?.cancel(); // new
      }
      notifyListeners();
    });
  }
Bu kod, katılımcı sayısını belirlemek için her zaman abone olunan bir sorgu ve kullanıcının katılıp katılmadığını belirlemek için yalnızca kullanıcı oturum açmışken etkin olan ikinci bir sorgu ekler.
lib/app_state.dartdosyasının en üstüne aşağıdaki numaralandırmayı ekleyin.
lib/app_state.dart
enum Attending { yes, no, unknown }
- Yeni bir dosya
yes_no_selection.dartoluşturun, radyo düğmeleri gibi davranan yeni bir widget tanımlayın:
lib/yes_no_selection.dart
import 'package:flutter/material.dart';

import 'app_state.dart';
import 'src/widgets.dart';

class YesNoSelection extends StatelessWidget {
  const YesNoSelection(
      {super.key, required this.state, required this.onSelection});
  final Attending state;
  final void Function(Attending selection) onSelection;

  @override
  Widget build(BuildContext context) {
    switch (state) {
      case Attending.yes:
        return Padding(
          padding: const EdgeInsets.all(8.0),
          child: Row(
            children: [
              FilledButton(
                onPressed: () => onSelection(Attending.yes),
                child: const Text('YES'),
              ),
              const SizedBox(width: 8),
              TextButton(
                onPressed: () => onSelection(Attending.no),
                child: const Text('NO'),
              ),
            ],
          ),
        );
      case Attending.no:
        return Padding(
          padding: const EdgeInsets.all(8.0),
          child: Row(
            children: [
              TextButton(
                onPressed: () => onSelection(Attending.yes),
                child: const Text('YES'),
              ),
              const SizedBox(width: 8),
              FilledButton(
                onPressed: () => onSelection(Attending.no),
                child: const Text('NO'),
              ),
            ],
          ),
        );
      default:
        return Padding(
          padding: const EdgeInsets.all(8.0),
          child: Row(
            children: [
              StyledButton(
                onPressed: () => onSelection(Attending.yes),
                child: const Text('YES'),
              ),
              const SizedBox(width: 8),
              StyledButton(
                onPressed: () => onSelection(Attending.no),
                child: const Text('NO'),
              ),
            ],
          ),
        );
    }
  }
}
Ne Evet ne de Hayır seçili olmayan belirsiz bir durumda başlar. Kullanıcı katılıp katılmayacağını seçtikten sonra, bu seçeneği dolu bir düğmeyle vurgulanmış olarak gösterirsiniz. Diğer seçenek ise düz bir şekilde gösterilir.
HomePageuygulamasınınbuild()yönteminiYesNoSelection'dan yararlanacak şekilde güncelleyin, oturum açmış bir kullanıcının katılıp katılmayacağını belirtmesine olanak tanıyın ve etkinliğe katılanların sayısını gösterin:
lib/home_page.dart
import 'yes_no_selection.dart';             // new

Consumer<ApplicationState>(
  builder: (context, appState, _) => Column(
    crossAxisAlignment: CrossAxisAlignment.start,
    children: [
      // Add from here...
      switch (appState.attendees) {
        1 => const Paragraph('1 person going'),
        >= 2 => Paragraph('${appState.attendees} people going'),
        _ => const Paragraph('No one going'),
      },
      // ...to here.
      if (appState.loggedIn) ...[
        // Add from here...
        YesNoSelection(
          state: appState.attending,
          onSelection: (attending) => appState.attending = attending,
        ),
        // ...to here.
        const Header('Discussion'),
        GuestBook(
          addMessage: (message) =>
              appState.addMessageToGuestBook(message),
          messages: appState.guestBookMessages,
        ),
      ],
    ],
  ),
),
Kural ekleyin
Daha önce bazı kurallar ayarladığınız için düğmelerle eklediğiniz veriler reddedilir. attendees koleksiyonuna ekleme yapılmasına izin vermek için kuralları güncellemeniz gerekir.
attendeeskoleksiyonunda, belge adı olarak kullandığınız kimlik doğrulama UID'sini alın ve göndereninuidile yazdığı belgenin aynı olduğunu doğrulayın:
rules_version = '2';
service cloud.firestore {
  match /databases/{database}/documents {
    // ... //
    match /attendees/{userId} {
      allow read: if true;
      allow write: if request.auth.uid == userId;
    }
  }
}
Bu ayar, katılımcı listesinde gizli veri bulunmadığı için herkesin listeyi okumasına olanak tanır ancak yalnızca içerik üretici listeyi güncelleyebilir.
- Beklenen tüm alanların belgede yer aldığından emin olmak için veri doğrulama ekleyin:
rules_version = '2';
service cloud.firestore {
  match /databases/{database}/documents {
    // ... //
    match /attendees/{userId} {
      allow read: if true;
      allow write: if request.auth.uid == userId
          && "attending" in request.resource.data;

    }
  }
}
- İsteğe bağlı: Uygulamada, sonuçları Firebase konsolundaki Firestore kontrol panelinde görmek için düğmeleri tıklayın.
Uygulama önizlemesi
|
|
|
|
10. Tebrikler!
Etkileşimli ve anlık web uygulaması oluşturmak için Firebase'i kullandınız.