
1. Overview
Firebase ML enables you to deploy your model over-the-air. This allows you to keep the app size small and only download the ML model when needed, experiment with multiple models, or update your ML model without having to republish the entire app.
In this codelab you will convert an Android app using a static TFLite model into an app using a model dynamically served from Firebase.
What you'll learn
- Deploy TFLite models to Firebase ML and access them from your app
- Track user feedback to measure model accuracy with Firebase Analytics
- Profile model performance via Firebase Performance
- Select which one of multiple deployed models is loaded through Remote Config
- Experiment with different models via Firebase A/B Testing
What you'll need
- Latest Android Studio version.
- Sample code.
- A test device with Android 5.0+ and Google Play services 9.8 or later, or an Emulator with Google Play services 9.8 or later
- If using a device, a connection cable.
How will you use this tutorial?
How would rate your experience with building Android apps?
2. Get the sample code
Clone the GitHub repository from the command line.
$ git clone https://github.com/FirebaseExtended/codelab-digitclassifier-android.git
If you don't have git installed, you can also download the sample project from its GitHub page or by clicking this link.
3. Import the starter app
From Android Studio, select the codelab-digitclassifier-android directory (  ) from the sample code download (File > Open > .../codelab-digitclassifier-android/start).
You should now have the start project open in Android Studio.
4. Run the starter app
Now that you have imported the project into Android Studio, you are ready to run the app for the first time. Connect your Android device, and click Run (  )in the Android Studio toolbar.
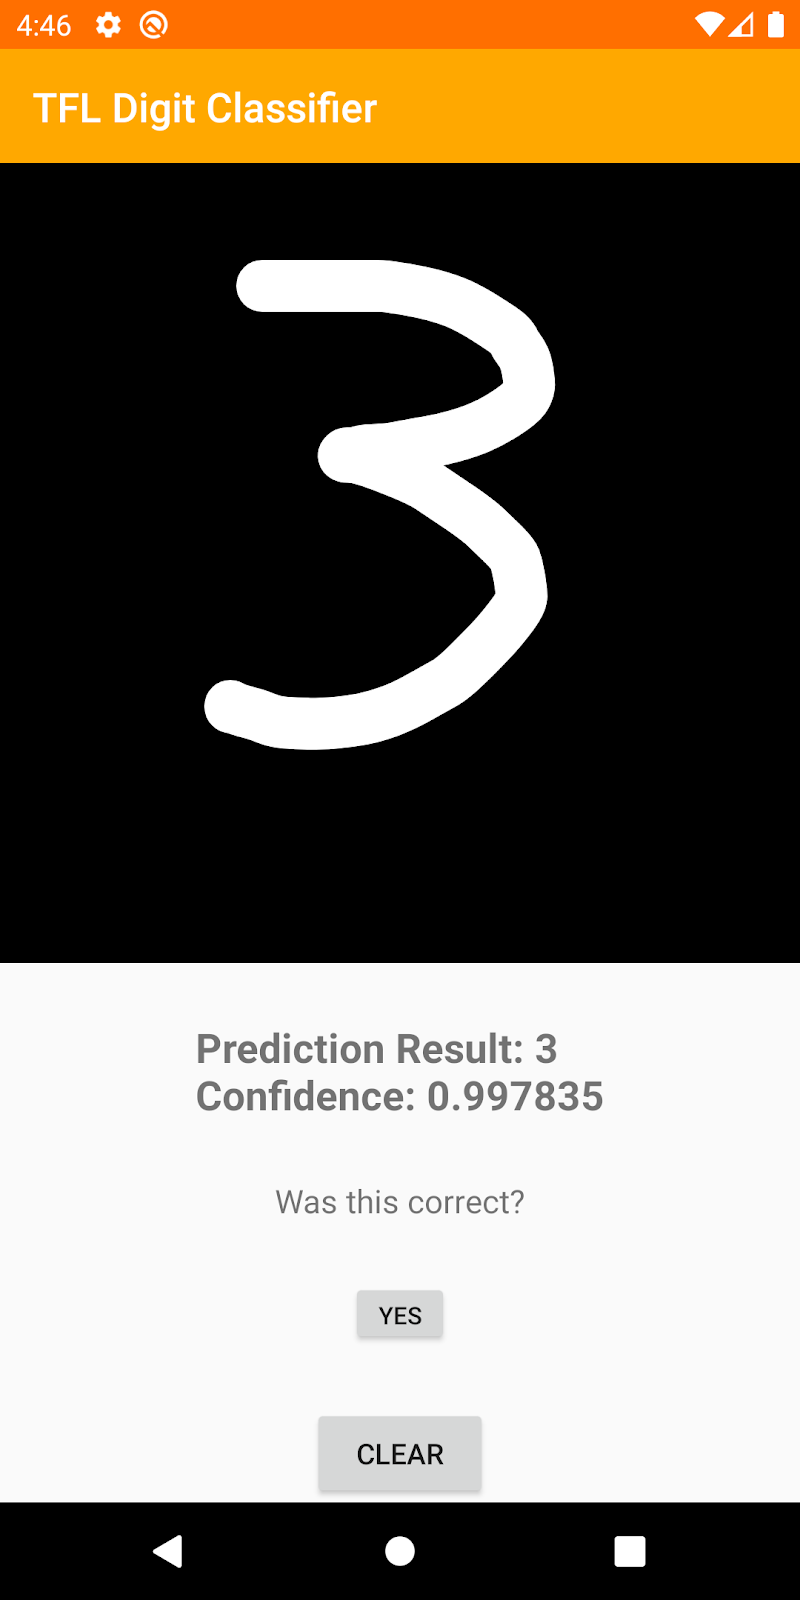
The app should launch on your device. At this point, if you try drawing a digit, the app should be able to recognize it.
5. Create Firebase console project
Add Firebase to the project
- Go to the Firebase console.
- Select Add project.
- Select or enter a Project name.
- Follow the remaining setup steps in the Firebase console, then click Create project (or Add Firebase, if you're using an existing Google project).
6. Add Firebase
- From the overview screen of your new project, click the Android icon to launch the setup workflow.
- Enter the codelab's package name:
org.tensorflow.lite.examples.digitclassifier
Add google-services.json file to your app
After registering the package name and selecting Next, click Download google-services.json to obtain your Firebase Android config file then copy the google-services.json file into the app directory in your project. After the file is downloaded you can Skip the next steps shown in the console (they've already been done for you in the build-android-start project).
Add google-services plugin to your app
The google-services plugin uses the google-services.json file to configure your application to use Firebase. Add the following line to the plugins block at the top of the build.gradle.kts file in the app directory of your project:
app/build.gradle.kts
id("com.google.gms.google-services")
Then add the following line to plugins block of your build.gradle.kts file in the project:
project/build.gradle.kts
id("com.google.gms.google-services") version "4.3.15" apply false
Sync your project with gradle files
To be sure that all dependencies are available to your app, you should sync your project with gradle files at this point. Select File > Sync Project with Gradle Files from the Android Studio toolbar.
7. Run the app with Firebase
Now that you have configured the google-services plugin with your JSON file, you are ready to run the app with Firebase. Connect your Android device, and click Run ( )in the Android Studio toolbar.
The app should launch on your device. At this point, your app should still build successfully.
8. Deploy a model to Firebase ML
Deploying a model to Firebase ML is useful for two main reasons:
- We can keep the app install size small and only download the model if needed
- The model can be updated regularly and with a different release cycle than the entire app
Before we can replace the static model in our app with a dynamically downloaded model from Firebase, we need to deploy it to Firebase ML. The model can be deployed either via the console, or programmatically, using the Firebase Admin SDK. In this step we will deploy via the console.
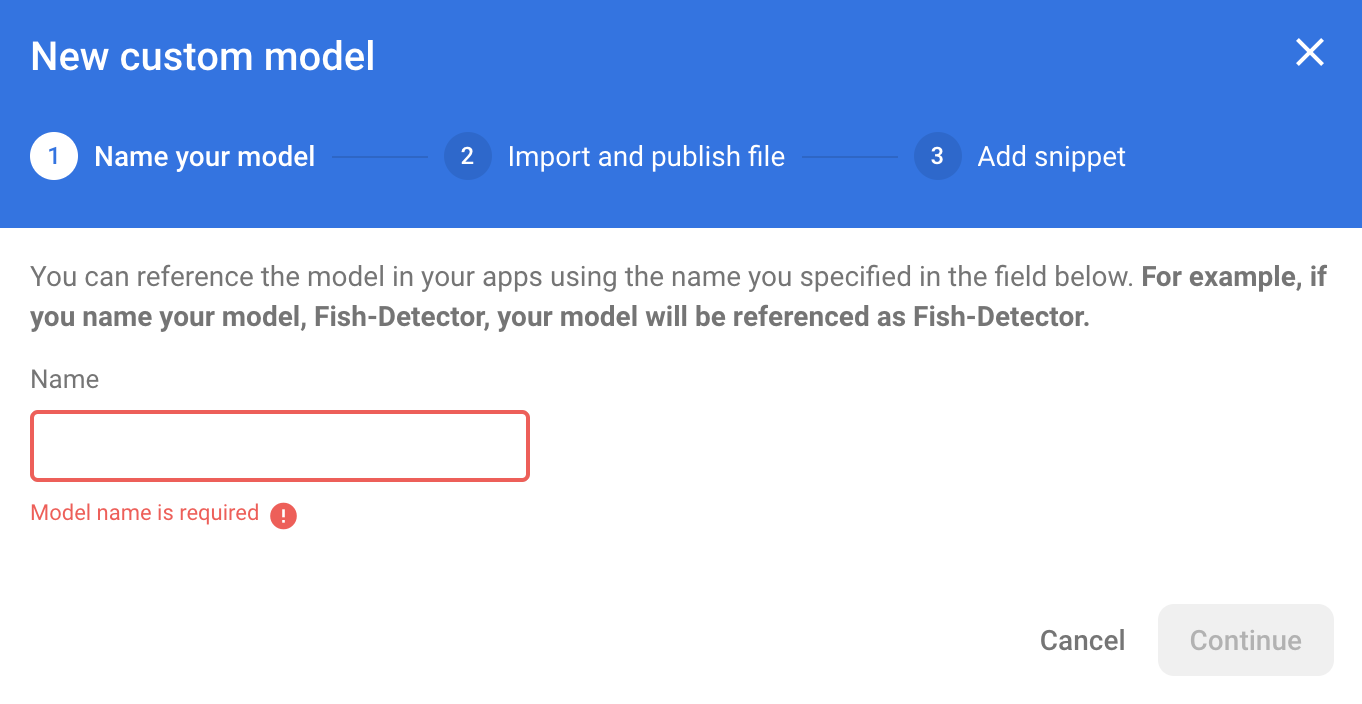
To keep things simple, we'll use the TensorFlow Lite model that's already in our app. First, open the Firebase Console and click on Machine Learning in the left navigation panel. Click ‘Get Started' if you are opening this first time. Then navigate to "Custom" and click on the "Add custom model" button.
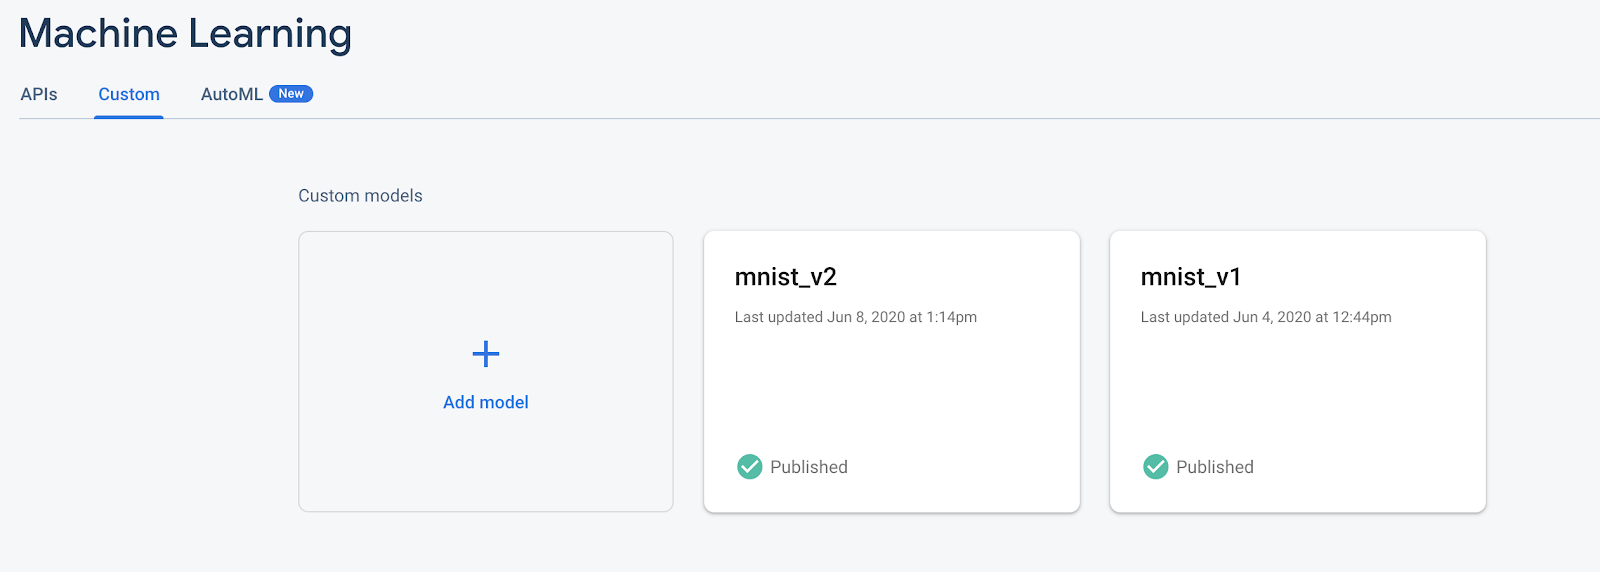
When prompted, give the model a descriptive name like mnist_v1 and upload the file from the codelab project directory under start/app/src/main/assets/mnist.tflite. Then you can delete this TF Lite model file from the Android project.
9. Download model from Firebase ML
Choosing when to download the remote model from Firebase into your app can be tricky since TFLite models can grow relatively large. Ideally we want to avoid loading the model immediately when the app launches, since if our model is used for only one feature and the user never uses that feature, we'll have downloaded a significant amount of data for no reason. We can also set download options such as only fetching models when connected to wifi. If you want to ensure that the model is available even without a network connection, it's important to also bundle it without the app as a backup.
For the sake of simplicity, we'll remove the default bundled model and always download a model from Firebase when the app starts. This way when running digit recognition you can be sure that the inference is running with the model provided from Firebase.
In the app/build.gradle.kts file, add the Firebase Machine Learning dependency
app/build.gradle.kts
implementation("com.google.firebase:firebase-ml-modeldownloader:24.1.2")
Then add logic to download the model from Firebase.
We'll replace digitClassifier.initialize(loadModelFile()) with downloadModel("mnist_v1") and implement this method.
MainActivity.kt
  private fun downloadModel(modelName: String): Task<CustomModel> {
    val conditions = CustomModelDownloadConditions.Builder()
    .requireWifi()
    .build()
    return FirebaseModelDownloader.getInstance()
        .getModel(modelName, DownloadType.LOCAL_MODEL, conditions)
        .addOnCompleteListener {
          val model = it.result
          if (model == null) {
            showToast("Failed to get model file.")
          } else {
            showToast("Downloaded remote model: $modelName")
            digitClassifier.initialize(model)
          }
        }
      .addOnFailureListener {
        showToast("Model download failed for $modelName, please check your connection.")
      }
  }
Re-run your app and draw a digit in the digit classifier. Once the download has finished, you should see a Toast message that the remote model is downloaded and a log indicating your new model is being used.
10. Track user feedback and conversion to measure model accuracy
Google Analytics for Firebase provides a way for you to understand the way users move through your application, where they succeed and where they get stuck and turn back. It can also be used to understand the most used parts of your application.
We will measure accuracy of the model by tracking user feedback on model predictions. If a user clicks "YES", it will indicate that the prediction was an accurate one.
We can log an Analytics event to track the accuracy of our model. First, we must add Analytics to the dependency before it can be used in the project:
Add Firebase Analytics dependency
app/build.gradle.kts
implementation(platform("com.google.firebase:firebase-bom:32.0.0"))
implementation("com.google.firebase:firebase-analytics-ktx")
Log Events
Then at the onCreate function we'll set the onclick listener to log correct_inference event to Firebase.
MainActivity.kt (onCreate)
// Setup YES button
yesButton?.setOnClickListener {
  Firebase.analytics.logEvent("correct_inference", null)
}
Run the app again and draw a digit. Press the "Yes" button a couple of times to send feedback that the inference was accurate.
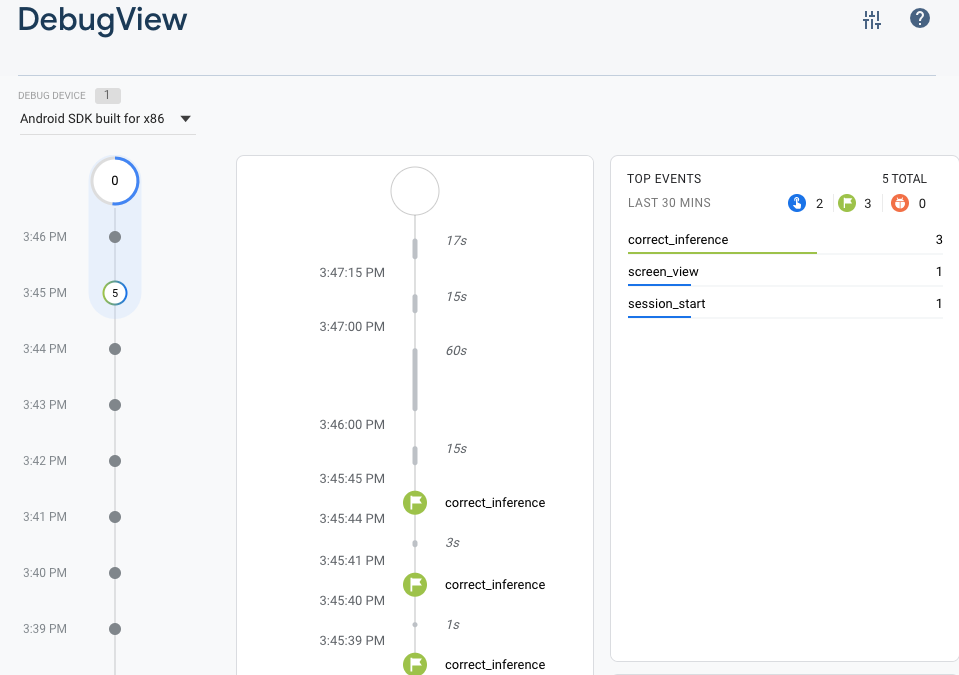
Debug analytics
Generally, events logged by your app are batched together over the period of approximately one hour and uploaded together. This approach conserves the battery on end users' devices and reduces network data usage. However, for the purposes of validating your analytics implementation (and, in order to view your analytics in the DebugView report), you can enable Debug mode on your development device to upload events with a minimal delay.
To enable Analytics Debug mode on an Android device, execute the following commands:
adb shell setprop debug.firebase.analytics.app org.tensorflow.lite.examples.digitclassifier
Run the app again and draw a digit. Press the "Yes" button a couple of times to send feedback that the inference was accurate. Now you can view the log events in near real time via the debug view in the Firebase console. Click on Analytics > DebugView from the left navigation bar.
11. Analyze Performance of the Model
Firebase Performance Monitoring is a service that helps you to gain insight into the performance characteristics of your iOS, Android, and web apps.
You use the Performance Monitoring SDK to collect performance data from your app, then review and analyze that data in the Firebase console. Performance Monitoring helps you to understand where and when the performance of your app can be improved so that you can use that information to fix performance issues.
Here we add perf traces around inference and download
This is important because larger models used in deep-learning have the potential to be more accurate, but they can also take longer to return a response. In our experiment we are trying to find the right balance between accuracy and speed.
Add Firebase Performance dependency
project/build.gradle.kts
plugins {
  // ...

  // Add the dependency for the Performance Monitoring plugin
  id("com.google.firebase.firebase-perf") version "1.4.2" apply false
}
app/build.gradle.kts
plugins {
  // ...

  // Add the Performance Monitoring plugin
  id("com.google.firebase.firebase-perf")
}

// ...

dependencies {
  // ...

  // Add the dependency for the Performance Monitoring library
  implementation("com.google.firebase:firebase-perf")
}
Add Custom Traces
In the setupDigitClassifier() function create a new downloadTrace, and start it right before downloading the model. Then add an onsuccess listener stopping the trace.
In the classifyDrawing() function create a new classifyTrace, and start it right before classification. Then stop the trace in onsuccess listener.
MainActivity.kt
class MainActivity : AppCompatActivity() {
  // ...

  private val firebasePerformance = FirebasePerformance.getInstance()

  // ...

  private fun setupDigitClassifier() {
    // Add these lines to create and start the trace
    val downloadTrace = firebasePerformance.newTrace("download_model")
    downloadTrace.start()
    downloadModel("mnist_v1")
      // Add these lines to stop the trace on success
      .addOnSuccessListener {
        downloadTrace.stop()
      }
  }

// ...

  private fun classifyDrawing() {
    val bitmap = drawView?.getBitmap()

    if ((bitmap != null) && (digitClassifier.isInitialized)) {
      // Add these lines to create and start the trace
      val classifyTrace = firebasePerformance.newTrace("classify")
      classifyTrace.start()
      digitClassifier
        .classifyAsync(bitmap)
        .addOnSuccessListener { resultText ->
          // Add this line to stop the trace on success
          classifyTrace.stop()
          predictedTextView?.text = resultText
        }
        .addOnFailureListener { e ->
          predictedTextView?.text = getString(
            R.string.tfe_dc_classification_error_message,
            e.localizedMessage
          )
          Log.e(TAG, "Error classifying drawing.", e)
        }
    }
  }
View log messages for performance events
- Enable debug logging for Performance Monitoring at build time by adding a
<meta-data>element to your app'sAndroidManifest.xmlfile, like so:
AndroidManifest.xml
<application>
    <meta-data
      android:name="firebase_performance_logcat_enabled"
      android:value="true" />
</application>
- Check your log messages for any error messages.
- Performance Monitoring tags its log messages with
FirebasePerformance. Using logcat filtering, you can specifically view duration trace and HTTP/S network request logging by running the following command:
adb logcat -s FirebasePerformance
- Check for the following types of logs which indicate that Performance Monitoring is logging performance events:
Logging TraceMetricLogging NetworkRequestMetric
12. Deploy a second model to Firebase ML
When coming up with a new version of your model, such as one with better model architecture or one trained on a larger or updated dataset, we may feel tempted to replace our current model with the new version. However, a model performing well in testing does not necessarily perform equally well in production. Therefore, let's do A/B testing in production to compare our original model and the new one.
Enable Firebase Model Management API
In this step, we will enable the Firebase Model Management API to deploy a new version of our TensorFlow Lite model using Python code.
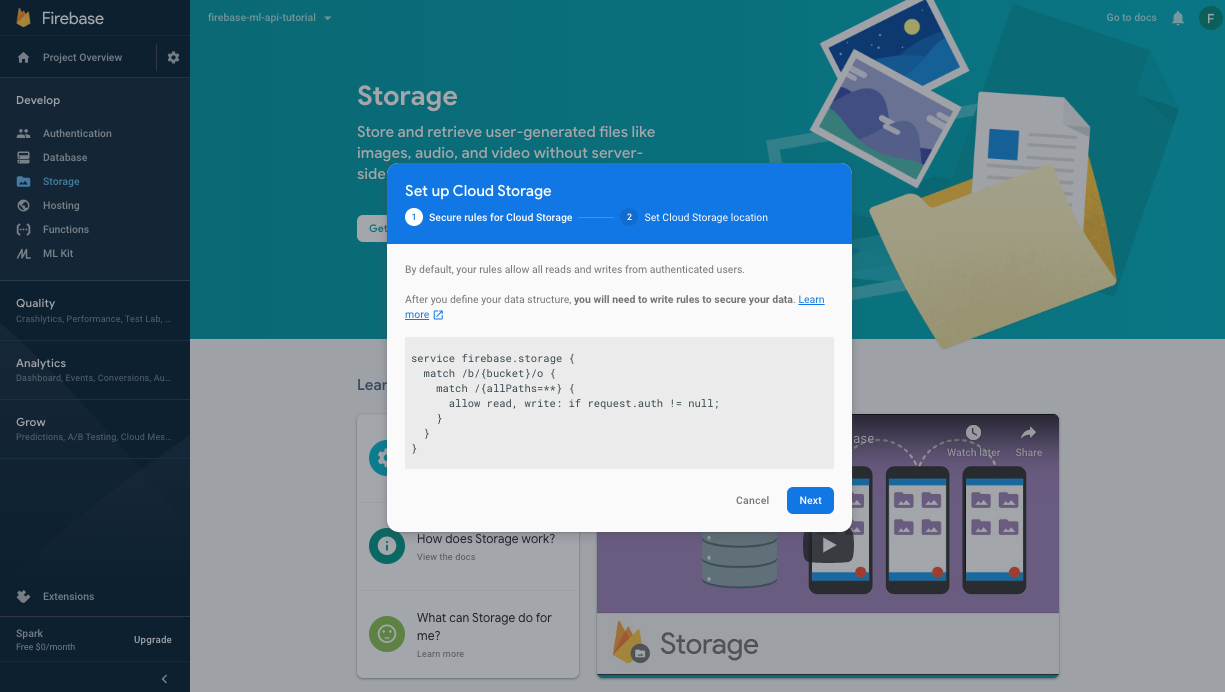
Create a bucket to store your ML models
In your Firebase Console, go to Storage and click Get started. 
Follow the dialogue to get your bucket set up.
Enable Firebase ML API
Go to Firebase ML API page on Google Cloud Console and click Enable.
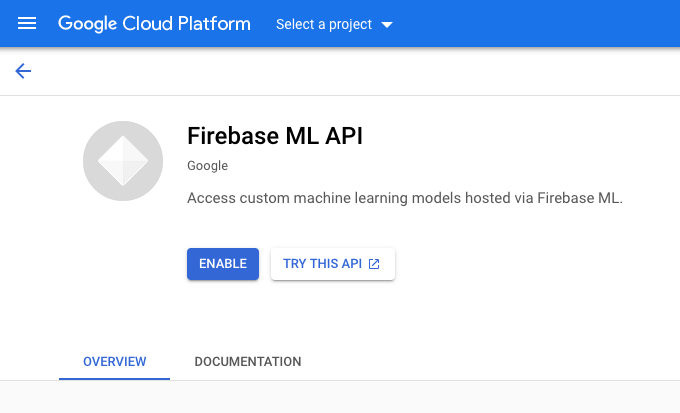 Select the Digit Classifier app when asked.
Train a new model and Publish to Firebase ML
Now we will train a new version of the model by using a larger dataset, and we will then deploy it programmatically directly from the training notebook using the Firebase Admin SDK.
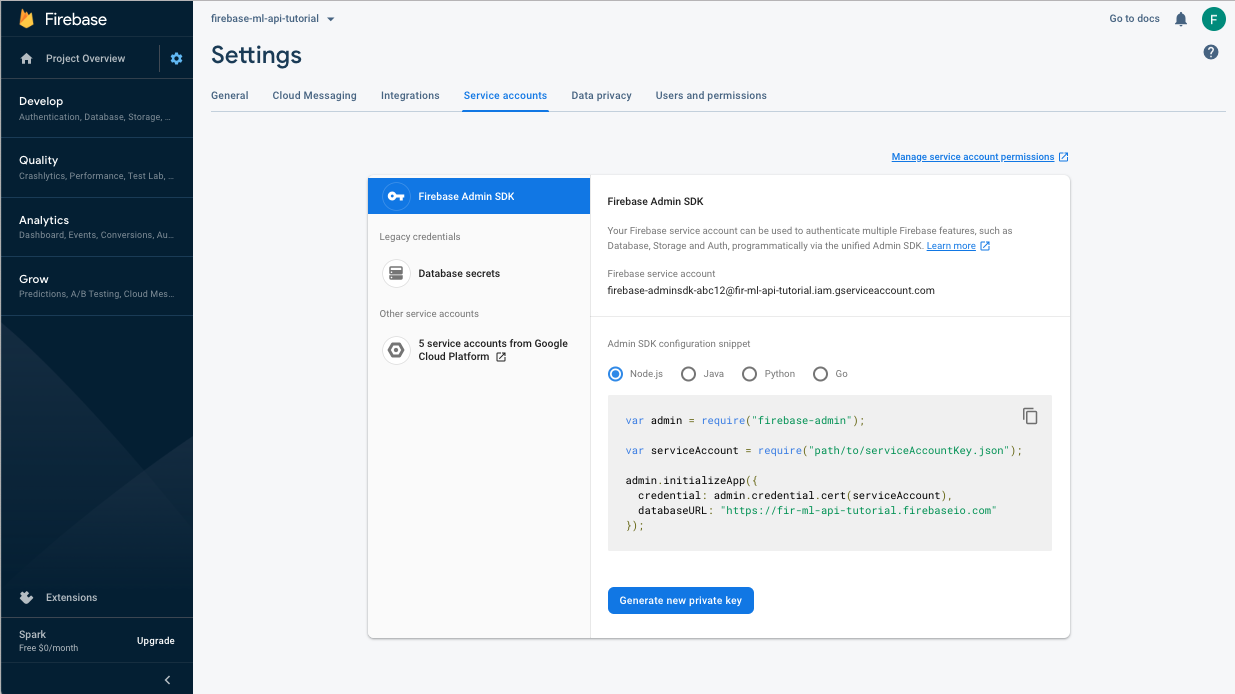
Download the private key for service account
Before we can use the Firebase Admin SDK, we'll need to create a service account. Open the Service Accounts panel of Firebase console by clicking this link and click on the button to create a new service account for the Firebase Admin SDK. When prompted, click the Generate New Private Key button. We'll use the service account key for authenticating our requests from the colab notebook.
Now we can train and deploy the new model.
- Open this colab notebook and make a copy of it under your own Drive.
- Run the first cell "Train an improved TensorFlow Lite model" by clicking on the play button to the left of it. This will train a new model and may take some time.
- Running the second cell will create a file upload prompt. Upload the json file you downloaded from Firebase Console when creating your service account.
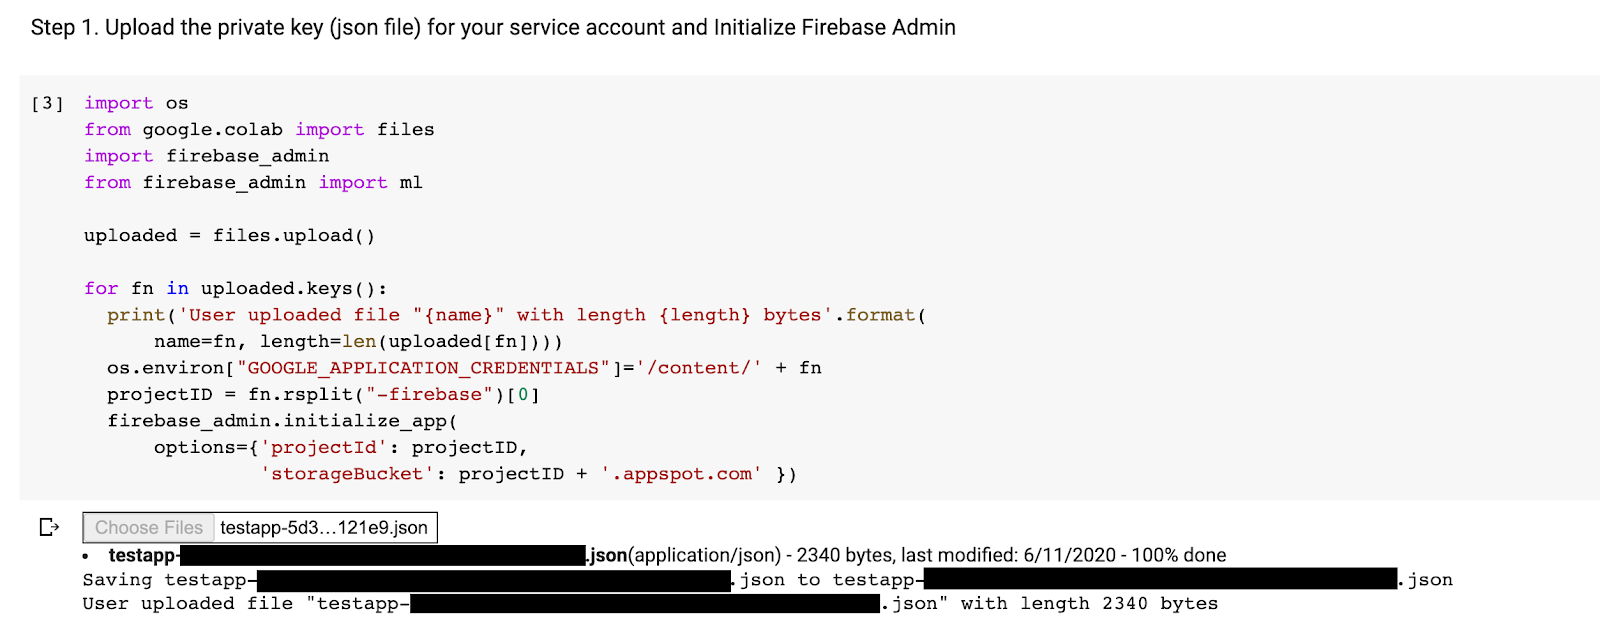
- Run the last two cells.
After running the colab notebook, you should see a second model in Firebase console. Make sure the second model is named mnist_v2.
13. Select a model via Remote Config
Now that we have two separate models, we'll add a parameter for selecting which model to download at runtime. The value of the parameter the client receives will determine which model the client downloads.
Add Config Rules in Firebase console
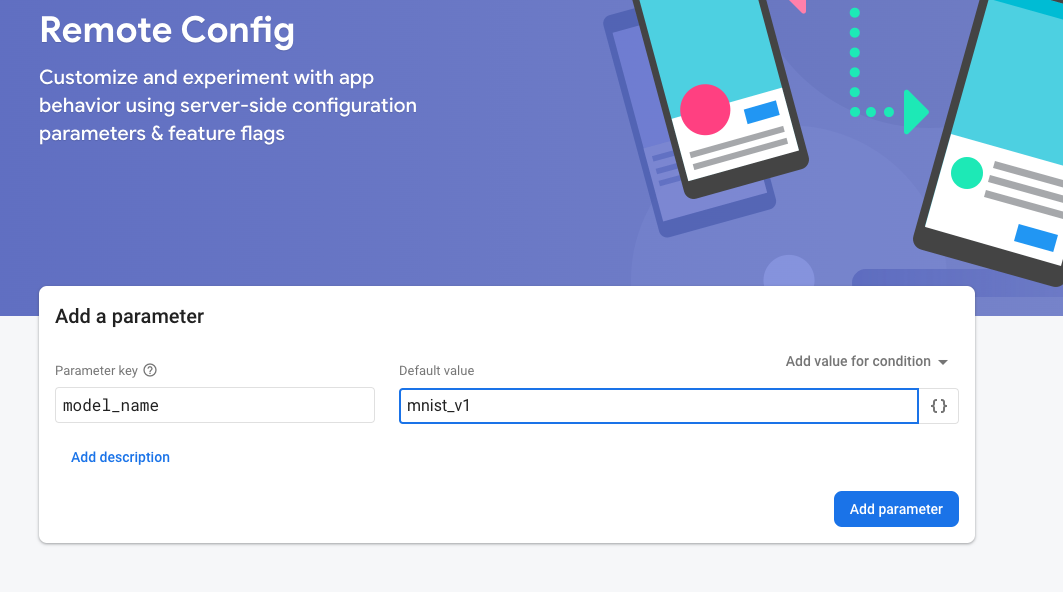
First, open up the Firebase console and click on the Remote Config button in the left nav menu. Then, click on the "Add Parameter" button.
Name the new parameter model_name and give it a default value of "mnist_v1". By putting the name of the model in the remote config parameter, we can test multiple models without adding a new parameter for every model we want to test. Click Publish Changes to apply the updates.
Add Firebase RemoteConfig dependency
app/build.gradle.kts
implementation("com.google.firebase:firebase-config-ktx")
Configure Firebase Remote Config
MainActivity.kt
  private fun configureRemoteConfig() {
    remoteConfig = Firebase.remoteConfig
    val configSettings = remoteConfigSettings {
      minimumFetchIntervalInSeconds = 3600
    }
    remoteConfig.setConfigSettingsAsync(configSettings)
  }
Request and Use Config
Create a fetch request for config and add a completion handler to pick up and use the config parameters.
MainActivity.kt
 private fun setupDigitClassifier() {
    configureRemoteConfig()
    remoteConfig.fetchAndActivate()
      .addOnCompleteListener { task ->
        if (task.isSuccessful) {
          val modelName = remoteConfig.getString("model_name")
          val downloadTrace = firebasePerformance.newTrace("download_model")
          downloadTrace.start()
          downloadModel(modelName)
            .addOnSuccessListener {
              downloadTrace.stop()
            }
        } else {
          showToast("Failed to fetch model name.")
        }
      }
  }
Test Remote Config
- Click the
 Run button.
 - Check that you see the Toast message that the mnist_v1 model is downloaded.
- Go back to Firebase Console, change the default value to mnist_v2 and select Publish Changes to apply the updates.
- Restart the app and check to see the Toast message that the mnist_v2 model is downloaded this time.
14. A/B Test Model Effectiveness
Firebase A/B Testing helps you optimize your app experience by making it easy to run, analyze, and scale product and marketing experiments. Finally, we can use Firebase's built-in A/B Testing behavior to see which of our two models is performing better.
Go to Analytics -> Events in the Firebase console. If the correct_inference event is showing, mark it as a "Conversion event", if not, you can go to Analytics -> Conversion Events and click "Create a New Conversion Event" and put down correct_inference.
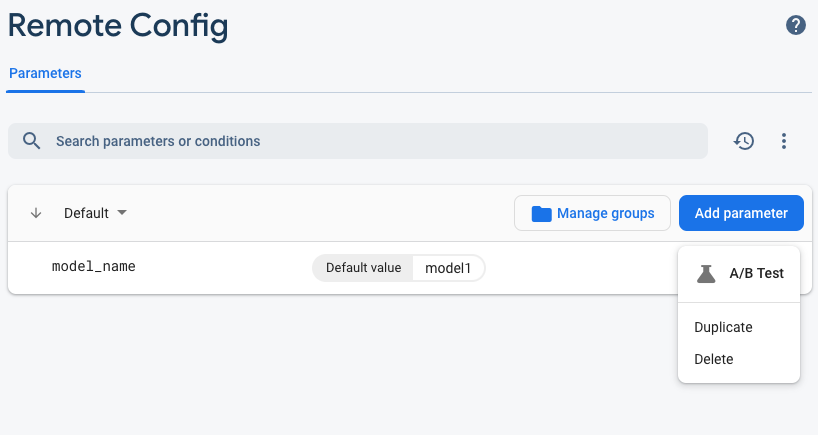
Now go to "Remote Config in the Firebase console, select the "A/B test" button from the more options menu on the "model_name" parameter we just added.
In the menu that follows, accept the default name.
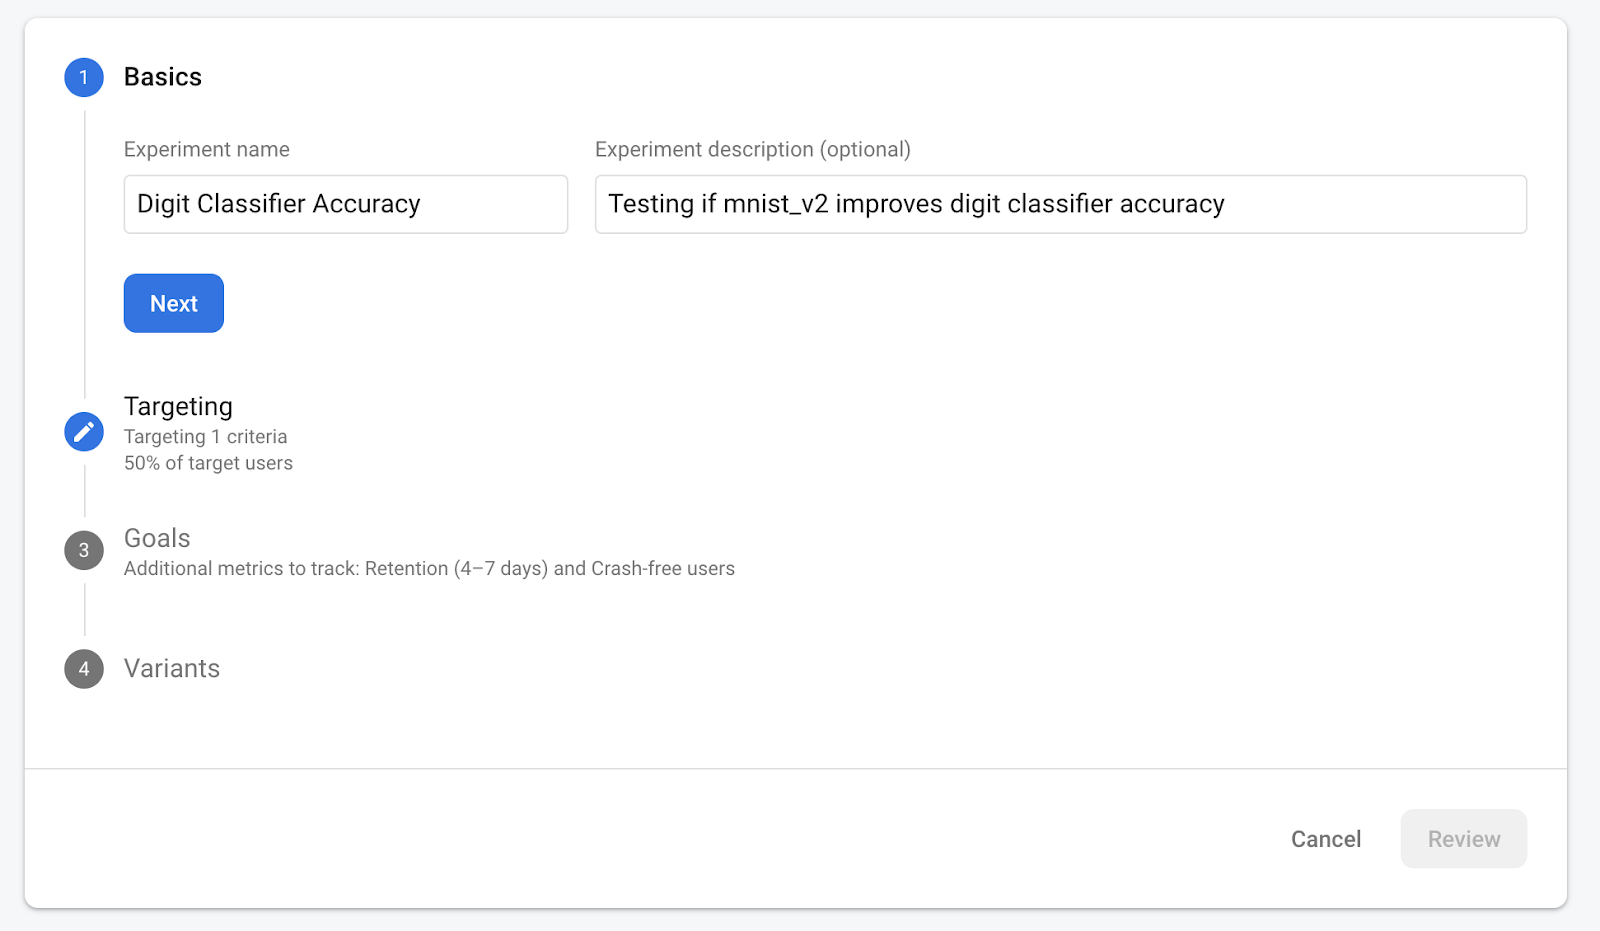
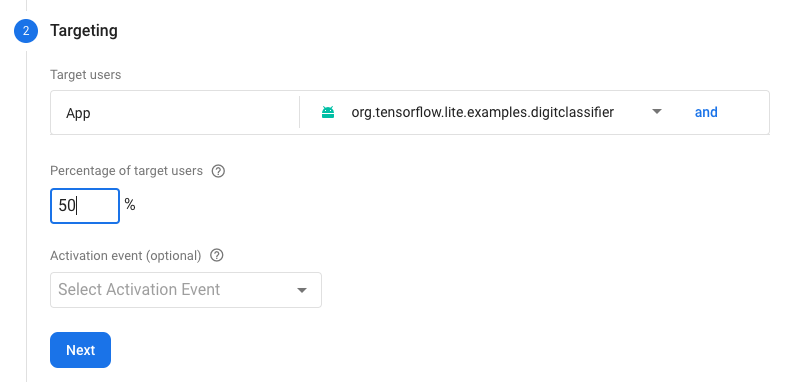
Select your app on the dropdown and change the targeting criteria to 50% of active users.
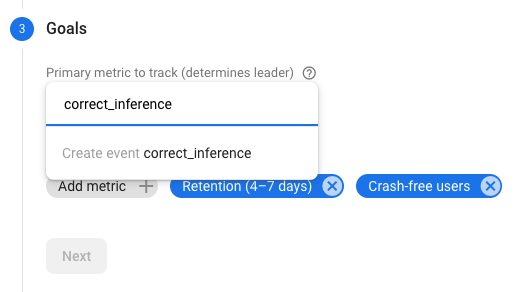
If you were able to set the correct_inference event as a conversion earlier, use this event as the primary metric to track. Otherwise, if you don't want to wait for the event to show up in Analytics, you can add correct_inference manually.
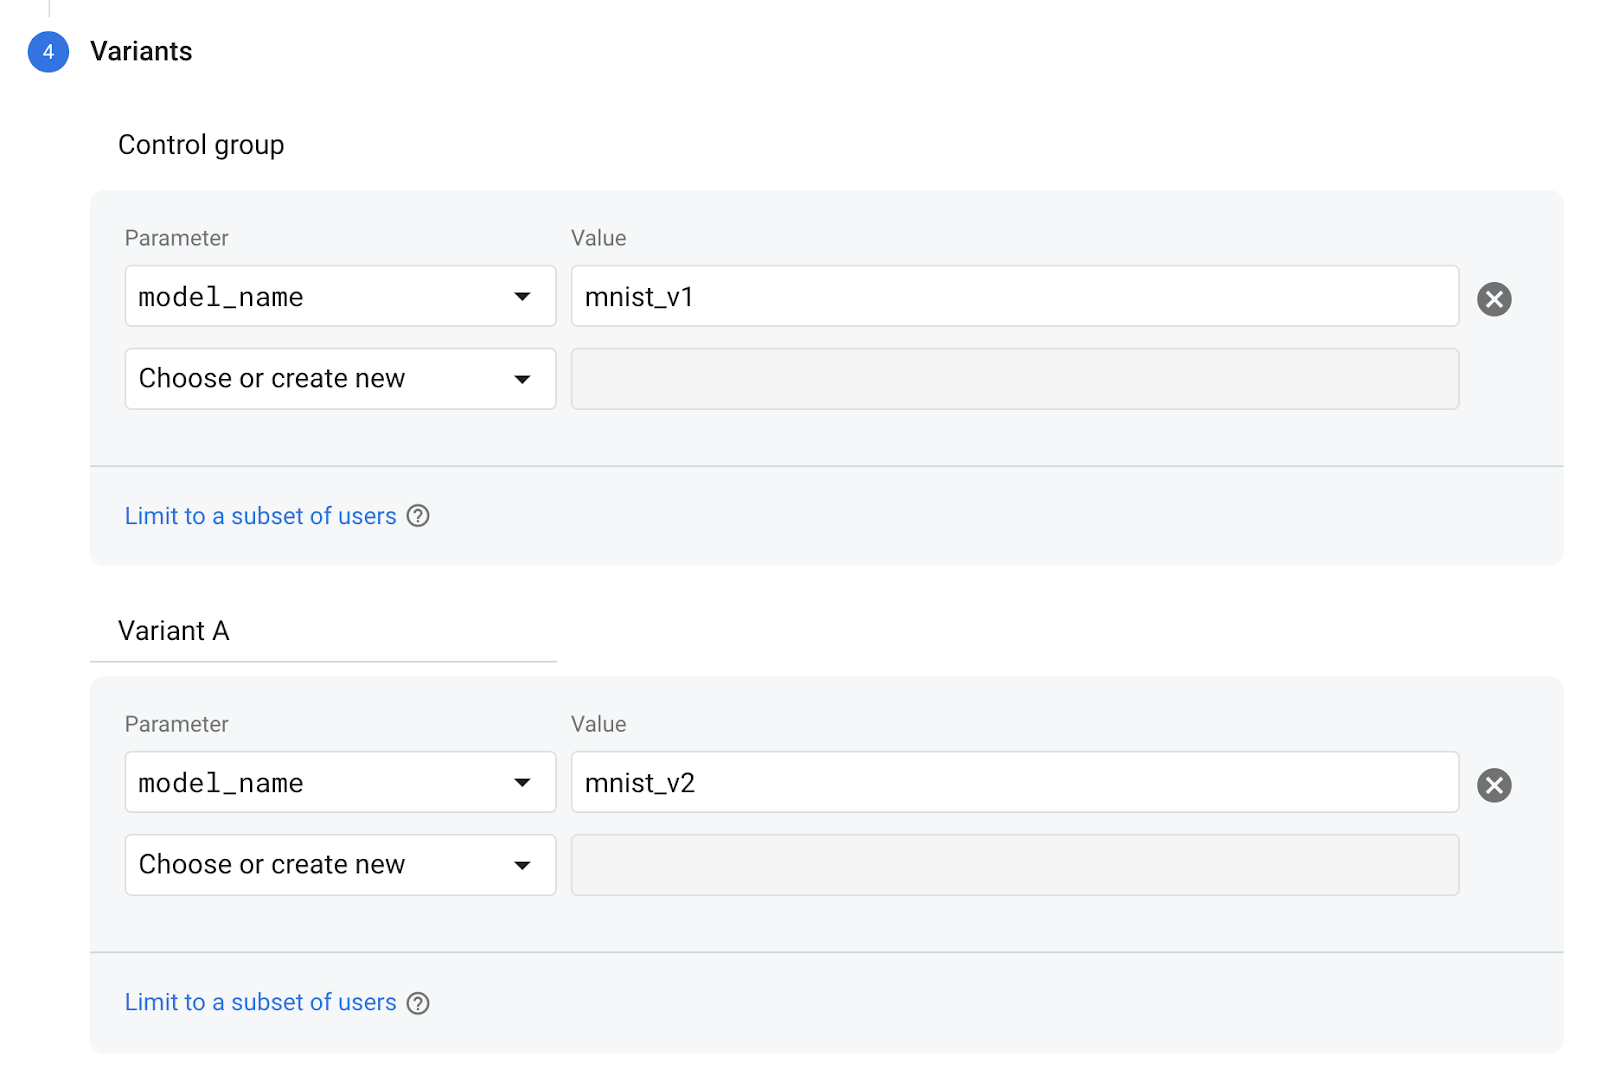
Finally, on the Variants screen, set your control group variant to use mnist_v1 and your Variant A group to use mnist_v2.
Click the Review button in the bottom right corner.
Congratulations, you've successfully created an A/B test for your two separate models! The A/B test is currently in a draft state and can be started at any time by clicking the "Start Experiment" button.
For a closer look at A/B testing, check out the A/B Testing documentation.
15. Congratulations!
In this codelab, you learned how to replace a statically-bundled tflite asset in your app with a dynamically loaded TFLite model from Firebase. To learn more about TFLite and Firebase, take a look at other TFLite samples and the Firebase getting started guides.
What we've covered
- TensorFlow Lite
- Firebase ML
- Firebase Analytics
- Firebase Performance Monitoring
- Firebase Remote Config
- Firebase A/B Testing
Next Steps
- Implement Firebase ML Deployment in your app.
Learn More
- Firebase Machine Learning documentation
- TensorFlow Lite documentation
- A/B Testing models with Firebase