
1. Before you begin
In this codelab, you'll learn how to add Firebase Authentication to your Flutter app using the FlutterFire UI package. With this package, you'll add both email and password auth and Google Sign In auth to a Flutter app. You'll also learn how to set up a Firebase project, and use the FlutterFire CLI to initialize Firebase in your Flutter app.
Prerequisites
This codelab assumes that you have some Flutter experience. If not, you might want to first learn the basics. The following links are helpful:
- Take a Tour of the Flutter Widget Framework
- Try the Write Your First Flutter App, part 1 codelab
You should also have some Firebase experience, but it's okay if you've never added Firebase to a Flutter project. If you're unfamiliar with the Firebase console, or you're completely new to Firebase altogether, see the following links first:
What you'll create
This codelab guides you through building the authentication flow for a Flutter app, using Firebase for Authentication. The application will have a login screen, a ‘Register' screen, a password recovery screen, and a user profile screen.


What you'll learn
This codelab covers:
- Adding Firebase to a Flutter app
- Firebase Console setup
- Using Firebase CLI to add Firebase to your application
- Using FlutterFire CLI to generate Firebase config in Dart
- Adding Firebase Authentication to your Flutter app
- Firebase Authentication setup in the console
- Adding Email and Password sign in with the
firebase_ui_authpackage - Adding user registration with the
firebase_ui_authpackage - Adding a ‘Forgot password?' page
- Adding Google Sign-in with
firebase_ui_auth - Configuring your app to work with multiple sign-in providers.
- Adding a user profile screen to your application with the
firebase_ui_authpackage
This codelab is specifically concerned with adding a robust Authentication system using the firebase_ui_auth package. As you'll see, this entire app, with all of the above features, can be implemented with around 100 lines of code.
What you'll need
- Working knowledge of Flutter, and the SDK installed
- A text editor (JetBrains IDE's, Android Studio, and VS Code are supported by Flutter)
- Google Chrome browser, or your other preferred development target for Flutter. (Some terminal commands in this codelab will assume you're running your app on Chrome)
2. Create and set up a Firebase project
The first task you'll need to complete is creating a Firebase project in Firebase web console.
Create a Firebase project
- Sign into the Firebase console using your Google Account.
- Click the button to create a new project, and then enter a project name (for example,
FlutterFire-UI-Codelab).
- Click Continue.
- If prompted, review and accept the Firebase terms, and then click Continue.
- (Optional) Enable AI assistance in the Firebase console (called "Gemini in Firebase").
- For this codelab, you do not need Google Analytics, so toggle off the Google Analytics option.
- Click Create project, wait for your project to provision, and then click Continue.
To learn more about Firebase projects, see Understand Firebase projects.
Enable email sign-in for Firebase Authentication
The app that you're building uses Firebase Authentication to allow your users to sign in to your app. It also allows new users to register from the Flutter application.
Firebase Authentication needs to be enabled using the Firebase Console, and needs special configuration once enabled.
To allow users to sign in to the web app, you'll first use the Email/Password sign-in method. Later, you'll add the Google Sign-In method.
- In the Firebase console, expand the Build menu in the left panel.
- Click Authentication, and then click the Get Started button, then the Sign-in method tab (or go directly to the Sign-in method tab).
- Click Email/Password in the Sign-in providers list, set the Enable switch to the on position, and then click Save.

3. Set up Flutter app
You'll need to download the starter code, and install the Firebase CLI before we begin.
Get the starter code
Clone the GitHub repository from the command line:
git clone https://github.com/flutter/codelabs.git flutter-codelabs
Alternatively, if you have GitHub's CLI tool installed:
gh repo clone flutter/codelabs flutter-codelabs
The sample code should be cloned into the flutter-codelabs directory on your machine, which contains the code for a collection of codelabs. The code for this codelab is in the sub-directory flutter-codelabs/firebase-auth-flutterfire-ui.
The directory flutter-codelabs/firebase-auth-flutterfire-ui contains two Flutter projects. One is called complete and the other is called start. The start directory contains an incomplete project, and it's where you'll spend the most time.
cd flutter-codelabs/firebase-auth-flutterfire-ui/start
If you want to skip forward, or see what something should look like when complete, look in the directory named complete to cross-reference.
If you want to follow along with the codelab, and add code yourself, you should start with the Flutter app at flutter-codelabs/firebase-auth-flutterfire-ui/start, and add code to that project throughout the codelab. Open or import that directory into your preferred IDE.
Install Firebase CLI
The Firebase CLI provides tools for managing your Firebase projects. The CLI is required for the FlutterFire CLI, which you'll install in a bit.
There are a variety of ways to install the CLI. Review all the available options for your operating system at firebase.google.com/docs/cli.
After installing the CLI, you must authenticate with Firebase.
- Log into Firebase using your Google Account by running the following command:
firebase login
- This command connects your local machine to Firebase and grants you access to your Firebase projects.
- Test that the CLI is properly installed and has access to your account by listing your Firebase projects. Run the following command:
firebase projects:list
- The displayed list should be the same as the Firebase projects listed in the Firebase console. You should see at least
flutterfire-ui-codelab.
Install the FlutterFire CLI
The FlutterFire CLI is a tool that helps ease the installation process of Firebase across all supported platforms in your Flutter app. It's built on top of the Firebase CLI.
First, install the CLI:
dart pub global activate flutterfire_cli
Make sure the CLI was installed. Run the following command and verify that the CLI outputs the help menu.
flutterfire --help
Add your Firebase project to your Flutter app
Configure FlutterFire
You can use FlutterFire to generate the needed Dart code to use Firebase in your Flutter app.
flutterfire configure
When this command is run, you'll be prompted to select which Firebase project you want to use, and which platforms you want to set up.
The following screenshots show the prompts you'll need to answer.
- Select the project you want to use. In this case, use
flutterfire-ui-codelab
- Select which platforms you want to use. In this codelab, there are steps to configure Firebase Authentication for Flutter for web, iOS, and Android, but you can set up your Firebase project to use all options.

- This screenshot shows the output at the end of the process. If you're familiar with Firebase, you'll notice that you didn't have to create platform applications (for example, an Android application) in the console, and the FlutterFire CLI did it for you.

When this is complete, look at the Flutter app in your text editor. FlutterFire CLI has modified a file called firebase_options.dart. This file contains a class called FirebaseOptions, which has static variables that hold the Firebase configuration needed for each platform. If you selected all platforms when you ran flutterfire configure, you'll see static values named web, android, ios, and macos.
lib/firebase_options.dart
import 'package:firebase_core/firebase_core.dart' show FirebaseOptions;
import 'package:flutter/foundation.dart'
    show defaultTargetPlatform, kIsWeb, TargetPlatform;

class DefaultFirebaseOptions {
  static FirebaseOptions get currentPlatform {
    if (kIsWeb) {
      return web;
    }

    switch (defaultTargetPlatform) {
      case TargetPlatform.android:
        return android;
      case TargetPlatform.iOS:
        return ios;
      case TargetPlatform.macOS:
        return macos;
      default:
        throw UnsupportedError(
          'DefaultFirebaseOptions are not supported for this platform.',
        );
    }
  }

  static const FirebaseOptions web = FirebaseOptions(
    apiKey: 'AIzaSyCqFjCV_9CZmYeIvcK9FVy4drmKUlSaIWY',
    appId: '1:963656261848:web:7219f7fca5fc70afb237ad',
    messagingSenderId: '963656261848',
    projectId: 'flutterfire-ui-codelab',
    authDomain: 'flutterfire-ui-codelab.firebaseapp.com',
    storageBucket: 'flutterfire-ui-codelab.firebasestorage.app',
    measurementId: 'G-DGF0CP099H',
  );

  static const FirebaseOptions android = FirebaseOptions(
    apiKey: 'AIzaSyDconZaCQpkxIJ5KQBF-3tEU0rxYsLkIe8',
    appId: '1:963656261848:android:c939ccc86ab2dcdbb237ad',
    messagingSenderId: '963656261848',
    projectId: 'flutterfire-ui-codelab',
    storageBucket: 'flutterfire-ui-codelab.firebasestorage.app',
  );

  static const FirebaseOptions ios = FirebaseOptions(
    apiKey: 'AIzaSyBqLWsqFjYAdGyihKTahMRDQMo0N6NVjAs',
    appId: '1:963656261848:ios:d9e01cfe8b675dfcb237ad',
    messagingSenderId: '963656261848',
    projectId: 'flutterfire-ui-codelab',
    storageBucket: 'flutterfire-ui-codelab.firebasestorage.app',
    iosClientId: '963656261848-v7r3vq1v6haupv0l1mdrmsf56ktnua60.apps.googleusercontent.com',
    iosBundleId: 'com.example.complete',
  );

  static const FirebaseOptions macos = FirebaseOptions(
    apiKey: 'AIzaSyBqLWsqFjYAdGyihKTahMRDQMo0N6NVjAs',
    appId: '1:963656261848:ios:d9e01cfe8b675dfcb237ad',
    messagingSenderId: '963656261848',
    projectId: 'flutterfire-ui-codelab',
    storageBucket: 'flutterfire-ui-codelab.firebasestorage.app',
    iosClientId: '963656261848-v7r3vq1v6haupv0l1mdrmsf56ktnua60.apps.googleusercontent.com',
    iosBundleId: 'com.example.complete',
  );
}
Firebase uses the word application to refer to specific build for a specific platform in a Firebase project. For example, the Firebase project called FlutterFire-ui-codelab has multiple applications: one for Android, one for iOS, one for macOS, and one for Web.
The method DefaultFirebaseOptions.currentPlatform uses the TargetPlatform enum exposed by Flutter to detect the platform that your app is running on, and then returns the Firebase configuration values needed for the correct Firebase application.
Add Firebase packages to Flutter app
The final setup step is to add the relevant Firebase packages to your Flutter project. The firebase_options.dart file should have errors, because it relies on Firebase packages that haven't been added yet. In the terminal, make sure you're in the root of the Flutter project at flutter-codelabs/firebase-emulator-suite/start. Then, install the three required packages using the following command:
flutter pub add firebase_core firebase_auth firebase_ui_auth
These are the only packages you need at this point.
Initialize Firebase
In order to use the packages added, and the DefaultFirebaseOptions.currentPlatform, update the code in the main function in the main.dart file.
lib/main.dart
import 'package:firebase_core/firebase_core.dart';                  // Add this import
import 'package:flutter/material.dart';

import 'app.dart';
import 'firebase_options.dart';                                     // And this import

// TODO(codelab user): Get API key
const clientId = 'YOUR_CLIENT_ID';

void main() async {
  // Add from here...
  WidgetsFlutterBinding.ensureInitialized();
  await Firebase.initializeApp(options: DefaultFirebaseOptions.currentPlatform);
  // To here.

  runApp(const MyApp(clientId: clientId));
}
This code does two things.
WidgetsFlutterBinding.ensureInitialized()tells Flutter not to start running the application widget code until the Flutter framework is completely booted. Firebase uses native platform channels, which require the framework to be running.Firebase.initializeAppsets up a connection between your Flutter app and your Firebase project. TheDefaultFirebaseOptions.currentPlatformis imported from our generatedfirebase_options.dartfile. This static value detects which platform you're running on, and passes in the corresponding Firebase keys.
4. Add initial Firebase UI Auth page
Firebase UI for Auth provides widgets that represent entire screens in your application. These screens handle different authentication flows throughout your application, such as Sign In, Registration, Forgot Password, User Profile, and more. To get started, add a landing page to your app that acts as an authentication guard to the main application.
Material or Cupertino App
FlutterFire UI requires that your application is wrapped in either a MaterialApp or CupertinoApp. Depending on your choice, the UI will automatically reflect the differences of Material or Cupertino widgets. For this codelab, use MaterialApp, which is already added to the app in app.dart.
lib/app.dart
import 'package:flutter/material.dart';

import 'auth_gate.dart';

class MyApp extends StatelessWidget {
  const MyApp({super.key, required this.clientId});

  final String clientId;

  @override
  Widget build(BuildContext context) {
    return MaterialApp(
      theme: ThemeData(
        colorScheme: ColorScheme.fromSeed(seedColor: Colors.deepPurple),
      ),
      home: AuthGate(clientId: clientId),
    );
  }
}
Check authentication state
Before you can display a sign-in screen, you need to determine whether the user is authenticated. The most common way to check for this is to listen to FirebaseAuth's authStateChanges using the Firebase Auth plugin.
In the code sample above, the MaterialApp is building an AuthGate widget in its build method. (This is a custom widget, not provided by FlutterFire UI.)
That widget needs to be updated to include the authStateChanges stream.
The authStateChanges API returns a Stream with either the current user (if they are signed in), or null if they are not. To subscribe to this state in our application, you can use Flutter's StreamBuilder widget and pass the stream to it.
StreamBuilder is a widget that builds itself based on the latest snapshot of data from a Stream that you pass it. It automatically rebuilds when the Stream emits a new snapshot.
Update the code in auth_gate.dart.
lib/auth_gate.dart
import 'package:firebase_auth/firebase_auth.dart' hide EmailAuthProvider; // Add this import
import 'package:firebase_ui_auth/firebase_ui_auth.dart';                  // And this import
import 'package:flutter/material.dart';

import 'home.dart';

class AuthGate extends StatelessWidget {
  const AuthGate({super.key, required this.clientId});

  final String clientId;

  @override
  Widget build(BuildContext context) {
    return StreamBuilder<User?>(                                       // Modify from here...
      stream: FirebaseAuth.instance.authStateChanges(),
      builder: (context, snapshot) {
        if (!snapshot.hasData) {
          return SignInScreen(providers: []);
        }

        return const HomeScreen();
      },
    );                                                                 // To here.
  }
}
StreamBuilder.streamis being passedFirebaseAuth.instance.authStateChanged, the aforementioned stream, which will return a FirebaseUserobject if the user has authenticated, otherwise it will returnnull.- Next, the code is using
snapshot.hasDatato check if the value from the stream contains theUserobject. - If there isn't, it'll return a
SignInScreenwidget. For now, this screen won't do anything, it will be updated in the next step. - Otherwise, it returns a
HomeScreen, which is the main part of the application that only authenticated users can access.
The SignInScreen is a widget that comes from the FlutterFire UI package. This will be the focus of the next step of this codelab. When you run the app at this point, you should see a blank sign-in screen.
5. Sign-In screen
The SignInScreen widget, provided by FlutterFire UI, adds the following functionality:
- Allows users to sign in
- If users forgot their password, they can tap "Forgot password?" and be taken to a form to reset their password
- If a user isn't yet registered, they can tap "Register", and be taken to another form that allows them to sign up.
Again, this requires only a couple lines of code. Recall the code in the AuthGate widget:
lib/auth_gate.dart
import 'package:firebase_auth/firebase_auth.dart' hide EmailAuthProvider;
import 'package:firebase_ui_auth/firebase_ui_auth.dart';
import 'package:flutter/material.dart';

import 'home.dart';

class AuthGate extends StatelessWidget {
  const AuthGate({super.key, required this.clientId});

  final String clientId;

  @override
  Widget build(BuildContext context) {
    return StreamBuilder<User?>(
      stream: FirebaseAuth.instance.authStateChanges(),
      builder: (context, snapshot) {
        if (!snapshot.hasData) {
          return SignInScreen(providers: [EmailAuthProvider()]);  // Modify this line
        }

        return const HomeScreen();
      },
    );
  }
}
The SignInScreen widget, and its providers argument, is the only code required to get all the aforementioned functionality. You should now see a sign-in screen that has ‘email' and ‘password' text inputs, as well as a ‘Sign In' button.
While functional, it lacks styling. The widget exposes parameters to customize the sign-in screen's look. For example, you might want to add your company's logo.
Customize the sign-in Screen
Header Builder
Using the SignInScreen.headerBuilder argument, you can add whatever widgets you want above the sign-in form. This widget is only displayed on narrow screens, such as mobile devices. On wide screens, you can use SignInScreen.sideBuilder, which is discussed later in this codelab.
Update the lib/auth_gate.dart file with this code:
lib/auth_gate.dart
import 'package:firebase_auth/firebase_auth.dart' hide EmailAuthProvider;
import 'package:firebase_ui_auth/firebase_ui_auth.dart';
import 'package:flutter/material.dart';

import 'home.dart';

class AuthGate extends StatelessWidget {
  const AuthGate({super.key, required this.clientId});

  final String clientId;

  @override
  Widget build(BuildContext context) {
    return StreamBuilder<User?>(
      stream: FirebaseAuth.instance.authStateChanges(),
      builder: (context, snapshot) {
        if (!snapshot.hasData) {
          return SignInScreen(                                         // Modify from here...
            providers: [EmailAuthProvider()],
            headerBuilder: (context, constraints, shrinkOffset) {
              return Padding(
                padding: const EdgeInsets.all(20),
                child: AspectRatio(
                  aspectRatio: 1,
                  child: Image.asset('assets/flutterfire_300x.png'),
                ),
              );
            },
          );                                                           // To here.
        }

        return const HomeScreen();
      },
    );
  }
}
The headerBuilder argument requires a function of the type HeaderBuilder, which is defined in the FlutterFire UI package.
typedef HeaderBuilder = Widget Function(
 BuildContext context,
 BoxConstraints constraints,
 double shrinkOffset,
);
Because it's a callback, it exposes values you could use, such as the BuildContext and BoxConstraints, and requires you return a widget. Whichever widget you return is displayed at the top of the screen. In this example, the new code adds an image to the top of the screen. Your application should now look like this.

Subtitle Builder
The sign-in screen exposes three additional parameters that allow you to customize the screen: subtitleBuilder, footerBuilder, and sideBuilder.
The subtitleBuilder is slightly different in that the callback arguments include an action, which is of type AuthAction. AuthAction is an enum that you can use to detect if the screen the user is on is the "sign in" screen or the "register" screen.
Update the code in lib/auth_gate.dart to use the subtitleBuilder.
lib/auth_gate.dart
import 'package:firebase_auth/firebase_auth.dart' hide EmailAuthProvider;
import 'package:firebase_ui_auth/firebase_ui_auth.dart';
import 'package:flutter/material.dart';

import 'home.dart';

class AuthGate extends StatelessWidget {
  const AuthGate({super.key, required this.clientId});

  final String clientId;

  @override
  Widget build(BuildContext context) {
    return StreamBuilder<User?>(
      stream: FirebaseAuth.instance.authStateChanges(),
      builder: (context, snapshot) {
        if (!snapshot.hasData) {
          return SignInScreen(
            providers: [EmailAuthProvider()],
            headerBuilder: (context, constraints, shrinkOffset) {
              return Padding(
                padding: const EdgeInsets.all(20),
                child: AspectRatio(
                  aspectRatio: 1,
                  child: Image.asset('assets/flutterfire_300x.png'),
                ),
              );
            },
            subtitleBuilder: (context, action) {                     // Add from here...
              return Padding(
                padding: const EdgeInsets.symmetric(vertical: 8.0),
                child: action == AuthAction.signIn
                    ? const Text('Welcome to FlutterFire, please sign in!')
                    : const Text('Welcome to Flutterfire, please sign up!'),
              );
            },                                                       // To here.
          );
        }

        return const HomeScreen();
      },
    );
  }
}
Footer Builder
The footerBuilder argument is the same as the subtitleBuilder. It doesn't expose BoxConstraints or shrinkOffset, as it's intended for text rather than images. You can, of course, add any widget you want.
Add a footer to your sign-in screen with this code.
lib/auth_gate.dart
import 'package:firebase_auth/firebase_auth.dart' hide EmailAuthProvider;
import 'package:firebase_ui_auth/firebase_ui_auth.dart';
import 'package:flutter/material.dart';

import 'home.dart';

class AuthGate extends StatelessWidget {
  const AuthGate({super.key, required this.clientId});

  final String clientId;

  @override
  Widget build(BuildContext context) {
    return StreamBuilder<User?>(
      stream: FirebaseAuth.instance.authStateChanges(),
      builder: (context, snapshot) {
        if (!snapshot.hasData) {
          return SignInScreen(
            providers: [EmailAuthProvider()],
            headerBuilder: (context, constraints, shrinkOffset) {
              return Padding(
                padding: const EdgeInsets.all(20),
                child: AspectRatio(
                  aspectRatio: 1,
                  child: Image.asset('assets/flutterfire_300x.png'),
                ),
              );
            },
            subtitleBuilder: (context, action) {
              return Padding(
                padding: const EdgeInsets.symmetric(vertical: 8.0),
                child: action == AuthAction.signIn
                    ? const Text('Welcome to FlutterFire, please sign in!')
                    : const Text('Welcome to Flutterfire, please sign up!'),
              );
            },
            footerBuilder: (context, action) {                       // Add from here...
              return const Padding(
                padding: EdgeInsets.only(top: 16),
                child: Text(
                  'By signing in, you agree to our terms and conditions.',
                  style: TextStyle(color: Colors.grey),
                ),
              );
            },                                                       // To here.
          );
        }

        return const HomeScreen();
      },
    );
  }
}
Side Builder
The SignInScreen.sidebuilder argument accepts a callback, and this time the arguments to that callback are BuildContext and double shrinkOffset. The widget that sideBuilder returns will be displayed to the left of the sign in form, and only on wide screens. Effectively that means the widget will only be displayed on desktop and web apps.
Internally, FlutterFire UI uses a breakpoint to determine if the header content should be shown (on tall screens, like mobile) or the side content should be shown (on wide screens, desktop or web). Specifically, if a screen is more than 800 pixels wide, the side builder content is shown, and the header content is not. If the screen is less than 800 pixels wide, the opposite is true.
Update the code in lib/auth_gate.dart to add sideBuilder widgets.
lib/auth_gate.dart
import 'package:firebase_auth/firebase_auth.dart' hide EmailAuthProvider;
import 'package:firebase_ui_auth/firebase_ui_auth.dart';
import 'package:flutter/material.dart';

import 'home.dart';

class AuthGate extends StatelessWidget {
  const AuthGate({super.key, required this.clientId});

  final String clientId;

  @override
  Widget build(BuildContext context) {
    return StreamBuilder<User?>(
      stream: FirebaseAuth.instance.authStateChanges(),
      builder: (context, snapshot) {
        if (!snapshot.hasData) {
          return SignInScreen(
            providers: [EmailAuthProvider()],
            headerBuilder: (context, constraints, shrinkOffset) {
              return Padding(
                padding: const EdgeInsets.all(20),
                child: AspectRatio(
                  aspectRatio: 1,
                  child: Image.asset('assets/flutterfire_300x.png'),
                ),
              );
            },
            subtitleBuilder: (context, action) {
              return Padding(
                padding: const EdgeInsets.symmetric(vertical: 8.0),
                child: action == AuthAction.signIn
                    ? const Text('Welcome to FlutterFire, please sign in!')
                    : const Text('Welcome to Flutterfire, please sign up!'),
              );
            },
            footerBuilder: (context, action) {
              return const Padding(
                padding: EdgeInsets.only(top: 16),
                child: Text(
                  'By signing in, you agree to our terms and conditions.',
                  style: TextStyle(color: Colors.grey),
                ),
              );
            },
            sideBuilder: (context, shrinkOffset) {                   // Add from here...
              return Padding(
                padding: const EdgeInsets.all(20),
                child: AspectRatio(
                  aspectRatio: 1,
                  child: Image.asset('assets/flutterfire_300x.png'),
                ),
              );                                                     // To here.
            },
          );
        }

        return const HomeScreen();
      },
    );
  }
}
Your app should now look like this when you expand the width of the window (if you're using Flutter web or MacOS).

Create a user
At this point, all of the code for this screen is done. Before you can sign-in, though, you need to create a User. You can do this with the "Register" screen, or you can create a user in the Firebase console.
To use the console:
- Go to the "Users" table in the Firebase console. Select ‘flutterfire-ui-codelab', or another project if you used a different name. You'll see this table:

- Click the "Add user" button.

- Enter an email address and password for the new user. This can be a fake email and password, as I've entered in the image below. That will work, but the "Forgot password" functionality won't work if you use a fake email address.

- Click "Add user"

Now, you can return to your Flutter application, and sign in a user using the sign-in page. Your app should look like this:

6. Profile Screen
FlutterFire UI also provides a ProfileScreen widget, which again, gives you a lot of functionality in a few lines of code.
Add ProfileScreen widget
Navigate to the home.dart file in your text editor. Update it with this code:
lib/home.dart
import 'package:firebase_ui_auth/firebase_ui_auth.dart';
import 'package:flutter/material.dart';

class HomeScreen extends StatelessWidget {
  const HomeScreen({super.key});

  @override
  Widget build(BuildContext context) {
    return Scaffold(
      appBar: AppBar(
        actions: [
          IconButton(
            icon: const Icon(Icons.person),
            onPressed: () {
              Navigator.push(
                context,
                MaterialPageRoute<ProfileScreen>(
                  builder: (context) => const ProfileScreen(),
                ),
              );
            },
          ),
        ],
        automaticallyImplyLeading: false,
      ),
      body: Center(
        child: Column(
          children: [
            SizedBox(width: 250, child: Image.asset('assets/dash.png')),
            Text('Welcome!', style: Theme.of(context).textTheme.displaySmall),
            const SignOutButton(),
          ],
        ),
      ),
    );
  }
}
The new code of note is the callback passed to the IconButton.isPressed method. When that IconButton is pressed, your application creates a new anonymous route and navigates to it. That route will display the ProfileScreen widget, which is returned from the MaterialPageRoute.builder callback.
Reload your app, and push the icon in the top-right (in the app bar), and it will display a page like this:
This is the standard UI provided by the FlutterFire UI page. All of the buttons and text fields are wired up to Firebase Auth, and work out of the box. For example, you can enter a name into the "Name" textfield, and FlutterFire UI will call the FirebaseAuth.instance.currentUser?.updateDisplayName method, which will save that name in Firebase.
Sign Out
Right now, if you press the "Sign out" button, the app won't change. It will sign you out, but you won't be navigated back to the AuthGate widget. To implement this, use the ProfileScreen.actions parameter.
First, update the code in home.dart.
lib/home.dart
import 'package:firebase_ui_auth/firebase_ui_auth.dart';
import 'package:flutter/material.dart';

class HomeScreen extends StatelessWidget {
  const HomeScreen({super.key});

  @override
  Widget build(BuildContext context) {
    return Scaffold(
      appBar: AppBar(
        actions: [
          IconButton(
            icon: const Icon(Icons.person),
            onPressed: () {
              Navigator.push(
                context,
                MaterialPageRoute<ProfileScreen>(
                  builder: (context) => ProfileScreen(
                    actions: [
                      SignedOutAction((context) {
                        Navigator.of(context).pop();
                      }),
                    ],
                  ),
                ),
              );
            },
          ),
        ],
        automaticallyImplyLeading: false,
      ),
      body: Center(
        child: Column(
          children: [
            SizedBox(width: 250, child: Image.asset('assets/dash.png')),
            Text('Welcome!', style: Theme.of(context).textTheme.displaySmall),
            const SignOutButton(),
          ],
        ),
      ),
    );
  }
}
Now, when you create an instance of ProfileScreen, you also pass it a list of actions to the ProfileScreen.actions argument. These actions are of the type FlutterFireUiAction. There are many different classes that are subtypes of FlutterFireUiAction, and in general you use them to tell your app to react to different auth state changes. The SignedOutAction calls a callback function that you give it when the Firebase auth state changes to the currentUser being null.
By adding a callback that calls Navigator.of(context).pop() when SignedOutAction triggers, the app will navigate to the previous page. In this example app, there is only one permanent route, which shows the Sign In screen if there isn't a user signed in, and the home page if there is a user. Because this happens when the user signs out, the app will display the Sign In screen.
Customize the Profile Page
Similar to the Sign In screen, the profile page is customizable. First, our current page has no way of navigating back to the home page once a user is on the profile page. Fix this by giving the ProfileScreen widget an AppBar.
lib/home.dart
import 'package:firebase_ui_auth/firebase_ui_auth.dart';
import 'package:flutter/material.dart';

class HomeScreen extends StatelessWidget {
  const HomeScreen({super.key});

  @override
  Widget build(BuildContext context) {
    return Scaffold(
      appBar: AppBar(
        actions: [
          IconButton(
            icon: const Icon(Icons.person),
            onPressed: () {
              Navigator.push(
                context,
                MaterialPageRoute<ProfileScreen>(
                  builder: (context) => ProfileScreen(
                    appBar: AppBar(title: const Text('User Profile')),
                    actions: [
                      SignedOutAction((context) {
                        Navigator.of(context).pop();
                      }),
                    ],
                  ),
                ),
              );
            },
          ),
        ],
        automaticallyImplyLeading: false,
      ),
      body: Center(
        child: Column(
          children: [
            SizedBox(width: 250, child: Image.asset('assets/dash.png')),
            Text('Welcome!', style: Theme.of(context).textTheme.displaySmall),
            const SignOutButton(),
          ],
        ),
      ),
    );
  }
}
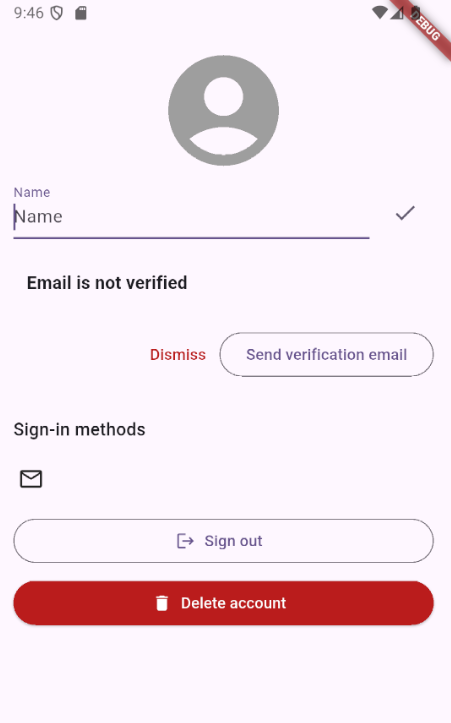
The ProfileScreen.appBar argument accepts an AppBar widget from the Flutter Material package, so it can be treated like any other AppBar you've built and passed to a Scaffold. In this example, the default functionality of automatically adding a "back" button is kept, and the screen now has a title.
Add Children to the Profile Screen
The ProfileScreen widget also has an optional argument named children. This argument accepts a list of widgets, and those widgets will be placed vertically inside of a Column widget that's already used internally to build the ProfileScreen. This Column widget in the ProfileScreen build method will place the children you pass it above the "Sign out" button.
Update the code in home.dart to show the company logo here, similar to the Sign In screen.
lib/home.dart
import 'package:firebase_ui_auth/firebase_ui_auth.dart';
import 'package:flutter/material.dart';

class HomeScreen extends StatelessWidget {
  const HomeScreen({super.key});

  @override
  Widget build(BuildContext context) {
    return Scaffold(
      appBar: AppBar(
        actions: [
          IconButton(
            icon: const Icon(Icons.person),
            onPressed: () {
              Navigator.push(
                context,
                MaterialPageRoute<ProfileScreen>(
                  builder: (context) => ProfileScreen(
                    appBar: AppBar(title: const Text('User Profile')),
                    actions: [
                      SignedOutAction((context) {
                        Navigator.of(context).pop();
                      }),
                    ],
                    children: [
                      const Divider(),
                      Padding(
                        padding: const EdgeInsets.all(2),
                        child: AspectRatio(
                          aspectRatio: 1,
                          child: Image.asset('assets/flutterfire_300x.png'),
                        ),
                      ),
                    ],
                  ),
                ),
              );
            },
          ),
        ],
        automaticallyImplyLeading: false,
      ),
      body: Center(
        child: Column(
          children: [
            SizedBox(width: 250, child: Image.asset('assets/dash.png')),
            Text('Welcome!', style: Theme.of(context).textTheme.displaySmall),
            const SignOutButton(),
          ],
        ),
      ),
    );
  }
}
Reload your app, and you'll see this on the screen:

7. Multiplatform Google Auth Sign In
FlutterFire UI also provides widgets and functionality for authenticating with 3rd party providers, such as Google, Twitter, Facebook, Apple, and GitHub.
To integrate with Google authentication, install the official firebase_ui_oauth_google plugin and its dependencies, which will handle the native authentication flow. In the terminal, navigate to the root of your Flutter project and enter the following command:
flutter pub add google_sign_in firebase_ui_oauth_google
Enable Google Sign-in Provider
Next, enable the Google provider in the Firebase Console:
- Navigate to the Authentication sign-in providers screen in the console.
- Click "Add new provider".

- Select "Google".

- Toggle the switch labeled "Enable", and press "Save".

- If a modal appears with information about downloading configuration files, click "Done".
- Confirm that the Google sign-in provider has been added.

Add Google sign-in button
With Google sign-in enabled, add the widget needed to display a stylized Google sign-in button to the sign in screen. Navigate to auth_gate.dart file and update the code to the following:
lib/auth_gate.dart
import 'package:firebase_auth/firebase_auth.dart' hide EmailAuthProvider;
import 'package:firebase_ui_auth/firebase_ui_auth.dart';
import 'package:firebase_ui_oauth_google/firebase_ui_oauth_google.dart';  // Add this import
import 'package:flutter/material.dart';

import 'home.dart';

class AuthGate extends StatelessWidget {
  const AuthGate({super.key, required this.clientId});

  final String clientId;

  @override
  Widget build(BuildContext context) {
    return StreamBuilder<User?>(
      stream: FirebaseAuth.instance.authStateChanges(),
      builder: (context, snapshot) {
        if (!snapshot.hasData) {
          return SignInScreen(
            providers: [
              EmailAuthProvider(),
              GoogleProvider(clientId: clientId),                         // Add this line
            ],
            headerBuilder: (context, constraints, shrinkOffset) {
              return Padding(
                padding: const EdgeInsets.all(20),
                child: AspectRatio(
                  aspectRatio: 1,
                  child: Image.asset('assets/flutterfire_300x.png'),
                ),
              );
            },
            subtitleBuilder: (context, action) {
              return Padding(
                padding: const EdgeInsets.symmetric(vertical: 8.0),
                child: action == AuthAction.signIn
                    ? const Text('Welcome to FlutterFire, please sign in!')
                    : const Text('Welcome to Flutterfire, please sign up!'),
              );
            },
            footerBuilder: (context, action) {
              return const Padding(
                padding: EdgeInsets.only(top: 16),
                child: Text(
                  'By signing in, you agree to our terms and conditions.',
                  style: TextStyle(color: Colors.grey),
                ),
              );
            },
            sideBuilder: (context, shrinkOffset) {
              return Padding(
                padding: const EdgeInsets.all(20),
                child: AspectRatio(
                  aspectRatio: 1,
                  child: Image.asset('assets/flutterfire_300x.png'),
                ),
              );
            },
          );
        }

        return const HomeScreen();
      },
    );
  }
}
The only new code here is the addition of GoogleProvider(clientId: "YOUR_WEBCLIENT_ID") to the SignInScreen widget configuration.
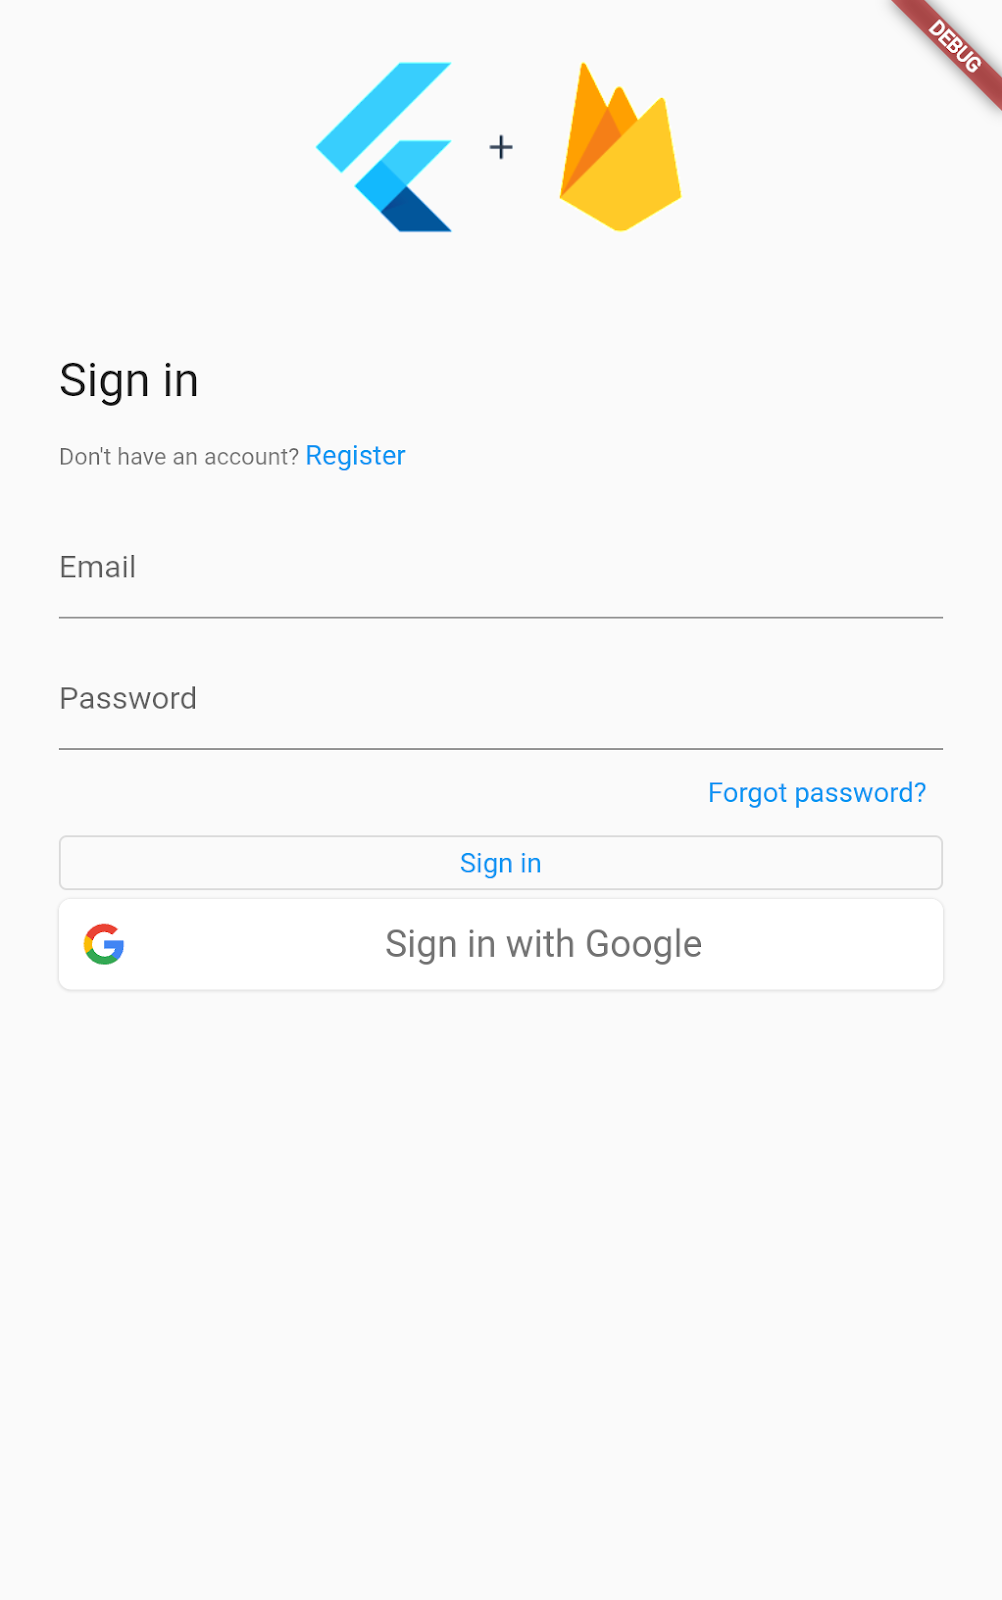
With that added, reload your app, and you will see a Google sign in button.

Configure sign-in button
The button doesn't work without additional configuration. If you're developing with Flutter Web, this is the only step you have to add for this to work. Other platforms require additional steps, which are discussed in a bit.
- Navigate to the Authentication providers page in the Firebase Console.
- Click the Google provider.

- Click the "Web SDK configuration" expansion-panel.
- Copy the value from "Web client ID".

- Return to your text editor, and update the instance of
GoogleProviderin the fileauth_gate.dartby passing this ID to theclientIdnamed parameter.
GoogleProvider(
   clientId: "YOUR_WEBCLIENT_ID"
)
Once the web client ID is entered, reload your app. When you press the "Sign in with Google" button, a new window will appear, if you're using web, that walks you through the Google sign in flow. Initially, it looks like this:

Configure iOS
In order for this to work on iOS, there is an additional configuration process.
- Navigate to the Project Settings screen in the Firebase console. There will be a card that lists your Firebase apps that looks like this:

- Select iOS. Note that your application name will be different from the one shown in the screenshot. Where the screenshot says "complete" yours will say "start", if you used the
flutter-codelabs/firebase-auth-flutterfire-ui/startproject to follow along with this codelab. - Click the button that says
GoogleServices-Info.plistto download the configuration file needed.
- Drag the downloaded file to the directory called
/ios/Runnerin your Flutter project. - Open Xcode by running the following terminal command from the root of your project:
open ios/Runner.xcworkspace - Right-click on the Runner directory and select Add Files to "Runner".

- Select
GoogleService-Info.plistfrom the file manager. - Back in your text editor (that isn't Xcode), add the
CFBundleURLTypesattributes below into theios/Runner/Info.plistfile. Make sure to replaceREVERSE_CLIENT_IDwith the one copied fromGoogleService-Info.plist.<!-- Put me in the [my_project]/ios/Runner/Info.plist file --> <!-- Google Sign-in Section --> <key>CFBundleURLTypes</key> <array> <dict> <key>CFBundleTypeRole</key> <string>Editor</string> <key>CFBundleURLSchemes</key> <array> <!-- TODO Replace this value: --> <!-- Copied from GoogleService-Info.plist key REVERSED_CLIENT_ID --> <string>REVERSE_CLIENT_ID</string> </array> </dict> </array> <!-- End of the Google Sign-in Section --> - Run the command
flutterfire configureagain to update thefirebase_options.dartfile. If the CLI asks if you want to reuse the existingfirebase.jsonfile, select yes. - You need to replace the
GoogleProvider.clientIdthat you added in the web setup with the Client Id associated with your Firebase iOS client ID. First, you can find this ID in thefirebase_options.dartfile, as part of theiOSconstant. Copy the value passed toiOSClientId.static const FirebaseOptions ios = FirebaseOptions( apiKey: 'YOUR API KEY', appId: 'YOUR APP ID', messagingSenderId: '', projectId: 'PROJECT_ID', storageBucket: 'PROJECT_ID.firebasestorage.app', iosClientId: 'IOS CLIENT ID', // Find your iOS client Id here. iosBundleId: 'com.example.BUNDLE', ); - Paste that value into the
clientIdvariable in thelib/main.dartfile.
lib/main.dart
import 'package:firebase_core/firebase_core.dart';
import 'package:flutter/material.dart';

import 'app.dart';
import 'firebase_options.dart';

const clientId = 'YOUR_CLIENT_ID'; // Replace this value with your iosClientId.

void main() async {
  WidgetsFlutterBinding.ensureInitialized();
  await Firebase.initializeApp(options: DefaultFirebaseOptions.currentPlatform);

  runApp(const MyApp(clientId: clientId));
}
If your Flutter app is running in iOS already, you have to shut it down completely and then re-run the application. Otherwise, run the app in iOS.
Configure Android
To use Google Sign-in on Android, you first have to register your app's SHA-1 fingerprint in your Firebase project.
- Navigate to the
androiddirectory in your project and run the following command to generate the signing report for your app:
./gradlew signingReport
- After the command completes, you will see a list of variants and their signing information. Look for the SHA-1 key under the
debugvariant and copy it.

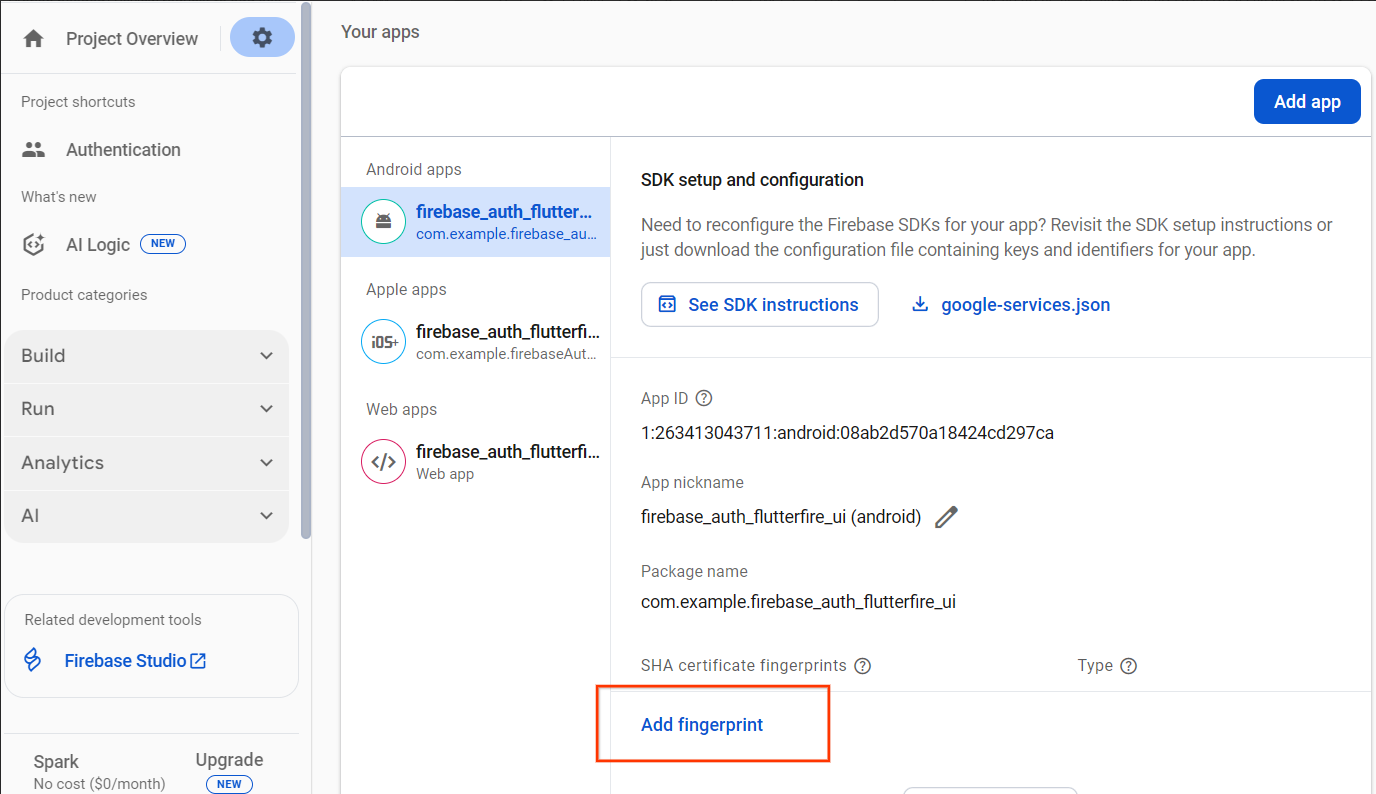
- Navigate to the Project Settings screen in the Firebase console and select your Android app. Click the
Add fingerprintbutton and register the SHA-1 key you copied.
8. Congratulations!
You have completed the Firebase Auth UI for Flutter codelab . You can find the completed code for this Codelab in the firebase-auth-flutterfire-ui/complete directory on GitHub.
What we've covered
- Setting up a Flutter app to use Firebase
- Setting up a Firebase project in the Firebase console
- FlutterFire CLI
- Firebase CLI
- Using Firebase Authentication
- Using FlutterFire UI to handle Firebase auth in your Flutter app
Next Steps
- Learn more about using Firestore and Authentication in Flutter: Get to know Firebase for Flutter Codelab
- Explore other Firebase tools for building your Flutter application:
Learn more
- Firebase site: firebase.google.com
- Flutter site: flutter.dev
- FlutterFire Firebase Flutter widgets: firebase.flutter.dev
- Firebase YouTube channel
- Flutter YouTube channel
Sparky is here to celebrate with you!
