1. לפני שמתחילים
כלים ל-backend ללא שרת (serverless) כמו Cloud Firestore ו-Cloud Functions הם קלים מאוד לשימוש, אבל יכול להיות שיהיה קשה לבדוק אותם. חבילת הכלים לאמולטור מקומי ב-Firebase מאפשרת להריץ גרסאות מקומיות של השירותים האלה במחשב הפיתוח, כדי שתוכלו לפתח את האפליקציה במהירות ובצורה בטוחה.
דרישות מוקדמות
- כלי עריכה פשוט כמו Visual Studio Code, Atom או Sublime Text
- Node.js 10.0.0 ואילך (כדי להתקין את Node.js, משתמשים ב-nvm, כדי לבדוק את הגרסה, מריצים את
node --version) - Java 7 ואילך (כדי להתקין Java פועלים לפי ההוראות האלה, כדי לבדוק את הגרסה, מריצים את הפקודה
java -version)
מה עושים
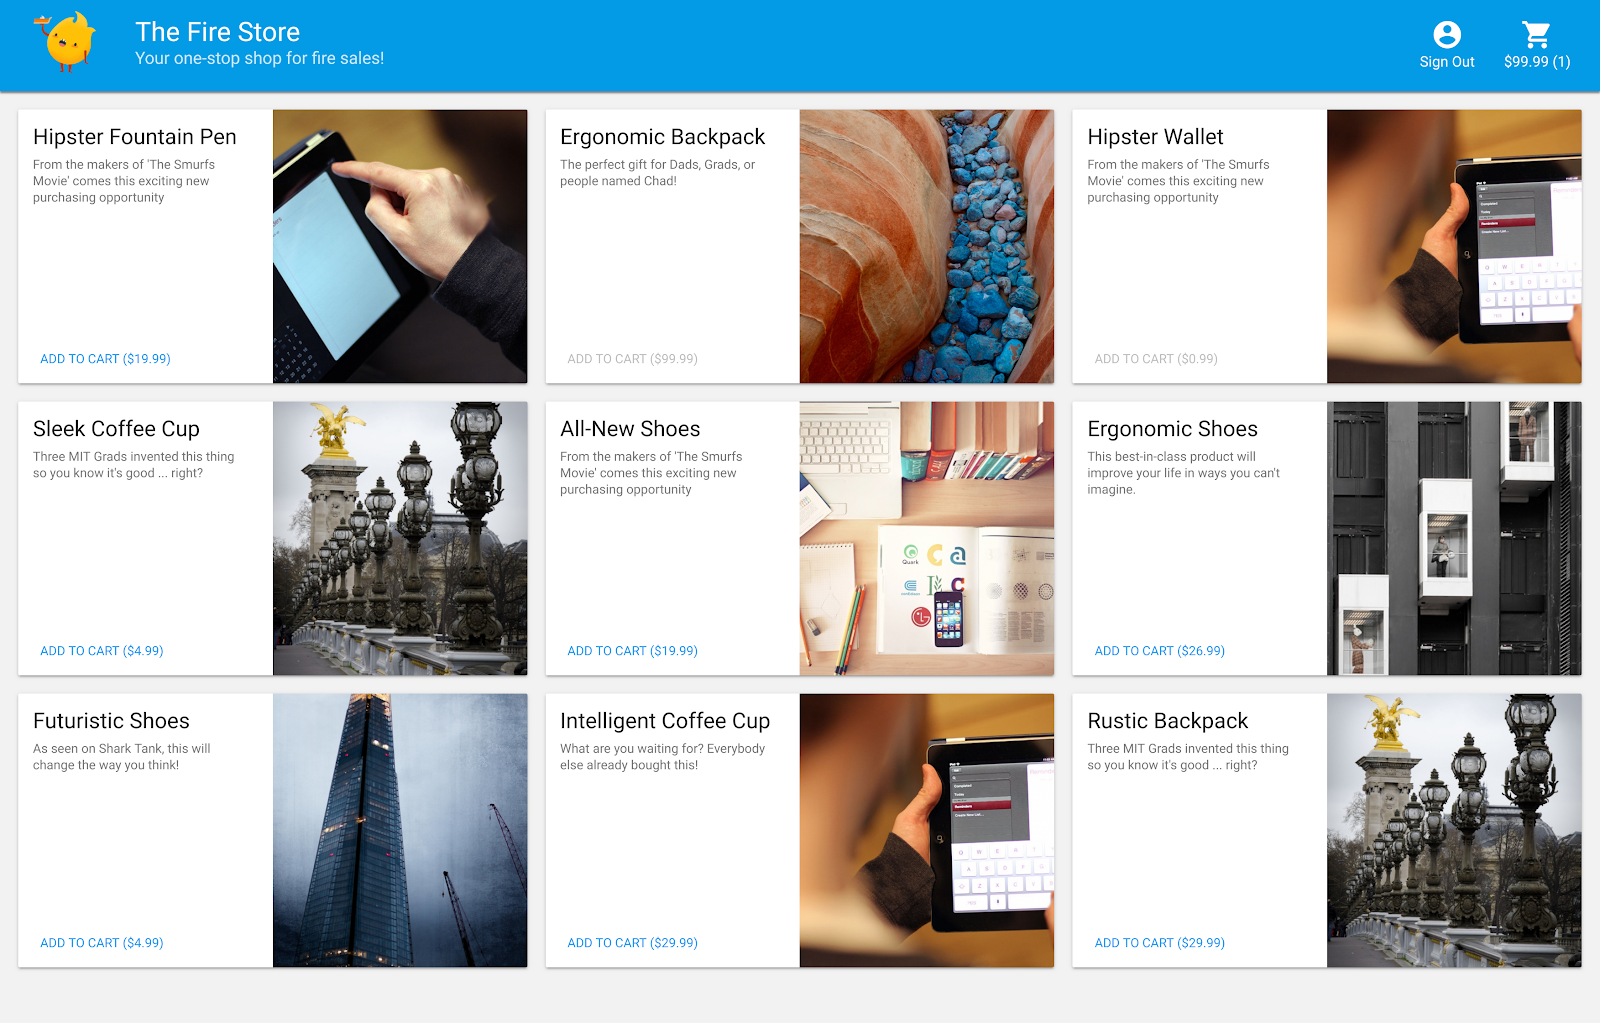
ב-codelab הזה תפעילו ותנפו באגים באפליקציית קניות פשוטה באינטרנט שמבוססת על כמה שירותי Firebase:
- Cloud Firestore: מסד נתונים ב-NoSQL ללא שרת, עם יכולות בזמן אמת, שניתן להרחבה גלובלית.
- Cloud Functions: קוד קצה עורפי ללא שרת שפועל בתגובה לאירועים או לבקשות HTTP.
- אימות ב-Firebase: שירות אימות מנוהל שמשתלב עם מוצרים אחרים של Firebase.
- אירוח ב-Firebase: אירוח מהיר ומאובטח של אפליקציות אינטרנט.
תחברו את האפליקציה ל-Emulator Suite כדי להפעיל פיתוח מקומי.
בנוסף, תלמדו איך:
- איך לקשר את האפליקציה ל-Emulator Suite ואיך האמולטורים השונים מקושרים.
- איך פועלים כללי האבטחה של Firebase ואיך בודקים את כללי האבטחה של Firestore באמצעות אמולטור מקומי.
- איך כותבים פונקציית Firebase שמופעלת על ידי אירועי Firestore, ואיך כותבים בדיקות שילוב שמופעלות מול Emulator Suite.
2. הגדרה
קבלת קוד המקור
ב-codelab הזה מתחילים עם גרסה כמעט מלאה של הדוגמה The Fire Store, ולכן הדבר הראשון שצריך לעשות הוא לשכפל את קוד המקור:
$ git clone https://github.com/firebase/emulators-codelab.git
אחר כך עוברים לספריית ה-codelab, שבה תעבדו עד סוף ה-codelab הזה:
$ cd emulators-codelab/codelab-initial-state
עכשיו מתקינים את יחסי התלות כדי להריץ את הקוד. אם החיבור לאינטרנט איטי, יכול להיות שהפעולה תימשך דקה או שתיים:
# Move into the functions directory
$ cd functions

# Install dependencies
$ npm install

# Move back into the previous directory
$ cd ../
קבלת Firebase CLI
חבילת הכלים לאמולטור היא חלק מ-Firebase CLI (ממשק שורת הפקודה), שאפשר להתקין במחשב באמצעות הפקודה הבאה:
$ npm install -g firebase-tools
לאחר מכן, מוודאים שמותקנת הגרסה העדכנית של ה-CLI. ה-codelab הזה אמור לפעול עם גרסה 9.0.0 ומעלה, אבל גרסאות מאוחרות יותר כוללות יותר תיקוני באגים.
$ firebase --version
9.6.0
קישור לפרויקט Firebase
יצירת פרויקט Firebase
- נכנסים למסוף Firebase באמצעות חשבון Google.
- לוחצים על הלחצן כדי ליצור פרויקט חדש, ואז מזינים שם לפרויקט (לדוגמה,
Emulators Codelab).
- לוחצים על המשך.
- אם מוצגת בקשה לעשות זאת, קוראים ומאשרים את התנאים של Firebase, ואז לוחצים על המשך.
- (אופציונלי) מפעילים את העזרה מבוססת-AI במסוף Firebase (שנקראת Gemini ב-Firebase).
- ב-codelab הזה לא צריך להשתמש ב-Google Analytics, ולכן משביתים את האפשרות Google Analytics.
- לוחצים על יצירת פרויקט, מחכים שהפרויקט יוקצה ולוחצים על המשך.
קישור הקוד לפרויקט Firebase
עכשיו צריך לקשר את הקוד הזה לפרויקט Firebase. קודם מריצים את הפקודה הבאה כדי להיכנס ל-Firebase CLI:
$ firebase login
לאחר מכן מריצים את הפקודה הבאה כדי ליצור כינוי לפרויקט. מחליפים את $YOUR_PROJECT_ID במזהה פרויקט Firebase.
$ firebase use $YOUR_PROJECT_ID
עכשיו אפשר להפעיל את האפליקציה.
3. הפעלת האמולטורים
בקטע הזה מפעילים את האפליקציה באופן מקומי. המשמעות היא שהגיע הזמן להפעיל את חבילת האמולטורים.
הפעלת האמולטורים
מתוך ספריית המקור של ה-codelab, מריצים את הפקודה הבאה כדי להפעיל את האמולטורים:
$ firebase emulators:start --import=./seed
הפלט אמור להיראות כך:
$ firebase emulators:start --import=./seed
i  emulators: Starting emulators: auth, functions, firestore, hosting
⚠  functions: The following emulators are not running, calls to these services from the Functions emulator will affect production: database, pubsub
i  firestore: Importing data from /Users/samstern/Projects/emulators-codelab/codelab-initial-state/seed/firestore_export/firestore_export.overall_export_metadata
i  firestore: Firestore Emulator logging to firestore-debug.log
i  hosting: Serving hosting files from: public
✔  hosting: Local server: http://127.0.0.1:5000
i  ui: Emulator UI logging to ui-debug.log
i  functions: Watching "/Users/samstern/Projects/emulators-codelab/codelab-initial-state/functions" for Cloud Functions...
✔  functions[calculateCart]: firestore function initialized.

┌─────────────────────────────────────────────────────────────┐
│ ✔  All emulators ready! It is now safe to connect your app. │
│ i  View Emulator UI at http://127.0.0.1:4000                │
└─────────────────────────────────────────────────────────────┘

┌────────────────┬────────────────┬─────────────────────────────────┐
│ Emulator       │ Host:Port      │ View in Emulator UI             │
├────────────────┼────────────────┼─────────────────────────────────┤
│ Authentication │ 127.0.0.1:9099 │ http://127.0.0.1:4000/auth      │
├────────────────┼────────────────┼─────────────────────────────────┤
│ Functions      │ 127.0.0.1:5001 │ http://127.0.0.1:4000/functions │
├────────────────┼────────────────┼─────────────────────────────────┤
│ Firestore      │ 127.0.0.1:8080 │ http://127.0.0.1:4000/firestore │
├────────────────┼────────────────┼─────────────────────────────────┤
│ Hosting        │ 127.0.0.1:5000 │ n/a                             │
└────────────────┴────────────────┴─────────────────────────────────┘
  Emulator Hub running at 127.0.0.1:4400
  Other reserved ports: 4500

Issues? Report them at https://github.com/firebase/firebase-tools/issues and attach the *-debug.log files.
אחרי שמופיעה ההודעה All emulators started, האפליקציה מוכנה לשימוש.
חיבור אפליקציית האינטרנט לאמולטורים
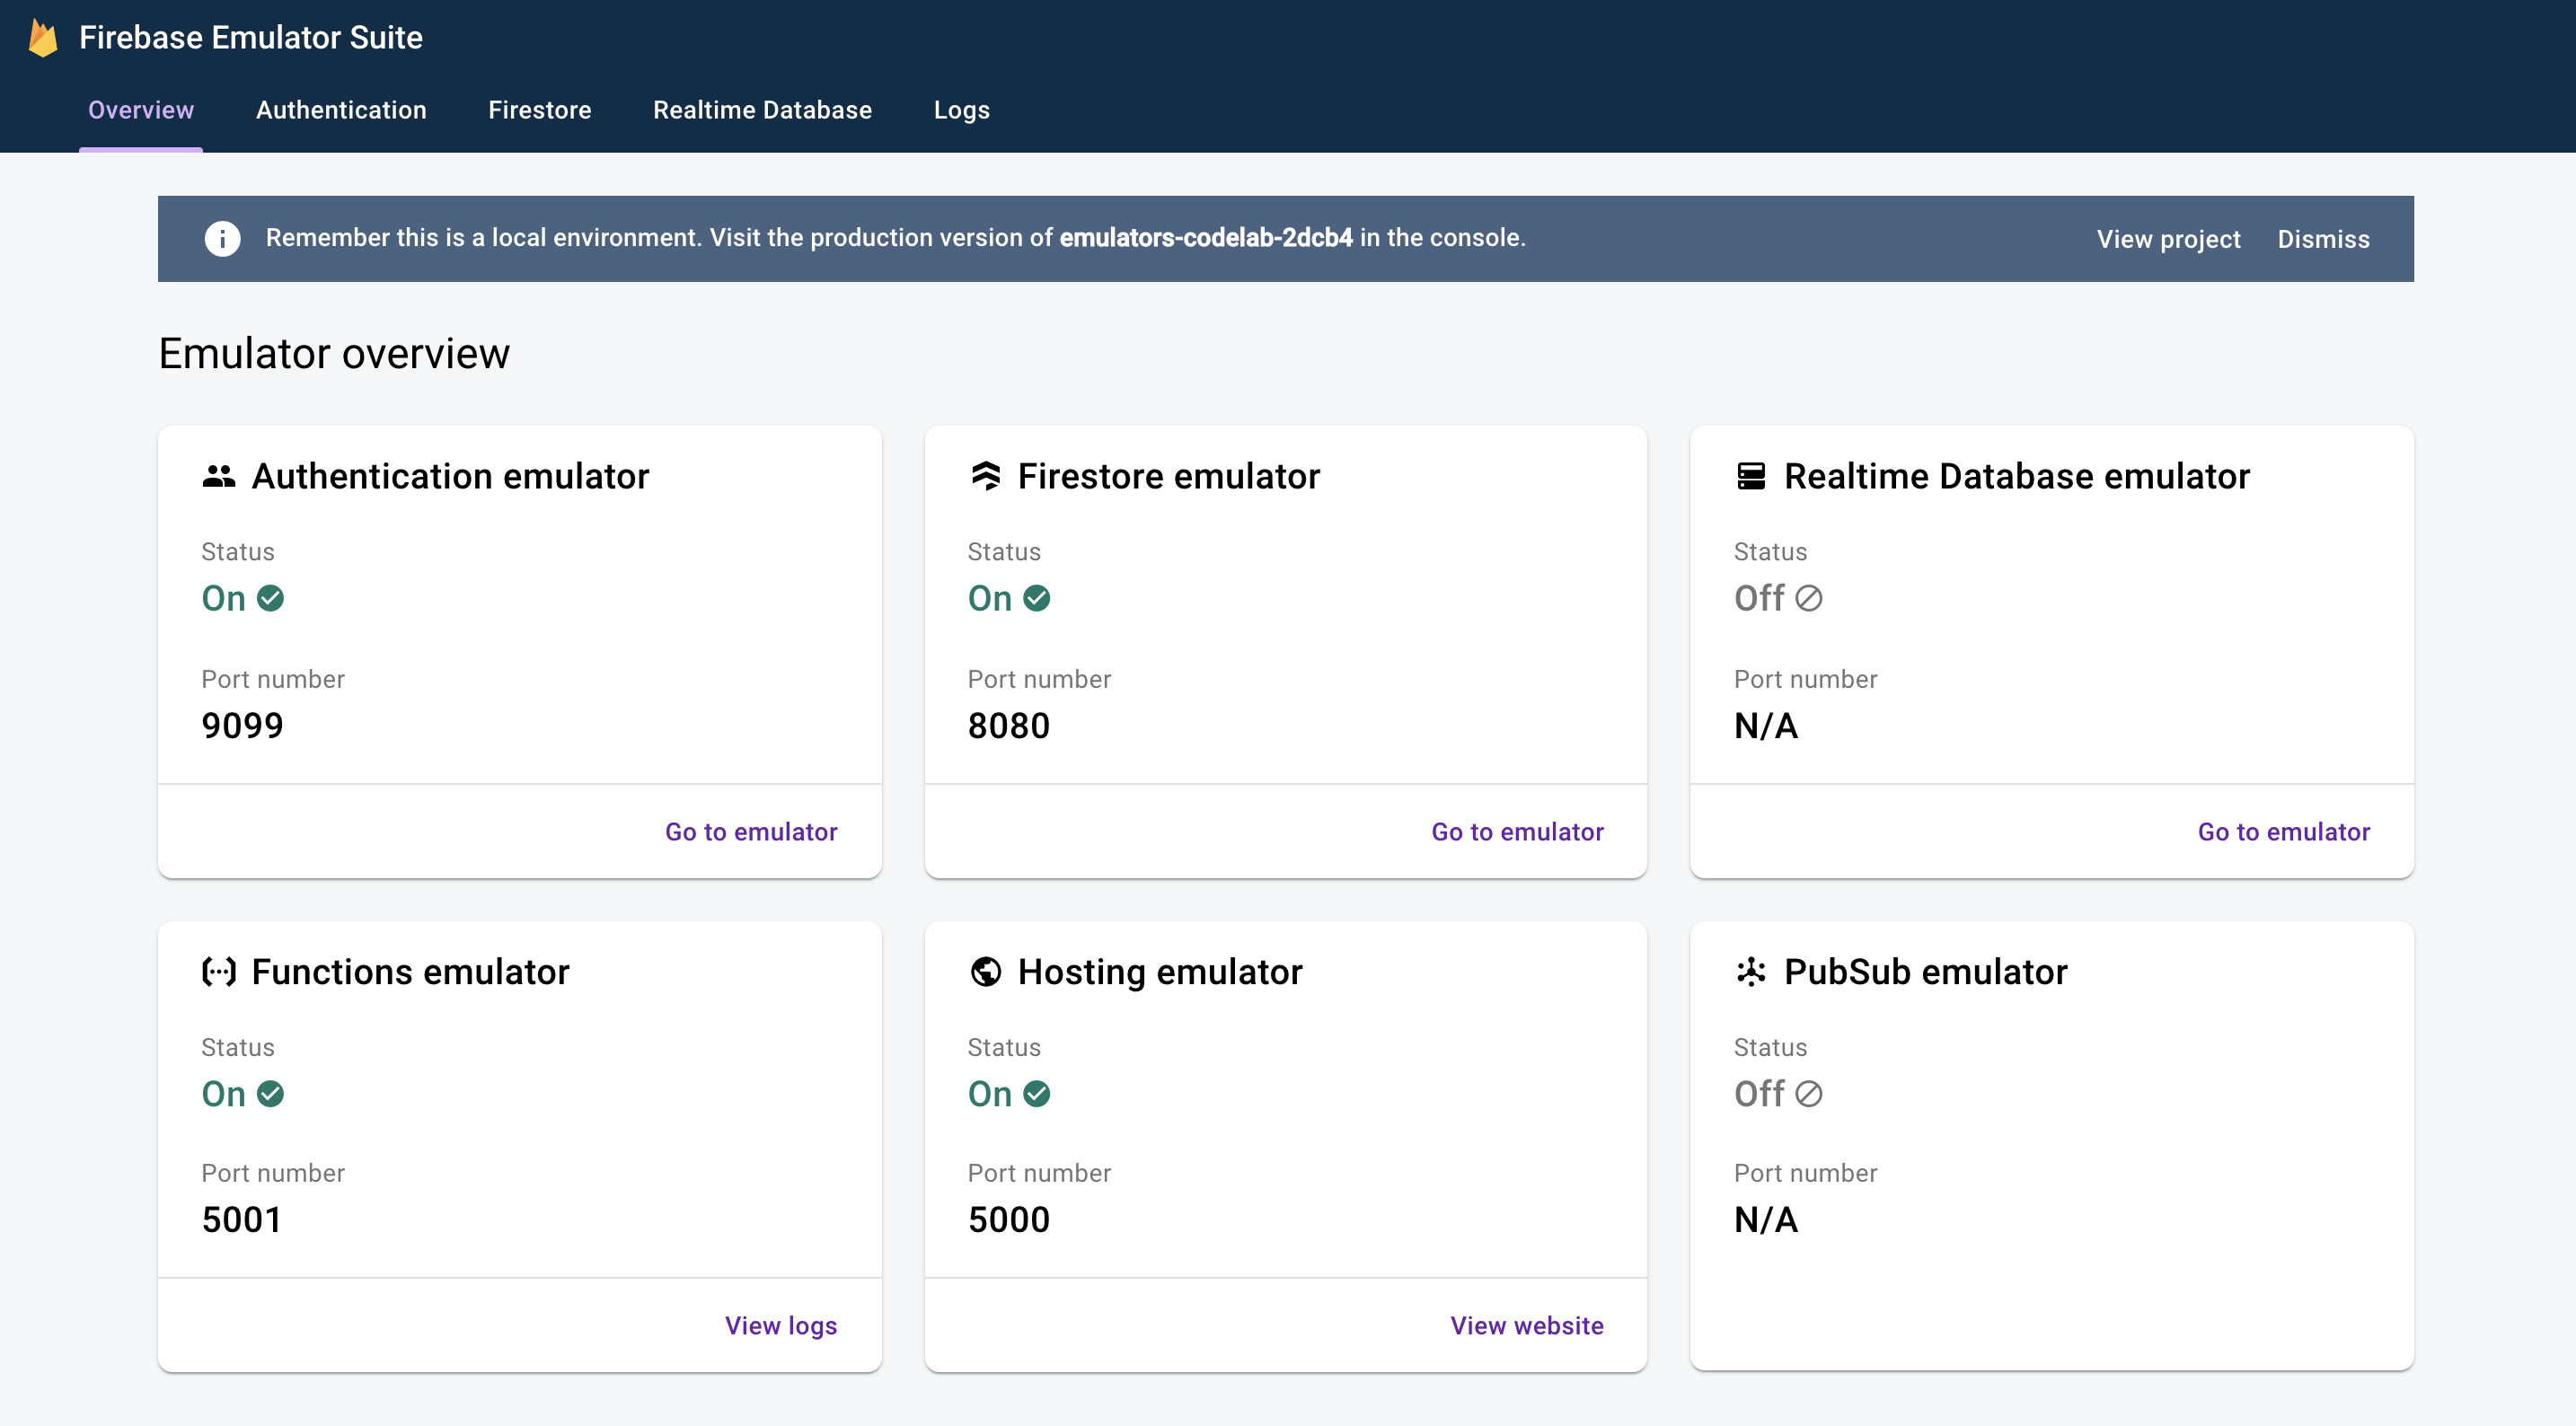
על סמך הטבלה ביומנים, אפשר לראות שאמולטור Cloud Firestore מאזין ליציאה 8080 ואמולטור האימות מאזין ליציאה 9099.
┌────────────────┬────────────────┬─────────────────────────────────┐
│ Emulator       │ Host:Port      │ View in Emulator UI             │
├────────────────┼────────────────┼─────────────────────────────────┤
│ Authentication │ 127.0.0.1:9099 │ http://127.0.0.1:4000/auth      │
├────────────────┼────────────────┼─────────────────────────────────┤
│ Functions      │ 127.0.0.1:5001 │ http://127.0.0.1:4000/functions │
├────────────────┼────────────────┼─────────────────────────────────┤
│ Firestore      │ 127.0.0.1:8080 │ http://127.0.0.1:4000/firestore │
├────────────────┼────────────────┼─────────────────────────────────┤
│ Hosting        │ 127.0.0.1:5000 │ n/a                             │
└────────────────┴────────────────┴─────────────────────────────────┘
במקום להתחבר לסביבת הייצור, נתחבר לאמולטור עם קוד ה-frontend. פותחים את הקובץ public/js/homepage.js ומחפשים את הפונקציה onDocumentReady. אנחנו רואים שהקוד ניגש למופעים הרגילים של Firestore ו-Auth:
public/js/homepage.js
  const auth = firebaseApp.auth();
  const db = firebaseApp.firestore();
צריך לעדכן את האובייקטים db ו-auth כך שיצביעו על האמולטורים המקומיים:
public/js/homepage.js
  const auth = firebaseApp.auth();
  const db = firebaseApp.firestore();

  // ADD THESE LINES
  if (location.hostname === "127.0.0.1") {
    console.log("127.0.0.1 detected!");
    auth.useEmulator("http://127.0.0.1:9099");
    db.useEmulator("127.0.0.1", 8080);
  }
עכשיו, כשהאפליקציה פועלת במחשב המקומי (מוגשת על ידי אמולטור האירוח), לקוח Firestore מצביע גם על האמולטור המקומי ולא על מסד נתונים של ייצור.
פתיחת ממשק המשתמש של האמולטור
בדפדפן האינטרנט, עוברים לכתובת http://127.0.0.1:4000/. אמור להופיע ממשק המשתמש של Emulator Suite.
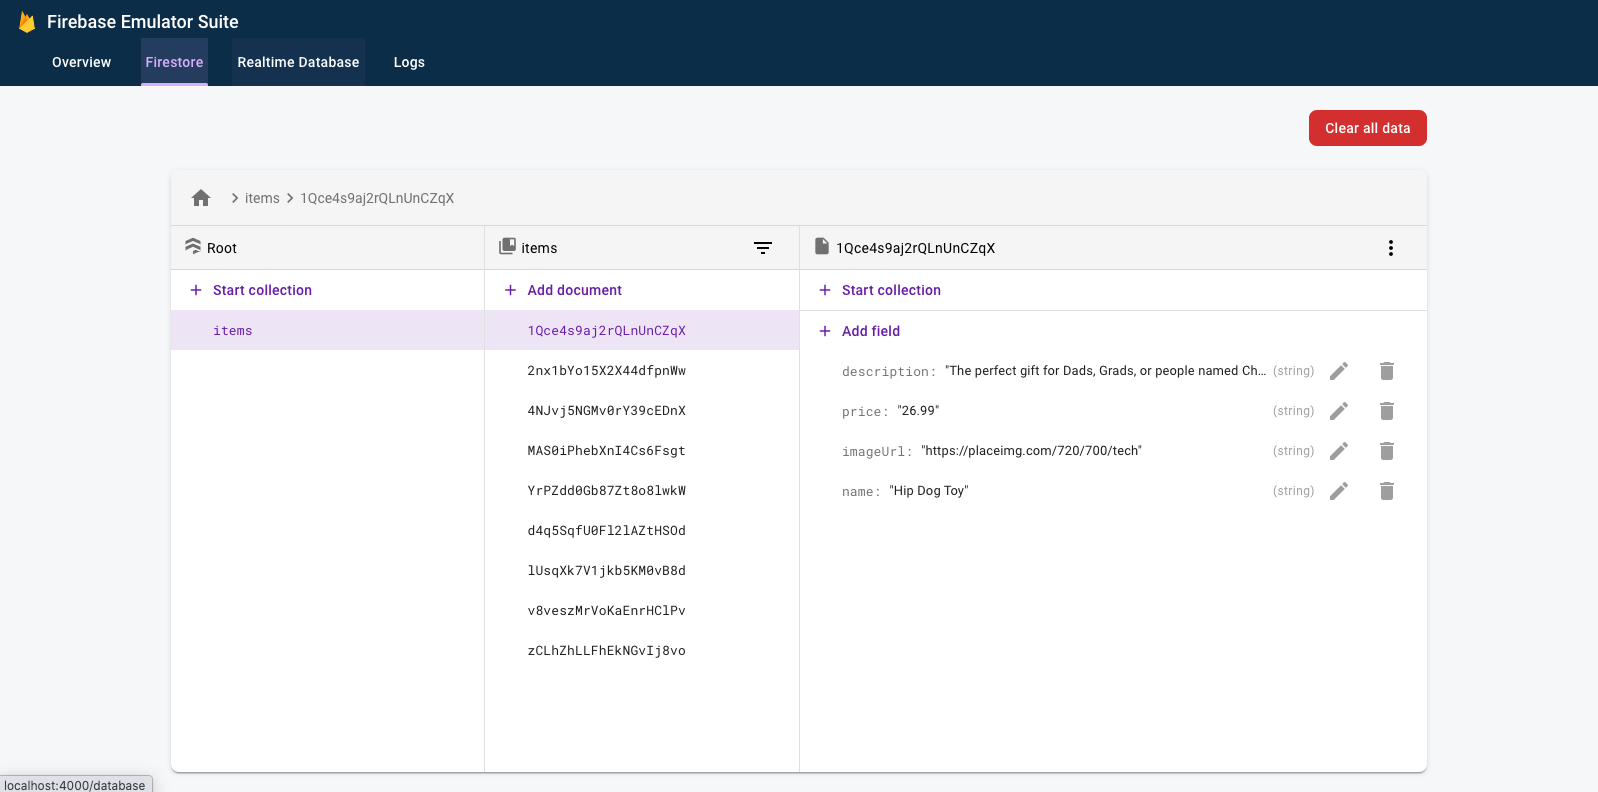
לוחצים כדי לראות את ממשק המשתמש של אמולטור Firestore. האוסף items כבר מכיל נתונים בגלל הנתונים שיובאו באמצעות הדגל --import.
4. הפעלת האפליקציה
פתיחת האפליקציה
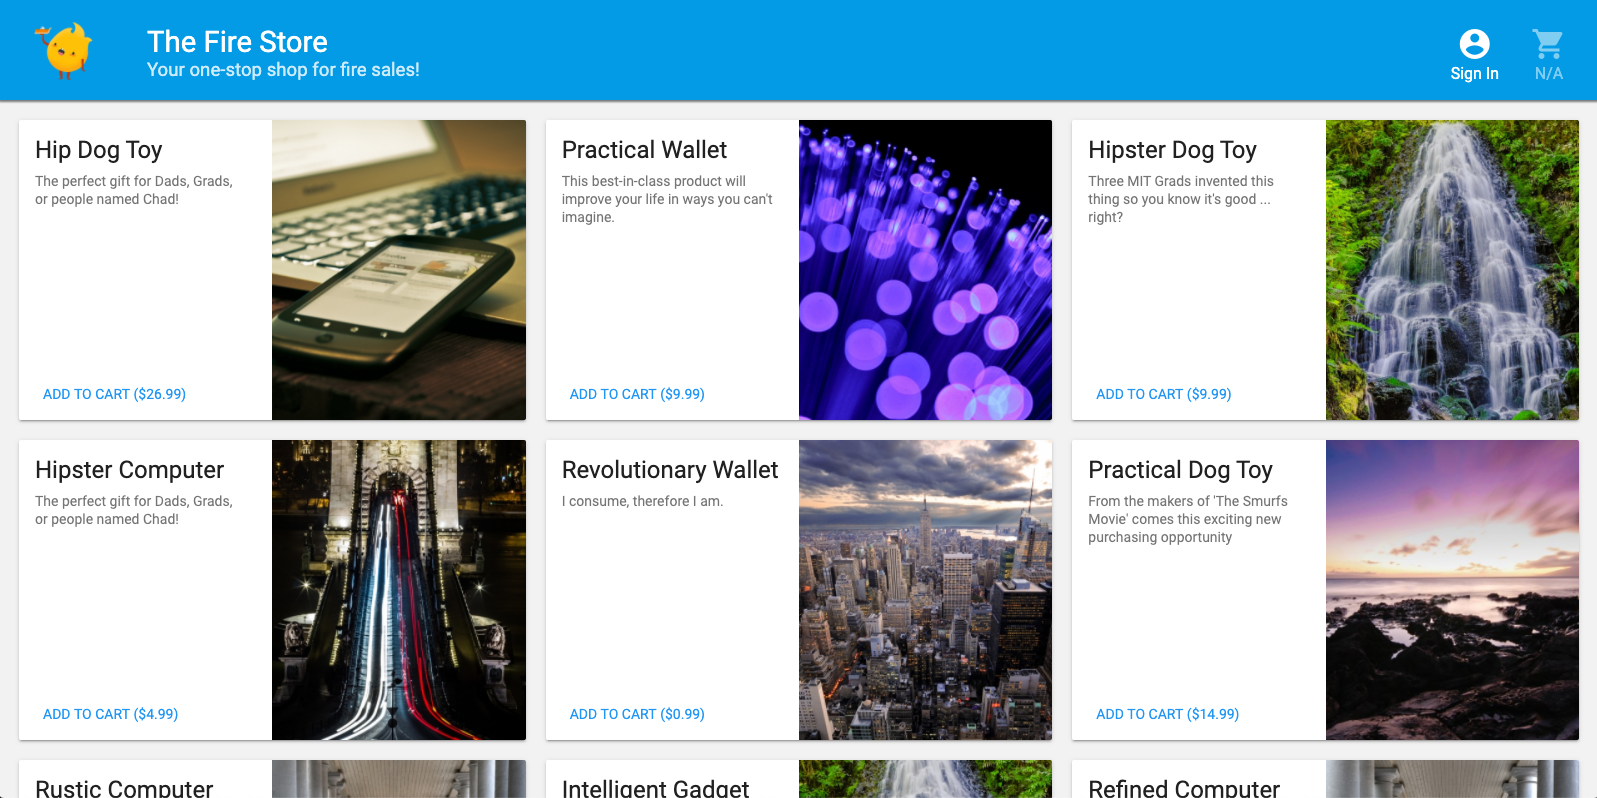
בדפדפן האינטרנט, עוברים אל http://127.0.0.1:5000. אמור להופיע הכיתוב The Fire Store running locally on your machine! (חנות Fire פועלת באופן מקומי במחשב שלך).
שימוש באפליקציה
בוחרים פריט בדף הבית ולוחצים על הוספה לעגלת הקניות. לצערנו, תיתקלו בשגיאה הבאה:

בוא נתקן את הבאג הזה! מכיוון שהכול פועל באמולטורים, אפשר להתנסות בלי לדאוג להשפיע על נתונים אמיתיים.
5. ניפוי באגים באפליקציה
מציאת הבאג
בואו נבדוק במסוף למפתחים של Chrome. מקישים על Control+Shift+J (Windows, Linux, ChromeOS) או על Command+Option+J (Mac) כדי לראות את השגיאה במסוף:

נראה שהייתה שגיאה כלשהי בשיטה addToCart. בואו נבדוק את זה. איפה אנחנו מנסים לגשת למשהו שנקרא uid בשיטה הזו, ולמה זה יכול להיות null? בשלב הזה, המתודה נראית כך ב-public/js/homepage.js:
public/js/homepage.js
  addToCart(id, itemData) {
    console.log("addToCart", id, JSON.stringify(itemData));
    return this.db
      .collection("carts")
      .doc(this.auth.currentUser.uid)
      .collection("items")
      .doc(id)
      .set(itemData);
  }
אהה! לא מחוברים לאפליקציה. לפי המסמכים של Firebase Authentication, כשלא מחוברים לחשבון, הערך של auth.currentUser הוא null. נוסיף בדיקה לזה:
public/js/homepage.js
  addToCart(id, itemData) {
    // ADD THESE LINES
    if (this.auth.currentUser === null) {
      this.showError("You must be signed in!");
      return;
    }

    // ...
  }
בדיקת האפליקציה
עכשיו מרעננים את הדף ולוחצים על הוספה לעגלת הקניות. הפעם אמורה להופיע שגיאה ברורה יותר:
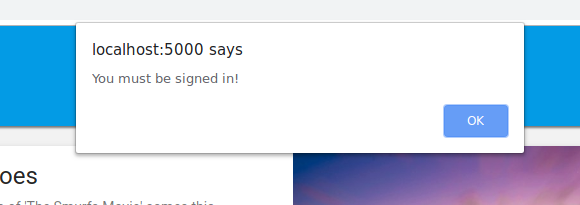
אבל אם לוחצים על כניסה בסרגל הכלים העליון ואז לוחצים שוב על הוספה לעגלת הקניות, אפשר לראות שעגלת הקניות מתעדכנת.
עם זאת, נראה שהמספרים לא נכונים בכלל:

אל דאגה, נתקן את הבאג הזה בקרוב. קודם כול, נסביר מה קורה כשמוסיפים פריט לעגלת הקניות.
6. טריגרים של פונקציות מקומיות
לחיצה על הוספה לעגלת הקניות מפעילה שרשרת של אירועים שכוללים כמה אמולטורים. בלוגים של Firebase CLI, אמורות להופיע הודעות כמו אלה שבהמשך אחרי שמוסיפים פריט לעגלת הקניות:
i  functions: Beginning execution of "calculateCart"
i  functions: Finished "calculateCart" in ~1s
התרחשו ארבעה אירועים מרכזיים שיצרו את היומנים האלה ואת עדכון ממשק המשתמש שראיתם:
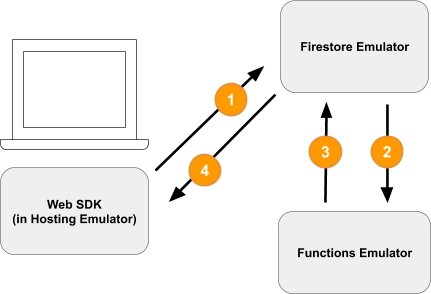
1) Firestore Write - Client
מסמך חדש נוסף לאוסף Firestore /carts/{cartId}/items/{itemId}/. אפשר לראות את הקוד הזה בפונקציה addToCart בתוך public/js/homepage.js:
public/js/homepage.js
  addToCart(id, itemData) {
    // ...
    console.log("addToCart", id, JSON.stringify(itemData));
    return this.db
      .collection("carts")
      .doc(this.auth.currentUser.uid)
      .collection("items")
      .doc(id)
      .set(itemData);
  }
2) Cloud Function Triggered
פונקציית Cloud calculateCart מאזינה לאירועי כתיבה (יצירה, עדכון או מחיקה) שמתרחשים בפריטים בעגלת הקניות באמצעות הטריגר onWrite, שמופיע ב-functions/index.js:
functions/index.js
exports.calculateCart = functions.firestore
    .document("carts/{cartId}/items/{itemId}")
    .onWrite(async (change, context) => {
      try {
        let totalPrice = 125.98;
        let itemCount = 8;

        const cartRef = db.collection("carts").doc(context.params.cartId);

        await cartRef.update({
          totalPrice,
          itemCount
        });
      } catch(err) {
      }
    }
);
3) Firestore Write - Admin
הפונקציה calculateCart קוראת את כל הפריטים בעגלת הקניות, מחשבת את הכמות והמחיר הכוללים ומעדכנת את המסמך cart עם הסכומים החדשים (ראו cartRef.update(...) למעלה).
4) קריאה מ-Firestore – לקוח
ממשק הקצה של האתר רשום לקבלת עדכונים על שינויים בעגלת הקניות. העדכון מתבצע בזמן אמת אחרי שפונקציית Cloud כותבת את הסכומים החדשים ומעדכנת את ממשק המשתמש, כמו שרואים באיור public/js/homepage.js:
public/js/homepage.js
this.cartUnsub = cartRef.onSnapshot(cart => {
   // The cart document was changed, update the UI
   // ...
});
סיכום
כל הכבוד! הרגע הגדרתם אפליקציה מקומית לחלוטין שמשתמשת בשלושה אמולטורים שונים של Firebase לבדיקה מקומית לחלוטין.

רק רגע, יש עוד! בקטע הבא מוסבר:
- איך כותבים בדיקות יחידה שמשתמשות באמולטורים של Firebase.
- איך משתמשים באמולטורים של Firebase כדי לנפות באגים בכללי האבטחה.
7. יצירת כללי אבטחה שמותאמים לאפליקציה
אפליקציית האינטרנט שלנו קוראת וכותבת נתונים, אבל עד עכשיו לא דאגנו לאבטחה. ב-Cloud Firestore נעשה שימוש במערכת שנקראת 'כללי אבטחה' כדי להצהיר למי יש גישה לקריאה ולכתיבה של נתונים. הכלי Emulator Suite הוא דרך מצוינת ליצור אב טיפוס של הכללים האלה.
בכלי העריכה, פותחים את הקובץ emulators-codelab/codelab-initial-state/firestore.rules. אפשר לראות שיש שלושה קטעים עיקריים בכללים שלנו:
rules_version = '2';
service cloud.firestore {
  match /databases/{database}/documents {
    // User's cart metadata
    match /carts/{cartID} {
      // TODO: Change these! Anyone can read or write.
      allow read, write: if true;
    }

    // Items inside the user's cart
    match /carts/{cartID}/items/{itemID} {
      // TODO: Change these! Anyone can read or write.
      allow read, write: if true;
    }

    // All items available in the store. Users can read
    // items but never write them.
    match /items/{itemID} {
      allow read: if true;
    }
  }
}
כרגע כל אחד יכול לקרוא ולכתוב נתונים במסד הנתונים שלנו. אנחנו רוצים לוודא שרק פעולות תקינות יתבצעו ושלא נחשוף מידע רגיש.
במהלך ה-codelab הזה, בהתאם לעיקרון של הרשאות מינימליות, ננעל את כל המסמכים ונוסיף גישה בהדרגה עד שלכל המשתמשים תהיה גישה לכל מה שהם צריכים, אבל לא יותר מזה. נעדכן את שני הכללים הראשונים כדי לדחות את הגישה על ידי הגדרת התנאי ל-false:
rules_version = '2';
service cloud.firestore {
  match /databases/{database}/documents {
    // User's cart metadata
    match /carts/{cartID} {
      // UPDATE THIS LINE
      allow read, write: if false;
    }

    // Items inside the user's cart
    match /carts/{cartID}/items/{itemID} {
      // UPDATE THIS LINE
      allow read, write: if false;
    }

    // All items available in the store. Users can read
    // items but never write them.
    match /items/{itemID} {
      allow read: if true;
    }
  }
}
8. הפעלת האמולטורים והבדיקות
הפעלת האמולטורים
בשורה של הפקודה, מוודאים שאתם נמצאים ב-emulators-codelab/codelab-initial-state/. יכול להיות שהאמולטורים עדיין פועלים מהשלבים הקודמים. אם לא, מפעילים מחדש את האמולטורים:
$ firebase emulators:start --import=./seed
אחרי שהאמולטורים פועלים, אפשר להריץ בדיקות באופן מקומי מולם.
הרצת הבדיקות
בשורת הפקודה בכרטיסייה חדשה בטרמינל מהספרייה emulators-codelab/codelab-initial-state/
קודם עוברים לספריית הפונקציות (נישאר כאן למשך שאר ההדרכה):
$ cd functions
עכשיו מריצים את בדיקות mocha בספריית הפונקציות וגוללים לחלק העליון של הפלט:
# Run the tests
$ npm test

> functions@ test .../emulators-codelab/codelab-initial-state/functions
> mocha

  shopping carts
    1) can be created and updated by the cart owner
    2) can be read only by the cart owner

  shopping cart items
    3) can be read only by the cart owner
    4) can be added only by the cart owner

  adding an item to the cart recalculates the cart total.
    - should sum the cost of their items


  0 passing (364ms)
  1 pending
  4 failing
יש לנו כרגע ארבעה כשלים. בזמן שיוצרים את קובץ הכללים, אפשר לעקוב אחרי ההתקדמות על ידי צפייה ביותר בדיקות שעוברות.
9. גישה מאובטחת לעגלת הקניות
שתי הבדיקות הראשונות שנכשלו הן בדיקות של "עגלת הקניות", שבודקות את הדברים הבאים:
- משתמשים יכולים רק ליצור ולעדכן עגלות קניות משלהם
- משתמשים יכולים לקרוא רק את העגלות שלהם
functions/test.js
  it('can be created and updated by the cart owner', async () => {
    // Alice can create her own cart
    await firebase.assertSucceeds(aliceDb.doc("carts/alicesCart").set({
      ownerUID: "alice",
      total: 0
    }));

    // Bob can't create Alice's cart
    await firebase.assertFails(bobDb.doc("carts/alicesCart").set({
      ownerUID: "alice",
      total: 0
    }));

    // Alice can update her own cart with a new total
    await firebase.assertSucceeds(aliceDb.doc("carts/alicesCart").update({
      total: 1
    }));

    // Bob can't update Alice's cart with a new total
    await firebase.assertFails(bobDb.doc("carts/alicesCart").update({
      total: 1
    }));
  });

  it("can be read only by the cart owner", async () => {
    // Setup: Create Alice's cart as admin
    await admin.doc("carts/alicesCart").set({
      ownerUID: "alice",
      total: 0
    });

    // Alice can read her own cart
    await firebase.assertSucceeds(aliceDb.doc("carts/alicesCart").get());

    // Bob can't read Alice's cart
    await firebase.assertFails(bobDb.doc("carts/alicesCart").get());
  });
בואו נדאג שהבדיקות האלה יעברו. בעורך, פותחים את קובץ כללי האבטחה, firestore.rules, ומעדכנים את ההצהרות בתוך match /carts/{cartID}:
firestore.rules
rules_version = '2';
service cloud.firestore {
    // UPDATE THESE LINES
    match /carts/{cartID} {
      allow create: if request.auth.uid == request.resource.data.ownerUID;
      allow read, update, delete: if request.auth.uid == resource.data.ownerUID;
    }

    // ...
  }
}
הכללים האלה מאפשרים עכשיו רק לבעלי העגלה גישת קריאה וכתיבה.
כדי לאמת את הנתונים הנכנסים ואת האימות של המשתמש, אנחנו משתמשים בשני אובייקטים שזמינים בהקשר של כל כלל:
- האובייקט
requestמכיל נתונים ומטא-נתונים על הפעולה שמנסים לבצע. - אם בפרויקט Firebase נעשה שימוש ב-Firebase Authentication, האובייקט
request.authמתאר את המשתמש שמבצע את הבקשה.
10. בדיקת הגישה לעגלת הקניות
חבילת כלי האמולטור מעדכנת אוטומטית את הכללים בכל פעם ששומרים את firestore.rules. כדי לוודא שהאמולטור עדכן את הכללים, מחפשים את ההודעה Rules updated בכרטיסייה שבה האמולטור פועל:

מריצים מחדש את הבדיקות ומוודאים ששתי הבדיקות הראשונות עוברות:
$ npm test

> functions@ test .../emulators-codelab/codelab-initial-state/functions
> mocha

  shopping carts
    ✓ can be created and updated by the cart owner (195ms)
    ✓ can be read only by the cart owner (136ms)

  shopping cart items
    1) can be read only by the cart owner
    2) can be added only by the cart owner

  adding an item to the cart recalculates the cart total.
    - should sum the cost of their items

  2 passing (482ms)
  1 pending
  2 failing
יפה מאוד! עכשיו יש לכם גישה מאובטחת לעגלות קניות. נעבור לבדיקה הבאה שנכשלה.
11. בדיקת התהליך 'הוספה לעגלת הקניות' בממשק המשתמש
נכון לעכשיו, בעלי עגלות קניות יכולים לקרוא את העגלות שלהם ולכתוב בהן, אבל הם לא יכולים לקרוא פריטים בודדים בעגלות או לכתוב בהן פריטים בודדים. הסיבה לכך היא שלבעלים יש גישה למסמך של עגלת הקניות, אבל אין להם גישה לאוסף המשנה של הפריטים בעגלת הקניות.
זהו מצב לא תקין עבור המשתמשים.
חוזרים לממשק המשתמש באינטרנט שפועל בכתובת http://127.0.0.1:5000, ומנסים להוסיף משהו לעגלת הקניות. מופיעה שגיאה Permission Denied, שאפשר לראות במסוף לניפוי באגים, כי עדיין לא הענקנו למשתמשים גישה למסמכים שנוצרו באוסף המשנה items.
12. מתן גישה לפריטים בעגלת הקניות
שתי הבדיקות האלה מאשרות שמשתמשים יכולים רק להוסיף פריטים לעגלת הקניות שלהם או לקרוא פריטים מתוכה:
  it("can be read only by the cart owner", async () => {
    // Alice can read items in her own cart
    await firebase.assertSucceeds(aliceDb.doc("carts/alicesCart/items/milk").get());

    // Bob can't read items in alice's cart
    await firebase.assertFails(bobDb.doc("carts/alicesCart/items/milk").get())
  });

  it("can be added only by the cart owner",  async () => {
    // Alice can add an item to her own cart
    await firebase.assertSucceeds(aliceDb.doc("carts/alicesCart/items/lemon").set({
      name: "lemon",
      price: 0.99
    }));

    // Bob can't add an item to alice's cart
    await firebase.assertFails(bobDb.doc("carts/alicesCart/items/lemon").set({
      name: "lemon",
      price: 0.99
    }));
  });
לכן אפשר לכתוב כלל שמאפשר גישה אם למשתמש הנוכחי יש את אותו UID כמו ownerUID במסמך של העגלה. אין צורך לציין כללים שונים עבור create, update, delete, לכן אפשר להשתמש בכלל write, שחל על כל הבקשות שמשנות נתונים.
מעדכנים את הכלל עבור המסמכים בקולקציית המשנה של הפריטים. הערך get בתנאי נקרא מ-Firestore – במקרה הזה, הערך ownerUID במסמך של עגלת הקניות.
rules_version = '2';
service cloud.firestore {
  match /databases/{database}/documents {
    // ...

    // UPDATE THESE LINES
    match /carts/{cartID}/items/{itemID} {
      allow read, write: if get(/databases/$(database)/documents/carts/$(cartID)).data.ownerUID == request.auth.uid;
    }

    // ...
  }
}
13. בדיקת הגישה לפריטים בעגלת הקניות
עכשיו אפשר להריץ מחדש את הבדיקה. גוללים לחלק העליון של הפלט ומוודאים שיותר בדיקות עברו:
$ npm test

> functions@ test .../emulators-codelab/codelab-initial-state/functions
> mocha

  shopping carts
    ✓ can be created and updated by the cart owner (195ms)
    ✓ can be read only by the cart owner (136ms)

  shopping cart items
    ✓ can be read only by the cart owner (111ms)
    ✓ can be added only by the cart owner


  adding an item to the cart recalculates the cart total.
    - should sum the cost of their items


  4 passing (401ms)
  1 pending
מעולה! עכשיו כל הבדיקות שלנו עוברות. יש לנו בדיקה אחת בהמתנה, אבל נגיע אליה בעוד כמה שלבים.
14. בדיקה חוזרת של תהליך ההוספה לעגלת הקניות
חוזרים לחלק הקדמי של האתר ( http://127.0.0.1:5000) ומוסיפים פריט לעגלת הקניות. זהו שלב חשוב שבו מוודאים שהבדיקות והכללים שלנו תואמים לפונקציונליות הנדרשת על ידי הלקוח. (חשוב לזכור שבפעם האחרונה שניסינו את ממשק המשתמש, המשתמשים לא הצליחו להוסיף פריטים לעגלת הקניות שלהם!)
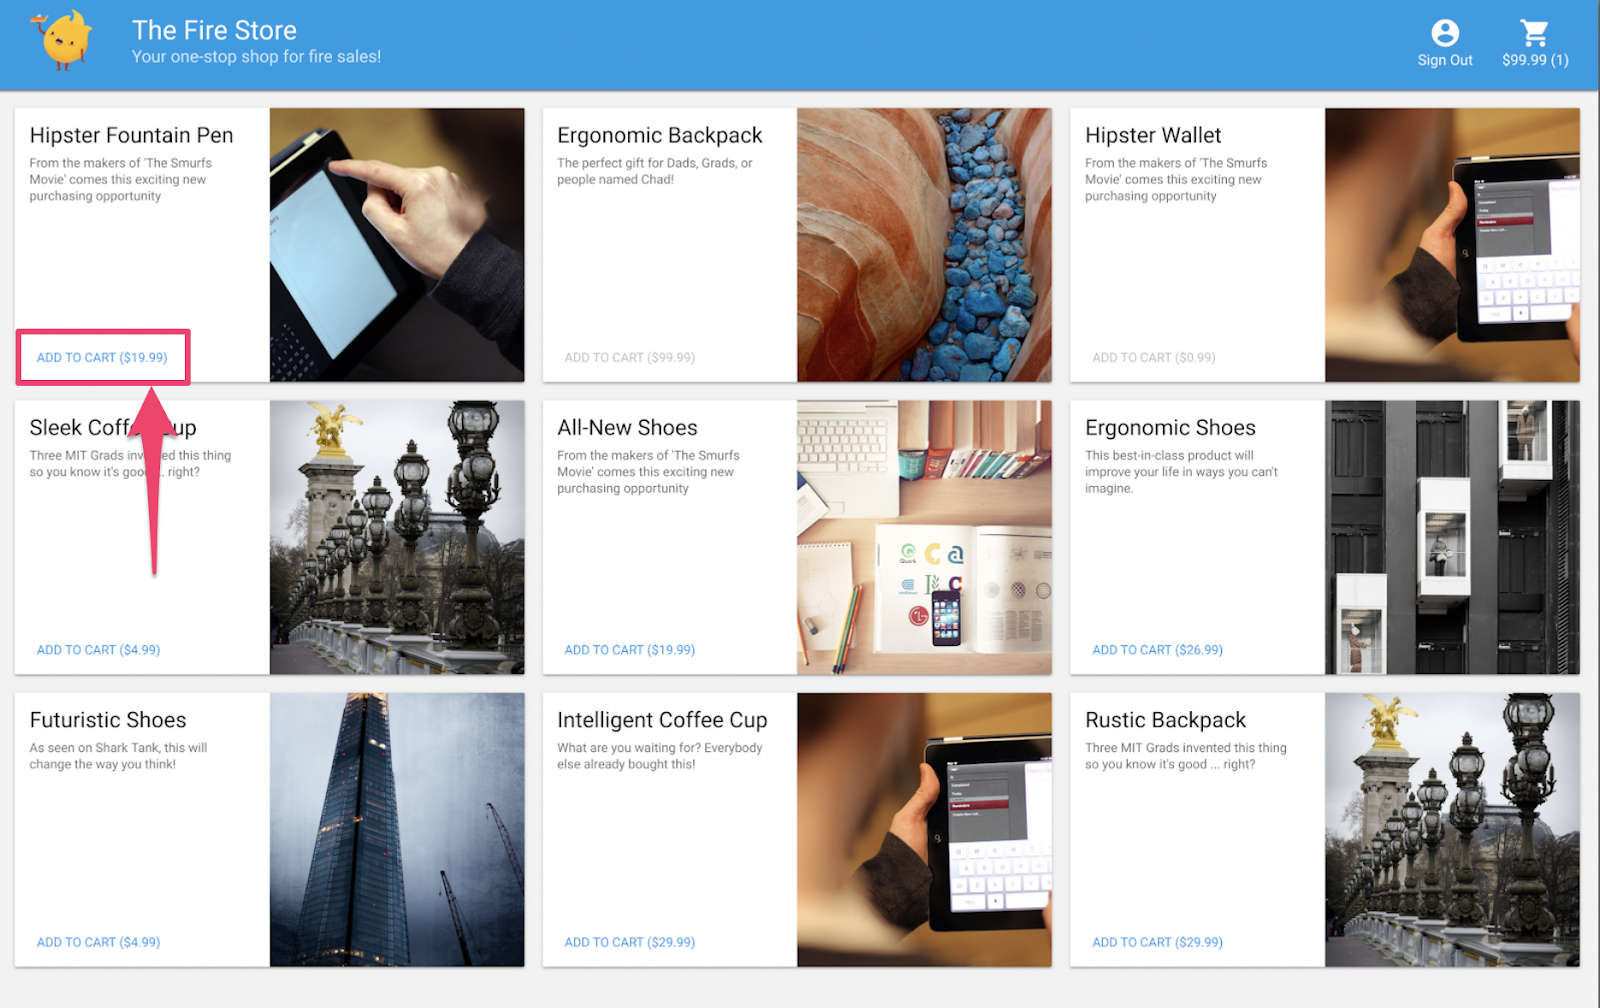
הכללים נטענים מחדש באופן אוטומטי בלקוח כששומרים את firestore.rules. לכן, כדאי לנסות להוסיף משהו לעגלת הקניות.
סיכום
כל הכבוד! הרגע שיפרתם את האבטחה של האפליקציה שלכם, וזהו שלב חיוני בהכנת האפליקציה לייצור. אם זו הייתה אפליקציה בסביבת ייצור, היינו יכולים להוסיף את הבדיקות האלה לצינור השילוב הרציף שלנו. כך נוכל להיות בטוחים שנתוני עגלות הקניות שלנו יהיו מוגנים באמצעות אמצעי בקרת הגישה האלה גם אם גורמים אחרים ישנו את הכללים.

אבל רגע, יש עוד!
אם תמשיכו, תגלו:
- איך כותבים פונקציה שמופעלת על ידי אירוע ב-Firestore
- איך יוצרים בדיקות שפועלות בכמה אמולטורים
15. הגדרת בדיקות של Cloud Functions
עד עכשיו התמקדנו בחלק הקדמי של אפליקציית האינטרנט ובכללי האבטחה של Firestore. אבל האפליקציה הזו גם משתמשת ב-Cloud Functions כדי לעדכן את עגלת הקניות של המשתמש, ולכן אנחנו רוצים לבדוק גם את הקוד הזה.
חבילת כלי האמולטור מאפשרת לבדוק בקלות את Cloud Functions, כולל פונקציות שמשתמשות ב-Cloud Firestore ובשירותים אחרים.
בעורך, פותחים את הקובץ emulators-codelab/codelab-initial-state/functions/test.js וגוללים עד לבדיקה האחרונה בקובץ. בשלב הזה, הוא מסומן כממתין:
//  REMOVE .skip FROM THIS LINE
describe.skip("adding an item to the cart recalculates the cart total. ", () => {
  // ...

  it("should sum the cost of their items", async () => {
    ...
  });
});
כדי להפעיל את הבדיקה, מסירים את .skip, כך שהיא תיראה כך:
describe("adding an item to the cart recalculates the cart total. ", () => {
  // ...

  it("should sum the cost of their items", async () => {
    ...
  });
});
לאחר מכן, מחפשים את המשתנה REAL_FIREBASE_PROJECT_ID בחלק העליון של הקובץ ומשנים אותו למזהה הפרויקט האמיתי שלכם ב-Firebase:
// CHANGE THIS LINE
const REAL_FIREBASE_PROJECT_ID = "changeme";
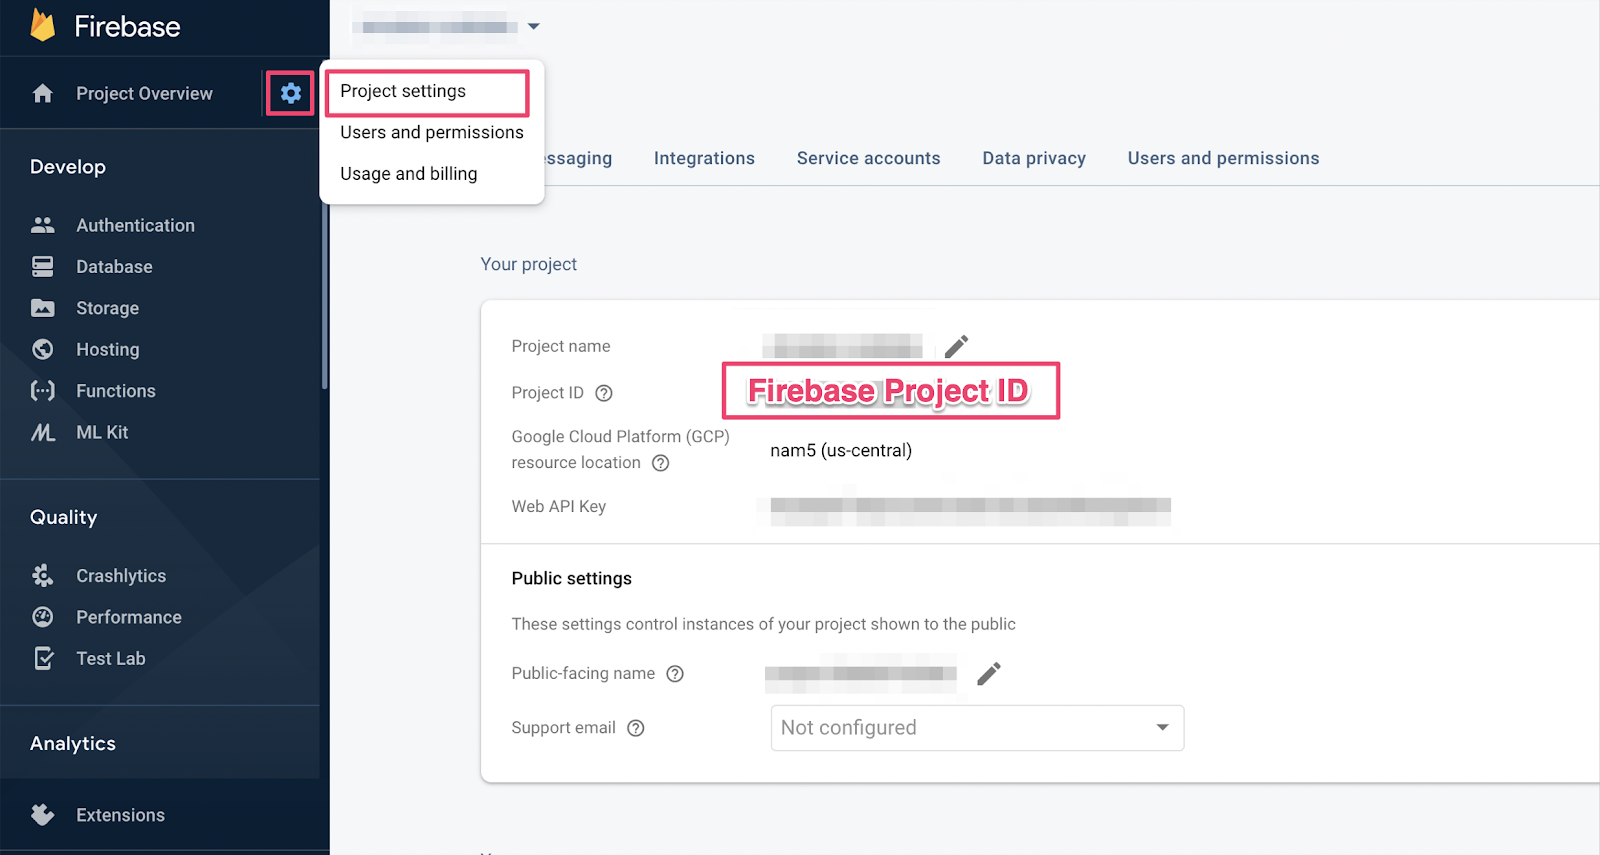
אם שכחתם את מזהה הפרויקט, תוכלו למצוא אותו בהגדרות הפרויקט במסוף Firebase:
16. הסבר על בדיקות של פונקציות
הבדיקה הזו מאמתת את האינטראקציה בין Cloud Firestore לבין Cloud Functions, ולכן היא כוללת יותר הגדרות מהבדיקות ב-codelabs הקודמים. נבחן את הבדיקה הזו כדי להבין מה היא בודקת.
יצירת עגלת קניות
פונקציות Cloud פועלות בסביבת שרת מהימנה ויכולות להשתמש באימות חשבון השירות שבו נעשה שימוש ב-Admin SDK . קודם מאתחלים אפליקציה באמצעות initializeAdminApp במקום initializeApp. לאחר מכן יוצרים DocumentReference לעגלת הקניות שאליה נוסיף פריטים ומפעילים את העגלה:
it("should sum the cost of their items", async () => {
    const db = firebase
        .initializeAdminApp({ projectId: REAL_FIREBASE_PROJECT_ID })
        .firestore();

    // Setup: Initialize cart
    const aliceCartRef = db.doc("carts/alice")
    await aliceCartRef.set({ ownerUID: "alice", totalPrice: 0 });

    ...
  });
הפעלת הפונקציה
לאחר מכן, מוסיפים מסמכים לאוסף המשנה items של מסמך עגלת הקניות כדי להפעיל את הפונקציה. מוסיפים שני פריטים כדי לוודא שבודקים את ההוספה שמתבצעת בפונקציה.
it("should sum the cost of their items", async () => {
    const db = firebase
        .initializeAdminApp({ projectId: REAL_FIREBASE_PROJECT_ID })
        .firestore();

    // Setup: Initialize cart
    const aliceCartRef = db.doc("carts/alice")
    await aliceCartRef.set({ ownerUID: "alice", totalPrice: 0 });

    //  Trigger calculateCart by adding items to the cart
    const aliceItemsRef = aliceCartRef.collection("items");
    await aliceItemsRef.doc("doc1").set({name: "nectarine", price: 2.99});
    await aliceItemsRef.doc("doc2").set({ name: "grapefruit", price: 6.99 });

    ...
    });
  });
הגדרת ציפיות לגבי הבדיקה
אפשר להשתמש ב-onSnapshot() כדי לרשום מאזין לכל השינויים במסמך של העגלה. onSnapshot() מחזירה פונקציה שאפשר להפעיל כדי לבטל את הרישום של ה-listener.
במסגרת הבדיקה הזו, מוסיפים שני פריטים שהמחיר הכולל שלהם הוא 9.98$. לאחר מכן, בודקים אם בעגלת הקניות מופיעים הפריטים itemCount ו-totalPrice. אם כן, הפונקציה עשתה את העבודה.
it("should sum the cost of their items", (done) => {
    const db = firebase
        .initializeAdminApp({ projectId: REAL_FIREBASE_PROJECT_ID })
        .firestore();

    // Setup: Initialize cart
    const aliceCartRef = db.doc("carts/alice")
    aliceCartRef.set({ ownerUID: "alice", totalPrice: 0 });

    //  Trigger calculateCart by adding items to the cart
    const aliceItemsRef = aliceCartRef.collection("items");
    aliceItemsRef.doc("doc1").set({name: "nectarine", price: 2.99});
    aliceItemsRef.doc("doc2").set({ name: "grapefruit", price: 6.99 });

    // Listen for every update to the cart. Every time an item is added to
    // the cart's subcollection of items, the function updates `totalPrice`
    // and `itemCount` attributes on the cart.
    // Returns a function that can be called to unsubscribe the listener.
    await new Promise((resolve) => {
      const unsubscribe = aliceCartRef.onSnapshot(snap => {
        // If the function worked, these will be cart's final attributes.
        const expectedCount = 2;
        const expectedTotal = 9.98;

        // When the `itemCount`and `totalPrice` match the expectations for the
        // two items added, the promise resolves, and the test passes.
        if (snap.data().itemCount === expectedCount && snap.data().totalPrice == expectedTotal) {
          // Call the function returned by `onSnapshot` to unsubscribe from updates
          unsubscribe();
          resolve();
        };
      });
    });
   });
 });
17. הרצת הבדיקות
יכול להיות שהאמולטורים עדיין פועלים מהבדיקות הקודמות. אם לא, מפעילים את האמולטורים. משורת הפקודה, מריצים את
$ firebase emulators:start --import=./seed
פותחים כרטיסיית טרמינל חדשה (משאירים את האמולטורים פועלים) ועוברים לספריית הפונקציות. יכול להיות שהכרטיסייה הזו עדיין פתוחה מהבדיקות של כללי האבטחה.
$ cd functions
עכשיו מריצים את בדיקות היחידה. אמורות להופיע 5 בדיקות בסך הכול:
$ npm test

> functions@ test .../emulators-codelab/codelab-initial-state/functions
> mocha

  shopping cart creation
    ✓ can be created by the cart owner (82ms)

  shopping cart reads, updates, and deletes
    ✓ cart can be read by the cart owner (42ms)

  shopping cart items
    ✓ items can be read by the cart owner (40ms)
    ✓ items can be added by the cart owner

  adding an item to the cart recalculates the cart total.
    1) should sum the cost of their items

  4 passing (2s)
  1 failing
אם בודקים את הכשל הספציפי, נראה שזו שגיאת זמן קצוב לתפוגה. הסיבה לכך היא שהבדיקה ממתינה לעדכון הנכון של הפונקציה, אבל זה לא קורה. עכשיו אפשר לכתוב את הפונקציה כדי לעבור את הבדיקה.
18. כתיבת פונקציה
כדי לתקן את הבדיקה הזו, צריך לעדכן את הפונקציה ב-functions/index.js. למרות שחלק מהפונקציה הזו כתוב, היא לא שלמה. כך נראית הפונקציה כרגע:
// Recalculates the total cost of a cart; triggered when there's a change
// to any items in a cart.
exports.calculateCart = functions
    .firestore.document("carts/{cartId}/items/{itemId}")
    .onWrite(async (change, context) => {
      console.log(`onWrite: ${change.after.ref.path}`);
      if (!change.after.exists) {
        // Ignore deletes
        return;
      }

      let totalPrice = 125.98;
      let itemCount = 8;
      try {

        const cartRef = db.collection("carts").doc(context.params.cartId);

        await cartRef.update({
          totalPrice,
          itemCount
        });
      } catch(err) {
      }
    });
הפונקציה מגדירה נכון את הפניה לעגלת הקניות, אבל במקום לחשב את הערכים של totalPrice ושל itemCount, היא מעדכנת אותם לערכים שמוגדרים בהגדרות קשיחות.
אחזור ואיטרציה של
items subcollection
מאתחלים קבוע חדש, itemsSnap, כך שיהיה אוסף המשנה items. לאחר מכן, חוזרים על הפעולה לכל המסמכים באוסף.
// Recalculates the total cost of a cart; triggered when there's a change
// to any items in a cart.
exports.calculateCart = functions
    .firestore.document("carts/{cartId}/items/{itemId}")
    .onWrite(async (change, context) => {
      console.log(`onWrite: ${change.after.ref.path}`);
      if (!change.after.exists) {
        // Ignore deletes
        return;
      }


      try {
        let totalPrice = 125.98;
        let itemCount = 8;

        const cartRef = db.collection("carts").doc(context.params.cartId);
        // ADD LINES FROM HERE
        const itemsSnap = await cartRef.collection("items").get();

        itemsSnap.docs.forEach(item => {
          const itemData = item.data();
        })
        // TO HERE

        return cartRef.update({
          totalPrice,
          itemCount
        });
      } catch(err) {
      }
    });
חישוב הערכים של totalPrice ו-itemCount
קודם כל, נאתחל את הערכים של totalPrice ו-itemCount לאפס.
לאחר מכן, מוסיפים את הלוגיקה לבלוק האיטרציה. קודם כול בודקים אם יש מחיר לפריט. אם לא מציינים כמות לפריט, כמות ברירת המחדל היא 1. לאחר מכן, מוסיפים את הכמות לסכום המצטבר של itemCount. לבסוף, מוסיפים את מחיר הפריט כפול הכמות לסכום הכולל של totalPrice:
// Recalculates the total cost of a cart; triggered when there's a change
// to any items in a cart.
exports.calculateCart = functions
    .firestore.document("carts/{cartId}/items/{itemId}")
    .onWrite(async (change, context) => {
      console.log(`onWrite: ${change.after.ref.path}`);
      if (!change.after.exists) {
        // Ignore deletes
        return;
      }

      try {
        // CHANGE THESE LINES
        let totalPrice = 0;
        let itemCount = 0;

        const cartRef = db.collection("carts").doc(context.params.cartId);
        const itemsSnap = await cartRef.collection("items").get();

        itemsSnap.docs.forEach(item => {
          const itemData = item.data();
          // ADD LINES FROM HERE
          if (itemData.price) {
            // If not specified, the quantity is 1
            const quantity = itemData.quantity ? itemData.quantity : 1;
            itemCount += quantity;
            totalPrice += (itemData.price * quantity);
          }
          // TO HERE
        })

        await cartRef.update({
          totalPrice,
          itemCount
        });
      } catch(err) {
      }
    });
אפשר גם להוסיף רישום ביומן כדי לנפות באגים במצבי הצלחה ושגיאה:
// Recalculates the total cost of a cart; triggered when there's a change
// to any items in a cart.
exports.calculateCart = functions
    .firestore.document("carts/{cartId}/items/{itemId}")
    .onWrite(async (change, context) => {
      console.log(`onWrite: ${change.after.ref.path}`);
      if (!change.after.exists) {
        // Ignore deletes
        return;
      }

      let totalPrice = 0;
      let itemCount = 0;
      try {
        const cartRef = db.collection("carts").doc(context.params.cartId);
        const itemsSnap = await cartRef.collection("items").get();

        itemsSnap.docs.forEach(item => {
          const itemData = item.data();
          if (itemData.price) {
            // If not specified, the quantity is 1
            const quantity = (itemData.quantity) ? itemData.quantity : 1;
            itemCount += quantity;
            totalPrice += (itemData.price * quantity);
          }
        });

        await cartRef.update({
          totalPrice,
          itemCount
        });

        // OPTIONAL LOGGING HERE
        console.log("Cart total successfully recalculated: ", totalPrice);
      } catch(err) {
        // OPTIONAL LOGGING HERE
        console.warn("update error", err);
      }
    });
19. הפעלה מחדש של בדיקות
בשורה של הפקודה, מוודאים שהאמולטורים עדיין פועלים ומריצים מחדש את הבדיקות. אין צורך להפעיל מחדש את האמולטורים כי הם מזהים שינויים בפונקציות באופן אוטומטי. כל הבדיקות אמורות לעבור:
$ npm test
> functions@ test .../emulators-codelab/codelab-initial-state/functions
> mocha

  shopping cart creation
    ✓ can be created by the cart owner (306ms)

  shopping cart reads, updates, and deletes
    ✓ cart can be read by the cart owner (59ms)

  shopping cart items
    ✓ items can be read by the cart owner
    ✓ items can be added by the cart owner

  adding an item to the cart recalculates the cart total.
    ✓ should sum the cost of their items (800ms)


  5 passing (1s)
יפה מאוד!
20. ניסיון באמצעות ממשק המשתמש של חנות Play
כדי לבצע את הבדיקה הסופית, חוזרים לאפליקציית האינטרנט ( http://127.0.0.1:5000/) ומוסיפים פריט לעגלת הקניות.

מוודאים שסכום העדכון בעגלת הקניות נכון. נהדר!
סיכום
הסברנו תרחיש בדיקה מורכב בין Cloud Functions for Firebase לבין Cloud Firestore. כתבתם פונקציה של Cloud Functions כדי שהבדיקה תעבור. בנוסף, אישרתם שהפונקציונליות החדשה פועלת בממשק המשתמש. כל הפעולות האלה בוצעו באופן מקומי, והאמולטורים הופעלו במחשב שלכם.
בנוסף, יצרתם לקוח אינטרנט שפועל מול האמולטורים המקומיים, התאמתם כללי אבטחה להגנה על הנתונים ובדקתם את כללי האבטחה באמצעות האמולטורים המקומיים.

