
1. Overview
In this codelab, you'll practice using the App Prototyping agent in Firebase Studio to create an app designed to help you learn a new language. You'll then refine and improve the app, optionally publishing to Firebase App Hosting.
What you'll learn
- Best practices for prompting in Firebase Studio
- Iterate on an app to add functionality and fix bugs
- Publish an app to Firebase App Hosting and share it with others
- Track key metrics through the App Hosting App overview panel
What you'll need
- A browser of your choice, such as Google Chrome
- A Google Account for the creation and management of your Firebase project
2. Generate your app using the App Prototyping agent
The App Prototyping agent uses Gemini in Firebase to build your app. Even when using identical prompts, your result might not look or act exactly as the one featured in this codelab. If you get stuck, we've provided a set of files you can add to your workspace to pick up the lab at several checkpoints throughout this codelab.
- Log into your Google Account and open Firebase Studio.
- In the Prototype an app with AI field, enter a description of the app you want to build. For this codelab, you'll build an app that helps you learn a new language through stories, flashcards, and an AI tutor. Enter a prompt, such as:
An app to help someone learn a new language. The app should include AI-generated stories in the target language, where users can click vocab words or the entire story to see it in English. A different section includes flashcards, where the user is shown a word in the chosen language and can click it to flip the card and see the word in English. The final section includes an AI chatbot that allows the user to have simple conversations in the chosen language or ask questions in English about what a word means or how to form a sentence in the chosen language. All content should be beginner-friendly, focusing on basic greetings, common questions/answers, and vocabulary relevant to the lessons or stories. To start, the app should teach the user French, although we might add additional languages in the future. - Click Prototype with AI.
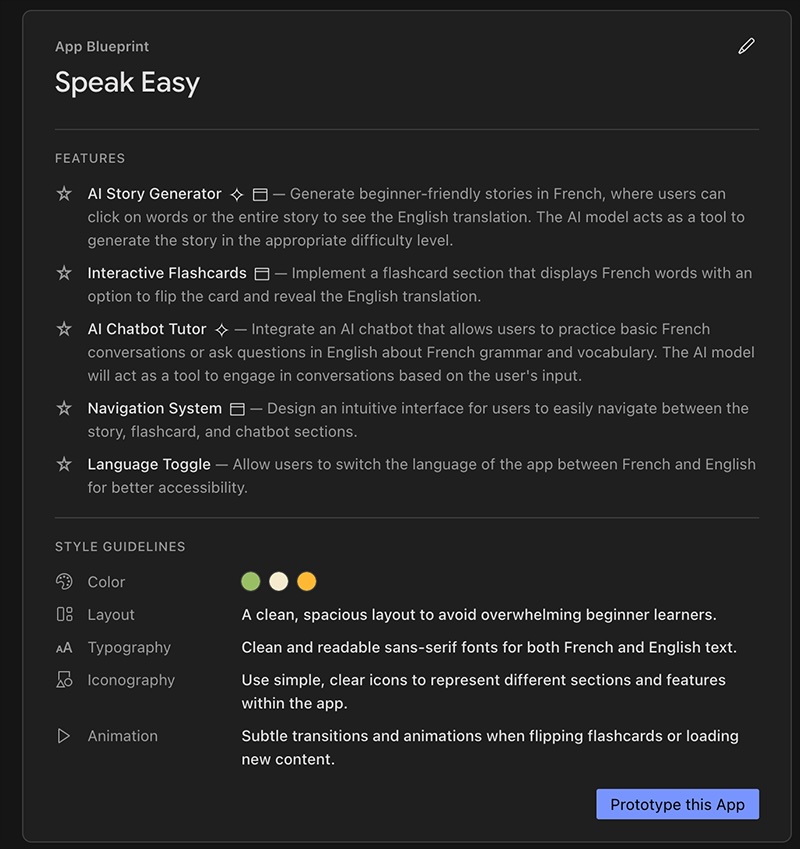
- Review the suggested App Blueprint. Click
 Customize to edit the blueprint:
- Change the App Name to Speak Easy.
- Change the color scheme to the following:
Primary color: Asparagus green (#98BF64) for a calm and friendly feel. Secondary color: Light parchment (#F5EBCD) to complement the primary color. Accent: Marigold (#FFB833) for interactive elements and call-to-action buttons. Attachment option to upload an image during the prompt or blueprint process. Images must be less than 3MiB.
 - Click Save.
- When the blueprint finishes incorporating your updates, click Prototype this App.
- Because this app includes AI elements, the agent prompts you for a Gemini key. Add your own Gemini API key or click Auto-generate to generate a Gemini API key. If you click Auto-generate, Firebase Studio creates a Firebase project and generates a Gemini API key for you.
- The App Prototyping agent uses the App Blueprint to create a first version of your app. When it's done, the preview of your app appears alongside a Gemini chat interface. Take a moment to test your app. Even if it doesn't look exactly how you envisioned, the next section describes how to add new functionality and refine the design.
3. (Optional) Get the code
If you get stuck or want to follow along more closely with the example app, use the sample files provided at several checkpoints throughout the codelab.
- Download the files in the folder.
- In Firebase Studio, click
 Switch to Code to open Code view.
 - Drag the files you downloaded into the Explorer pane of Firebase Studio. Allow the files to replace any existing files.
- Click Switch to Prototyper to continue the codelab, using the example version of the app.
4. Test, iterate, and debug the functionality of your app
As you preview the app, you may notice bugs or unexpected functionality. In the example version of the app, we'll add the following changes and fixes:
- In the AI story generator, users should be able to click vocab words to get a definition in English.
- The flashcards should appear in French, then switch to English when clicked.
- The user should be able to go to a settings page and switch to learning Japanese instead of French.
Goal 1: Add vocab words to the AI Story Generator
Optional: To use the example version of the app from this point, download and drag these files into the Explorer pane of Firebase Studio in Code view.
- In the chat interface, describe the feature you want to add:
In the AI Story Generator, users should be able to click vocab words or phrases to get the definition in English. Words or phrases should be underlined to indicate they can be clicked. - Test the app in the preview window. You'll update the look and feel of the app later, so try to focus on just the functionality for now.
- If your app doesn't function as you expected, continue prompting the App Prototyping agent to make adjustments. For example:
IMPORTANT: Be sure to underline and provide a definition for most words and phrases, and ESPECIALLY all nouns and verbs. If a word or phrase in the story appears multiple times, only underline and define the first instance. - Click Switch to Code to open Code view, where you can see all of your app's files and modify your code directly. If there's a bug Gemini isn't able to solve, it's sometimes easier to edit a file manually. When you're ready, Switch to Prototyper mode to continue using the App Prototyping agent.
Goal 2: Add translations to the flash cards
Optional: To use the example version of the app from this point, download and drag these files into the Explorer pane of Firebase Studio in Code view.
Follow the same process as above, using the chat interface to describe the feature, test it in the preview window, then either use additional prompts or Code view to add translations to the flash cards. Try a prompt such as:
 The flash cards should appear in the target language to start, then switch to
 English when clicked.
Sometimes, the App Prototyping agent doesn't recognize when there's a bug. Describing what you see and what needs to be fixed can be more effective, such as:
 The flip button for the flash cards isn't working. Can you debug it? All flash
 cards are only showing in English.
Goal 3: Add a new language
Optional: To use the example version of the app from this point, download and drag these files into the Explorer pane of Firebase Studio in Code view.
Try a prompt such as:
 Add a settings section to the app, where users can swap to a new language
 to learn. Add Japanese to the list of languages the user can pick from. If
 the user selects Japanese, the AI-generated stories, flash cards, and chatbot
 tutor should all use Japanese instead of French.
5. Iterate on the design of your app
Optional: To use the example version of the app from this point, download and drag these files into the Explorer pane of Firebase Studio in Code view.
Now that your app has all the functionality you want, it's time to work on the style.
Change the color scheme of the app
You can be specific about what colors you want to use, or you can let the App Prototyping agent take the lead. In the chat interface, you can also click the ![]() Attachment option to upload an image of the colors or style you want to use. If you prefer to use a prompt, try:
Attachment option to upload an image of the colors or style you want to use. If you prefer to use a prompt, try:
 Add color to the design of the app. Use modern, clean colors that adhere
 to accessibility standards and have a calming feel.
Update the text used in the app
For example, instead of "AI Chatbot Tutor" you may want it to just say "Chat":
Change the text "AI Chatbot Tutor" to "Chat".
Adjust the UI of the app to make it more intuitive
For example, instead of the user having to press a button to submit text, you may want to allow the user to press Return on their keyboard:
 In the story generator section, allow the user to press the return key on
 the keyboard to submit the text.
Add the option for the user to choose between light and dark mode
Many users may prefer the option to choose between a lighter or darker theme for the app. Consider where a logical place to find this switch would be:
 Add an icon in the upper right corner to dynamically switch the color theme of
 the app between dark mode and light mode.
Prompting and debugging tips
- Get help with prompts: If you have trouble explaining to the App Prototyping agent what you want, try asking Gemini for Google to help refine the prompt. Learn more about effective prompting.
- Test on other devices: In Prototype mode, click
 Share Preview Link to test your app on other devices.
 - Use built-in tools: In Code view, use Firebase Studio's built-in debugging and reporting features to inspect, debug, and audit your app.
- Start simple: Work on one feature at a time. Consider starting with a basic set of features in your prototype, then expand once those work as expected.
- Describe bugs: If something isn't working, describe the current behavior to the App Prototyping agent, followed by the behavior you want.
- Roll back when needed: When the App Prototyping agent misunderstands a prompt or introduces a difficult-to-solve problem, click the Restore button to roll back to an earlier version of the app and try again with a different prompt.
6. (Optional) Publish your app
Optional: To use the example version of the app from this point, download and drag these files into the Explorer pane of Firebase Studio in Code view.
After you've tested the app and are satisfied with it, you can publish it to the web with Firebase App Hosting.
- Click Publish to create a new Firebase project and begin App Hosting setup. The Publish your app pane appears.
- In the Firebase project step, note the name of the Firebase project that was created for you, then click Next.
- In the Link Cloud Billing account step, choose one of the following:
- Select the Cloud Billing account that you want to link to your Firebase project.
- If you don't have a Cloud Billing account or want to create a new one, click Create a Cloud Billing account. This opens the Google Cloud text, where you can create a new self-serve Cloud Billing account. After you create the account, return to Firebase Studio and select the account from the Link Cloud Billing list.
- Click Next. Firebase Studio links the billing account to the project associated with your workspace, created either when you auto-generated a Gemini API key or when you clicked Publish. Then, App Hosting sets up a fully-managed environment for your app in Google Cloud.
- Click Create your first rollout. Firebase Studio launches the App Hosting rollout. This can take up to ten minutes to complete. To learn more about what's happening behind the scenes, see The App Hosting build process.
- When the rollout completes, the App overview appears with a URL and app insights powered by App Hosting observability. To use a custom domain (like example.com or app.example.com) instead of the Firebase-generated domain, you can add a custom domain in the Firebase text.
For more information about App Hosting, see Understand App Hosting and how it works.
7. (Optional) Monitor your app
The App Hosting App overview panel provides key metrics and information about your app, letting you monitor your web app's performance using App Hosting's built-in observability tools. After your site rolls out, you can access the overview by clicking Publish. From this panel, you can:
- Click Create rollout to release a new version of your app.
- Share the link to your app or open your app directly in Visit your app.
- Review a summary of your app's performance over the last 7 days, including the total number of requests and the status of your latest rollout. Click View details to access even more information in the Firebase text.
- View a graph of the number of the number of requests your app has received over the last 24 hours, broken down by HTTP status code.
If you close the App overview panel, you can re-open it at any time by clicking Publish.
Learn more about managing and monitoring App Hosting rollouts at Manage rollouts and releases.
8. Conclusion
Congratulations! You successfully created an app using Firebase Studio. There's much more you could add to the app, such as an expanded dictionary, more languages, audio, animations, or a difficulty selection. Feel free to keep playing with your app or create something new.