
1. 概览
目标
在此 Codelab 中,您将构建一个由 Cloud Firestore 提供支持的 Android 餐厅推荐应用。您将学习如何:
- 从 Android 应用读取数据并将数据写入 Firestore 中
- 实时监听 Firestore 数据的变化
- 使用 Firebase Authentication 和安全规则保护 Firestore 数据
- 编写复杂的 Firestore 查询
前提条件
在开始此 Codelab 之前,请确保您已具备以下条件:
- Android Studio Flamingo 或更高版本
- 搭载 API 级别 19 或更高级别的 Android 模拟器
- Node.js 版本 16 或更高版本
- Java 版本 17 或更高版本
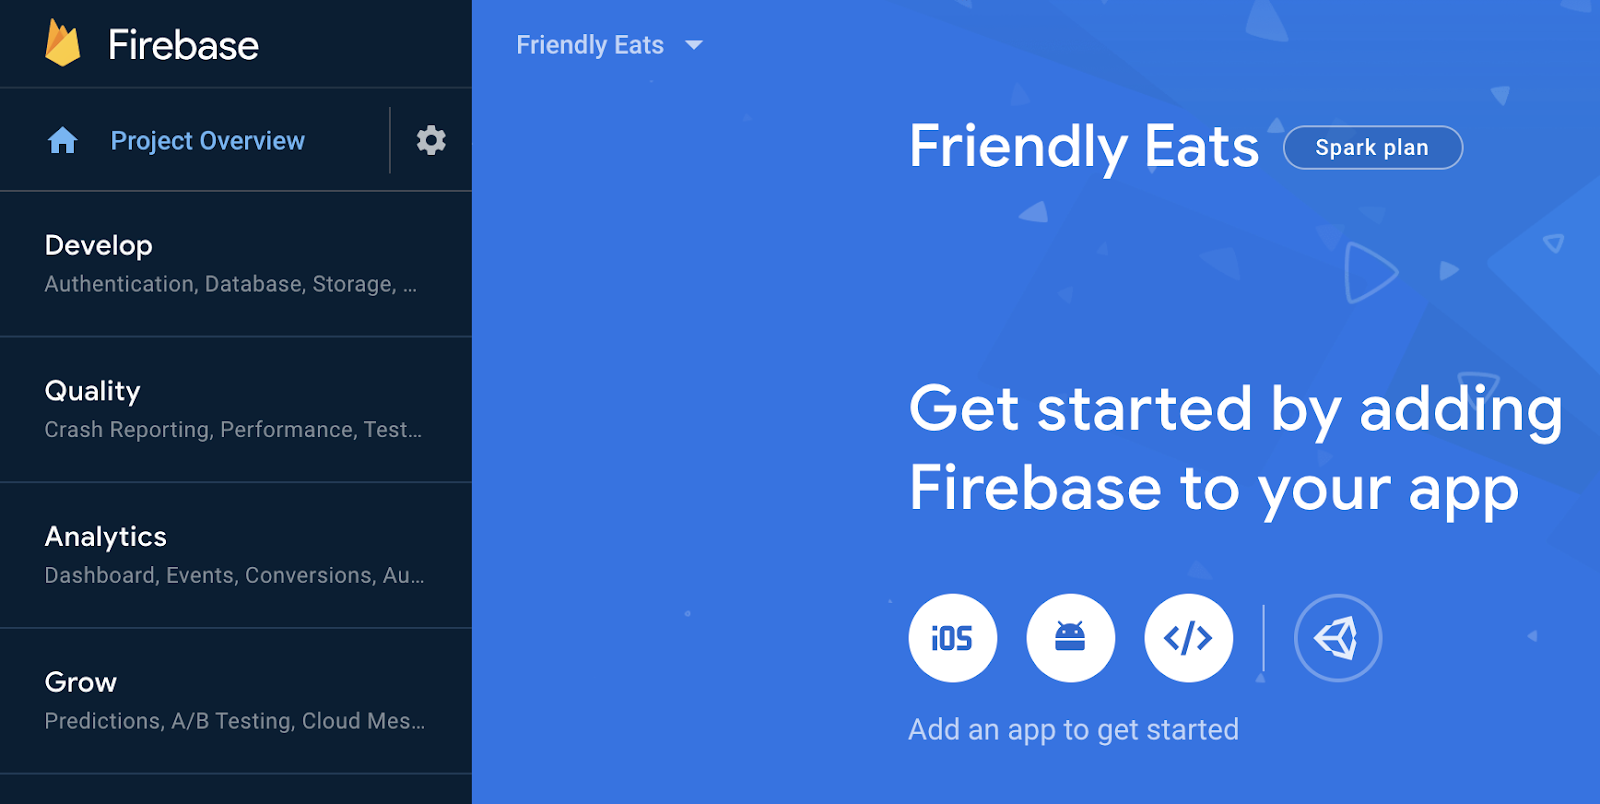
2. 创建 Firebase 项目
- 使用您的 Google 账号登录 Firebase 控制台。
- 点击相应按钮以创建新项目,然后输入项目名称(例如
FriendlyEats)。
- 点击继续。
- 如果看到相关提示,请查看并接受 Firebase 条款,然后点击继续。
- (可选)在 Firebase 控制台中启用 AI 辅助功能(称为“Gemini in Firebase”)。
- 在此 Codelab 中,您不需要使用 Google Analytics,因此请关闭 Google Analytics 选项。
- 点击创建项目,等待项目完成预配,然后点击继续。
3. 设置示例项目
下载代码
运行以下命令,克隆本 Codelab 的示例代码。这将在您的机器上创建一个名为 friendlyeats-android 的文件夹:
$ git clone https://github.com/firebase/friendlyeats-android
如果您的机器上没有 git,也可以直接从 GitHub 下载代码。
添加 Firebase 配置
- 在 Firebase 控制台中,选择左侧导航栏中的项目概览。点击 Android 按钮以选择平台。当系统提示输入软件包名称时,请使用
com.google.firebase.example.fireeats
- 点击注册应用,然后按照说明下载
google-services.json文件,并将其移至您刚刚下载的代码的app/文件夹中。然后点击下一步。
导入项目
打开 Android Studio。依次点击 File > New > Import Project,然后选择 friendlyeats-android 文件夹。
4. 设置 Firebase 模拟器
在此 Codelab 中,您将使用 Firebase Emulator Suite 在本地模拟 Cloud Firestore 和其他 Firebase 服务。这可提供安全、快速且免费的本地开发环境来构建应用。
安装 Firebase CLI
首先,您需要安装 Firebase CLI。如果您使用的是 macOS 或 Linux,可以运行以下 c网址 命令:
curl -sL https://firebase.tools | bash
如果您使用的是 Windows,请阅读安装说明,以获取独立二进制文件或通过 npm 进行安装。
安装 CLI 后,运行 firebase --version 应报告 9.0.0 或更高版本:
$ firebase --version
9.0.0
登录
运行 firebase login 以将 CLI 连接到您的 Google 账号。系统会打开一个新的浏览器窗口,以便您完成登录流程。请务必选择您之前创建 Firebase 项目时所用的账号。
关联项目
在 friendlyeats-android 文件夹中运行 firebase use --add,将本地项目与 Firebase 项目相关联。按照提示选择您之前创建的项目,如果系统要求您选择别名,请输入 default。
5. 运行应用
现在,您可以首次运行 Firebase Emulator Suite 和 FriendlyEats Android 应用了。
运行模拟器
在终端中,从 friendlyeats-android 目录内运行 firebase emulators:start 以启动 Firebase 模拟器。您应该会看到如下所示的日志:
$ firebase emulators:start
i  emulators: Starting emulators: auth, firestore
i  firestore: Firestore Emulator logging to firestore-debug.log
i  ui: Emulator UI logging to ui-debug.log

┌─────────────────────────────────────────────────────────────┐
│ ✔  All emulators ready! It is now safe to connect your app. │
│ i  View Emulator UI at http://localhost:4000                │
└─────────────────────────────────────────────────────────────┘

┌────────────────┬────────────────┬─────────────────────────────────┐
│ Emulator       │ Host:Port      │ View in Emulator UI             │
├────────────────┼────────────────┼─────────────────────────────────┤
│ Authentication │ localhost:9099 │ http://localhost:4000/auth      │
├────────────────┼────────────────┼─────────────────────────────────┤
│ Firestore      │ localhost:8080 │ http://localhost:4000/firestore │
└────────────────┴────────────────┴─────────────────────────────────┘
  Emulator Hub running at localhost:4400
  Other reserved ports: 4500

Issues? Report them at https://github.com/firebase/firebase-tools/issues and attach the *-debug.log files.
现在,您已在自己的机器上运行了一个完整的本地开发环境!请务必让此命令在整个 Codelab 期间保持运行,因为您的 Android 应用需要连接到模拟器。
将应用连接到模拟器
在 Android Studio 中打开 util/FirestoreInitializer.kt 和 util/AuthInitializer.kt 文件。这些文件包含在应用启动时将 Firebase SDK 连接到本地计算机上运行的模拟器的逻辑。
在 FirestoreInitializer 类的 create() 方法中,详细分析这段代码:
    // Use emulators only in debug builds
    if (BuildConfig.DEBUG) {
        firestore.useEmulator(FIRESTORE_EMULATOR_HOST, FIRESTORE_EMULATOR_PORT)
    }
我们使用 BuildConfig 来确保仅当应用在 debug 模式下运行时才连接到模拟器。当我们在 release 模式下编译应用时,此条件将为 false。
我们可以看到,它使用 useEmulator(host, port) 方法将 Firebase SDK 连接到本地 Firestore 模拟器。在整个应用中,我们将使用 FirebaseUtil.getFirestore() 来访问此 FirebaseFirestore 实例,以便确保在 debug 模式下运行时始终连接到 Firestore 模拟器。
运行应用
如果您已正确添加 google-services.json 文件,项目现在应该可以编译了。在 Android Studio 中,依次点击 Build > Rebuild Project,确保没有剩余错误。
在 Android Studio 中,在 Android 模拟器上运行应用。首先,系统会显示“登录”界面。您可以使用任意电子邮件地址和密码登录应用。此登录过程会连接到 Firebase Authentication 模拟器,因此不会传输任何真实凭据。
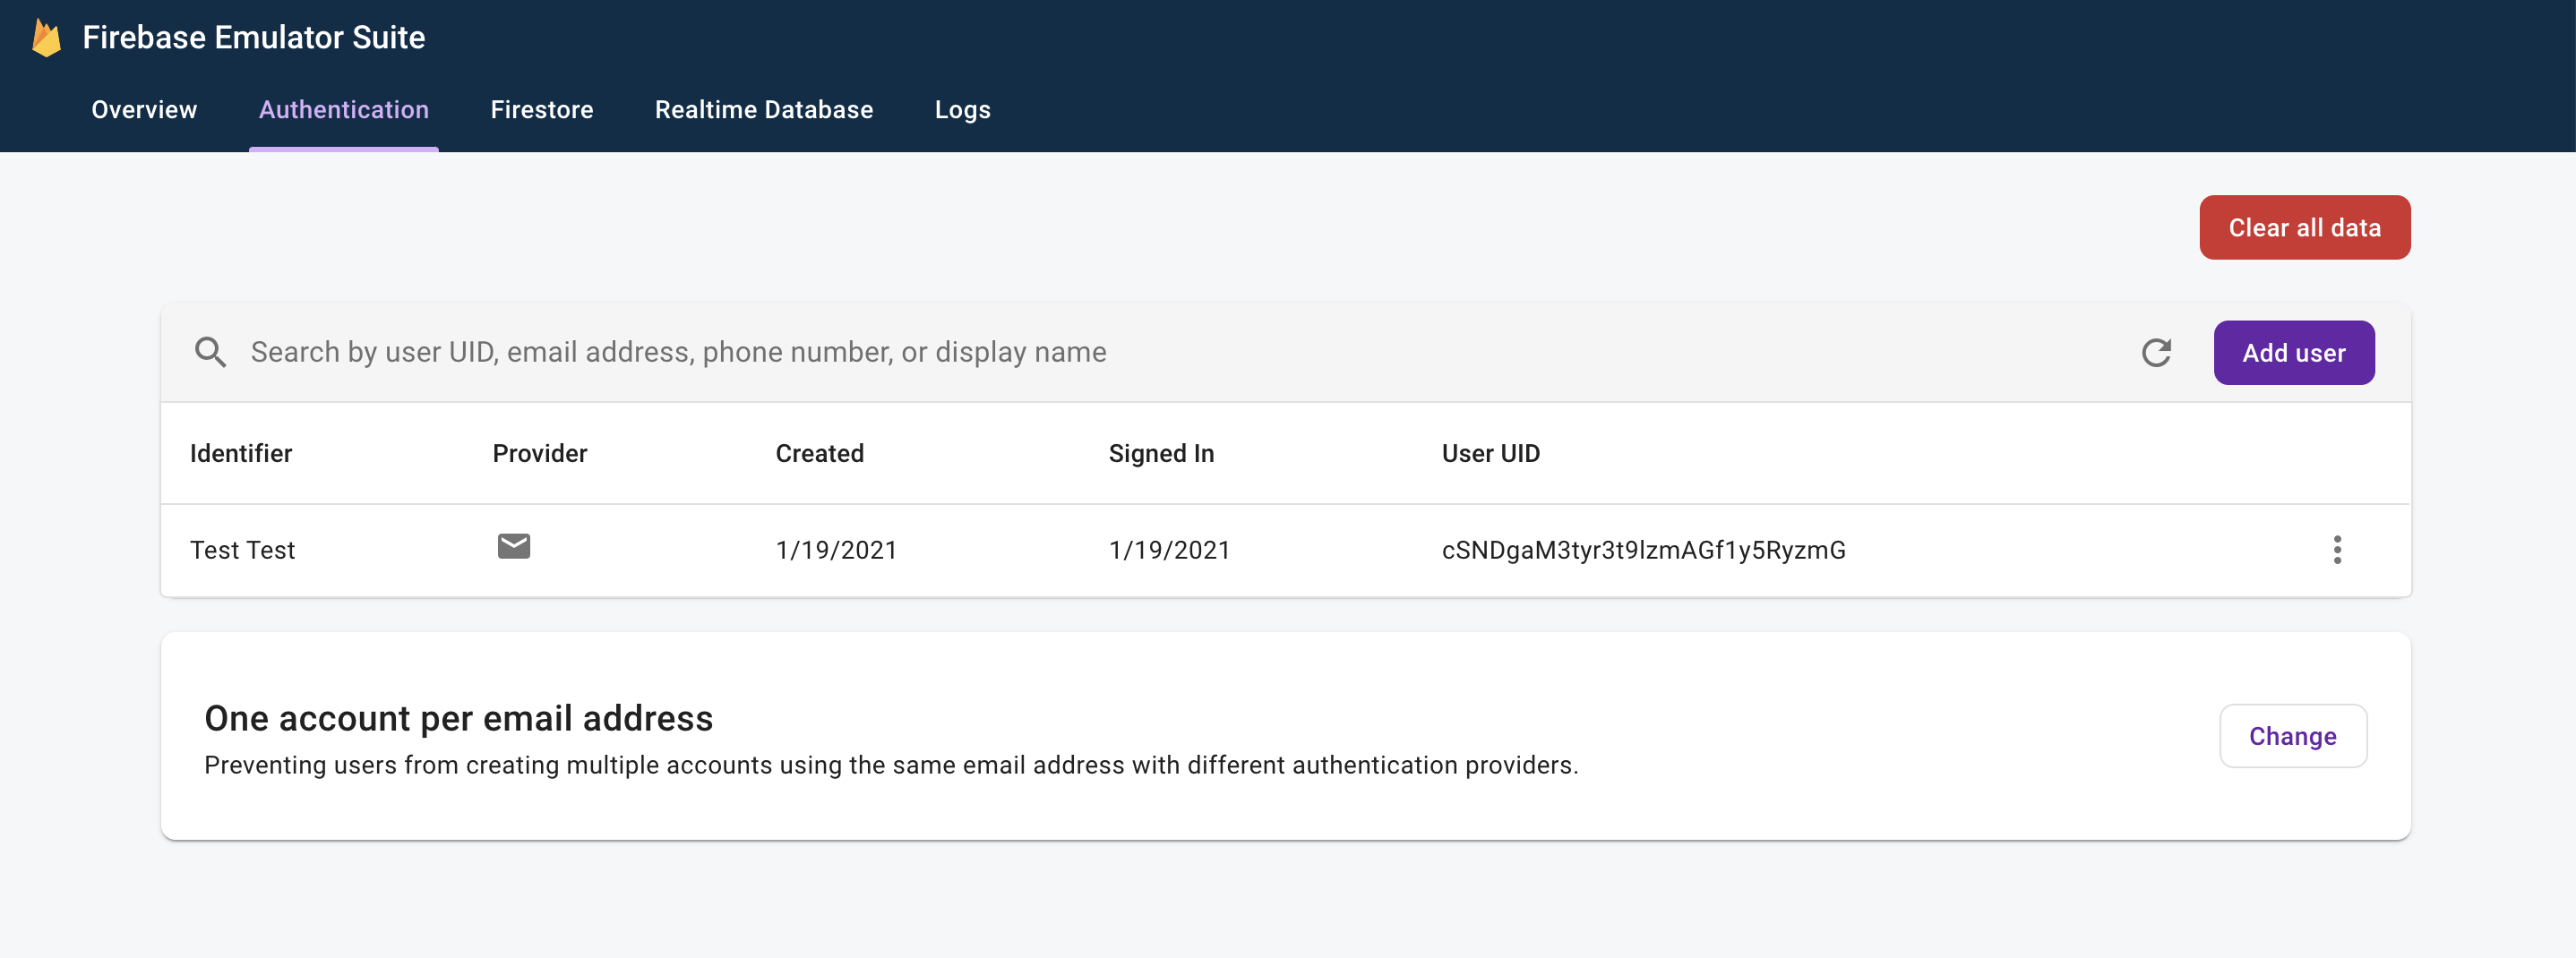
现在,在网络浏览器中前往 http://localhost:4000,打开模拟器界面。然后点击身份验证标签页,您应该会看到刚刚创建的账号:
完成登录流程后,您应该会看到应用主屏幕:
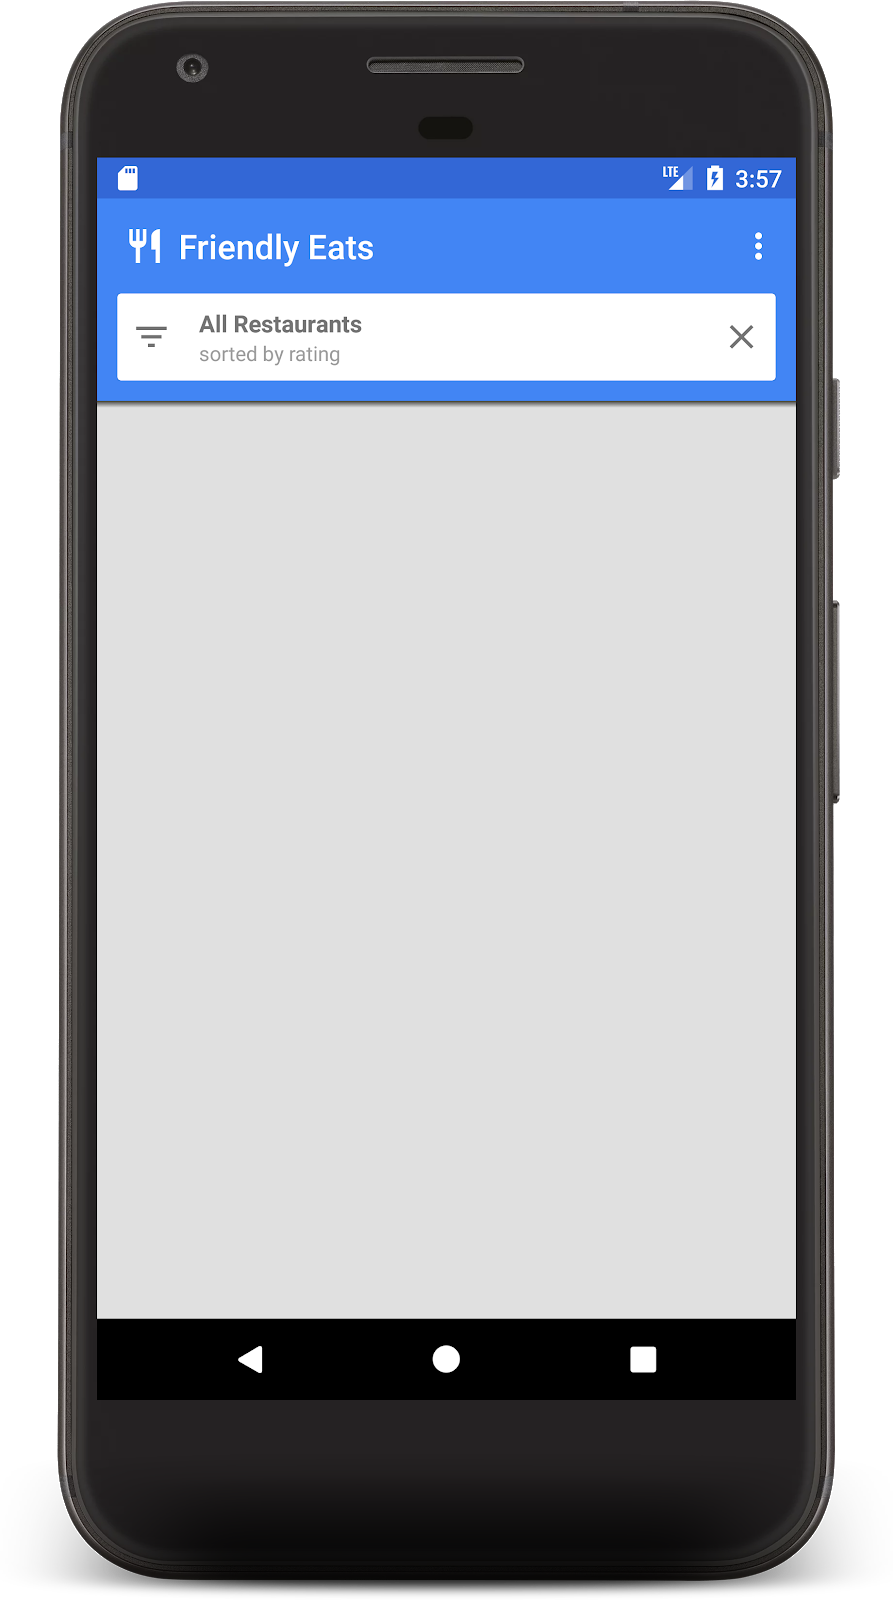
很快,我们将添加一些数据来填充主屏幕。
6. 将数据写入 Firestore
在本部分中,我们将一些数据写入 Firestore,以便填充目前空白的主屏幕。
我们应用中的主要模型对象是餐厅(请参阅 model/Restaurant.kt)。Firestore 数据分为文档、集合和子集合。我们将每家餐馆以文档形式存储在名为 "restaurants" 的顶级集合中。如需详细了解 Firestore 数据模型,请参阅文档中的文档和集合。
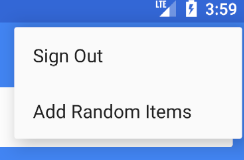
出于演示目的,我们将在应用中添加一项功能,以便在点击溢出菜单中的“添加随机项”按钮时创建 10 家随机餐馆。打开文件 MainFragment.kt,并将 onAddItemsClicked() 方法中的内容替换为:
    private fun onAddItemsClicked() {
        val restaurantsRef = firestore.collection("restaurants")
        for (i in 0..9) {
            // Create random restaurant / ratings
            val randomRestaurant = RestaurantUtil.getRandom(requireContext())

            // Add restaurant
            restaurantsRef.add(randomRestaurant)
        }
    }
关于上述代码,有几点重要事项需要注意:
- 我们首先获取对
"restaurants"集合的引用。添加文档时会隐式创建集合,因此无需在写入数据之前创建集合。 - 可以使用 Kotlin 数据类创建文档,我们使用这些数据类来创建每个餐厅文档。
add()方法会向集合中添加具有自动生成的 ID 的文档,因此我们无需为每个餐厅指定唯一 ID。
现在,再次运行应用,然后点击溢出菜单(右上角)中的“Add Random Items”按钮,以调用您刚刚编写的代码:
现在,在网络浏览器中前往 http://localhost:4000,打开模拟器界面。然后,点击 Firestore 标签页,您应该会看到刚刚添加的数据:
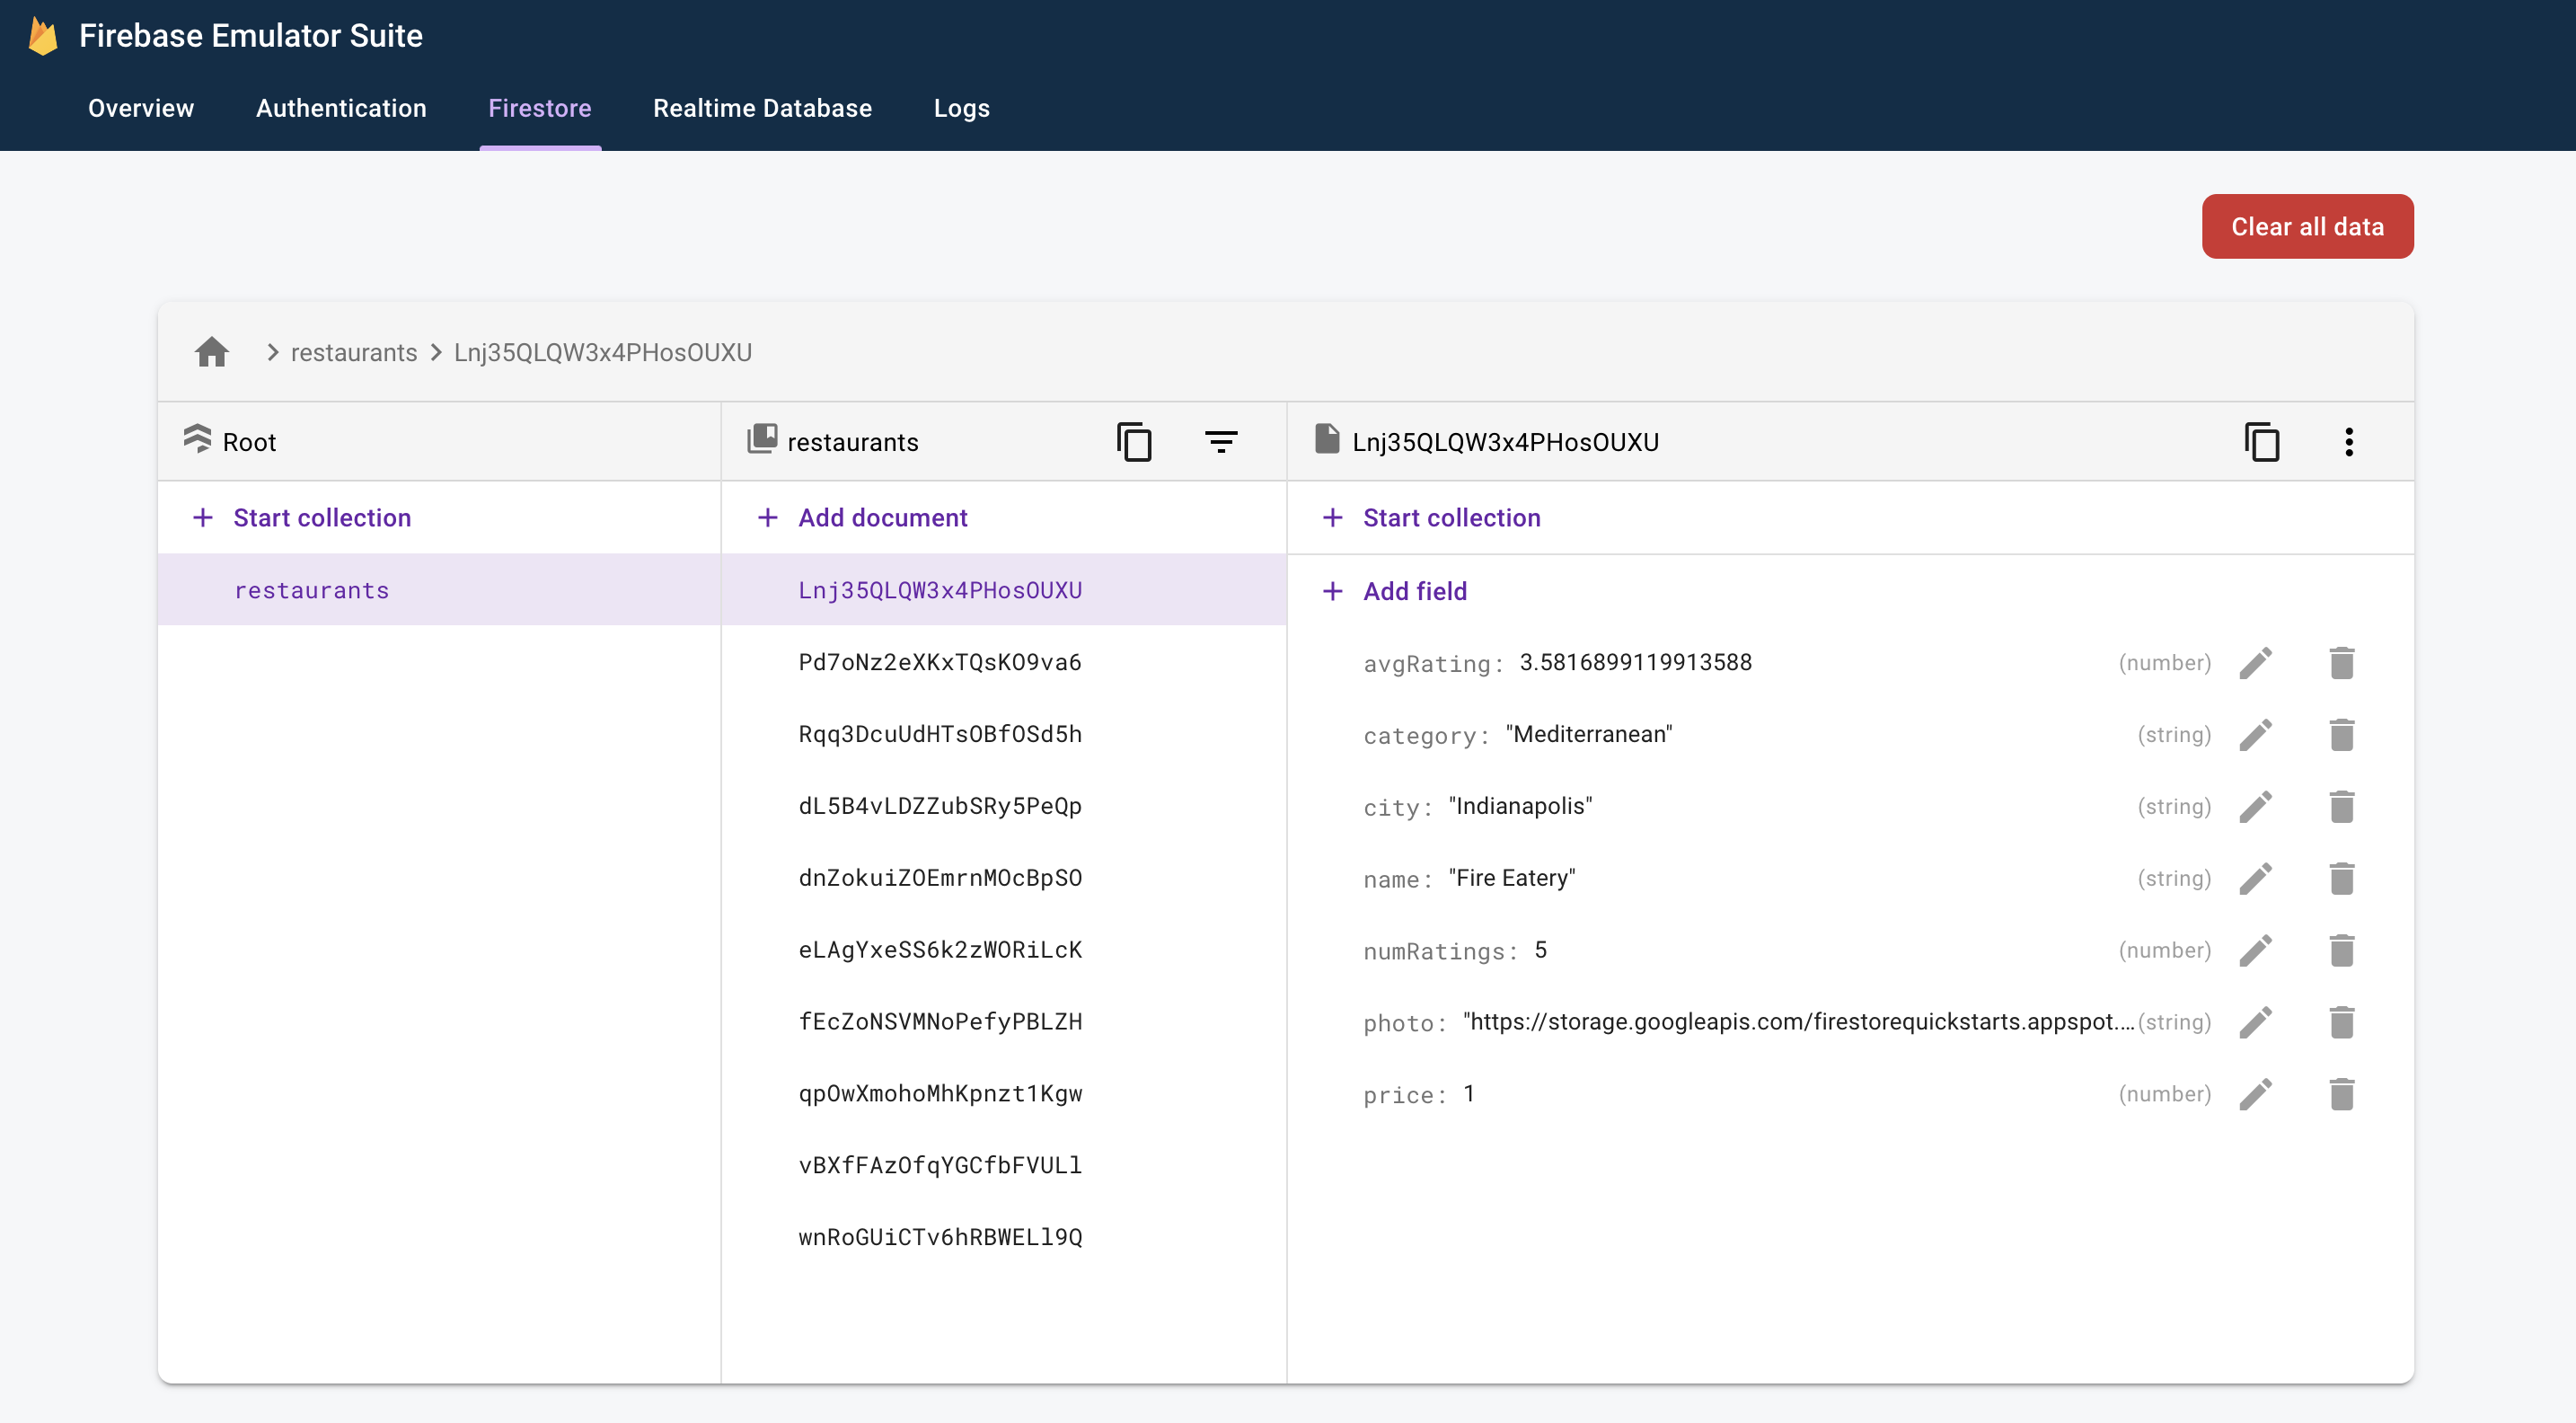
这些数据 100% 位于您的本地机器上。事实上,您的实际项目甚至还没有包含 Firestore 数据库!这意味着您可以放心地尝试修改和删除这些数据,而不会产生任何后果。
恭喜,您刚刚向 Firestore 写入了数据!在下一步中,我们将学习如何在应用中显示这些数据。
7. 显示来自 Firestore 的数据
在此步骤中,我们将学习如何从 Firestore 检索数据并在应用中显示这些数据。从 Firestore 读取数据的第一步是创建 Query。打开 MainFragment.kt 文件,并将以下代码添加到 onViewCreated() 方法的开头:
        // Firestore
        firestore = Firebase.firestore

        // Get the 50 highest rated restaurants
        query = firestore.collection("restaurants")
            .orderBy("avgRating", Query.Direction.DESCENDING)
            .limit(LIMIT.toLong())
现在,我们想要监听查询,以便获取所有匹配的文档,并实时收到未来更新的通知。由于我们的最终目标是将此数据绑定到 RecyclerView,因此我们需要创建一个 RecyclerView.Adapter 类来监听数据。
打开已部分实现的 FirestoreAdapter 类。首先,让适配器实现 EventListener 并定义 onEvent 函数,以便它可以接收对 Firestore 查询的更新:
abstract class FirestoreAdapter<VH : RecyclerView.ViewHolder>(private var query: Query?) :
        RecyclerView.Adapter<VH>(),
        EventListener<QuerySnapshot> { // Add this implements

    // ...

    // Add this method
    override fun onEvent(documentSnapshots: QuerySnapshot?, e: FirebaseFirestoreException?) {

        // Handle errors
        if (e != null) {
            Log.w(TAG, "onEvent:error", e)
            return
        }

        // Dispatch the event
        if (documentSnapshots != null) {
            for (change in documentSnapshots.documentChanges) {
                // snapshot of the changed document
                when (change.type) {
                    DocumentChange.Type.ADDED -> {
                        // TODO: handle document added
                    }
                    DocumentChange.Type.MODIFIED -> {
                        // TODO: handle document changed
                    }
                    DocumentChange.Type.REMOVED -> {
                        // TODO: handle document removed
                    }
                }
            }
        }

        onDataChanged()
    }

    // ...
}
在初始加载时,监听器将为每个新文档接收一个 ADDED 事件。随着查询结果集随时间变化,监听器将收到更多包含这些变化的事件。现在,我们来完成监听器的实现。首先,添加三种新方法:onDocumentAdded、onDocumentModified 和 onDocumentRemoved:
    private fun onDocumentAdded(change: DocumentChange) {
        snapshots.add(change.newIndex, change.document)
        notifyItemInserted(change.newIndex)
    }

    private fun onDocumentModified(change: DocumentChange) {
        if (change.oldIndex == change.newIndex) {
            // Item changed but remained in same position
            snapshots[change.oldIndex] = change.document
            notifyItemChanged(change.oldIndex)
        } else {
            // Item changed and changed position
            snapshots.removeAt(change.oldIndex)
            snapshots.add(change.newIndex, change.document)
            notifyItemMoved(change.oldIndex, change.newIndex)
        }
    }

    private fun onDocumentRemoved(change: DocumentChange) {
        snapshots.removeAt(change.oldIndex)
        notifyItemRemoved(change.oldIndex)
    }
然后,从 onEvent 调用这些新方法:
    override fun onEvent(documentSnapshots: QuerySnapshot?, e: FirebaseFirestoreException?) {

        // Handle errors
        if (e != null) {
            Log.w(TAG, "onEvent:error", e)
            return
        }

        // Dispatch the event
        if (documentSnapshots != null) {
            for (change in documentSnapshots.documentChanges) {
                // snapshot of the changed document
                when (change.type) {
                    DocumentChange.Type.ADDED -> {
                        onDocumentAdded(change) // Add this line
                    }
                    DocumentChange.Type.MODIFIED -> {
                        onDocumentModified(change) // Add this line
                    }
                    DocumentChange.Type.REMOVED -> {
                        onDocumentRemoved(change) // Add this line
                    }
                }
            }
        }

        onDataChanged()
    }
最后,实现 startListening() 方法以附加监听器:
    fun startListening() {
        if (registration == null) {
            registration = query.addSnapshotListener(this)
        }
    }
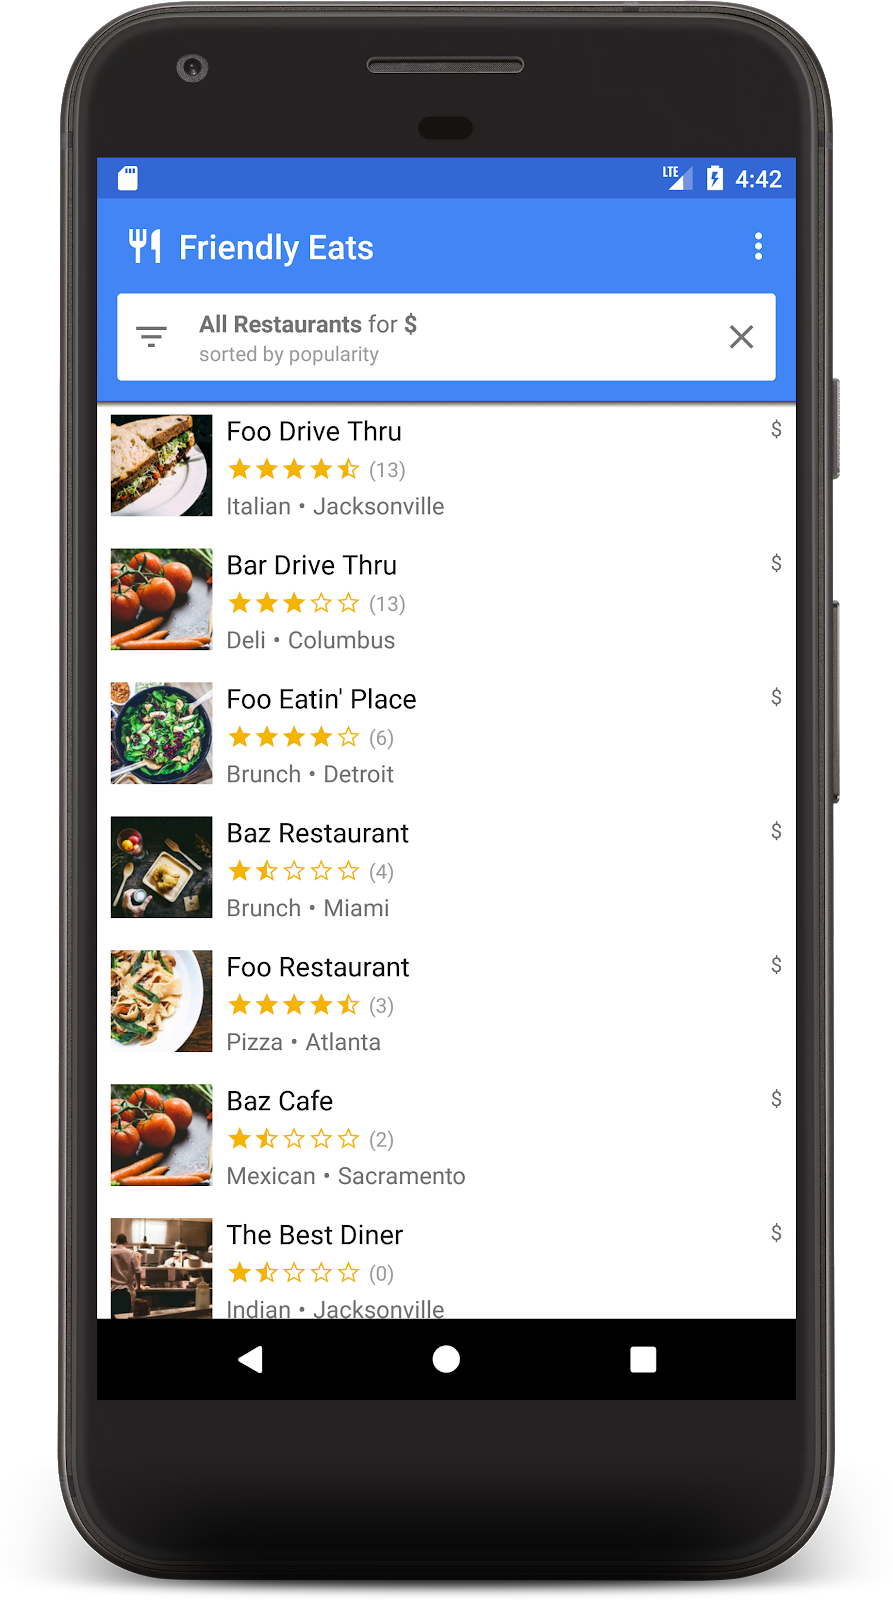
现在,应用已完全配置为从 Firestore 读取数据。再次运行应用,您应该会看到在上一步中添加的餐厅:
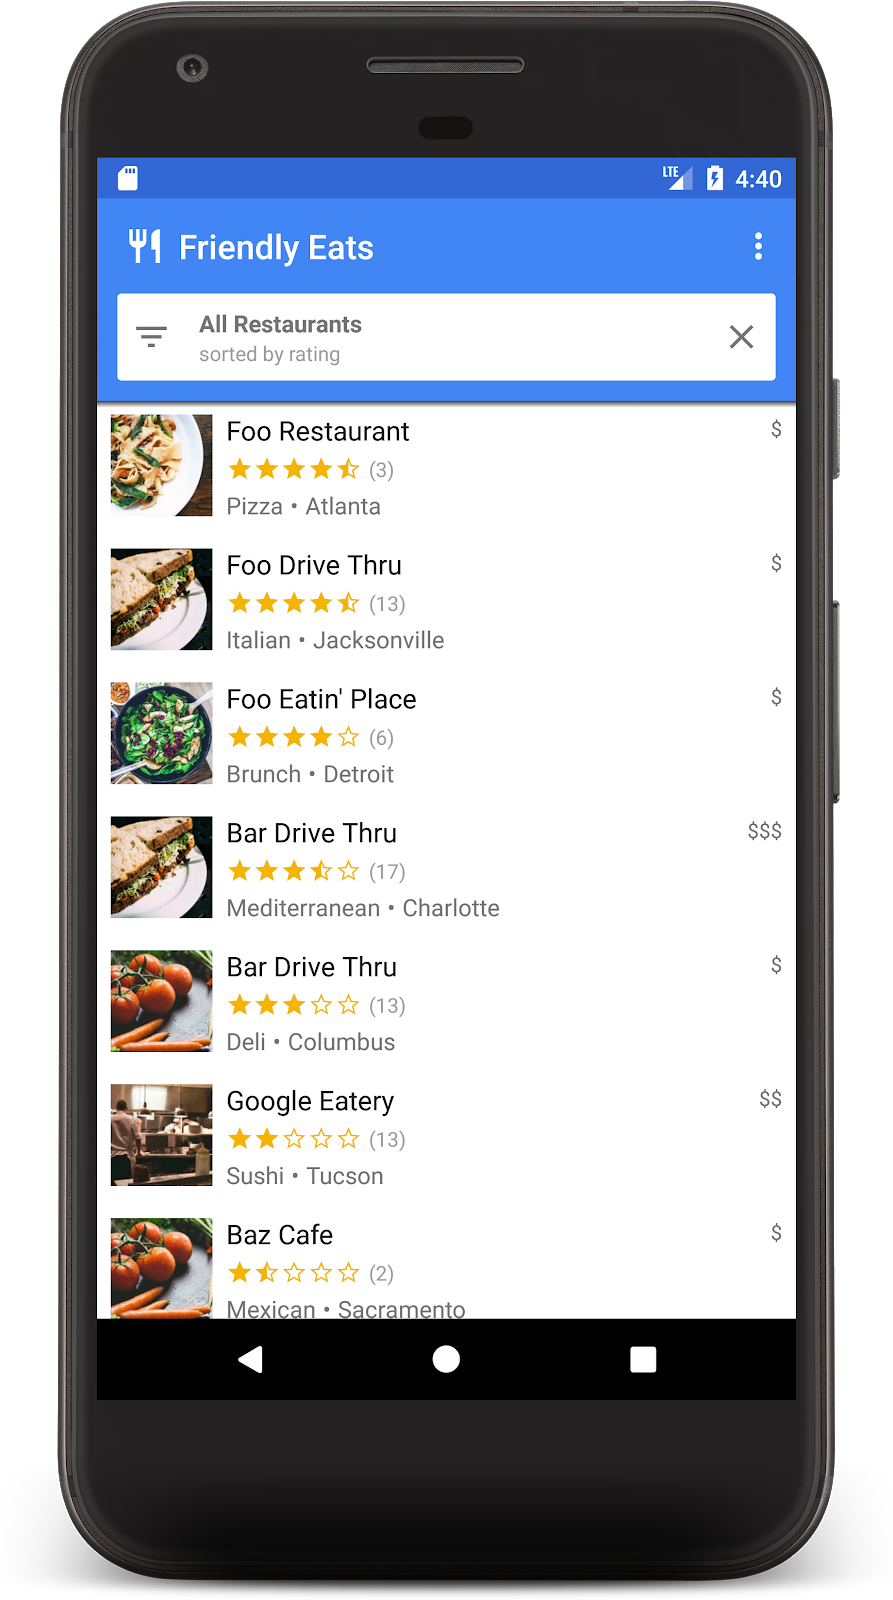
现在,返回浏览器中的模拟器界面,然后修改其中一个餐厅名称。您应该会看到应用中的名称几乎立即发生变化!
8. 对数据进行排序和过滤
该应用目前会显示整个集合中评价最高的餐厅,但在真实的餐厅应用中,用户会希望对数据进行排序和过滤。例如,应用应能够显示“费城最棒的海鲜餐厅”或“最便宜的披萨”。
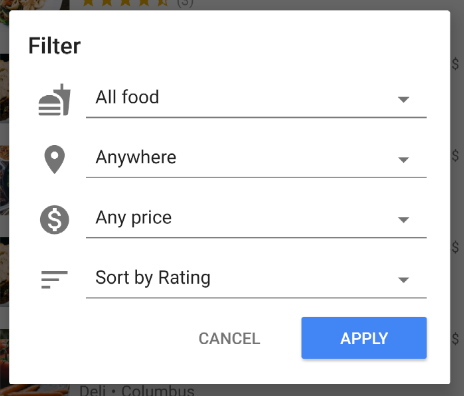
点击应用顶部的白色栏会显示一个过滤条件对话框。在本部分中,我们将使用 Firestore 查询来使此对话框正常工作:
我们来修改 MainFragment.kt 的 onFilter() 方法。此方法接受 Filters 对象,该对象是我们创建的用于捕获过滤条件对话框输出的辅助对象。我们将更改此方法,以根据过滤条件构建查询:
    override fun onFilter(filters: Filters) {
        // Construct query basic query
        var query: Query = firestore.collection("restaurants")

        // Category (equality filter)
        if (filters.hasCategory()) {
            query = query.whereEqualTo(Restaurant.FIELD_CATEGORY, filters.category)
        }

        // City (equality filter)
        if (filters.hasCity()) {
            query = query.whereEqualTo(Restaurant.FIELD_CITY, filters.city)
        }

        // Price (equality filter)
        if (filters.hasPrice()) {
            query = query.whereEqualTo(Restaurant.FIELD_PRICE, filters.price)
        }

        // Sort by (orderBy with direction)
        if (filters.hasSortBy()) {
            query = query.orderBy(filters.sortBy.toString(), filters.sortDirection)
        }

        // Limit items
        query = query.limit(LIMIT.toLong())

        // Update the query
        adapter.setQuery(query)

        // Set header
        binding.textCurrentSearch.text = HtmlCompat.fromHtml(
            filters.getSearchDescription(requireContext()),
            HtmlCompat.FROM_HTML_MODE_LEGACY
        )
        binding.textCurrentSortBy.text = filters.getOrderDescription(requireContext())

        // Save filters
        viewModel.filters = filters
    }
在上面的代码段中,我们通过附加 where 和 orderBy 子句来构建 Query 对象,以匹配给定的过滤条件。
再次运行应用,然后选择以下过滤条件以显示最受欢迎的低价餐厅:
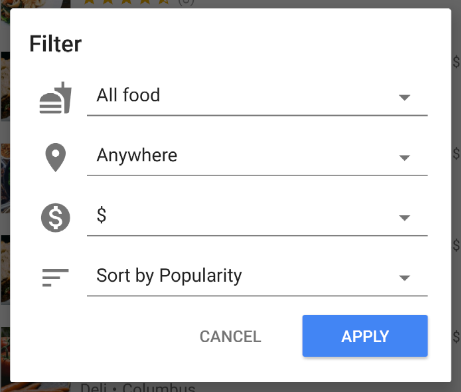
现在,您应该会看到过滤后的餐厅列表,其中仅包含低价选项:
如果您已完成上述所有步骤,那么现在您已在 Firestore 上构建了一个功能齐全的餐馆推荐查看应用!您现在可以实时对餐厅进行排序和过滤。在接下来的几个部分中,我们将为餐厅添加评价,并为应用添加安全规则。
9. 整理子集合中的数据
在本部分中,我们将向应用添加评分功能,以便用户评价自己最喜欢(或最不喜欢)的餐厅。
集合和子集合
到目前为止,我们已将所有餐厅数据存储在名为“restaurants”的顶级集合中。当用户为餐厅评分时,我们希望向餐厅添加新的 Rating 对象。在此任务中,我们将使用子集合。您可以将子集合视为附加到文档的集合。因此,每个餐厅文档都会有一个包含评分文档的评分子集合。子集合有助于整理数据,而不会使文档过于庞大,也不需要复杂的查询。
如需访问子集合,请对父文档调用 .collection():
val subRef = firestore.collection("restaurants")
        .document("abc123")
        .collection("ratings")
您可以像访问和查询顶级集合一样访问和查询子集合,并且不会有大小限制或性能变化。您可以点击此处,详细了解 Firestore 数据模型。
在事务中写入数据
向适当的子集合添加 Rating 只需调用 .add(),但我们还需要更新 Restaurant 对象的平均评分和评分数量,以反映新数据。如果我们使用单独的操作来进行这两项更改,则可能会出现许多竞态条件,导致数据过时或不正确。
为确保评分添加正确,我们将使用事务为餐厅添加评分。此交易将执行以下几项操作:
- 读取餐厅的当前评分并计算新评分
- 将评分添加到子集合
- 更新餐厅的平均评分和评分数量
打开 RestaurantDetailFragment.kt 并实现 addRating 函数:
    private fun addRating(restaurantRef: DocumentReference, rating: Rating): Task<Void> {
        // Create reference for new rating, for use inside the transaction
        val ratingRef = restaurantRef.collection("ratings").document()

        // In a transaction, add the new rating and update the aggregate totals
        return firestore.runTransaction { transaction ->
            val restaurant = transaction.get(restaurantRef).toObject<Restaurant>()
                ?: throw Exception("Restaurant not found at ${restaurantRef.path}")

            // Compute new number of ratings
            val newNumRatings = restaurant.numRatings + 1

            // Compute new average rating
            val oldRatingTotal = restaurant.avgRating * restaurant.numRatings
            val newAvgRating = (oldRatingTotal + rating.rating) / newNumRatings

            // Set new restaurant info
            restaurant.numRatings = newNumRatings
            restaurant.avgRating = newAvgRating

            // Commit to Firestore
            transaction.set(restaurantRef, restaurant)
            transaction.set(ratingRef, rating)

            null
        }
    }
addRating() 函数会返回一个表示整个交易的 Task。在 onRating() 函数中,监听器会添加到任务中,以响应交易结果。
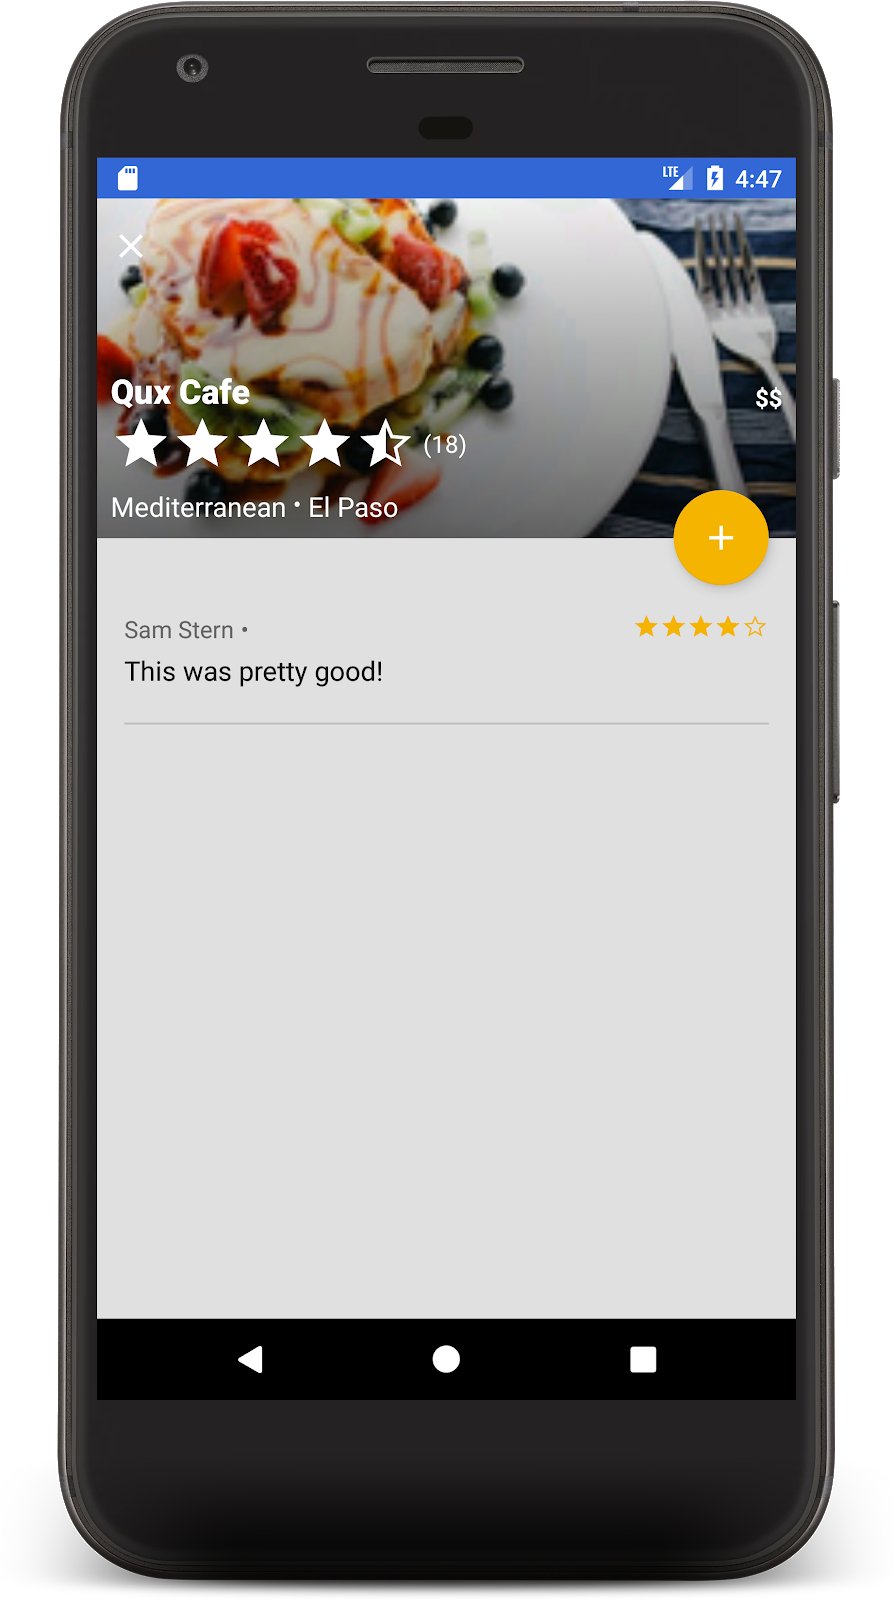
现在,再次运行应用,然后点击其中一家餐厅,系统应会显示餐厅详情界面。点击 + 按钮,开始添加评价。选择星级并输入一些文字,即可添加评价。
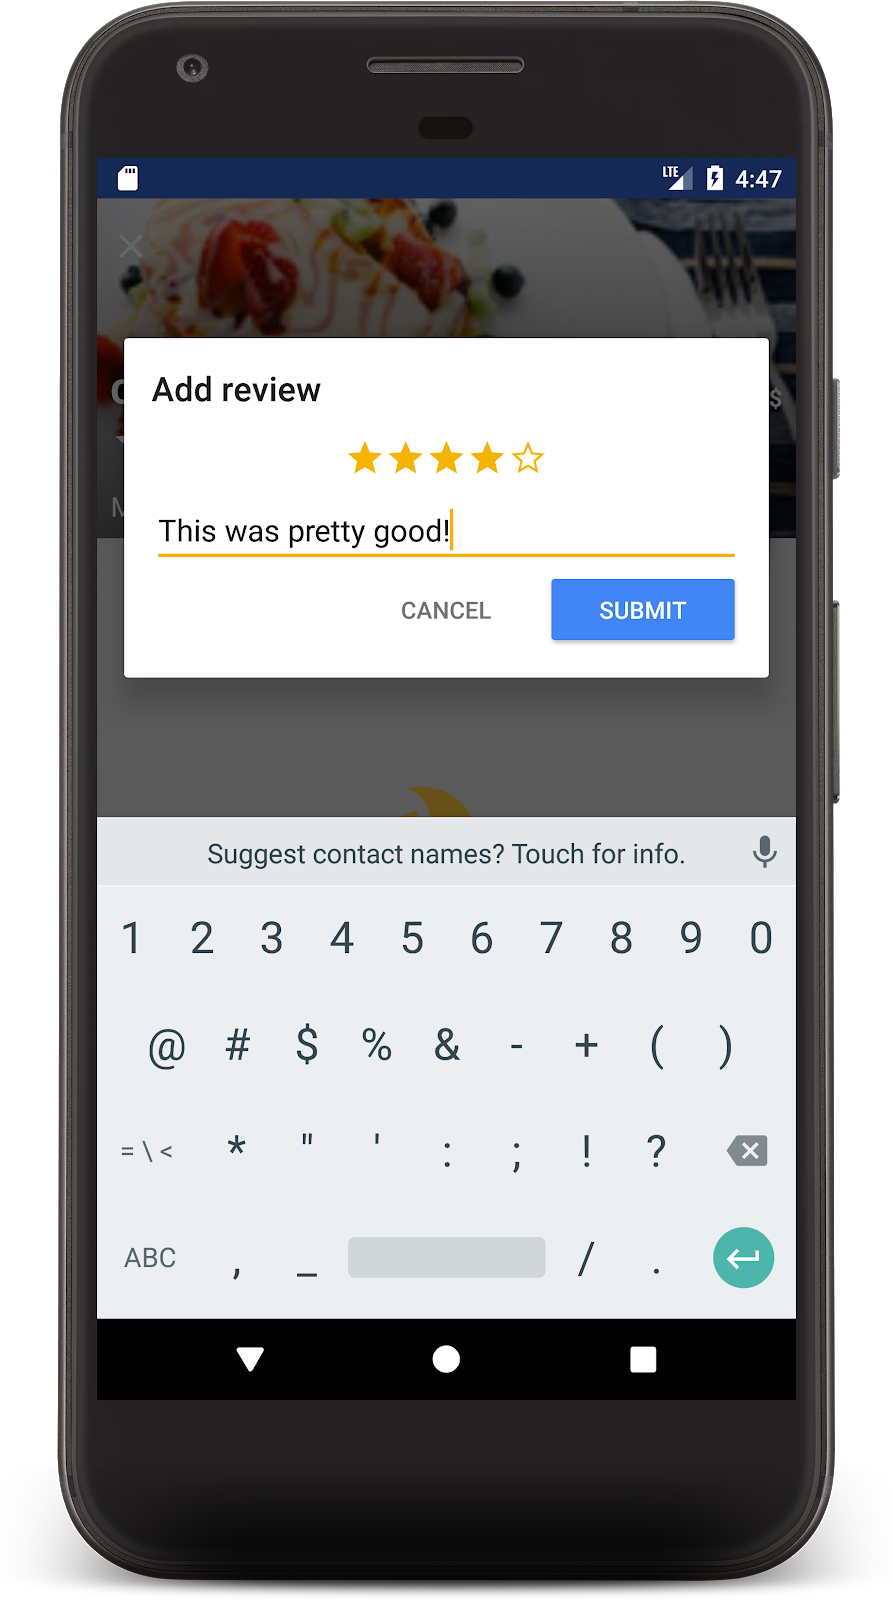
点击提交即可开始交易。交易完成后,您会在下方看到自己的评价,并且餐馆的评价数量也会更新:
恭喜!现在,您已构建了一个基于 Cloud Firestore 的社交本地移动餐馆评价应用。听说这些功能现在非常受欢迎。
10. 保护您的数据
到目前为止,我们尚未考虑此应用的安全问题。我们如何知道用户只能读取和写入正确的数据?Firestore 数据库通过名为安全规则的配置文件进行保护。
打开 firestore.rules 文件,然后将内容替换为以下内容:
rules_version = '2';
service cloud.firestore {
  match /databases/{database}/documents {
    // Determine if the value of the field "key" is the same
    // before and after the request.
    function isUnchanged(key) {
      return (key in resource.data)
        && (key in request.resource.data)
        && (resource.data[key] == request.resource.data[key]);
    }

    // Restaurants
    match /restaurants/{restaurantId} {
      // Any signed-in user can read
      allow read: if request.auth != null;

      // Any signed-in user can create
      // WARNING: this rule is for demo purposes only!
      allow create: if request.auth != null;

      // Updates are allowed if no fields are added and name is unchanged
      allow update: if request.auth != null
                    && (request.resource.data.keys() == resource.data.keys())
                    && isUnchanged("name");

      // Deletes are not allowed.
      // Note: this is the default, there is no need to explicitly state this.
      allow delete: if false;

      // Ratings
      match /ratings/{ratingId} {
        // Any signed-in user can read
        allow read: if request.auth != null;

        // Any signed-in user can create if their uid matches the document
        allow create: if request.auth != null
                      && request.resource.data.userId == request.auth.uid;

        // Deletes and updates are not allowed (default)
        allow update, delete: if false;
      }
    }
  }
}
这些规则用于限制访问,以确保客户端仅进行安全的更改。例如,对餐馆文档的更新只能更改评分,不能更改名称或任何其他不可变数据。只有当用户 ID 与登录的用户相匹配时,才能创建评分,这样可以防止仿冒攻击。
如需详细了解安全规则,请参阅相关文档。
11. 总结
现在,您已在 Firestore 的基础上创建了一个功能齐全的应用。您了解了最重要的 Firestore 功能,包括:
- 文档和集合
- 读取和写入数据
- 使用查询进行排序和过滤
- 子集合
- 事务
了解详情
如需继续了解 Firestore,建议您从以下资源着手:
此 Codelab 中的餐厅应用基于“Friendly Eats”示例应用。您可以点击此处浏览该应用的源代码。
可选:部署到生产环境
到目前为止,此应用仅使用了 Firebase Emulator Suite。如果您想了解如何将此应用部署到真实的 Firebase 项目,请继续执行下一步。
12. (可选)部署应用
到目前为止,此应用完全是本地应用,所有数据都包含在 Firebase Emulator Suite 中。在本部分中,您将学习如何配置 Firebase 项目,以便此应用在生产环境中正常运行。
Firebase Authentication
在 Firebase 控制台中,前往身份验证部分,然后点击开始。前往登录方法标签页,然后从原生提供方中选择电子邮件地址/密码选项。
启用电子邮件地址/密码登录方法,然后点击保存。

Firestore
创建数据库
前往控制台的 Firestore 数据库部分,然后点击创建数据库:
- 当系统提示您选择安全规则时,请选择以生产模式开始,我们会尽快更新这些规则。
- 为应用选择要使用的数据库位置。请注意,选择数据库位置是永久性的决定,如需更改,您必须创建新项目。如需详细了解如何选择项目位置,请参阅相关文档。
部署规则
如需部署您之前编写的安全规则,请在 Codelab 目录中运行以下命令:
$ firebase deploy --only firestore:rules
这会将 firestore.rules 的内容部署到您的项目中,您可以通过前往控制台中的规则标签页来确认这一点。
部署索引
FriendlyEats 应用具有复杂的排序和过滤功能,需要多个自定义复合索引。这些索引可以在 Firebase 控制台中手动创建,但更简单的方法是在 firestore.indexes.json 文件中写入其定义,然后使用 Firebase CLI 部署它们。
如果您打开 firestore.indexes.json 文件,会看到所需的索引已提供:
{
  "indexes": [
    {
      "collectionId": "restaurants",
      "queryScope": "COLLECTION",
      "fields": [
        { "fieldPath": "city", "mode": "ASCENDING" },
        { "fieldPath": "avgRating", "mode": "DESCENDING" }
      ]
    },
    {
      "collectionId": "restaurants",
      "queryScope": "COLLECTION",
      "fields": [
        { "fieldPath": "category", "mode": "ASCENDING" },
        { "fieldPath": "avgRating", "mode": "DESCENDING" }
      ]
    },
    {
      "collectionId": "restaurants",
      "queryScope": "COLLECTION",
      "fields": [
        { "fieldPath": "price", "mode": "ASCENDING" },
        { "fieldPath": "avgRating", "mode": "DESCENDING" }
      ]
    },
    {
      "collectionId": "restaurants",
      "queryScope": "COLLECTION",
      "fields": [
        { "fieldPath": "city", "mode": "ASCENDING" },
        { "fieldPath": "numRatings", "mode": "DESCENDING" }
      ]
    },
    {
      "collectionId": "restaurants",
      "queryScope": "COLLECTION",
      "fields": [
        { "fieldPath": "category", "mode": "ASCENDING" },
        { "fieldPath": "numRatings", "mode": "DESCENDING" }
      ]
    },
    {
      "collectionId": "restaurants",
      "queryScope": "COLLECTION",
      "fields": [
        { "fieldPath": "price", "mode": "ASCENDING" },
        { "fieldPath": "numRatings", "mode": "DESCENDING" }
      ]
    },
    {
      "collectionId": "restaurants",
      "queryScope": "COLLECTION",
      "fields": [
        { "fieldPath": "city", "mode": "ASCENDING" },
        { "fieldPath": "price", "mode": "ASCENDING" }
      ]
    },
    {
      "collectionId": "restaurants",
      "fields": [
        { "fieldPath": "category", "mode": "ASCENDING" },
        { "fieldPath": "price", "mode": "ASCENDING" }
      ]
    }
  ],
  "fieldOverrides": []
}
如需部署这些索引,请运行以下命令:
$ firebase deploy --only firestore:indexes
请注意,索引创建不是即时完成的,您可以在 Firebase 控制台中监控进度。
配置应用
在 util/FirestoreInitializer.kt 和 util/AuthInitializer.kt 文件中,我们配置了 Firebase SDK,使其在调试模式下连接到模拟器:
    override fun create(context: Context): FirebaseFirestore {
        val firestore = Firebase.firestore
        // Use emulators only in debug builds
        if (BuildConfig.DEBUG) {
            firestore.useEmulator(FIRESTORE_EMULATOR_HOST, FIRESTORE_EMULATOR_PORT)
        }
        return firestore
    }
如果您想使用真实的 Firebase 项目测试应用,可以执行以下任一操作:
- 在发布模式下构建应用,并在设备上运行该应用。
- 暂时将
BuildConfig.DEBUG替换为false,然后再次运行应用。
请注意,您可能需要退出应用,然后重新登录,才能正确连接到正式版。