1. Overview
Goals
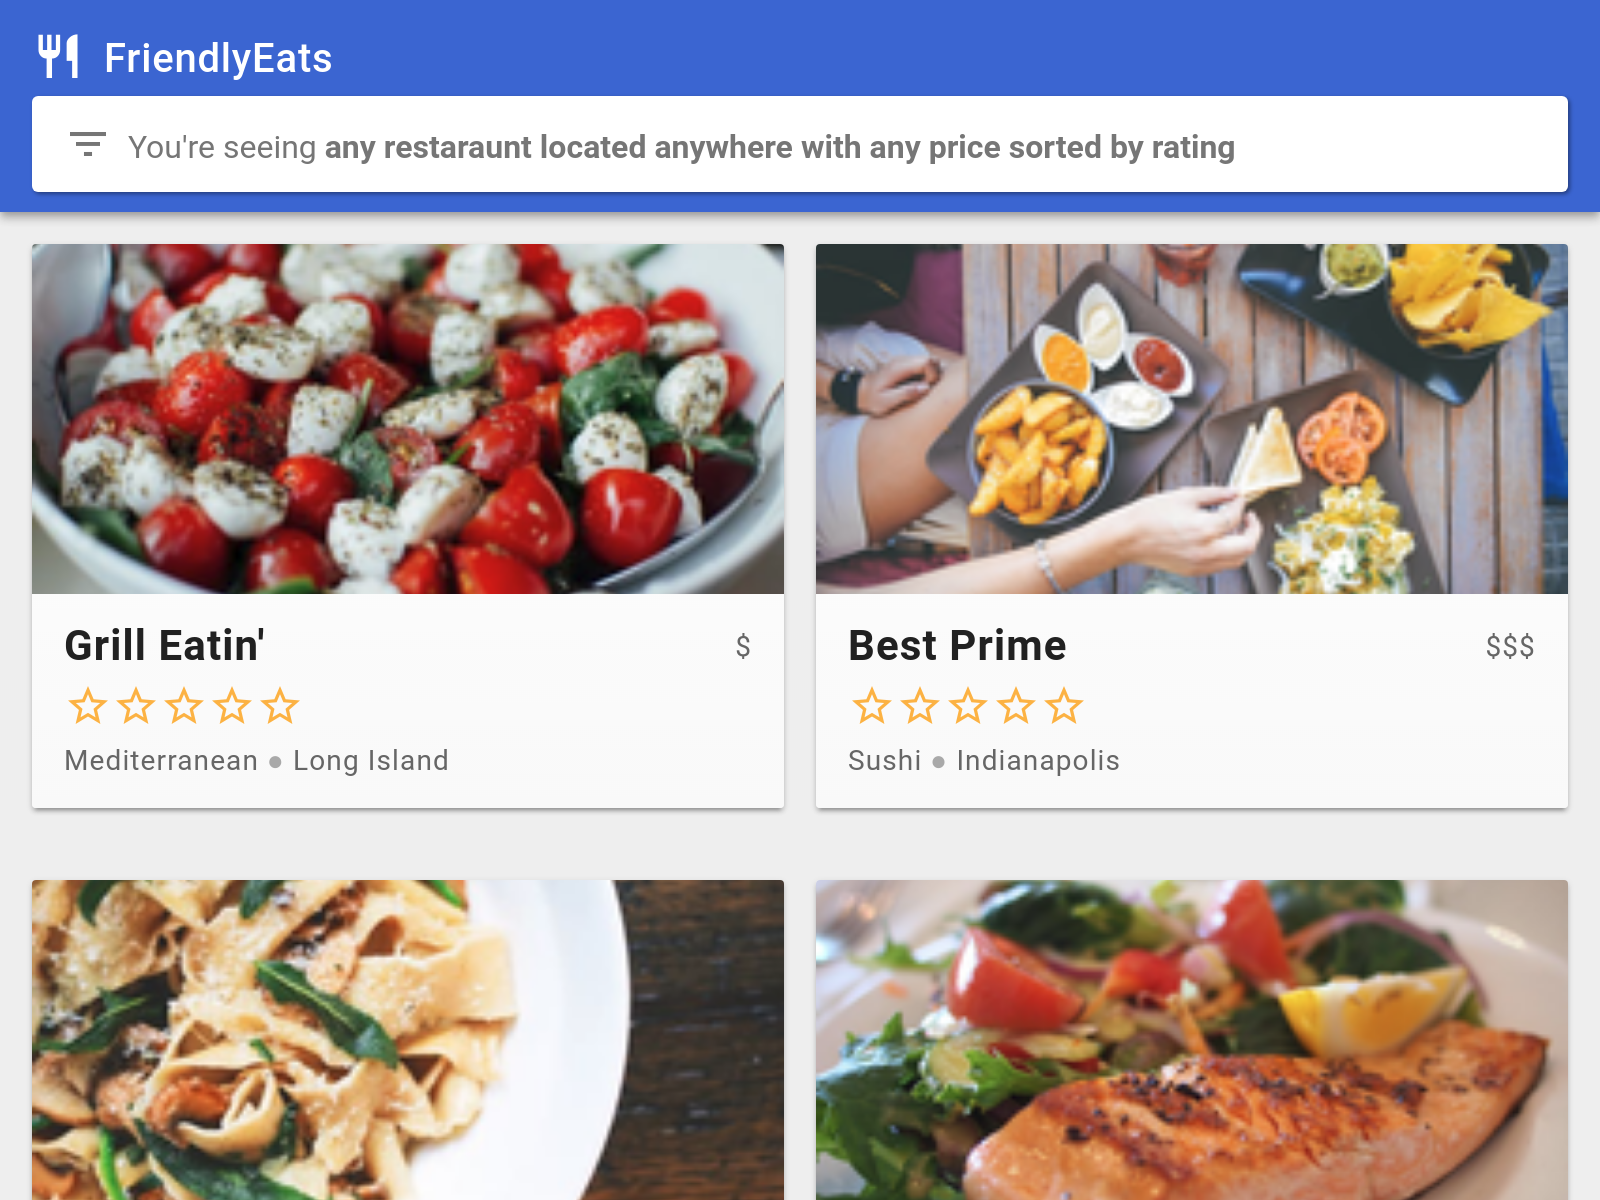
In this codelab, you'll build a restaurant recommendation web app powered by Cloud Firestore.
What you'll learn
- Read and write data to Cloud Firestore from a web app
- Listen to changes in Cloud Firestore data in real time
- Use Firebase Authentication and security rules to secure Cloud Firestore data
- Write complex Cloud Firestore queries
What you'll need
Before starting this codelab, make sure that you've installed:
2. Create and set up a Firebase project
Create a Firebase project
- Sign into the Firebase console using your Google Account.
- Click the button to create a new project, and then enter a project name (for example,
FriendlyEats).
- Click Continue.
- If prompted, review and accept the Firebase terms, and then click Continue.
- (Optional) Enable AI assistance in the Firebase console (called "Gemini in Firebase").
- For this codelab, you do not need Google Analytics, so toggle off the Google Analytics option.
- Click Create project, wait for your project to provision, and then click Continue.
Set up Firebase products
The application that we're going to build uses a few Firebase services available on the web:
- Firebase Authentication to easily identify your users
- Cloud Firestore to save structured data on the Cloud and get instant notification when the data is updated
- Firebase Hosting to host and serve your static assets
For this specific codelab, we've already configured Firebase Hosting. However, for Firebase Auth and Cloud Firestore, we'll walk you through the configuration and enabling of the services using the Firebase console.
Enable Anonymous Auth
Although authentication isn't the focus of this codelab, it's important to have some form of authentication in our app. We'll use Anonymous login - meaning that the user will be silently signed in without being prompted.
You'll need to enable Anonymous login.
- In the Firebase console, locate the Build section in the left nav.
- Click Authentication, then click the Sign-in method tab (or click here to go directly there).
- Enable the Anonymous Sign-in Provider, then click Save.

This will allow the application to silently sign in your users when they access the web app. Feel free to read the Anonymous Authentication documentation to learn more.
Enable Cloud Firestore
The app uses Cloud Firestore to save and receive restaurant information and ratings.
You'll need to enable Cloud Firestore. In the Firebase console's Build section, click Firestore Database. Click Create database in the Cloud Firestore pane.
Access to data in Cloud Firestore is controlled by Security Rules. We'll talk more about rules later in this codelab but first we need to set some basic rules on our data to get started. In the Rules tab of the Firebase console add the following rules and then click Publish.
rules_version = '2';
service cloud.firestore {

  // Determine if the value of the field "key" is the same
  // before and after the request.
  function unchanged(key) {
    return (key in resource.data)
      && (key in request.resource.data)
      && (resource.data[key] == request.resource.data[key]);
  }

  match /databases/{database}/documents {
    // Restaurants:
    //   - Authenticated user can read
    //   - Authenticated user can create/update (for demo purposes only)
    //   - Updates are allowed if no fields are added and name is unchanged
    //   - Deletes are not allowed (default)
    match /restaurants/{restaurantId} {
      allow read: if request.auth != null;
      allow create: if request.auth != null;
      allow update: if request.auth != null
                    && (request.resource.data.keys() == resource.data.keys())
                    && unchanged("name");

      // Ratings:
      //   - Authenticated user can read
      //   - Authenticated user can create if userId matches
      //   - Deletes and updates are not allowed (default)
      match /ratings/{ratingId} {
        allow read: if request.auth != null;
        allow create: if request.auth != null
                      && request.resource.data.userId == request.auth.uid;
      }
    }
  }
}
We'll discuss these rules and how they work later in the codelab.
3. Get the sample code
Clone the GitHub repository from the command line:
git clone https://github.com/firebase/friendlyeats-web
The sample code should have been cloned into the 📁friendlyeats-web directory. From now on, make sure to run all your commands from this directory:
cd friendlyeats-web/vanilla-js
Import the starter app
Using your IDE (WebStorm, Atom, Sublime, Visual Studio Code...) open or import the 📁friendlyeats-web directory. This directory contains the starting code for the codelab which consists of a not-yet functional restaurant recommendation app. We'll make it functional throughout this codelab so you will need to edit code in that directory soon.
4. Install the Firebase Command Line Interface
The Firebase Command Line Interface (CLI) allows you to serve your web app locally and deploy your web app to Firebase Hosting.
- Install the CLI by running the following npm command:
npm -g install firebase-tools
- Verify that the CLI has been installed correctly by running the following command:
firebase --version
Make sure the version of the Firebase CLI is v7.4.0 or later.
- Authorize the Firebase CLI by running the following command:
firebase login
We've set up the web app template to pull your app's configuration for Firebase Hosting from your app's local directory and files. But to do this, we need to associate your app with your Firebase project.
- Make sure that your command line is accessing your app's local directory.
- Associate your app with your Firebase project by running the following command:
firebase use --add
- When prompted, select your Project ID, then give your Firebase project an alias.
An alias is useful if you have multiple environments (production, staging, etc). However, for this codelab, let's just use the alias of default.
- Follow the remaining instructions in your command line.
5. Run the local server
We're ready to actually start work on our app! Let's run our app locally!
- Run the following Firebase CLI command:
firebase emulators:start --only hosting
- Your command line should display the following response:
hosting: Local server: http://localhost:5000
We're using the Firebase Hosting emulator to serve our app locally. The web app should now be available from http://localhost:5000.
- Open your app at http://localhost:5000.
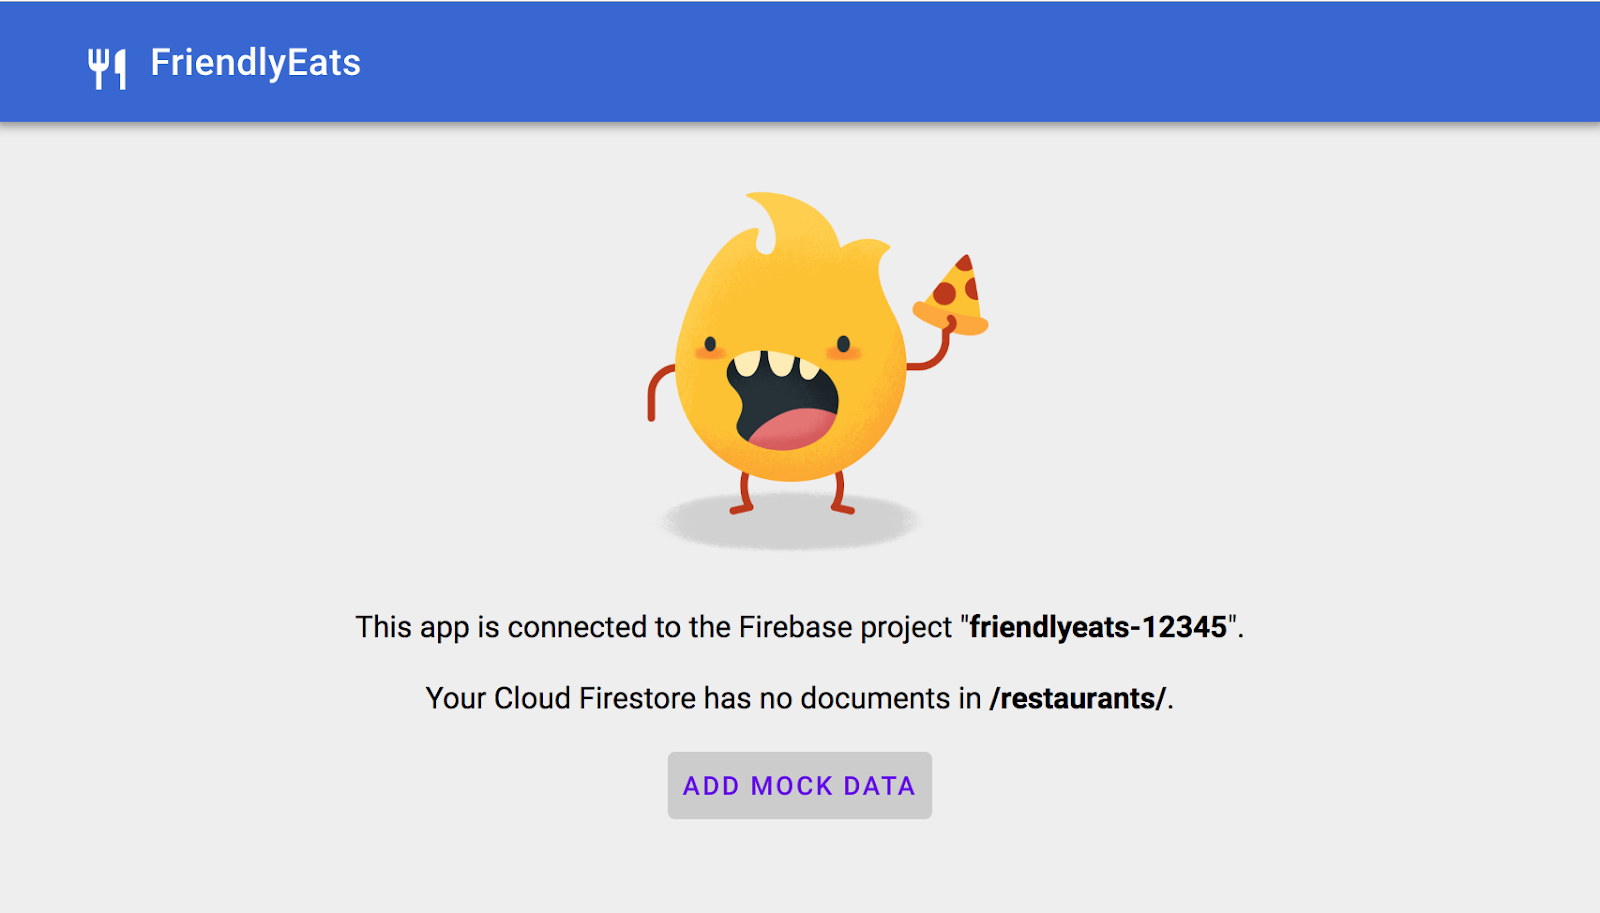
You should see your copy of FriendlyEats which has been connected to your Firebase project.
The app has automatically connected to your Firebase project and silently signed you in as an anonymous user.
6. Write data to Cloud Firestore
In this section, we'll write some data to Cloud Firestore so that we can populate the app's UI. This can be done manually via the Firebase console, but we'll do it in the app itself to demonstrate a basic Cloud Firestore write.
Data Model
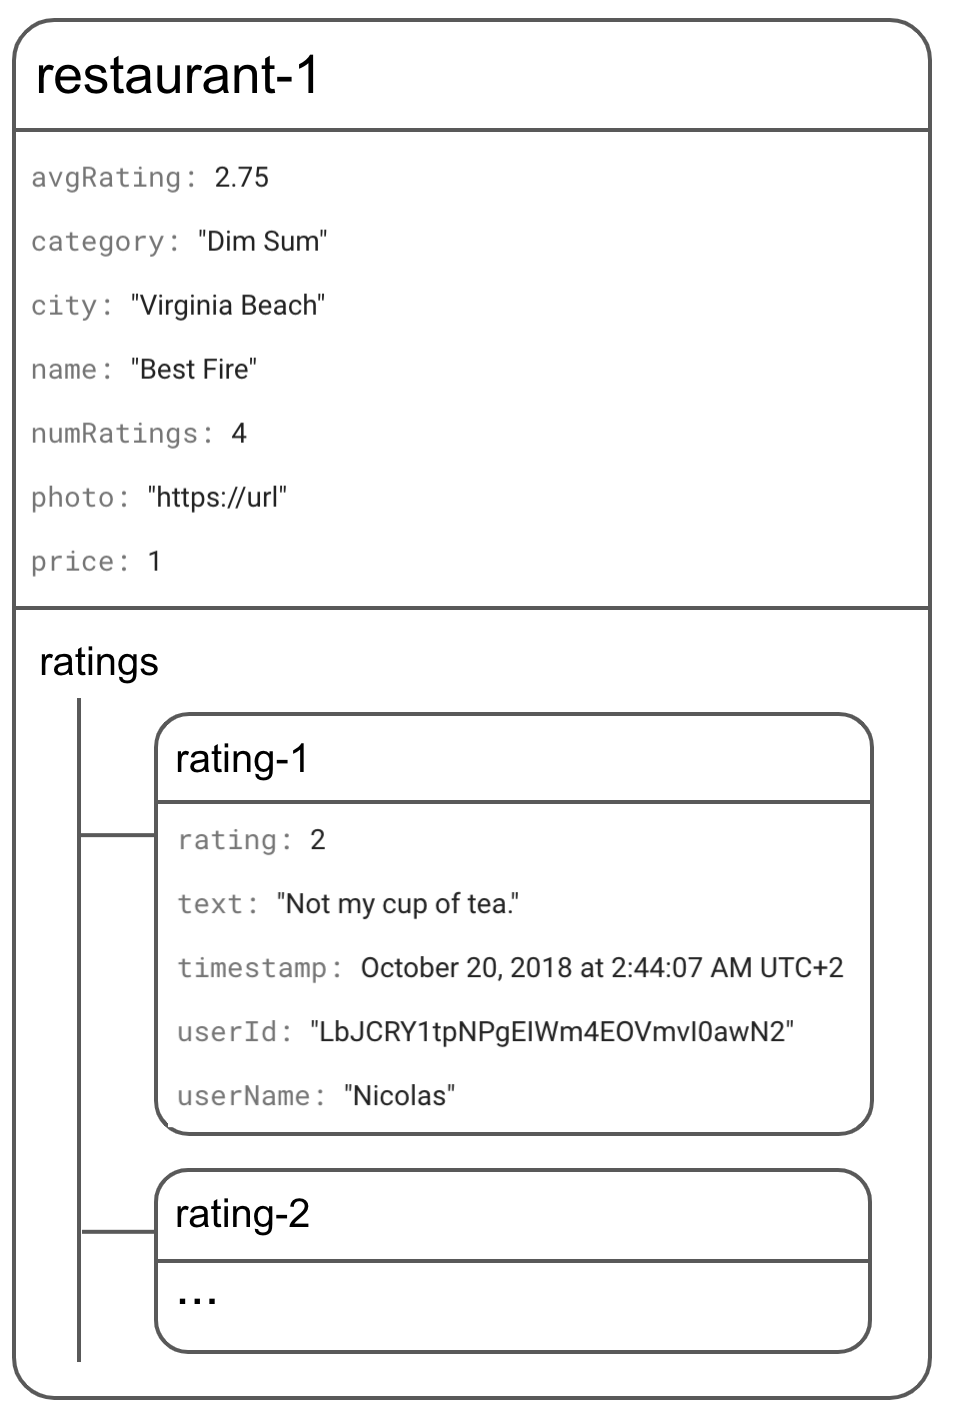
Firestore data is split into collections, documents, fields, and subcollections. We will store each restaurant as a document in a top-level collection called restaurants.
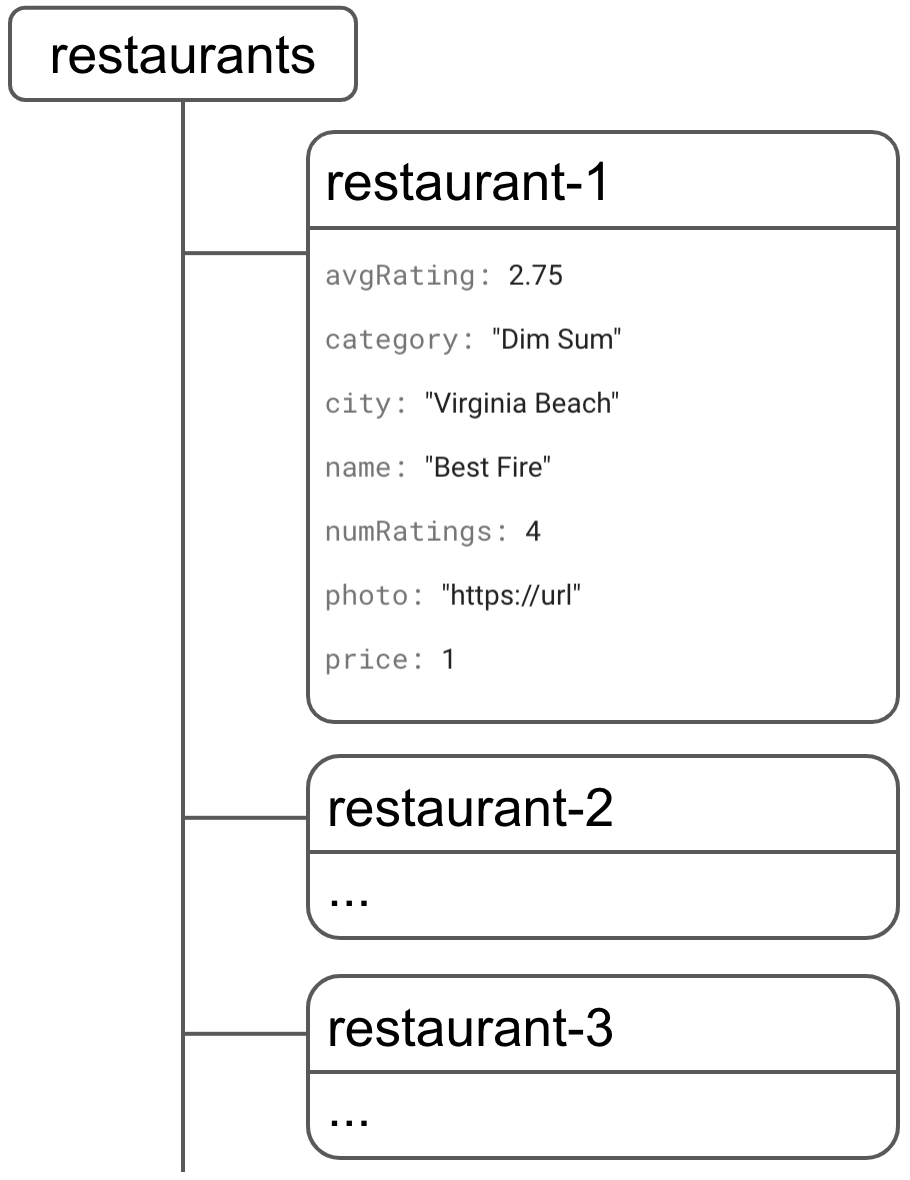
Later, we'll store each review in a subcollection called ratings under each restaurant.
Add restaurants to Firestore
The main model object in our app is a restaurant. Let's write some code that adds a restaurant document to the restaurants collection.
- From your downloaded files, open
scripts/FriendlyEats.Data.js. - Find the function
FriendlyEats.prototype.addRestaurant. - Replace the entire function with the following code.
FriendlyEats.Data.js
FriendlyEats.prototype.addRestaurant = function(data) {
  var collection = firebase.firestore().collection('restaurants');
  return collection.add(data);
};
The code above adds a new document to the restaurants collection. The document data comes from a plain JavaScript object. We do this by first getting a reference to a Cloud Firestore collection restaurants then add‘ing the data.
Let's add restaurants!
- Go back to your FriendlyEats app in your browser and refresh it.
- Click Add Mock Data.
The app will automatically generate a random set of restaurants objects, then call your addRestaurant function. However, you won't yet see the data in your actual web app because we still need to implement retrieving the data (the next section of the codelab).
If you navigate to the Cloud Firestore tab in the Firebase console, though, you should now see new documents in the restaurants collection!
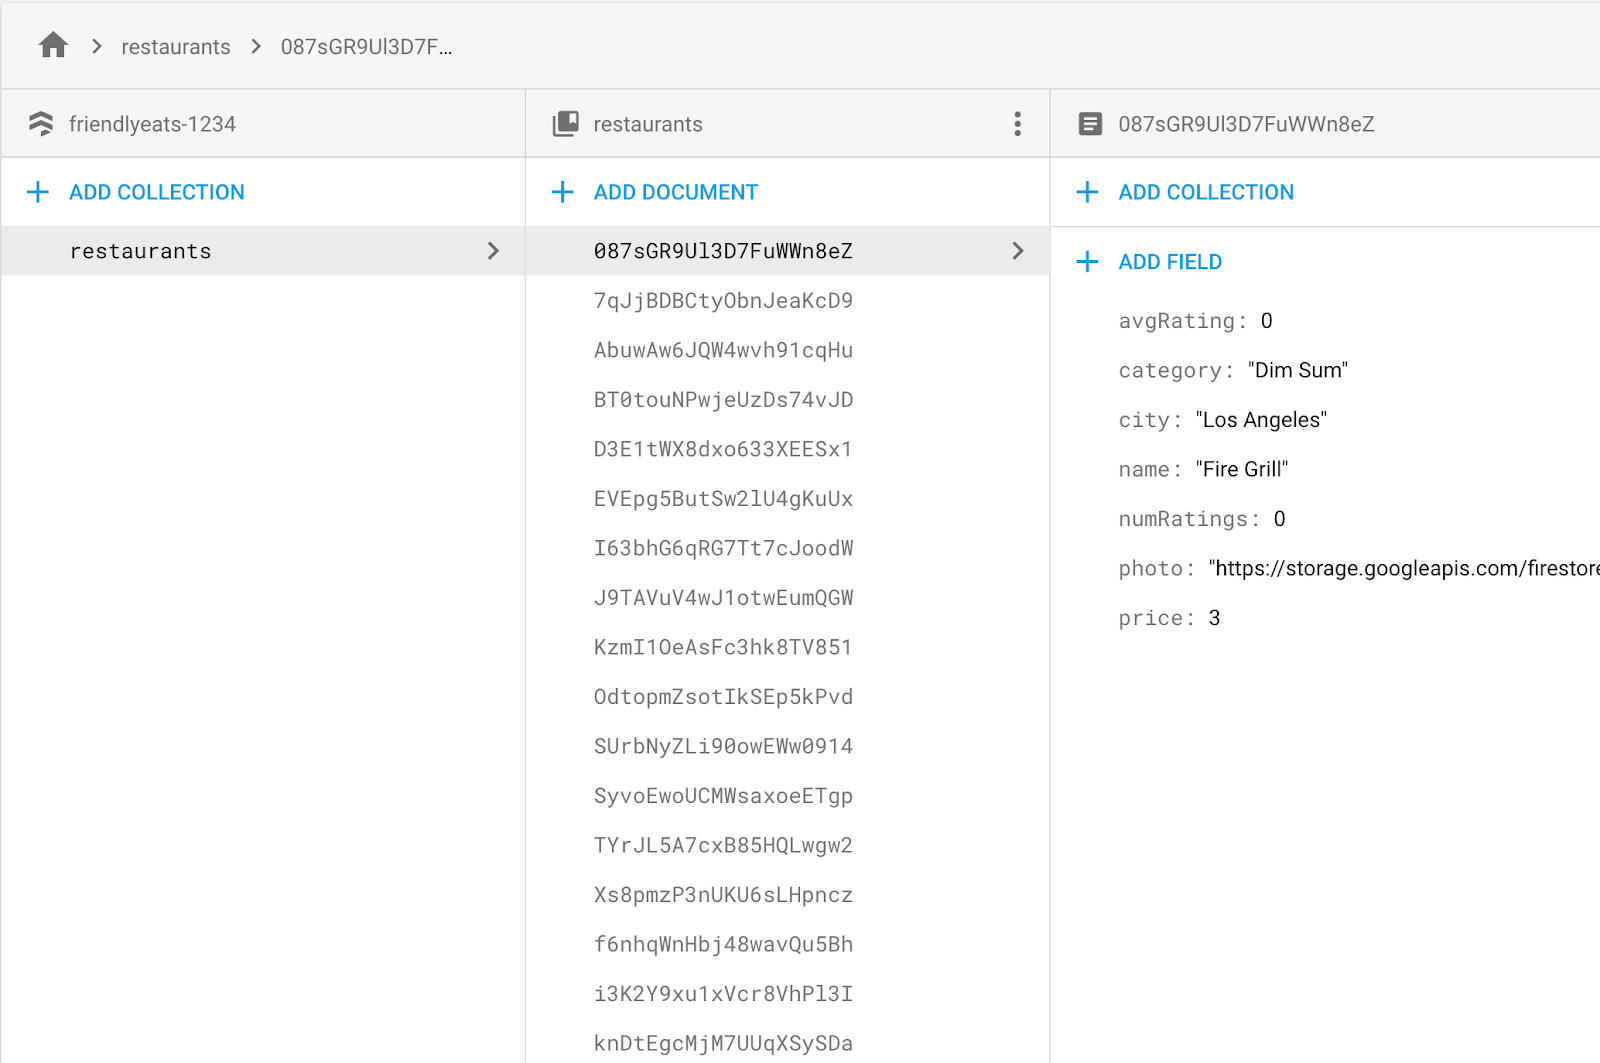
Congratulations, you have just written data to Cloud Firestore from a web app!
In the next section, you'll learn how to retrieve data from Cloud Firestore and display it in your app.
7. Display data from Cloud Firestore
In this section, you'll learn how to retrieve data from Cloud Firestore and display it in your app. The two key steps are creating a query and adding a snapshot listener. This listener will be notified of all existing data that matches the query and will receive updates in real time.
First, let's construct the query that will serve the default, unfiltered list of restaurants.
- Go back to the file
scripts/FriendlyEats.Data.js. - Find the function
FriendlyEats.prototype.getAllRestaurants. - Replace the entire function with the following code.
FriendlyEats.Data.js
FriendlyEats.prototype.getAllRestaurants = function(renderer) {
  var query = firebase.firestore()
      .collection('restaurants')
      .orderBy('avgRating', 'desc')
      .limit(50);

  this.getDocumentsInQuery(query, renderer);
};
In the code above, we construct a query which will retrieve up to 50 restaurants from the top-level collection named restaurants, which are ordered by the average rating (currently all zero). After we declared this query, we pass it to the getDocumentsInQuery() method which is responsible for loading and rendering the data.
We'll do this by adding a snapshot listener.
- Go back to the file
scripts/FriendlyEats.Data.js. - Find the function
FriendlyEats.prototype.getDocumentsInQuery. - Replace the entire function with the following code.
FriendlyEats.Data.js
FriendlyEats.prototype.getDocumentsInQuery = function(query, renderer) {
  query.onSnapshot(function(snapshot) {
    if (!snapshot.size) return renderer.empty(); // Display "There are no restaurants".

    snapshot.docChanges().forEach(function(change) {
      if (change.type === 'removed') {
        renderer.remove(change.doc);
      } else {
        renderer.display(change.doc);
      }
    });
  });
};
In the code above, query.onSnapshot will trigger its callback every time there's a change to the result of the query.
- The first time, the callback is triggered with the entire result set of the query – meaning the whole
restaurantscollection from Cloud Firestore. It then passes all the individual documents to therenderer.displayfunction. - When a document is deleted,
change.typeequals toremoved. So in this case, we'll call a function that removes the restaurant from the UI.
Now that we've implemented both methods, refresh the app and verify that the restaurants we saw earlier in the Firebase console are now visible in the app. If you completed this section successfully, then your app is now reading and writing data with Cloud Firestore!
As your list of restaurants changes, this listener will keep updating automatically. Try going to the Firebase console and manually deleting a restaurant or changing its name - you'll see the changes show up on your site immediately!

8. Get() data
So far, we've shown how to use onSnapshot to retrieve updates in real time; however, that's not always what we want. Sometimes it makes more sense to only fetch the data once.
We'll want to implement a method that's triggered when a user clicks into a specific restaurant in your app.
- Go back to your file
scripts/FriendlyEats.Data.js. - Find the function
FriendlyEats.prototype.getRestaurant. - Replace the entire function with the following code.
FriendlyEats.Data.js
FriendlyEats.prototype.getRestaurant = function(id) {
  return firebase.firestore().collection('restaurants').doc(id).get();
};
After you've implemented this method, you'll be able to view pages for each restaurant. Just click on a restaurant in the list and you should see the restaurant's details page:
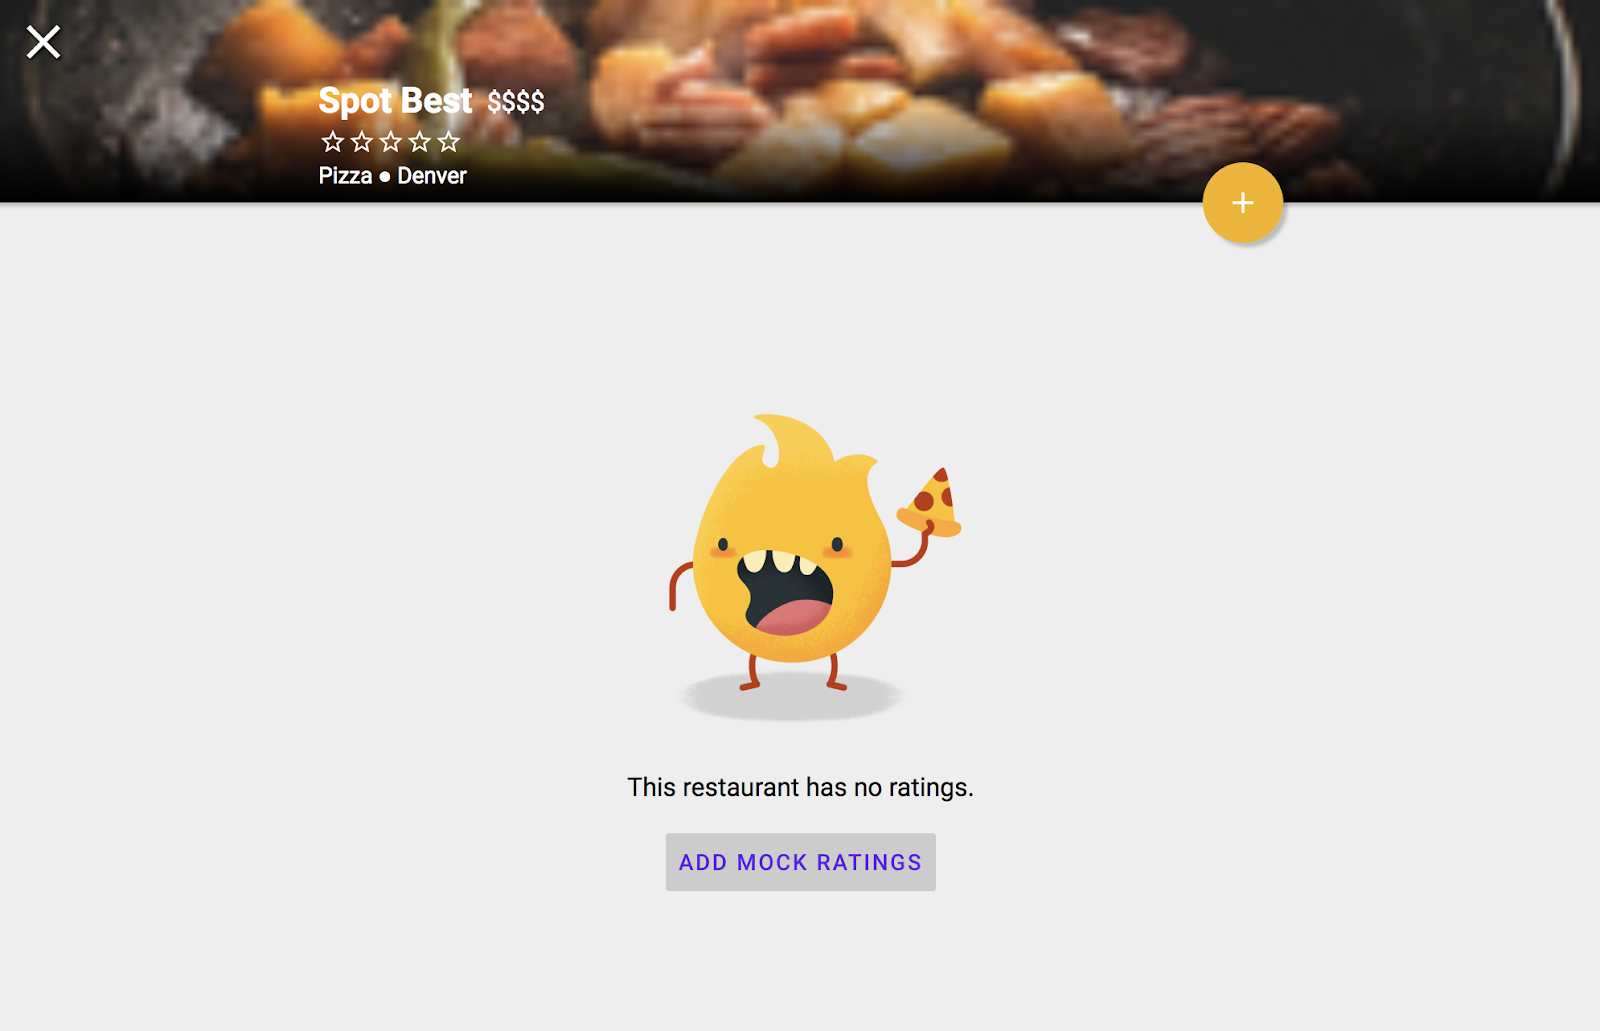
For now, you can't add ratings as we still need to implement adding ratings later on in the codelab.
9. Sort and filter data
Currently, our app displays a list of restaurants, but there's no way for the user to filter based on their needs. In this section, you'll use Cloud Firestore's advanced querying to enable filtering.
Here's an example of a simple query to fetch all Dim Sum restaurants:
var filteredQuery = query.where('category', '==', 'Dim Sum')
As its name implies, the where() method will make our query download only members of the collection whose fields meet the restrictions we set. In this case, it'll only download restaurants where category is Dim Sum.
In our app, the user can chain multiple filters to create specific queries, like "Pizza in San Francisco" or "Seafood in Los Angeles ordered by Popularity".
We'll create a method that builds up a query which will filter our restaurants based on multiple criteria selected by our users.
- Go back to your file
scripts/FriendlyEats.Data.js. - Find the function
FriendlyEats.prototype.getFilteredRestaurants. - Replace the entire function with the following code.
FriendlyEats.Data.js
FriendlyEats.prototype.getFilteredRestaurants = function(filters, renderer) {
  var query = firebase.firestore().collection('restaurants');

  if (filters.category !== 'Any') {
    query = query.where('category', '==', filters.category);
  }

  if (filters.city !== 'Any') {
    query = query.where('city', '==', filters.city);
  }

  if (filters.price !== 'Any') {
    query = query.where('price', '==', filters.price.length);
  }

  if (filters.sort === 'Rating') {
    query = query.orderBy('avgRating', 'desc');
  } else if (filters.sort === 'Reviews') {
    query = query.orderBy('numRatings', 'desc');
  }

  this.getDocumentsInQuery(query, renderer);
};
The code above adds multiple where filters and a single orderBy clause to build a compound query based on user input. Our query will now only return restaurants that match the user's requirements.
Refresh your FriendlyEats app in your browser, then verify that you can filter by price, city, and category. While testing, you'll see errors in the JavaScript Console of your browser that look like this:
The query requires an index. You can create it here: https://console.firebase.google.com/project/project-id/database/firestore/indexes?create_composite=...
These errors are because Cloud Firestore requires indexes for most compound queries. Requiring indexes on queries keeps Cloud Firestore fast at scale.
Opening the link from the error message will automatically open the index creation UI in the Firebase console with the correct parameters filled in. In the next section, we'll write and deploy the indexes needed for this application.
10. Deploy indexes
If we don't want to explore every path in our app and follow each of the index creation links, we can easily deploy many indexes at once using the Firebase CLI.
- In your app's downloaded local directory, you'll find a
firestore.indexes.jsonfile.
This file describes all the indexes needed for all the possible combinations of filters.
firestore.indexes.json
{
 "indexes": [
   {
     "collectionGroup": "restaurants",
     "queryScope": "COLLECTION",
     "fields": [
       { "fieldPath": "city", "order": "ASCENDING" },
       { "fieldPath": "avgRating", "order": "DESCENDING" }
     ]
   },

   ...

 ]
}
- Deploy these indexes with the following command:
firebase deploy --only firestore:indexes
After a few minutes, your indexes will be live and the error messages will go away.
11. Write data in a transaction
In this section, we'll add the ability for users to submit reviews to restaurants. So far, all of our writes have been atomic and relatively simple. If any of them errored, we'd likely just prompt the user to retry them or our app would retry the write automatically.
Our app will have many users who want to add a rating for a restaurant, so we'll need to coordinate multiple reads and writes. First the review itself has to be submitted, then the restaurant's rating count and average rating need to be updated. If one of these fails but not the other, we're left in an inconsistent state where the data in one part of our database doesn't match the data in another.
Fortunately, Cloud Firestore provides transaction functionality that allows us to perform multiple reads and writes in a single atomic operation, ensuring that our data remains consistent.
- Go back to your file
scripts/FriendlyEats.Data.js. - Find the function
FriendlyEats.prototype.addRating. - Replace the entire function with the following code.
FriendlyEats.Data.js
FriendlyEats.prototype.addRating = function(restaurantID, rating) {
  var collection = firebase.firestore().collection('restaurants');
  var document = collection.doc(restaurantID);
  var newRatingDocument = document.collection('ratings').doc();

  return firebase.firestore().runTransaction(function(transaction) {
    return transaction.get(document).then(function(doc) {
      var data = doc.data();

      var newAverage =
          (data.numRatings * data.avgRating + rating.rating) /
          (data.numRatings + 1);

      transaction.update(document, {
        numRatings: data.numRatings + 1,
        avgRating: newAverage
      });
      return transaction.set(newRatingDocument, rating);
    });
  });
};
In the block above, we trigger a transaction to update the numeric values of avgRating and numRatings in the restaurant document. At the same time, we add the new rating to the ratings subcollection.
12. Secure your data
At the beginning of this codelab, we set our app's security rules to restrict access to our application.
firestore.rules
rules_version = '2';
service cloud.firestore {

  // Determine if the value of the field "key" is the same
  // before and after the request.
  function unchanged(key) {
    return (key in resource.data)
      && (key in request.resource.data)
      && (resource.data[key] == request.resource.data[key]);
  }

  match /databases/{database}/documents {
    // Restaurants:
    //   - Authenticated user can read
    //   - Authenticated user can create/update (for demo purposes only)
    //   - Updates are allowed if no fields are added and name is unchanged
    //   - Deletes are not allowed (default)
    match /restaurants/{restaurantId} {
      allow read: if request.auth != null;
      allow create: if request.auth != null;
      allow update: if request.auth != null
                    && (request.resource.data.keys() == resource.data.keys())
                    && unchanged("name");

      // Ratings:
      //   - Authenticated user can read
      //   - Authenticated user can create if userId matches
      //   - Deletes and updates are not allowed (default)
      match /ratings/{ratingId} {
        allow read: if request.auth != null;
        allow create: if request.auth != null
                      && request.resource.data.userId == request.auth.uid;
      }
    }
  }
}
These rules restrict access to ensure that clients only make safe changes. For example:
- Updates to a restaurant document can only change the ratings, not the name or any other immutable data.
- Ratings can only be created if the user ID matches the signed-in user, which prevents spoofing.
Alternatively to using the Firebase console, you can use the Firebase CLI to deploy rules to your Firebase project. The firestore.rules file in your working directory already contains the rules from above. To deploy these rules from your local filesystem (rather than using the Firebase console), you'd run the following command:
firebase deploy --only firestore:rules
13. Conclusion
In this codelab, you learned how to perform basic and advanced reads and writes with Cloud Firestore, as well as how to secure data access with security rules. You can find the full solution in the quickstarts-js repository.
To learn more about Cloud Firestore, visit the following resources:
14. [Optional] Enforce with App Check
Firebase App Check provides protection by helping to validate and prevent unwanted traffic to your app. In this step, you will secure access to your services by adding App Check with reCAPTCHA Enterprise.
First, you'll need to enable App Check and reCaptcha.
Enabling reCaptcha Enterprise
- In the Cloud console, find and select reCaptcha Enterprise under Security.
- Enable the service as prompted, and click Create Key.
- Input a display name as prompted, and select Website as your platform type.
- Add your deployed URLs to the Domain list, and make sure that the "Use checkbox challenge" option is unselected.
- Click Create Key, and store the generated key somewhere for safekeeping. You will need it later in this step.
Enabling App Check
- In the Firebase console, locate the Build section in the left panel.
- Click App Check, then click the Get Started button (or redirect directly to console).
- Click Register and enter your reCaptcha Enterprise key when prompted, then click Save.
- In the APIs View, select Storage and click Enforce. Do the same for Cloud Firestore.
App Check should now be enforced! Refresh your app and try to create/view a restaurant. You should get the error message:
Uncaught Error in snapshot listener: FirebaseError: [code=permission-denied]: Missing or insufficient permissions.
This means App Check is blocking unvalidated requests by default. Now let's add validation to your app.
Navigate to FriendlyEats.View.js file, and update the initAppCheck function and add your reCaptcha key to initialize App Check.
FriendlyEats.prototype.initAppCheck = function() {
    var appCheck = firebase.appCheck();
    appCheck.activate(
    new firebase.appCheck.ReCaptchaEnterpriseProvider(
      /* reCAPTCHA Enterprise site key */
    ),
    true // Set to true to allow auto-refresh.
  );
};
The appCheck instance is initialized with a ReCaptchaEnterpriseProvider with your key, and isTokenAutoRefreshEnabled allows tokens to auto-refresh in your app.
To enable local testing, find the section where the app is initialized in FriendlyEats.js file, and add the following line to the FriendlyEats.prototype.initAppCheck function:
if(isLocalhost) {
  self.FIREBASE_APPCHECK_DEBUG_TOKEN = true;
}
This will log a debug token in the console of your local web app similar to:
App Check debug token: 8DBDF614-649D-4D22-B0A3-6D489412838B. You will need to add it to your app's App Check settings in the Firebase console for it to work.
Now, go to the Apps View of App Check in the Firebase console.
Click the overflow menu, and select Manage debug tokens.
Then, click Add debug token and paste the debug token from your console as prompted.
Congratulations! App Check should now be working in your app.
