1. Introduction
Last Updated: 2022-11-16
Building an Android app with Firebase and Jetpack Compose
In this codelab, you'll build an Android app called Make It So. The UI of this app is entirely built with Jetpack Compose, which is Android's modern toolkit for building native UI - it's intuitive and requires less code than writing .xml files and binding them to Activities, Fragments or Views.
The first step to understand how well Firebase and Jetpack Compose work together is understanding modern Android architecture. A good architecture makes the system easy to understand, easy to develop and easy to maintain, since it makes it very clear how the components are organized and communicate with each other. In the Android world, the recommended architecture is called Model - View - ViewModel. The Model represents the layer that accesses Data in the application. The View is the UI layer and should know nothing about the business logic. And the ViewModel is where the business logic is applied, which sometimes requires the ViewModel to call the Model layer.
We strongly recommend reading this article to understand how Model - View - ViewModel is applied to an Android app built with Jetpack Compose, as it will make the codebase easier to understand and the next steps easier to be completed.
What you'll build
Make It So is a simple to-do list application that allows the user to add and edit tasks, add flags, priorities and due dates, and mark the tasks as completed. The images below show the two main pages of this application: the task creation page and the main page with the list of tasks created.
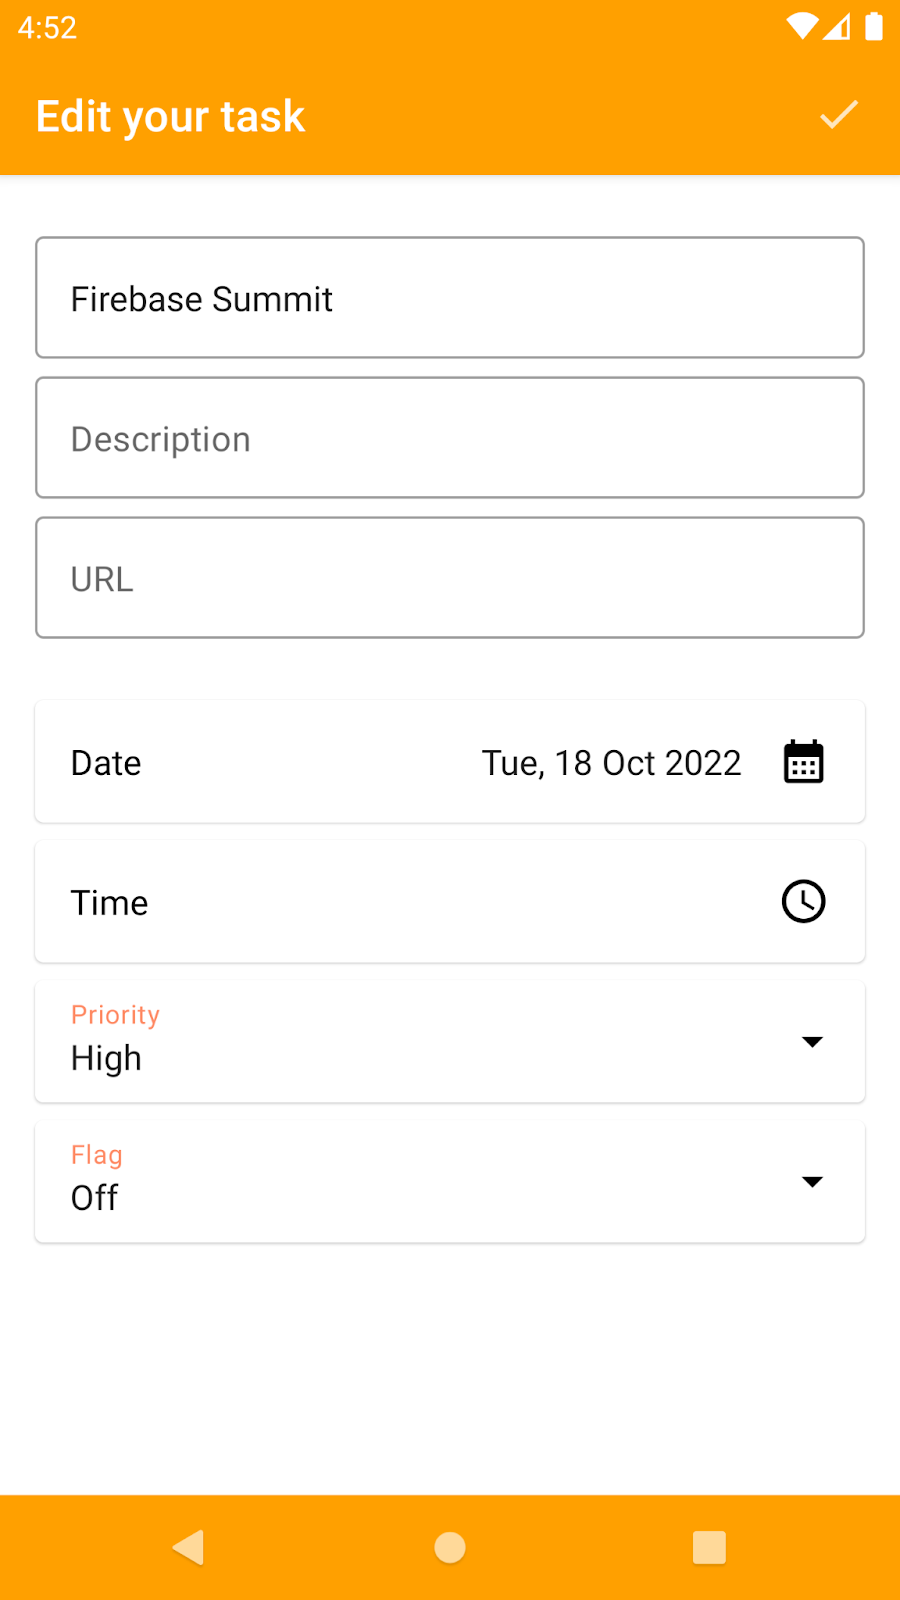
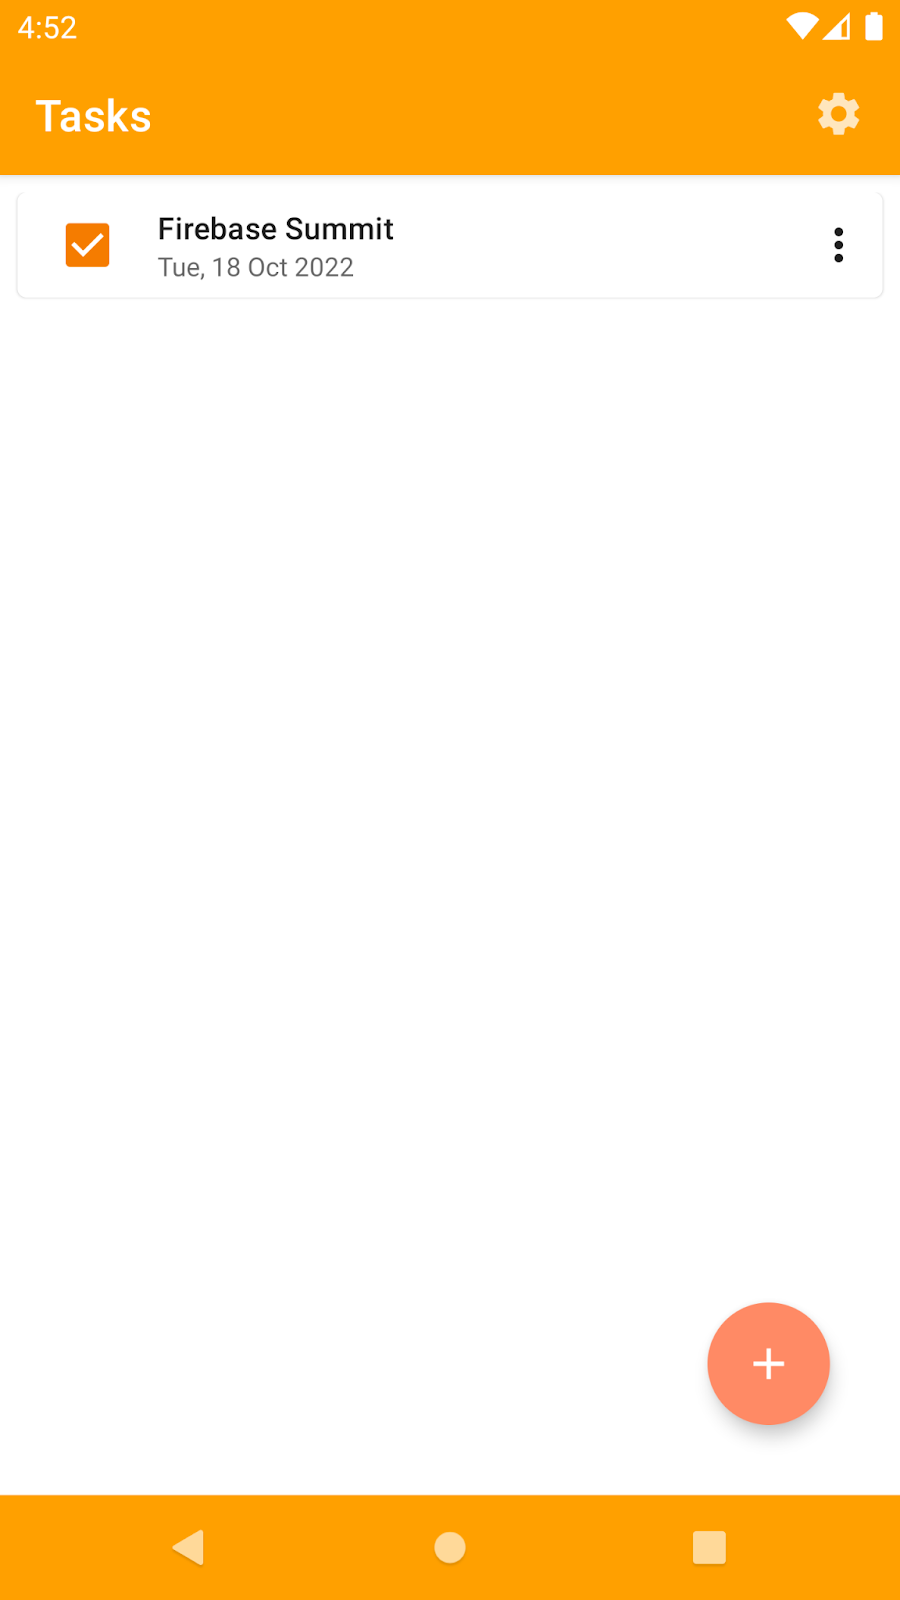
You will add some features that are missing in this app:
- Authenticate users with email and password
- Add a listener to a Firestore collection and make the UI react to changes
- Add custom traces to monitor the performance of specific code in the app
- Create a feature toggle using Remote Config and use staged rollout to launch it
What you'll learn
- How to use Firebase Authentication, Performance Monitoring, Remote Config and Cloud Firestore in a modern Android application
- How to make Firebase APIs fit into an MVVM architecture
- How to reflect changes made with Firebase APIs in a Compose UI
What you'll need
- Android Studio Flamingo+
- Android Emulator with API 21 or above
- Familiarity with the Kotlin programming language
2. Get the sample app and set up Firebase
Get the sample app's code
Clone the GitHub repository from the command line:
git clone https://github.com/FirebaseExtended/make-it-so-android.git
Create a Firebase project
- Sign into the Firebase console using your Google Account.
- Click the button to create a new project, and then enter a project name (for example,
Compose Firebase codelab). - Click Continue.
- If prompted, review and accept the Firebase terms, and then click Continue.
- (Optional) Enable AI assistance in the Firebase console (called "Gemini in Firebase").
- For this codelab, you need Google Analytics to use advanced targeting options with Remote Config, so keep the toggle on for the Google Analytics option. Follow the on-screen instructions to set up Google Analytics.
- Click Create project, wait for your project to provision, and then click Continue.
Add an Android app to your Firebase project
In your Firebase project, you can register different apps: for Android, iOS, Web, Flutter and Unity.
Choose the Android option, as you see here:
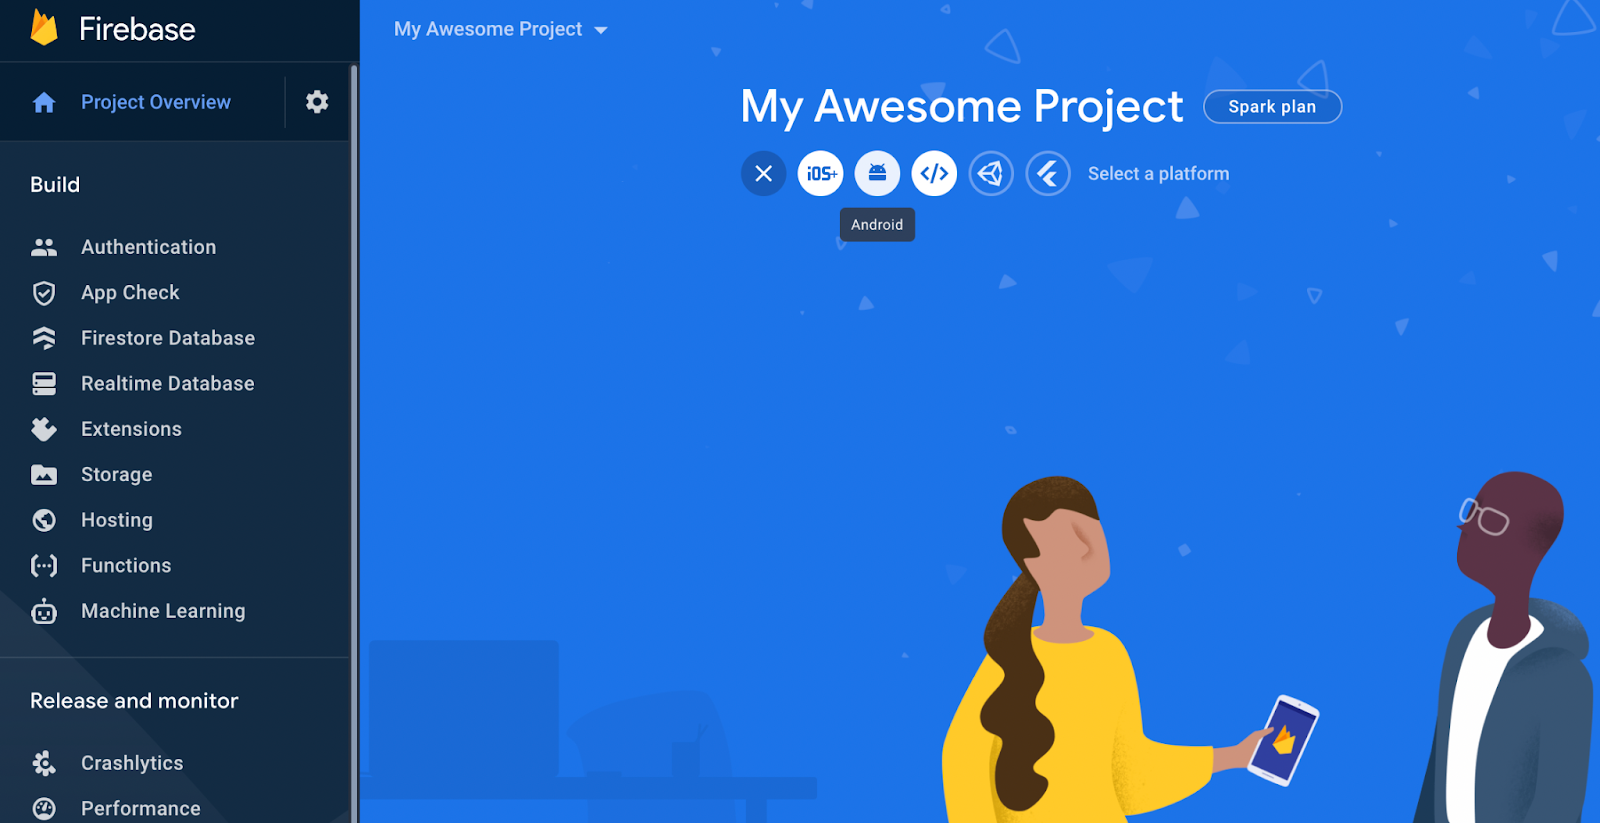
Then follow these steps:
- Enter
com.example.makeitsoas the package name and, optionally, enter a nickname. For this codelab, you don't need to add the debug signing certificate. - Click Next to register your app and access the Firebase config file.
- Click Download google-services.json to download your configuration file and save it in the
make-it-so-android/appdirectory. - Click Next. Because the Firebase SDKs are already included in the
build.gradlefile in the sample project, click Next to skip to Next steps. - Click Continue to console to finish.
To make the Make it So app work properly, there are two things you need to do in the Console before jumping to the code: enable authentication providers and create the Firestore database.
Set up Authentication
First, let's enable Authentication so that users can log into the app:
- From the Build menu, select Authentication, and then click Get Started.
- From the Sign-in method card, select Email/Password, and enable it.
- Next, click Add new provider and select and enable Anonymous.
Set up Cloud Firestore
Next, set up Firestore. You'll use Firestore to store a signed-in user's tasks. Each user will get their own document within a collection of the database.
- In the left-panel of the Firebase console, expand Build and then select Firestore database.
- Click Create database.
- Leave the Database ID set to
(default). - Select a location for your database, then click Next.
For a real app, you want to choose a location that's close to your users. - Click Start in test mode. Read the disclaimer about the security rules.
In the next steps of this section, you'll add Security Rules to secure your data. Do not distribute or expose an app publicly without adding Security Rules for your database. - Click Create.
Let's take a moment to build robust Security Rules to the Firestore database.
- Open the Firestore dashboard and go to the Rules tab.
- Update the Security Rules to look like this:
rules_version = '2';
service cloud.firestore {
  match /databases/{database}/documents {
    match /tasks/{document} {
      allow create: if request.auth != null;
      allow read, update, delete: if request.auth != null
        && resource.data.userId == request.auth.uid
        && request.data.userId == resource.data.userId;
    }
  }
}
These rules basically say that any signed-in user of the app can create a document for themselves within any collection. Then, once created, only the user who created that document will be able to view, update, or delete that document.
Run the application
Now you are ready to run the application! Open the make-it-so-android/start folder in Android Studio and run the app (it can be done using an Android Emulator or a real Android device).
3. Firebase Authentication
Which feature are you going to add?
In the current state of the Make It So sample app, a user can start using the app without having to sign-in first. It uses anonymous authentication to achieve this. However, anonymous accounts don't let a user access their data on other devices or even in future sessions. Although anonymous authentication is useful for a warm onboarding, you should always provide the option for users to convert to a different form of sign-in. With this in mind, in this codelab, you'll add email and password authentication to the Make It So app.
Time to code!
As soon as the user creates an account, by typing an email and a password, you need to ask the Firebase Authentication API for an email credential, then link the new credential to the anonymous account. Open the AccountServiceImpl.kt file in Android Studio and update the linkAccount function so it looks like the following:
model/service/impl/AccountServiceImpl.kt
override suspend fun linkAccount(email: String, password: String) {
    val credential = EmailAuthProvider.getCredential(email, password)
    auth.currentUser!!.linkWithCredential(credential).await()
}
Now open SignUpViewModel.kt and call the service linkAccount function inside the launchCatching block of the onSignUpClick function:
screens/sign_up/SignUpViewModel.kt
launchCatching {
    accountService.linkAccount(email, password)
    openAndPopUp(SETTINGS_SCREEN, SIGN_UP_SCREEN)
}
First it tries to authenticate, and if the call succeeds, it proceeds to the next screen (the SettingsScreen). As you are executing these calls inside a launchCatching block, if an error happens on the first line, the exception will be caught and handled, and the second line will not be reached at all.
As soon as the SettingsScreen is opened again, you need to make sure that the options for Sign in and Create account are gone, because now the user is already authenticated. To do this, let's make the SettingsViewModel listen to the status of the current user (available in AccountService.kt), to check if the account is anonymous or not. To do so, update the uiState in SettingsViewModel.kt to look like the following:
screens/settings/SettingsViewModel.kt
val uiState = accountService.currentUser.map {
    SettingsUiState(it.isAnonymous)
}
The last thing you need to do is update the uiState in SettingsScreen.kt to collect the states emitted by the SettingsViewModel:
screens/settings/SettingsScreen.kt
val uiState by viewModel.uiState.collectAsState(
    initial = SettingsUiState(false)
)
Now every time the user changes, the SettingsScreen will recompose itself to display the options according to the user's new authentication state.
Time to test!
Run Make it So and navigate to the settings by clicking in the gear icon on the top right corner of the screen. From there, click the create account option:
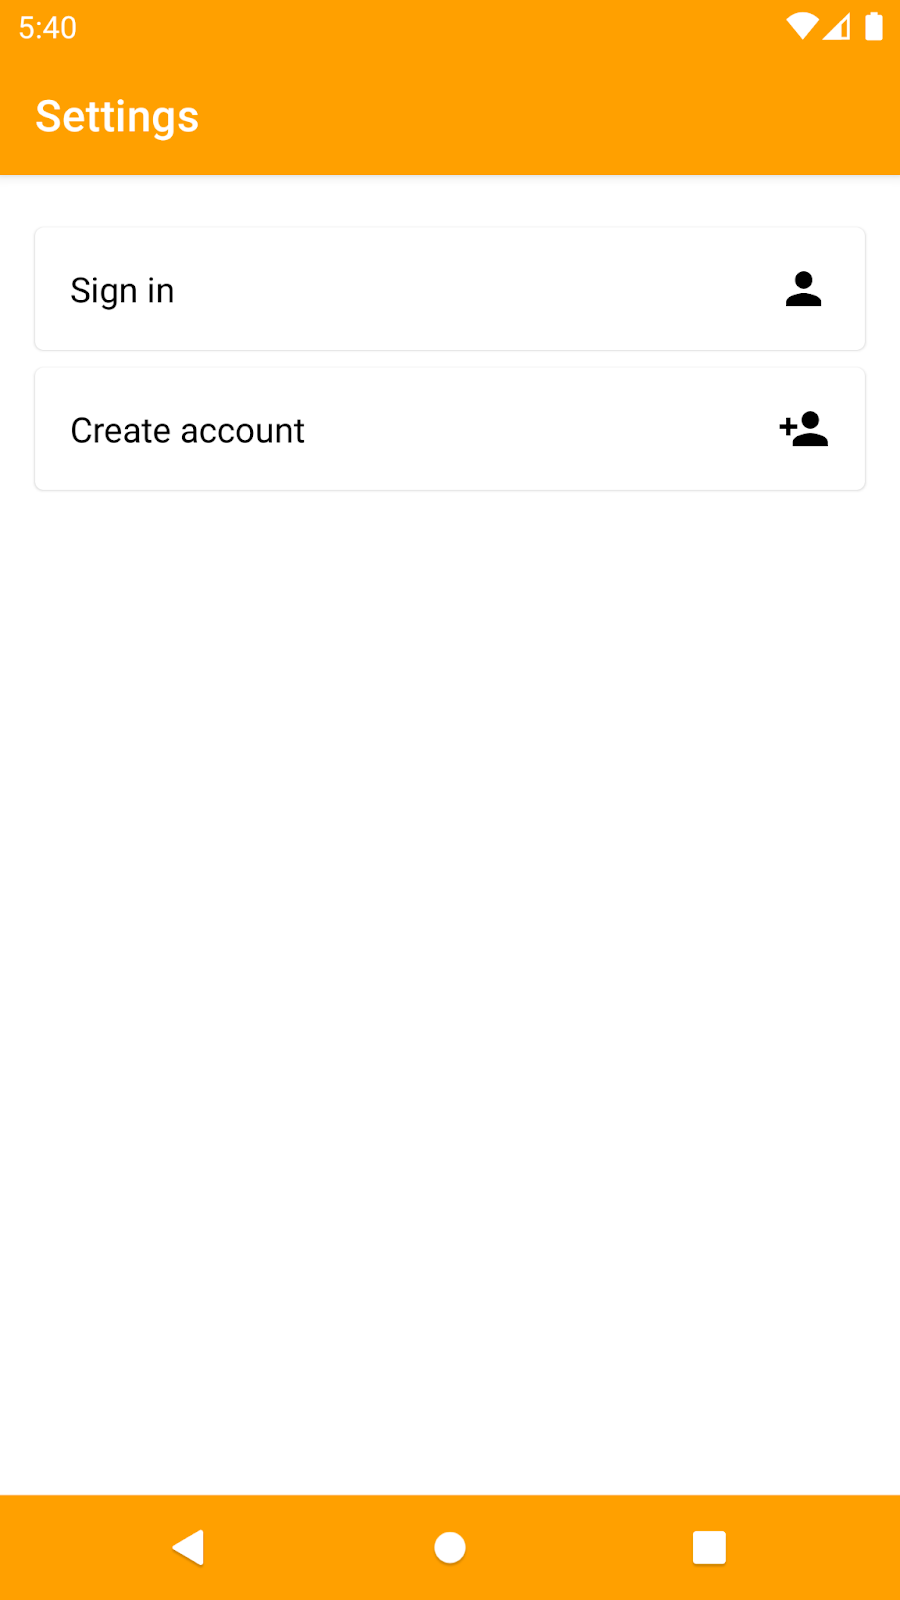
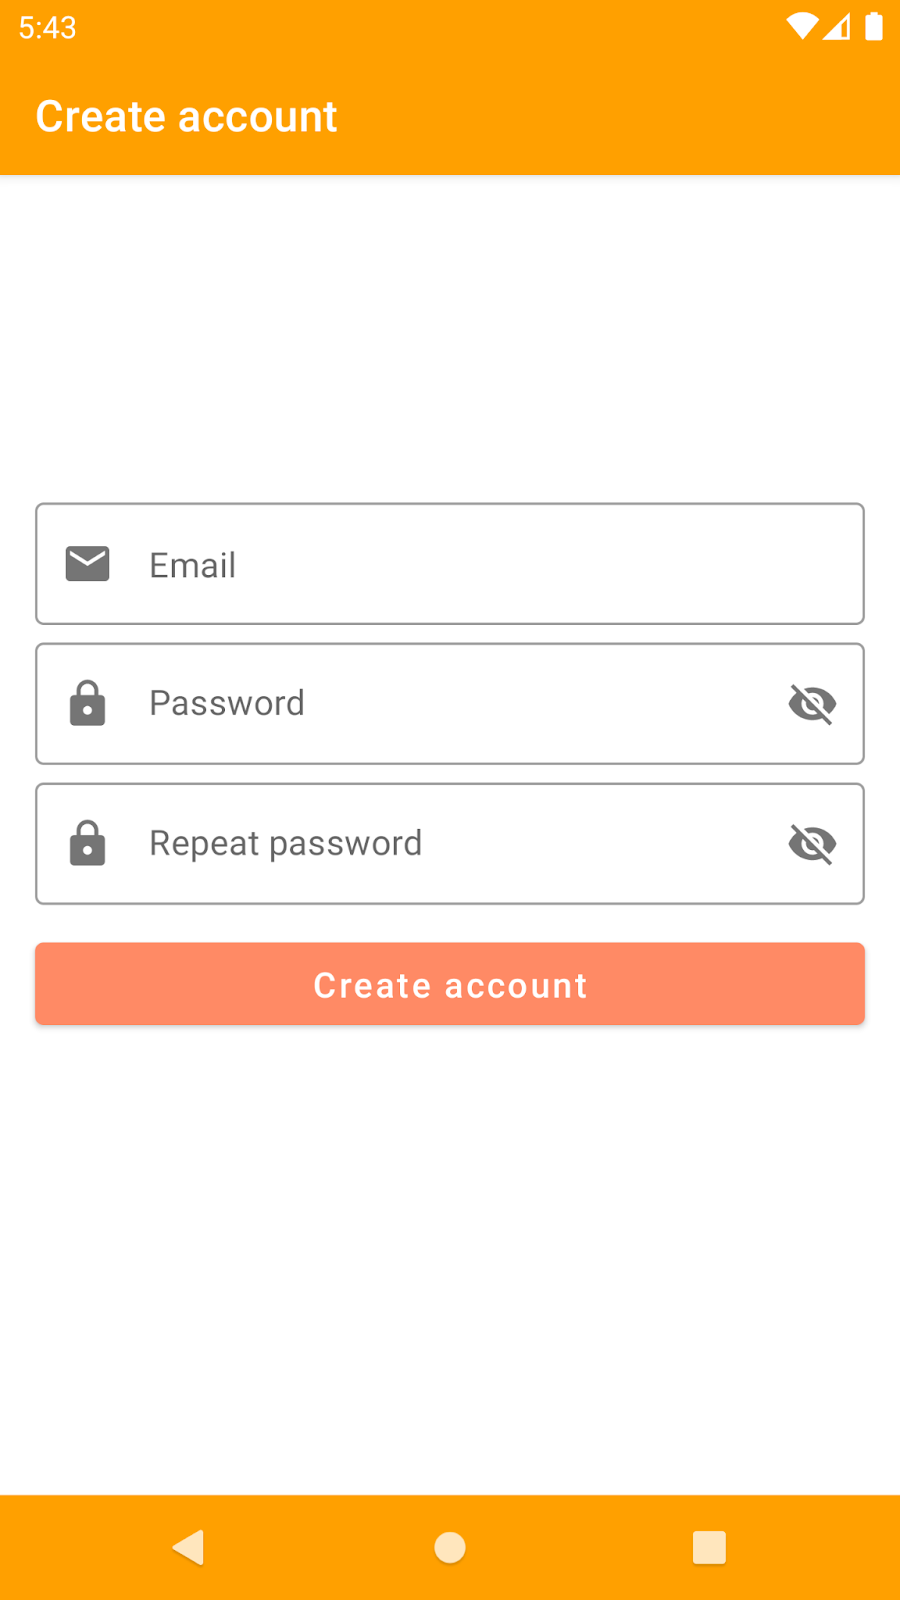
Type a valid email and a strong password to create your account. It should work and you should be redirected to the settings page, where you will see two new options: to sign out and delete your account. You can check the new account created in the Authentication dashboard on the Firebase console by clicking on the Users tab.
4. Cloud Firestore
Which feature are you going to add?
For Cloud Firestore, you will add a listener to the Firestore collection that stores the documents that represent the tasks displayed in Make it So. Once you add this listener, you will receive every update made to this collection.
Time to code!
Update the Flow available in StorageServiceImpl.kt to look like this:
model/service/impl/StorageServiceImpl.kt
override val tasks: Flow<List<Task>>
    get() =
      auth.currentUser.flatMapLatest { user ->
        firestore.collection(TASK_COLLECTION).whereEqualTo(USER_ID_FIELD, user.id).dataObjects()
      }
This code is adding a listener to the tasks collection based on the user.id. Each task is represented by a document in a collection named tasks, and each one of them has a field named userId. Please note that a new Flow will be emitted if the status of the currentUser changes (by signing out, for example).
Now you need to make the Flow in TasksViewModel.kt reflect the same as in the service:
screens/tasks/TasksViewModel.kt
val tasks = storageService.tasks
And the last thing will be to make the composable function in TasksScreens.kt, which represents the UI, be aware of this flow and collect it as a state. Everytime the state changes, the composable function will automatically recompose itself and display the most recent state to the user. Add this to the TasksScreen composable function:
screens/tasks/TasksScreen.kt
val tasks = viewModel
    .tasks
    .collectAsStateWithLifecycle(emptyList())
Once the composable function has access to these states, you can update the LazyColumn (which is the structure you use to display a list on the screen) to look like this:
screens/tasks/TasksScreen.kt
LazyColumn {
    items(tasks.value, key = { it.id }) { taskItem ->
        TaskItem( [...] )
    }
}
Time to test!
In order to test that it worked, add a new task using the app (by clicking on the add button at the bottom right corner of the screen). Once you finish creating the task, it should appear in the Firestore collection in the Firestore Console. If you log into Make it So on other devices with the same account, you will be able to edit your to-do items and watch them being updated on all devices in real-time.
5. Performance Monitoring
Which feature are you going to add?
Performance is a very important thing to pay attention to because users are very likely to give up using your app if the performance is not good and they take too much time to complete a simple task using it. That's why sometimes it is useful to collect some metrics about a specific journey that a user makes in your app. And to help you with that, Firebase Performance Monitoring offers custom traces. Follow the next steps to add custom traces and measure the performance in different pieces of code in Make it So.
Time to code!
If you open the Performance.kt file, you will see an inline function called trace. This function calls the Performance Monitoring API to create a custom trace, passing along the trace name as a parameter. The other parameter that you see is the block of code that you wish to monitor. The default metric collected for each trace is the time it takes to run completely:
model/service/Performance.kt
inline fun <T> trace(name: String, block: Trace.() -> T): T = Trace.create(name).trace(block)
You can choose which parts of the codebase you think is important to measure and add custom traces to it. Here's an example of adding a custom trace to the linkAccount function that you saw earlier (in AccountServiceImpl.kt) in this codelab:
model/service/impl/AccountServiceImpl.kt
override suspend fun linkAccount(email: String, password: String): Unit =
  trace(LINK_ACCOUNT_TRACE) {
      val credential = EmailAuthProvider.getCredential(email, password)
      auth.currentUser!!.linkWithCredential(credential).await()
  }
Now it's your turn! Add some custom traces to the Make it So app and proceed to the next section to test if it worked as expected.
Time to test!
After you finish adding the custom traces, run the app and make sure to use the features you want to measure a few times. Then head to the Firebase console and go to the Performance dashboard. At the bottom of the screen, you'll find three tabs: Network requests, Custom traces and Screen rendering.
Go to the Custom traces tab and check that the traces you added in the codebase are being displayed there, and that you can see how much time it usually takes to execute these pieces of code.
6. Remote Config
Which feature are you going to add?
There are a multitude of use cases for Remote Config, from changing your app's appearance remotely to configuring different behaviors for different user segments. In this codelab, you are going to use Remote Config to create a feature toggle that will show or hide the new edit task feature on the Make it So app.
Time to code!
The first thing you need to do is create the configuration in the Firebase console. To do so, you need to navigate to the Remote Config dashboard and click on the Add parameter button. Fill in the fields according to the image below:
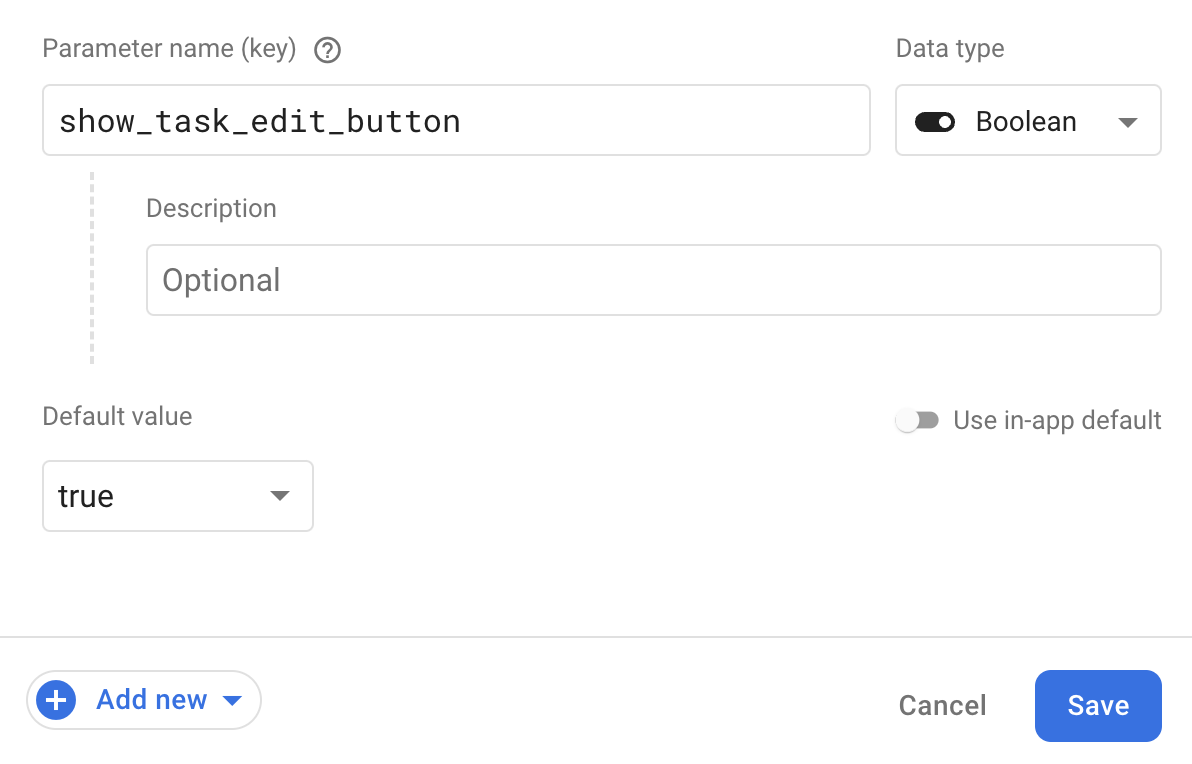
Once all fields are filled, you can click on the Save button and then Publish. Now that the parameter is created and available to your codebase, you need to add the code that will fetch the new values to your app. Open the ConfigurationServiceImpl.kt file and update the implementation of these two functions:
model/service/impl/ConfigurationServiceImpl.kt
override suspend fun fetchConfiguration(): Boolean {
  return remoteConfig.fetchAndActivate().await()
}

override val isShowTaskEditButtonConfig: Boolean
  get() = remoteConfig[SHOW_TASK_EDIT_BUTTON_KEY].asBoolean()
The first function fetches the values from the server, and it's being called as soon as the app starts, in SplashViewModel.kt. It's the best way to ensure that the most up-to-date values will be available in all the screens right from the beginning. It's not a good user experience if you change the UI or the behavior of the app later, when the user is in the middle of doing something!
The second function is returning the boolean value that was published for the parameter that you just created in the Console. And you'll need to retrieve this information in TasksViewModel.kt, by adding the following to the loadTaskOptions function:
screens/tasks/TasksViewModel.kt
fun loadTaskOptions() {
  val hasEditOption = configurationService.isShowTaskEditButtonConfig
  options.value = TaskActionOption.getOptions(hasEditOption)
}
You are retrieving the value on the first line, and using it to load the menu options for the task items on the second line. If the value is false, it means the menu won't contain the edit option. Now that you have the list of options, you need to make the UI display it correctly. As you are building an app with Jetpack Compose, you need to look for the composable function that declares how the UI of the TasksScreen should look like. So open the TasksScreen.kt file and update the LazyColum to point to the options available in TasksViewModel.kt:
screens/tasks/TasksScreen.kt
val options by viewModel.options

LazyColumn {
  items(tasks.value, key = { it.id }) { taskItem ->
    TaskItem(
      options = options,
      [...]
    )
  }
}
The TaskItem is another composable function that declares how the UI of a single task should look like. And each task has a menu with options that is displayed when the user clicks on the three dot icon at the end of it.
Time to test!
Now you are ready to run the app! Check that the value that you published using the Firebase console matches the behavior of the app:
- If it's
false, you should only see two options when clicking on the three dot icon; - If it's
true, you should see three options when clicking on the three dot icon;
Try changing the value a couple of times in the Console and restarting the app. That's how easy it is to launch new features in your app using Remote Config!
7. Congratulations
Congratulations, you've successfully built an Android app with Firebase and Jetpack Compose!
You added Firebase Authentication, Performance Monitoring, Remote Config and Cloud Firestore to an Android app entirely built with Jetpack Compose for the UI, and you made it fit into the recommended MVVM architecture!
Further reading
- Building an Android app with Firebase and Compose
- Adding Firebase Authentication to a Jetpack Compose app
- Adding Cloud Firestore to a Jetpack Compose app
- Adding Coroutines and Flow to an Android app built with Firebase and Compose
- Adding Firebase Performance Monitoring to a Jetpack Compose app
- Adding Firebase Remote Config to a Jetpack Compose app
