
1. Introduction
Last Updated: 2023-02-23
How can you prevent unauthorized access to your Firebase resources?
You can use Firebase App Check to prevent unauthorized clients from accessing your backend resources by requiring incoming requests to come attached with an attestation that the request comes from your genuine app and by blocking traffic that doesn't have a proper attestation. Firebase App Check relies on platform-specific attestation providers to verify the authenticity of the client: for web apps, App Check supports reCAPTCHA v3 and reCAPTCHA Enterprise as attestation providers.
App Check can be used to protect requests to Cloud Firestore, Realtime Database, Cloud Functions, Firebase Authentication with Identity Platform, and on backends you host yourself.
What you'll build
In this codelab, you're going to secure a chat application by first adding and then enforcing App Check.

What you'll learn
- How to monitor your backend for unauthorized access
- How to add enforcement to Firestore and Cloud Storage
- How to run your application with a debug token for local development
What you'll need
- The IDE/text editor of your choice
- The package manager npm, which typically comes with Node.js
- The Firebase CLI installed and configured to work with your account
- A terminal/console
- A browser of your choice, such as Chrome
- The codelab's sample code (See the next step of the codelab for how to get the code.)
2. Get the sample code
Clone the codelab's GitHub repository from the command line:
git clone https://github.com/firebase/codelab-friendlychat-web
Alternatively, if you do not have Git installed, you can download the repository as a ZIP file.
Import the starter app
Using your IDE, open or import the 📁 appcheck-start directory from the cloned repository. This 📁 appcheck-start directory contains the starting code for the codelab, which will be a fully functional chat web app. The 📁 appcheck directory will have the completed code for the codelab.
3. Create and set up a Firebase project
Create a Firebase project
- Sign into the Firebase console using your Google Account.
- Click the button to create a new project, and then enter a project name (for example,
FriendlyChat).
- Click Continue.
- If prompted, review and accept the Firebase terms, and then click Continue.
- (Optional) Enable AI assistance in the Firebase console (called "Gemini in Firebase").
- For this codelab, you do not need Google Analytics, so toggle off the Google Analytics option.
- Click Create project, wait for your project to provision, and then click Continue.
Upgrade your Firebase pricing plan
To use Cloud Storage for Firebase, your Firebase project needs to be on the pay-as-you go (Blaze) pricing plan, which means it's linked to a Cloud Billing account.
- A Cloud Billing account requires a payment method, like a credit card.
- If you're new to Firebase and Google Cloud, check if you're eligible for a $300 credit and a Free Trial Cloud Billing account.
- If you're doing this codelab as part of an event, ask your organizer if there are any Cloud credits available.
To upgrade your project to the Blaze plan, follow these steps:
- In the Firebase console, select to upgrade your plan.
- Select the Blaze plan. Follow the on-screen instructions to link a Cloud Billing account to your project.
If you needed to create a Cloud Billing account as part of this upgrade, you might need to navigate back to the upgrade flow in the Firebase console to complete the upgrade.
Add a Firebase web app to the project
- Click the web icon
 to create a new Firebase web app.
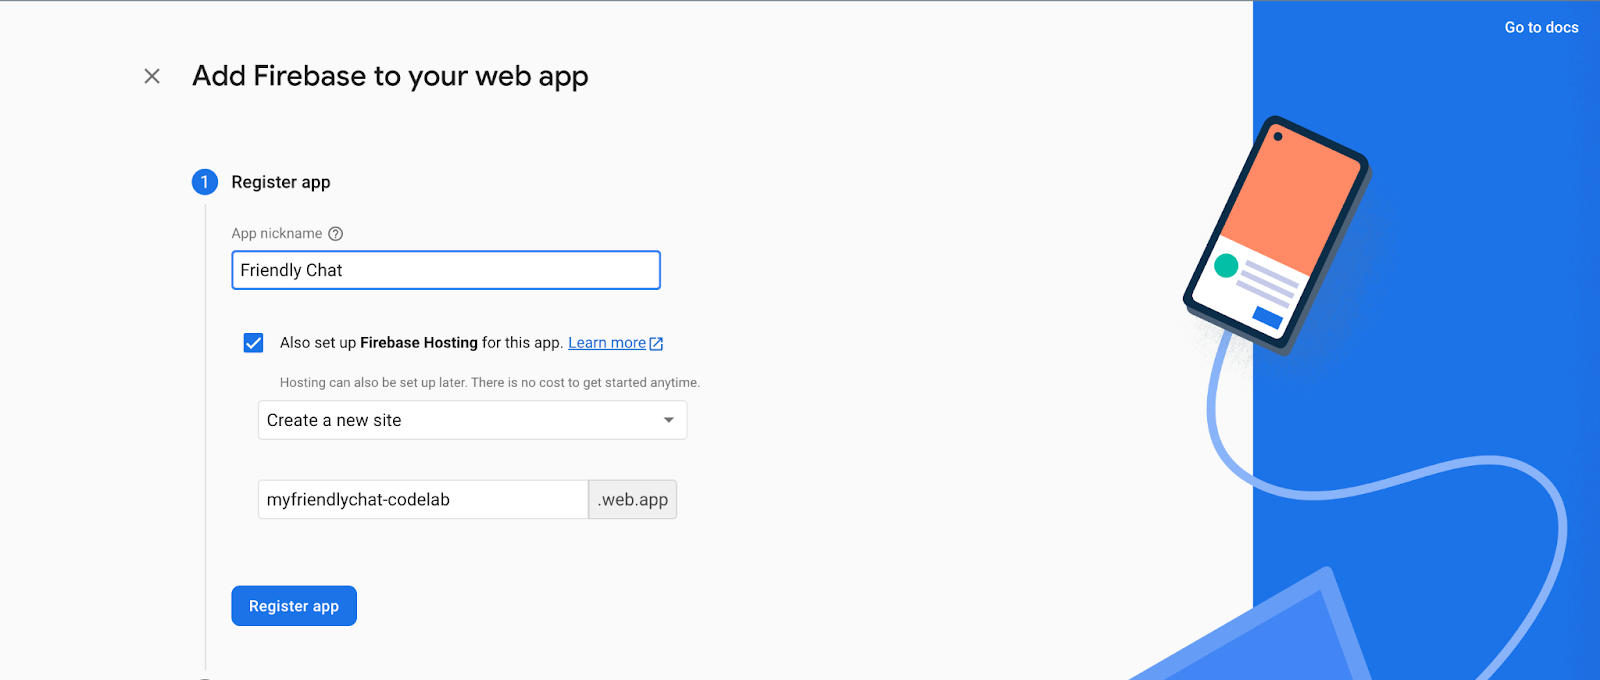
 - Register the app with the nickname Friendly Chat, then check the box next to Also set up Firebase Hosting for this app. Click Register app.
- On the next step, you'll see a command to install Firebase using npm and a configuration object. You copy this object later in the codelab, so for now, press Next.
- Then you see an option to install the Firebase CLI. If you have not already installed it, do so now using the command
npm install -g firebase-tools. Then click Next. - Then you see an option to log into Firebase and deploy to Firebase hosting. Go ahead and login to Firebase using the command
firebase login, then click Continue to Console. You deploy to Firebase hosting in a future step.
Set up Firebase products
The application that we're going to build uses Firebase products that are available for web apps:
- Firebase Authentication to easily allow your users to sign into your app.
- Cloud Firestore to save structured data on the cloud and get instant notification when data changes.
- Cloud Storage for Firebase to save files in the cloud.
- Firebase Hosting to host and serve your assets.
- Firebase Cloud Messaging to send push notifications and display browser popup notifications.
- Firebase Performance Monitoring to collect user performance data for your app.
Some of these products need special configuration or need to be enabled using the Firebase console.
Enable Google Sign-in for Firebase Authentication
To allow users to sign in to the web app with their Google accounts, we'll use the Google sign-in method.
You'll need to enable Google Sign-in:
- In the Firebase console, locate the Build section in the left panel.
- Click Authentication, click Get Started if applicable, then click the Sign-in method tab (or click here to go directly there).
- Enable the Google sign-in provider
- Set the public-facing name of your app to Friendly Chat and choose a Project support email from the dropdown menu.
- Click Save

Set up Cloud Firestore
The web app uses Cloud Firestore to save chat messages and receive new chat messages.
Here's how to set up Cloud Firestore in your Firebase project:
- In the left-panel of the Firebase console, expand Build and then select Firestore database.
- Click Create database.
- Leave the Database ID set to
(default). - Select a location for your database, then click Next.
For a real app, you want to choose a location that's close to your users. - Click Start in test mode. Read the disclaimer about the security rules.
Later in this codelab, you'll add Security Rules to secure your data. Do not distribute or expose an app publicly without adding Security Rules for your database. - Click Create.
Set up Cloud Storage for Firebase
The web app uses Cloud Storage for Firebase to store, upload, and share pictures.
Here's how to set up Cloud Storage for Firebase in your Firebase project:
- In the left-panel of the Firebase console, expand Build and then select Storage.
- Click Get started.
- Select a location for your default Storage bucket.
Buckets inUS-WEST1,US-CENTRAL1, andUS-EAST1can take advantage of the "Always Free" tier for Google Cloud Storage. Buckets in all other locations follow Google Cloud Storage pricing and usage. - Click Start in test mode. Read the disclaimer about the security rules.
Later in this codelab, you'll add security rules to secure your data. Do not distribute or expose an app publicly without adding Security Rules for your Storage bucket. - Click Create.
4. Configure Firebase
From the appcheck-start directory, call:
firebase use --add
When prompted, select your Project ID, then give your Firebase project an alias. For this project, you can just give an alias of default. Next, you will need to configure your local project to work with Firebase.
- Go to your Project settings in the Firebase console
- In the "Your apps" card, select the nickname of the app for which you need a config object.
- Select Config from the Firebase SDK snippet pane.
- Copy the config object snippet, then add it to
appcheck-start/hosting/src/firebase-config.js. The rest of the codelab assumes the variable is named config.
firebase-config.js
const config = {
  apiKey: "API_KEY",
  authDomain: "PROJECT_ID.firebaseapp.com",
  databaseURL: "https://PROJECT_ID.firebaseio.com",
  projectId: "PROJECT_ID",
  storageBucket: "PROJECT_ID.firebasestorage.app",
  messagingSenderId: "SENDER_ID",
  appId: "APP_ID",
  measurementId: "G-MEASUREMENT_ID",
};
From the same appcheck-start directory, then call:
firebase experiments:enable webframeworks
This enables web framework support which this project was built with.
We should be all ready to now run your project and test that the default project works!
5. Try the app without App Check
Now that you have your app configured and the SDK set up, try to use the app as it was originally designed. First, start by installing all of the dependencies. From your terminal, navigate to the appcheck-start/hosting directory. While inside that directory, run npm install. This fetches all of the dependencies for your project to work. To start the app in its current state, you can run firebase serve. The app asks you to log in with a Google account; do so, and then try posting a few chat messages and a few photos to the chat.
Now that you have tested it locally, time to see it in production! Run firebase deploy to deploy the web application to the web. This part is a crucial step in demoing how App Check works in the real world as it requires a domain to be configured for the reCAPTCHA Enterprise attestation provider.
Hopefully, you are experiencing the default capability that the app provides. Posting chat messages and everything else that should only be done from an app like this. The downside of the current state is that anyone with your app config from the previous step can access your backend resources. They still need to obey the security rules that are in place by your Firestore and Cloud Storage systems, but otherwise, they can still query, store, and access data stored there.
In the next few steps, you are going to:
- Register for App Check
- Validate enforcement
- Start enforcing rules
6. Turn on App Check and enforcement
Let's start by grabbing a reCAPTCHA Enterprise Key for your project and adding that to App Check. You start by visiting the reCAPTCHA Enterprise section of the Google Cloud Console. Select your project and then you are prompted to enable the reCAPTCHA Enterprise API. Enable the API and wait a few minutes for it to finish. Then click Create Key next to Enterprise keys. Then in this section, specify a display name and select a Website type key. You need to specify the domains on which your app is hosted. Since you are planning on hosting this on Firebase Hosting, you use the default hosting name which is generally ${YOUR_PROJECT_ID}.web.app. You can find your hosting domain under the Hosting section of the Firebase Console. After filling out this information, press Done and Create Key.

Once completed, you see an ID at the top of the Key Details page.

Go ahead and copy this ID to your clipboard. This is the key that you use for App Check. Next, visit the App Check portion of the Firebase console, and click Get Started. Then, click on Register and then click on reCAPTCHA Enterprise and place the copied ID into the text box for the reCAPTCHA Enterprise Site Key. Leave the rest of the settings as the default. Your App Check page should look something like this:

Unverified and unenforced requests
Now that you have a registered key within the Firebase console, go back to running your site in the browser by running firebase serve. Here you have the web app running locally and you can start making requests against the Firebase backend again. As requests go against the Firebase backend, these requests are being monitored by App Check but are not being enforced. If you wanted to see the status of the requests that are coming through, you could visit the Cloud Firestore section in the APIs tab of the App Check page in the Firebase console. Since you have not configured the client to use App Check yet, you should see something similar to this:

The backend has 100% unverified requests coming through. This screen is useful since it shows that almost all client requests are coming from clients that do not have App Check integrated.
This dashboard can indicate a few things. The first thing that it can indicate is whether all of your client apps are running the latest version of your client. If they are, then you can safely enforce App Check without worrying about turning off access for a genuine client of your application. The other thing that this may tell you is how many attempts to access your backend came in without coming from within your app. This may be users that are querying your backend directly without your knowledge. Since you can see that requests are not verified, it's time to see what would happen to those users that may have an unverified request to your backend before you move on to making their requests verified.
Unverified and enforced Requests
Go ahead and press the Enforce button from the previous screen and then press Enforce again if prompted.

This will start enforcing App Check; it will now block requests to your backend services that are not verified through your chosen attestation provider (in this case reCAPTCHA Enterprise). Return to your running web app that should be running at http://localhost:5000. When you refresh the page, and try to get data from the database, nothing happens. If you open up the Chrome console to read the errors, you should see something similar to the following:
Uncaught Error in snapshot listener: FirebaseError: [code=permission-denied]: Missing or insufficient permissions.
This is App Check blocking requests that did not pass a valid attestation token in their requests to your Firebase resources. For the time being, you can turn off App Check enforcement and in the next section, you examine how to add reCAPTCHA Enterprise App Check to the Friendly Chat example.
7. Add reCAPTCHA Enterprise key to site
We are going to add the enterprise key into your application. First, open hosting/src/firebase-config.js and add your reCAPTCHA Enterprise Key to the following code snippet:
const reCAPTCHAEnterpriseKey = {
  // Replace with your recaptcha enterprise site key
  key: "Replace with your recaptcha enterprise site key"
};
Once this is complete, open hosting/src/index.js and on line 51, you are going to add an import from firebase-config.js to fetch your reCAPTCHA key and also import the App Check library so you can work with the reCAPTCHA Enterprise provider.
// add from here
 import {
   initializeAppCheck,
   ReCaptchaEnterpriseProvider,
 } from 'firebase/app-check';
// to here

// replace this line
import { getFirebaseConfig } from './firebase-config.js';
// with this line
import { getFirebaseConfig, getReCaptchaKey } from './firebase-config.js';
Then, on the next line, you are going to create a function to set up App Check. The function will first check whether you are in a development environment and if so, print a debug token that you can use for local development.
import { getFirebaseConfig, getReCaptchaKey } from './firebase-config.js';
// add from here
 function setupAppCheck(app) {
   if(import.meta.env.MODE === 'development') {
     self.FIREBASE_APPCHECK_DEBUG_TOKEN = true;
   }
 }
// to here
Now it's time to initialize App Check to work with your selected provider–in this case, it's reCAPTCHA Enterprise. You then would also want to automatically refresh your App Check token in the background, which would prevent any type of delay from the user interacting with your service in the event that their App Check token had gone stale.
function setupAppCheck(app) {
   if(import.meta.env.MODE === 'development') {
     self.FIREBASE_APPCHECK_DEBUG_TOKEN = true;
   }
// add from here
   // Create a ReCaptchaEnterpriseProvider instance using your reCAPTCHA Enterprise
   // site key and pass it to initializeAppCheck().
   initializeAppCheck(app, {
     provider: new ReCaptchaEnterpriseProvider(getReCaptchaKey()),
     isTokenAutoRefreshEnabled: true // Set to true to allow auto-refresh.
   });
// to here
 }
Finally, once you make sure that the app is initialized, you then need to call the setupAppCheck function that you just created. At the bottom of the hosting/src/index.js file, add the call to your recently added method.
const firebaseApp = initializeApp(getFirebaseConfig());
// add from here
setupAppCheck(firebaseApp);
// to here
getPerformance();
initFirebaseAuth();
loadMessages();
Test locally first
Test your application locally first. If you are not already serving the application locally, run firebase serve. You should notice that the application still fails to load locally. This is because you only registered your Firebase domain with the reCAPTCHA attestation provider and not the localhost domain. You should never register localhost as an approved domain as this allows users to access your restricted backends from an application running locally on their machine. Instead, since you set self.FIREBASE_APPCHECK_DEBUG_TOKEN = true you would want to check in your JavaScript console for a line looking something similar to this:
App Check debug token: 55183c20-de61-4438-85e6-8065789265be. You will need to add it to your app's App Check settings in the Firebase console for it to work.
You will want to take the debug token supplied (in the example case it is : 55183c20-de61-4438-85e6-8065789265be) and plug this into the App Check configuration under the overflow menu for your app.

Give the token a unique name that you will remember and click Save. This option allows you to use a client generated token with your app which is a safer alternative than generating a debug token and embedding it within your application. Embedding a token within the app could have it accidentally distributed to end users, and those end users could exploit it bypassing your checks. If you wish to distribute a debug token, for instance, in a CI environment, read this documentation to learn more about how to distribute it.

Once you have the debug token registered in the Firebase console, you then can re-enable App Check enforcement and test that the app content loads locally by calling firebase serve from the terminal. You should see the data previously entered being served to the local version of the web application. You should still see the message with the debug token printed to the console.
Try it in production
Once you are satisfied that App Check works locally, deploy the web application to production. From your terminal call firebase deploy again and reload the page. This will package your web application up to run on Firebase Hosting. Once your application is hosted on Firebase Hosting, then try visiting your application at ${YOUR_PROJECT_ID}.web.app. You can open the JavaScript console, and should no longer see the debug token printed there and should see chats loading in your project. Additionally, after interacting with the application for a few moments, you can then visit the App Check section of the Firebase console and validate that the requests to your application have switched to all being verified.
8. Congratulations!
Congratulations, you've successfully added Firebase App Check to a Web App!
You set up the Firebase console to handle a reCAPTCHA Enterprise token for production environments and even set up debug tokens for local development. This ensures that your apps are still able to access Firebase resources from approved clients and prevents fraudulent activity from occurring from within your application.
What's next?
Checkout the following documentation to add Firebase App Check to: