
1. Introduction
You can use Firebase Remote Config to define key-value pairs, also known as parameters, in your app and update their values in the cloud, allowing you to modify the appearance and behavior of your app without distributing an app update.
You will add this new functionality to a sample game, MechaHamster: Level Up with Firebase Edition. This sample game is a new version of the classic Firebase game MechaHamster that removes most of its built-in Firebase functionality, giving you the chance to implement new uses of Firebase in their place.
To ensure that your app behaves as intended, you will set default configurations for values in the sample game code, and these values can be overridden by values you set in Remote Config in the Firebase console.
What you'll learn
- How to set Remote Config values in the cloud and retrieve them
- How to instrument your Unity C# code to automatically use the retrieved values
- How to store, instrument, and override compound values/objects as JSON values
- How to use Remote Config conditions to serve different value variants to different groups of users
What you'll need
- Unity 2019.1.0f1 or higher with iOS and/or Android build support
- A physical Android/iOS device or a simulator/emulator to build and run the game
2. Set up your development environment
The following sections describe how to download the Level Up with Firebase code, open it in Unity, and add a Firebase project. This Level Up with Firebase sample game is used by several other Firebase + Unity codelabs, so you might have already completed the tasks in this section. If so, you can skip these steps and proceed to Add Firebase SDKs for Unity to add Remote Config to the sample game code.
Download the code
Clone this codelab's GitHub repository from the command line:
git clone https://github.com/firebase/level-up-with-firebase
Alternatively, if you do not have git installed, you can download the repository as a ZIP file.
Open Level Up with Firebase in the Unity editor
- Launch the Unity Hub and, from the Projects tab, click the drop-down arrow next to Open.
- Click Add project from disk.
- Navigate to the directory that contains the code, and then click OK.
- If prompted, select a Unity editor version to use and your target platform (Android or iOS).
- Click on the project name, level-up-with-firebase, and the project will open in the Unity editor.
- If your editor does not automatically open it, open
MainGameScenein Assets > Hamster in the Project tab of the Unity Editor.
For more information about installing and using Unity, see Working in Unity.
3. Add Firebase to your Unity project
Create a Firebase project
- Sign into the Firebase console using your Google Account.
- Click the button to create a new project, and then enter a project name (for example,
LevelUpWithFirebase).
- Click Continue.
- If prompted, review and accept the Firebase terms, and then click Continue.
- (Optional) Enable AI assistance in the Firebase console (called "Gemini in Firebase").
- For this codelab, you need Google Analytics to optimally use Firebase products, so keep the toggle on for the Google Analytics option. Follow the on-screen instructions to set up Google Analytics.
- Click Create project, wait for your project to provision, and then click Continue.
Register your app with Firebase
- Open the Firebase console and, from the center of the project overview page, click the Unity icon to launch the setup workflow or, if you've already added an app to your Firebase project, click Add app to display the platform options.
- Select to register both the Apple (iOS) and Android build targets.
- Enter your Unity project's platform-specific ID(s). For this codelab, enter the following:
- For Apple (iOS) - Enter
com.google.firebase.level-upin the iOS bundle ID field. - For Android - Enter
com.google.firebase.level_upin the Android package name field.
- For Apple (iOS) - Enter
- Optionally, enter your Unity project's platform-specific nickname(s).
- Click Register app and proceed to the Download config file section.
- Repeat the process for whichever build target you did not do the first time.
Add Firebase Configuration Files
After clicking Register app, you'll be prompted to download two configuration files (one config file for each build target). Your Unity project needs the Firebase metadata in these files to connect with Firebase.
- Download both available config files:
- For Apple (iOS): Download GoogleService-Info.plist.
- For Android: Download google-services.json.
- Open the Project window of your Unity project, then move both config files into the Assets folder.
- Back in the Firebase console, in the setup workflow, click Next and proceed to Add Firebase SDKs for Unity.
Note: You can always redownload these files at a later time by opening your project's general settings, scrolling down to the Your apps section, and then clicking the download button for the desired configuration file.
Add Firebase SDKs for Unity
- Click Download Firebase Unity SDK in the Firebase console.
- Unzip the SDK somewhere convenient.
- In your open Unity Project, navigate to Assets > Import Package > Custom Package.
- In the Import package dialog, navigate to the directory that contains the unzipped SDK, select
FirebaseAnalytics.unitypackage, and then click Open. - From the Import Unity Package dialog that appears, click Import.
- Repeat the previous steps to import the following two packages:
FirebaseRemoteConfig.unitypackageFirebaseCrashlytics.unitypackage
Crashlytics is a lightweight, realtime crash reporter that helps you track, prioritize, and fix stability issues that erode your app quality. If you haven't previously used it, consider completing the Crashlytics Learning Pathway for Unity.
- Return to the Firebase console and, in the setup workflow, click Next.
For more information about adding Firebase SDKs to Unity projects, see Additional Unity installation options.
4. Set Remote Config defaults and fetch new values
In this codelab, you will update objects that use values defined in code or are serialized in the Unity editor to use values instrumented with Remote Config. You'll configure default values for each parameter using SetDefaultsAsync so your app behaves as intended before it connects to the Remote Config backend. Your app will stay up-to-date by fetching new values from Remote Config and activating them to make them usable in code.
To fetch new values from Remote Config, there are a number of unimplemented methods already present in the Assets/Hamster/Scripts/MainGame.cs file that must be completed.
- Add the following
usingstatements toMainGame.cs:using Firebase.Crashlytics; using Firebase.Extensions; using Firebase.RemoteConfig;Firebase.Extensionsmodule contains some extensions to the C# Tasks API which will help make managing the initialization process with callbacks simpler. - Add Firebase initialization to your
MainGame.csStart()method by replacing the existing InitializeCommonDataAndStartGame() method with the currently unimplemented method,InitializeFirebaseAndStartGame():void Start() { Screen.SetResolution(Screen.width / 2, Screen.height / 2, true); InitializeFirebaseAndStartGame(); } - In
MainGame.cs, findInitializeFirebaseAndStartGame(). Declare an app variable and overwrite the method's implementation as follows:public Firebase.FirebaseApp app = null; // Begins the firebase initialization process and afterwards, opens the main menu. private void InitializeFirebaseAndStartGame() { Firebase.FirebaseApp.CheckAndFixDependenciesAsync() .ContinueWithOnMainThread( previousTask => { var dependencyStatus = previousTask.Result; if (dependencyStatus == Firebase.DependencyStatus.Available) { // Create and hold a reference to your FirebaseApp, app = Firebase.FirebaseApp.DefaultInstance; // Set the recommended Crashlytics uncaught exception behavior. Crashlytics.ReportUncaughtExceptionsAsFatal = true; SetRemoteConfigDefaults(); } else { UnityEngine.Debug.LogError( $"Could not resolve all Firebase dependencies: {dependencyStatus}\n" + "Firebase Unity SDK is not safe to use here"); } }); } - Firebase initialization calls
SetRemoteConfigDefaultson success to set in-app default values. Replace the unimplemented SetRemoteConfigDefaults method with the following:private void SetRemoteConfigDefaults() { var defaults = new System.Collections.Generic.Dictionary < string, object > (); defaults.Add( Hamster.MapObjects.AccelerationTile.AccelerationTileForceKey, Hamster.MapObjects.AccelerationTile.AccelerationTileForceDefault); defaults.Add( Hamster.States.MainMenu.SubtitleOverrideKey, Hamster.States.MainMenu.SubtitleOverrideDefault); var remoteConfig = FirebaseRemoteConfig.DefaultInstance; remoteConfig.SetDefaultsAsync(defaults).ContinueWithOnMainThread( previousTask => { FetchRemoteConfig(InitializeCommonDataAndStartGame); } ); }
5. Fetch and Activate new values (as needed)
We now need to complete the existing FetchRemoteConfig method. This will chain calls to Remote Config's methods FetchAsync (which fetches new values from Remote Config) and ActivateAsync (which activates those obtained values to make them available in code) using a callback parameter named onFetchAndActivateSuccessful.
The startup code we added in the previous step calls FetchRemoteConfig with InitializeCommonDataAndStartGame as its callback in order to start the game at the end of the sequence. You can pass alternative callbacks to FetchRemoteConfig in order to invoke the fetch with different outcomes. An example (that you will implement later) is passing in a method that opens new UI menus, which depend on Remote Config values. This will cause the menus to open only after those values have been fetched and activated.
- Paste the code below into
FetchRemoteConfig:public void FetchRemoteConfig(System.Action onFetchAndActivateSuccessful) { if(app==null) { Debug.LogError($"Do not use Firebase until it is properly initialized by calling {nameof(InitializeFirebaseAndStartGame)}."); return; } Debug.Log("Fetching data..."); var remoteConfig = FirebaseRemoteConfig.DefaultInstance; remoteConfig.FetchAsync(System.TimeSpan.Zero).ContinueWithOnMainThread( previousTask=> { if (!previousTask.IsCompleted) { Debug.LogError($"{nameof(remoteConfig.FetchAsync)} incomplete: Status '{previousTask.Status}'"); return; } ActivateRetrievedRemoteConfigValues(onFetchAndActivateSuccessful); }); } - Next, complete the
ActivateRetrievedRemoteConfigValuesmethod, which receives a passed-in callback,onFetchAndActivateSuccessful. When activation finishes, the specified callback will be invoked:private void ActivateRetrievedRemoteConfigValues(System.Action onFetchAndActivateSuccessful) { var remoteConfig = FirebaseRemoteConfig.DefaultInstance; var info = remoteConfig.Info; if(info.LastFetchStatus == LastFetchStatus.Success) { remoteConfig.ActivateAsync().ContinueWithOnMainThread( previousTask => { Debug.Log($"Remote data loaded and ready (last fetch time {info.FetchTime})."); onFetchAndActivateSuccessful(); }); } }
When called downstream by SetRemoteConfigDefaults from the initialization context, ActivateRetrievedRemoteConfigValues calls the previous starting point, InitializeCommonDataAndStartGame, to start the game by opening the main menu.
6. Set up a Remote Config loading strategy
To fetch and activate values at another time during use of the app, you need to call these functions again and, if any objects have cached the values, they must be notified to perform an update. In order to develop a strategy to re-fetch Remote Config values, consider when the new values are needed and when to initiate the fetching and activation of new values to avoid their changing while in use.
As currently implemented, Remote Config values are fetched and activated when the app starts. Fetches can be hidden during menu changes while also blocking interaction during the transition. In addition, this is often the most relevant time to get new values, as a change in menu state can often be used to know "where" the player is going and predict that a value would be used.
Looking over Mechahamster's menu system, the easiest way to add UI blocking menu refreshes is to call it before the main menu resumes (specifically when it's accessed by backing out of another menu) and pass the UI display method as the onFetchAndActivateSuccessful callback. The same can be done for the Level Select menu.
With the initial load as part of app start-up, any menu navigation that goes through the main menu will be handled by the first of these, while any re-entrance of the Level Select menu will also cause a refresh. The initial entrance into the level select menu does not matter as it can only be accessed from the main menu and thus is already covered.
To enable this in the app, complete the relevant methods in the main menu and level select files, which will block the UI display until FetchAsync and ActivateAsync are complete:
- Open
Assets/Hamster/Scripts/States/MainMenu.csand replace the existingResumemethod with the following:public override void Resume(StateExitValue results) { CommonData.mainGame.SelectAndPlayMusic(CommonData.prefabs.menuMusic, true); CommonData.mainGame.FetchRemoteConfig(InitializeUI); } - Save the file.
- Open
Assets/Hamster/Scripts/States/BaseLevelSelect.cs, replace the existingResumemethod with the following:public override void Resume(StateExitValue results) { CommonData.mainGame.FetchRemoteConfig(ShowUI); } - Save the file.
7. Debug/validate fetch behaviors
At this point, it is beneficial to do a diagnostic/validation check. The following procedure will allow you to manually test your app and how/if it fetches and activates Remote Config values.
The information will be printed as part of your simulator, device or editor logs. For iOS, you can view device and simulator logs in Xcode. For Android, view logs by running adb logcat. If you run the code in Unity by pressing Play in the editor, logs appear in the Console tab.
- Rebuild and run the app (in the Editor, using a device or simulator).
- After the game's Main Menu appears, review your game's log output, which should contain the logs generated by
Debug.LoginFetchRemoteConfigandActivateRetrievedRemoteConfigValues. These should show "Fetching data..." and "Remote data loaded and ready" messages. Note the timestamps at the beginning of these messages. - In the game, press License.
- Press Okay.
- Wait for the game's Main Menu to appear.
- Review your game's log output, which should be similar to those in the earlier step, with new timestamps (matching the time set on the system clock where you are running the game).
- In the game, press Play.
- Press Let's Roll.
- Navigate the ball to the goal using the keyboard arrows, which will open a Level Complete menu.
- Press Levels.
- Wait for the Level Select menu to load.
- Review your game's log output again. It should match log messages from the earlier steps, with newer timestamps (matching the time set on the system clock where you are running the game).
If any of those did not appear in your app, some part of the fetch and activate flow (or your device) may be misconfigured. If the first log doesn't appear, there's a chance your game won't start up. Review the Editor console or device/emulator logs for warnings and errors about your project/environment and investigate them–the issue may be as simple as connecting to the internet.
If the initial logs from loading the menu appear, but one of the subsequent ones do not, investigate/reimplement the Resume methods in Assets/Hamster/Scripts/States/MainMenu.cs and Assets/Hamster/Scripts/States/BaseLevelSelect.cs.
8. Instrument your code
Now that you've configured in-app parameter values in SetDefaultsAsync() and made the most up-to-date versions available with FetchAsync() and ActivateAsync(), you'll reference and use those values in code.
After you set values in the Remote Config backend, fetch them, and activate them (or do both at once), those values are available to your app. To use these values, call GetValue(string key), and choose a parameter key as an argument. This returns a ConfigValue, which has properties to access the value as various supported types: string, bool, long, double. In this project and most gaming use cases, you must cast the last two types to the more idiomatic int and float. To ensure these conversions don't cause issues, make sure the initial values set in Remote Config are within the valid range of the types you will be using in your app code.
- Import Remote Config by adding
using Firebase.RemoteConfig;to the top of the following files:Assets/Hamster/Scripts/States/MainMenu.csAssets/Hamster/Scripts/MapObjects/AccelerationTile.cs
- Replace the
Startmethod ofAccelerationTile.cs:private void Start() { var remoteConfig = FirebaseRemoteConfig.DefaultInstance; Acceleration = (float)remoteConfig.GetValue(AccelerationTileForceKey).DoubleValue; } - Edit the body of the
InitializeUImethod ofMainMenu.cs:private void InitializeUI() { if (menuComponent == null) { menuComponent = SpawnUI<Menus.MainMenuGUI>(StringConstants.PrefabMainMenu); } var remoteConfig = FirebaseRemoteConfig.DefaultInstance; var subtitleOverride = JsonUtility.FromJson<Menus.MainMenuGUI.SubtitleOverride>( remoteConfig.GetValue(SubtitleOverrideKey).StringValue); // Only sets values if all fields of the override are non-default. if(subtitleOverride != null && subtitleOverride.IsValidOverride()) { menuComponent.MenuSubtitleText.text = subtitleOverride.text; menuComponent.MenuSubtitleText.fontSize = subtitleOverride.fontSize; menuComponent.MenuSubtitleText.color = subtitleOverride.textColor; } ShowUI(); }subtitleOverrideis set to change the subtitle on the main menu screen if all of its fields in the cloud are set as values other than their type's default values.
9. Set parameter values remotely
Now that your app is fully-instrumented, you're ready to configure parameters and values on the Remote Config server. In this codelab, we'll set this up using the Firebase console.
- In the Firebase console, open your project.
- Select Remote Config from the menu to view the Remote Config dashboard.
- For each for the parameters you defined in your app and listed in the table that follows, click Add parameter, paste in the parameter name (key), select the Data type listed in the table, disable Use in-app default and paste in the new default value:
Parameter name (key)
Data type
Default value
acceleration_tile_force
Number
100
subtitle_override
JSON
{"text":"We overwrote the subtitle","fontSize":8,"textColor":{"r":0.0,"g":255.0,"b":0.0,"a":255.0}}
- Click Save to save your changes.
- Click Publish to publish the new config and make the new values available to your game.
- Run your app again after setting these remote parameters and observe how they override the original defaults.

10. Use Remote Config conditions to serve variants
You may want to cater the app experience to the user based on the language they speak, where they are, the time of day, or what platform they use. Remote Config conditions give you the ability to use these and other attributes individually or in combination to serve different values (called variants) to the user.
One common use for conditions is to change content between iOS and Android platforms. Follow the steps below to implement a condition that serves a different value for subtitle_override depending on which platform is in use.
- Open your project's Remote Config tab in the Firebase console.
- Click the edit button for
subtitle_override. - At the bottom left corner, click Add new.
- In the drop-down that appears, hover over Conditional value and click Create new condition.

- When prompted, name the condition "is iOS" if you are targeting iOS, or "is Android" if you are targeting Android. If you are targeting both, simply choose one here and use it for the rest of the codelab.

- Under Applies if..., click the Select... drop-down and select Platform. Then, select the appropriate platform.

- Click Create condition to create the condition. The Edit parameter dialog reappears and you can now set a value:
- If you are targeting Android, set the Value to:
{"text":"Level Up Android Version","fontSize":8,"textColor":{"r":0.0,"g":255.0,"b":0.0,"a":255.0}} - If you are targeting iOS, set the Value to:
{"text":"Level Up iOS Version","fontSize":8,"textColor":{"r":0.0,"g":255.0,"b":0.0,"a":255.0}}
- If you are targeting Android, set the Value to:
- Click Save to save your changes.
- Click Publish to publish the new config and make the new values available to your game.
If you build and run the game again, you should see the game's subtitle replaced with its platform-specific variant.
11. Configure Remote Config to receive real-time updates
Remote Config can now listen for and handle updates to Remote Config templates in real-time. Apps can subscribe to the new real-time Remote Config API to listen for config changes and updated values.
How it works
To listen for updates, your app has to implement a method that subscribes to the OnConfigUpdateListener event. While one or more config update listeners are subscribed, new Remote Config templates will be fetched automatically, the subscribed handlers are called and can be used to perform logic in response, like activating the new values and making them available to the rest of the application.
Implement real-time Remote Config
To illustrate how this works in game, make the following changes to your code.
Create a Config Update handler
The first step to using the Config Update event is to create a method capable of listening for it. Place the following method in Assets/Hamster/Scripts/MainGame.cs:
   void ActivateValuesOnConfigUpdate( object sender, ConfigUpdateEventArgs args)
   {
      if (args.Error != RemoteConfigError.None) {
         Debug.Log($"Error occurred while listening: {args.Error}");
         return;
      }

      Debug.Log("Updated keys: " + string.Join(", ", args.UpdatedKeys));
      // Activate all fetched values and then logs.
      var remoteConfig = FirebaseRemoteConfig.DefaultInstance;
      remoteConfig.ActivateAsync().ContinueWithOnMainThread(
         task => {
            Debug.Log($"Keys from {nameof(ActivateValuesOnConfigUpdate)} activated.");
         });
   }
This method will print a list of updated keys and a success message to the log when it activates the new values.
Subscribe to the Update event
In order to activate ActivateValuesOnConfigUpdate when the event is called, subscribe it to the event. Replace the InitializeCommonDataAndStartGame() method in Assets/Hamster/Scripts/MainGame.cs with the following:
   void InitializeCommonDataAndStartGame()
   {
      CommonData.prefabs = FindObjectOfType<PrefabList>();
      CommonData.mainCamera = FindObjectOfType<CameraController>();
      CommonData.mainGame = this;

      Screen.orientation = ScreenOrientation.LandscapeLeft;

      musicPlayer = CommonData.mainCamera.GetComponentInChildren<AudioSource>();

      CommonData.gameWorld = FindObjectOfType<GameWorld>();

      // Set up volume settings.
      MusicVolume = PlayerPrefs.GetInt(StringConstants.MusicVolume, MaxVolumeValue);
      // Set the music to ignore the listeners volume, which is used for sound effects.
      CommonData.mainCamera.GetComponentInChildren<AudioSource>().ignoreListenerVolume = true;
      SoundFxVolume = PlayerPrefs.GetInt(StringConstants.SoundFxVolume, MaxVolumeValue);

      // Subscribes to on config update after first initial fetch and activate
      FirebaseRemoteConfig.DefaultInstance.OnConfigUpdateListener += ActivateValuesOnConfigUpdate;

      stateManager.PushState(new States.MainMenu());
   }
The new line (ending with += ActivateValuesOnConfigUpdate;) subscribes the event handler to the event.
Unsubscribe when the handler's owning object is destroyed
In order to prevent null reference errors, objects with methods that are subscribed to events must unsubscribe that method when they are destroyed. Add the following method to Assets/Hamster/Scripts/MainGame.cs:
   private void OnDestroy()
   {
      FirebaseRemoteConfig.DefaultInstance.OnConfigUpdateListener -= ActivateValuesOnConfigUpdate;
   }
Test the new functionality
To validate the new functionality, try out your built app. The following procedure requires that you can read the log and debug using a real device.
Change acceleration_tile_force and observe
After starting your app, in the Remote Config section of the Firebase console:
- Press the edit button next to
acceleration_tile_force.
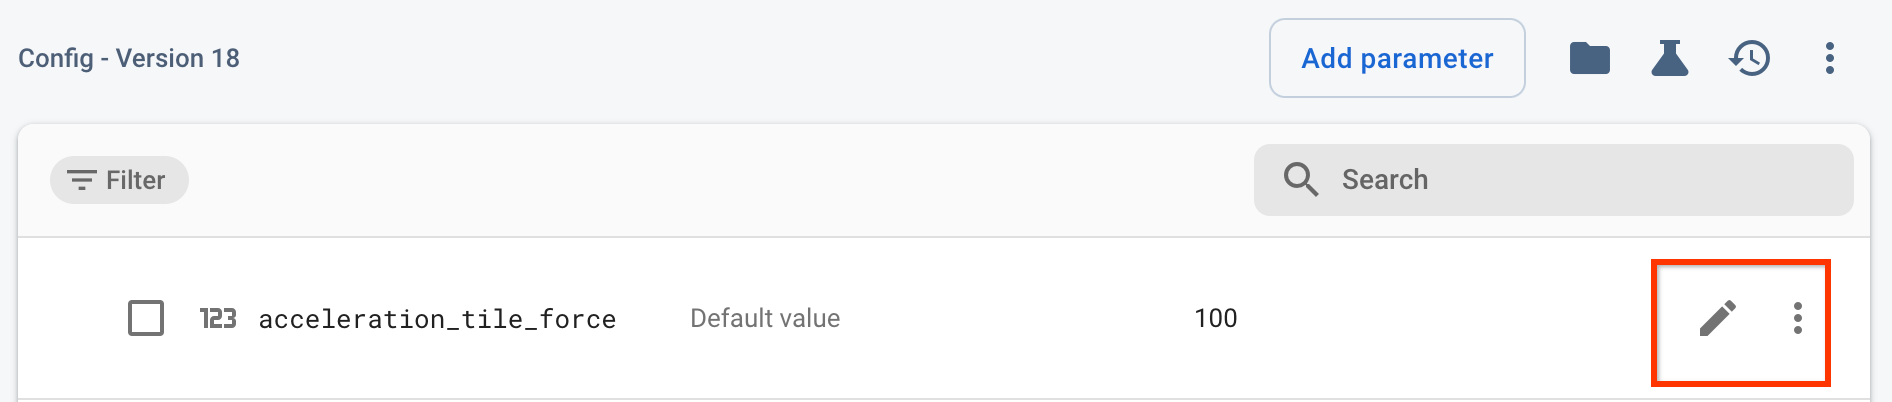
- Change the value to ‘120' and press Save.
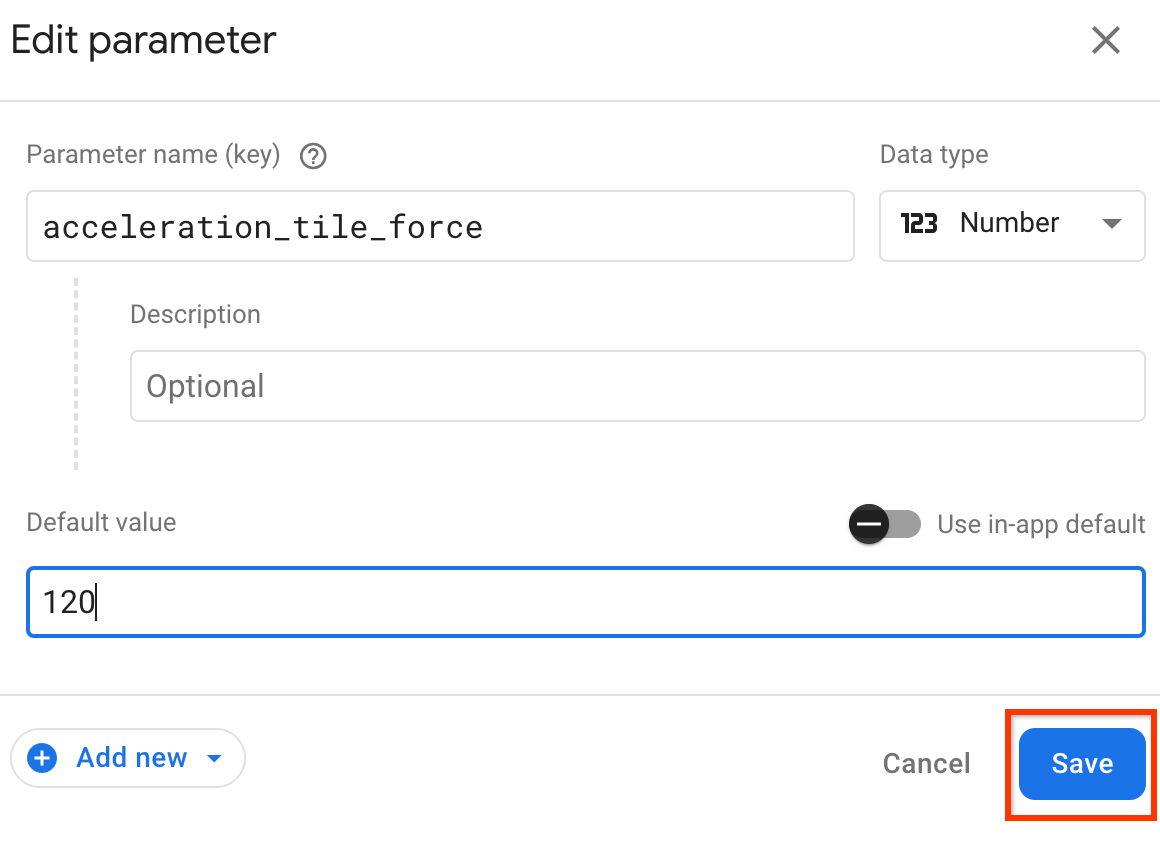
- Click the Publish Changes button.

- Inspect the log.
- If you see a log message that begins with "Error occurred while listening," read the rest of it and try debugging with the error message it prints.
- If you see a log that begins with "Updated keys," your app has received the changed values.
- If you see neither of these, look through the rest of your logs and then re-review the instructions from Create a Config Update handler, re-test, and re-check the logs to determine if anything is amiss.
12. Congratulations!
You've used Remote Config to control in-game values remotely by fetching them in your app and using conditions to serve different variants!
What we've covered
- How to set and retrieve Remote Config values
- How to instrument your Unity C# code to use the retrieved values
- How to store, instrument, and override compound values/objects as JSON values
- How to use Remote Config conditions to serve different value variants
Next steps
Read about parameter value priority to better understand the logic of which values are obtained by an app instance when it uses a parameter with multiple values (due to conditions or locality).