
Firebase Admin SDK या FCM ऐप्लिकेशन सर्वर प्रोटोकॉल का इस्तेमाल करके, मैसेज के अनुरोध बनाए जा सकते हैं और उन्हें इन टाइप के टारगेट पर भेजा जा सकता है:
- विषय का नाम
- शर्त
- डिवाइस रजिस्ट्रेशन टोकन
- डिवाइस ग्रुप का नाम (सिर्फ़ प्रोटोकॉल के लिए)
पहले से तय किए गए फ़ील्ड से बने सूचना पैल्यऑड, उपयोगकर्ता के तय किए गए फ़ील्ड का डेटा पैल्यऑड या दोनों तरह के पैल्यऑड वाले मैसेज भेजे जा सकते हैं. ज़्यादा जानकारी के लिए, मैसेज टाइप देखें.
इस पेज पर दिए गए उदाहरणों में, Firebase Admin SDK (इसमें Node, Java, Python, C#, और Go) और v1 HTTP प्रोटोकॉल का इस्तेमाल करके सूचना मैसेज भेजने का तरीका बताया गया है.
चुनिंदा डिवाइसों पर मैसेज भेजना
किसी एक डिवाइस पर मैसेज भेजने के लिए, डिवाइस का रजिस्टरेशन टोकन डालें, जैसा कि यहां दिखाया गया है. रजिस्ट्रेशन टोकन के बारे में ज़्यादा जानने के लिए, अपने प्लैटफ़ॉर्म के लिए क्लाइंट सेटअप की जानकारी देखें.
// This registration token comes from the client FCM SDKs.
const registrationToken = 'YOUR_REGISTRATION_TOKEN';

const message = {
  data: {
    score: '850',
    time: '2:45'
  },
  token: registrationToken
};

// Send a message to the device corresponding to the provided
// registration token.
getMessaging().send(message)
  .then((response) => {
    // Response is a message ID string.
    console.log('Successfully sent message:', response);
  })
  .catch((error) => {
    console.log('Error sending message:', error);
  });
// This registration token comes from the client FCM SDKs.
String registrationToken = "YOUR_REGISTRATION_TOKEN";
// See documentation on defining a message payload.
Message message = Message.builder()
.putData("score", "850")
.putData("time", "2:45")
.setToken(registrationToken)
.build();
// Send a message to the device corresponding to the provided
// registration token.
String response = FirebaseMessaging.getInstance().send(message);
// Response is a message ID string.
System.out.println("Successfully sent message: " + response);
# This registration token comes from the client FCM SDKs.
registration_token = 'YOUR_REGISTRATION_TOKEN'
# See documentation on defining a message payload.
message = messaging.Message(
data={
'score': '850',
'time': '2:45',
},
token=registration_token,
)
# Send a message to the device corresponding to the provided
# registration token.
response = messaging.send(message)
# Response is a message ID string.
print('Successfully sent message:', response)
// Obtain a messaging.Client from the App.
ctx := context.Background()
client, err := app.Messaging(ctx)
if err != nil {
log.Fatalf("error getting Messaging client: %v\n", err)
}
// This registration token comes from the client FCM SDKs.
registrationToken := "YOUR_REGISTRATION_TOKEN"
// See documentation on defining a message payload.
message := &messaging.Message{
Data: map[string]string{
"score": "850",
"time": "2:45",
},
Token: registrationToken,
}
// Send a message to the device corresponding to the provided
// registration token.
response, err := client.Send(ctx, message)
if err != nil {
log.Fatalln(err)
}
// Response is a message ID string.
fmt.Println("Successfully sent message:", response)
// This registration token comes from the client FCM SDKs.
var registrationToken = "YOUR_REGISTRATION_TOKEN";

// See documentation on defining a message payload.
var message = new Message()
{
    Data = new Dictionary<string, string>()
    {
        { "score", "850" },
        { "time", "2:45" },
    },
    Token = registrationToken,
};

// Send a message to the device corresponding to the provided
// registration token.
string response = await FirebaseMessaging.DefaultInstance.SendAsync(message);
// Response is a message ID string.
Console.WriteLine("Successfully sent message: " + response);
POST https://fcm.googleapis.com/v1/projects/myproject-b5ae1/messages:send HTTP/1.1

Content-Type: application/json
Authorization: Bearer ya29.ElqKBGN2Ri_Uz...HnS_uNreA

{
   "message":{
      "token":"bk3RNwTe3H0:CI2k_HHwgIpoDKCIZvvDMExUdFQ3P1...",
      "notification":{
        "body":"This is an FCM notification message!",
        "title":"FCM Message"
      }
   }
}
cURL कमांड:
curl -X POST -H "Authorization: Bearer ya29.ElqKBGN2Ri_Uz...HnS_uNreA" -H "Content-Type: application/json" -d '{
"message":{
   "notification":{
     "title":"FCM Message",
     "body":"This is an FCM Message"
   },
   "token":"bk3RNwTe3H0:CI2k_HHwgIpoDKCIZvvDMExUdFQ3P1..."
}}' https://fcm.googleapis.com/v1/projects/myproject-b5ae1/messages:send
मैसेज भेजने के हर तरीके से, मैसेज आईडी मिलता है. Firebase Admin SDK, projects/{project_id}/messages/{message_id} फ़ॉर्मैट में आईडी स्ट्रिंग दिखाता है.
एचटीटीपी प्रोटोकॉल का रिस्पॉन्स, एक JSON कुंजी होती है:
    {
      "name":"projects/myproject-b5ae1/messages/0:1500415314455276%31bd1c9631bd1c96"
    }
एक से ज़्यादा डिवाइसों पर मैसेज भेजना
एडमिन FCM एपीआई की मदद से, डिवाइस रजिस्ट्रेशन टोकन की सूची में मैसेज को मल्टीकास्ट किया जा सकता है. हर बार कॉल करने पर, ज़्यादा से ज़्यादा 500 डिवाइस रजिस्टरेशन टोकन डाले जा सकते हैं.
// Create a list containing up to 500 registration tokens.
// These registration tokens come from the client FCM SDKs.
const registrationTokens = [
  'YOUR_REGISTRATION_TOKEN_1',
  // …
  'YOUR_REGISTRATION_TOKEN_N',
];

const message = {
  data: {score: '850', time: '2:45'},
  tokens: registrationTokens,
};

getMessaging().sendMulticast(message)
  .then((response) => {
    console.log(response.successCount + ' messages were sent successfully');
  });
// Create a list containing up to 500 registration tokens.
// These registration tokens come from the client FCM SDKs.
List<String> registrationTokens = Arrays.asList(
"YOUR_REGISTRATION_TOKEN_1",
// ...
"YOUR_REGISTRATION_TOKEN_n"
);
MulticastMessage message = MulticastMessage.builder()
.putData("score", "850")
.putData("time", "2:45")
.addAllTokens(registrationTokens)
.build();
BatchResponse response = FirebaseMessaging.getInstance().sendMulticast(message);
// See the BatchResponse reference documentation
// for the contents of response.
System.out.println(response.getSuccessCount() + " messages were sent successfully");
# Create a list containing up to 500 registration tokens.
# These registration tokens come from the client FCM SDKs.
registration_tokens = [
'YOUR_REGISTRATION_TOKEN_1',
# ...
'YOUR_REGISTRATION_TOKEN_N',
]
message = messaging.MulticastMessage(
data={'score': '850', 'time': '2:45'},
tokens=registration_tokens,
)
response = messaging.send_multicast(message)
# See the BatchResponse reference documentation
# for the contents of response.
print('{0} messages were sent successfully'.format(response.success_count))
// Create a list containing up to 500 registration tokens.
// This registration tokens come from the client FCM SDKs.
registrationTokens := []string{
"YOUR_REGISTRATION_TOKEN_1",
// ...
"YOUR_REGISTRATION_TOKEN_n",
}
message := &messaging.MulticastMessage{
Data: map[string]string{
"score": "850",
"time": "2:45",
},
Tokens: registrationTokens,
}
br, err := client.SendMulticast(context.Background(), message)
if err != nil {
log.Fatalln(err)
}
// See the BatchResponse reference documentation
// for the contents of response.
fmt.Printf("%d messages were sent successfully\n", br.SuccessCount)
// Create a list containing up to 500 registration tokens.
// These registration tokens come from the client FCM SDKs.
var registrationTokens = new List<string>()
{
"YOUR_REGISTRATION_TOKEN_1",
// ...
"YOUR_REGISTRATION_TOKEN_n",
};
var message = new MulticastMessage()
{
Tokens = registrationTokens,
Data = new Dictionary<string, string>()
{
{ "score", "850" },
{ "time", "2:45" },
},
};
var response = await FirebaseMessaging.DefaultInstance.SendEachForMulticastAsync(message);
// See the BatchResponse reference documentation
// for the contents of response.
Console.WriteLine($"{response.SuccessCount} messages were sent successfully");
रिटर्न वैल्यू, टोकन की एक सूची होती है, जो इनपुट टोकन के क्रम के हिसाब से होती है. यह तब काम आता है, जब आपको यह देखना हो कि किन टोकन की वजह से गड़बड़ियां हुईं.
// These registration tokens come from the client FCM SDKs.
const registrationTokens = [
  'YOUR_REGISTRATION_TOKEN_1',
  // …
  'YOUR_REGISTRATION_TOKEN_N',
];

const message = {
  data: {score: '850', time: '2:45'},
  tokens: registrationTokens,
};

getMessaging().sendMulticast(message)
  .then((response) => {
    if (response.failureCount > 0) {
      const failedTokens = [];
      response.responses.forEach((resp, idx) => {
        if (!resp.success) {
          failedTokens.push(registrationTokens[idx]);
        }
      });
      console.log('List of tokens that caused failures: ' + failedTokens);
    }
  });
// These registration tokens come from the client FCM SDKs.
List<String> registrationTokens = Arrays.asList(
"YOUR_REGISTRATION_TOKEN_1",
// ...
"YOUR_REGISTRATION_TOKEN_n"
);
MulticastMessage message = MulticastMessage.builder()
.putData("score", "850")
.putData("time", "2:45")
.addAllTokens(registrationTokens)
.build();
BatchResponse response = FirebaseMessaging.getInstance().sendMulticast(message);
if (response.getFailureCount() > 0) {
List<SendResponse> responses = response.getResponses();
List<String> failedTokens = new ArrayList<>();
for (int i = 0; i < responses.size(); i++) {
if (!responses.get(i).isSuccessful()) {
// The order of responses corresponds to the order of the registration tokens.
failedTokens.add(registrationTokens.get(i));
}
}
System.out.println("List of tokens that caused failures: " + failedTokens);
}
# These registration tokens come from the client FCM SDKs.
registration_tokens = [
'YOUR_REGISTRATION_TOKEN_1',
# ...
'YOUR_REGISTRATION_TOKEN_N',
]
message = messaging.MulticastMessage(
data={'score': '850', 'time': '2:45'},
tokens=registration_tokens,
)
response = messaging.send_multicast(message)
if response.failure_count > 0:
responses = response.responses
failed_tokens = []
for idx, resp in enumerate(responses):
if not resp.success:
# The order of responses corresponds to the order of the registration tokens.
failed_tokens.append(registration_tokens[idx])
print('List of tokens that caused failures: {0}'.format(failed_tokens))
// Create a list containing up to 500 registration tokens.
// This registration tokens come from the client FCM SDKs.
registrationTokens := []string{
"YOUR_REGISTRATION_TOKEN_1",
// ...
"YOUR_REGISTRATION_TOKEN_n",
}
message := &messaging.MulticastMessage{
Data: map[string]string{
"score": "850",
"time": "2:45",
},
Tokens: registrationTokens,
}
br, err := client.SendMulticast(context.Background(), message)
if err != nil {
log.Fatalln(err)
}
if br.FailureCount > 0 {
var failedTokens []string
for idx, resp := range br.Responses {
if !resp.Success {
// The order of responses corresponds to the order of the registration tokens.
failedTokens = append(failedTokens, registrationTokens[idx])
}
}
fmt.Printf("List of tokens that caused failures: %v\n", failedTokens)
}
// These registration tokens come from the client FCM SDKs.
var registrationTokens = new List<string>()
{
"YOUR_REGISTRATION_TOKEN_1",
// ...
"YOUR_REGISTRATION_TOKEN_n",
};
var message = new MulticastMessage()
{
Tokens = registrationTokens,
Data = new Dictionary<string, string>()
{
{ "score", "850" },
{ "time", "2:45" },
},
};
var response = await FirebaseMessaging.DefaultInstance.SendEachForMulticastAsync(message);
if (response.FailureCount > 0)
{
var failedTokens = new List<string>();
for (var i = 0; i < response.Responses.Count; i++)
{
if (!response.Responses[i].IsSuccess)
{
// The order of responses corresponds to the order of the registration tokens.
failedTokens.Add(registrationTokens[i]);
}
}
Console.WriteLine($"List of tokens that caused failures: {failedTokens}");
}
विषयों पर मैसेज भेजना
विषय बनाने के बाद, क्लाइंट साइड पर विषय के लिए क्लाइंट ऐप्लिकेशन इंस्टेंस की सदस्यता लेकर या सर्वर एपीआई की मदद से, विषय पर मैसेज भेजे जा सकते हैं. अगर आपने पहली बार FCM के लिए अनुरोध भेजने की सुविधा बनाई है, तो अपने सर्वर इनवायरनमेंट और FCM के बारे में ज़रूरी जानकारी पाने के लिए, गाइड देखें.
बैकएंड पर ईमेल भेजने के लॉजिक में, यहां दिखाए गए तरीके से अपने पसंदीदा विषय का नाम डालें:
// The topic name can be optionally prefixed with "/topics/".
const topic = 'highScores';

const message = {
  data: {
    score: '850',
    time: '2:45'
  },
  topic: topic
};

// Send a message to devices subscribed to the provided topic.
getMessaging().send(message)
  .then((response) => {
    // Response is a message ID string.
    console.log('Successfully sent message:', response);
  })
  .catch((error) => {
    console.log('Error sending message:', error);
  });
// The topic name can be optionally prefixed with "/topics/".
String topic = "highScores";
// See documentation on defining a message payload.
Message message = Message.builder()
.putData("score", "850")
.putData("time", "2:45")
.setTopic(topic)
.build();
// Send a message to the devices subscribed to the provided topic.
String response = FirebaseMessaging.getInstance().send(message);
// Response is a message ID string.
System.out.println("Successfully sent message: " + response);
# The topic name can be optionally prefixed with "/topics/".
topic = 'highScores'
# See documentation on defining a message payload.
message = messaging.Message(
data={
'score': '850',
'time': '2:45',
},
topic=topic,
)
# Send a message to the devices subscribed to the provided topic.
response = messaging.send(message)
# Response is a message ID string.
print('Successfully sent message:', response)
// The topic name can be optionally prefixed with "/topics/".
topic := "highScores"
// See documentation on defining a message payload.
message := &messaging.Message{
Data: map[string]string{
"score": "850",
"time": "2:45",
},
Topic: topic,
}
// Send a message to the devices subscribed to the provided topic.
response, err := client.Send(ctx, message)
if err != nil {
log.Fatalln(err)
}
// Response is a message ID string.
fmt.Println("Successfully sent message:", response)
// The topic name can be optionally prefixed with "/topics/".
var topic = "highScores";

// See documentation on defining a message payload.
var message = new Message()
{
    Data = new Dictionary<string, string>()
    {
        { "score", "850" },
        { "time", "2:45" },
    },
    Topic = topic,
};

// Send a message to the devices subscribed to the provided topic.
string response = await FirebaseMessaging.DefaultInstance.SendAsync(message);
// Response is a message ID string.
Console.WriteLine("Successfully sent message: " + response);
POST https://fcm.googleapis.com/v1/projects/myproject-b5ae1/messages:send HTTP/1.1

Content-Type: application/json
Authorization: Bearer ya29.ElqKBGN2Ri_Uz...HnS_uNreA
{
  "message":{
    "topic" : "foo-bar",
    "notification" : {
      "body" : "This is a Firebase Cloud Messaging Topic Message!",
      "title" : "FCM Message"
      }
   }
}
cURL कमांड:
curl -X POST -H "Authorization: Bearer ya29.ElqKBGN2Ri_Uz...HnS_uNreA" -H "Content-Type: application/json" -d '{
  "message": {
    "topic" : "foo-bar",
    "notification": {
      "body": "This is a Firebase Cloud Messaging Topic Message!",
      "title": "FCM Message"
    }
  }
}' https://fcm.googleapis.com/v1/projects/myproject-b5ae1/messages:send HTTP/1.1
किसी विषय के कॉम्बिनेशन पर मैसेज भेजने के लिए, कोई शर्त तय करें. यह एक बूलियन एक्सप्रेशन है, जो टारगेट किए गए विषयों के बारे में बताता है. उदाहरण के लिए, यह शर्त उन डिवाइसों पर मैसेज भेजेगी जो TopicA और TopicB या TopicC की सदस्यता लेते हैं:
"'TopicA' in topics && ('TopicB' in topics || 'TopicC' in topics)"
FCM सबसे पहले ब्रैकेट में दी गई शर्तों का आकलन करता है. इसके बाद, एक्सप्रेशन का आकलन बाएं से दाएं करता है. ऊपर दिए गए एक्सप्रेशन में, किसी एक विषय की सदस्यता लेने वाले उपयोगकर्ता को मैसेज नहीं मिलता. इसी तरह, TopicA की सदस्यता न लेने वाले उपयोगकर्ता को मैसेज नहीं मिलता. इन कॉम्बिनेशन को यह जानकारी मिलती है:
TopicAऔरTopicBTopicAऔरTopicC
शर्त वाले एक्सप्रेशन में ज़्यादा से ज़्यादा पांच विषय शामिल किए जा सकते हैं.
किसी शर्त के हिसाब से भेजने के लिए:
// Define a condition which will send to devices which are subscribed
// to either the Google stock or the tech industry topics.
const condition = '\'stock-GOOG\' in topics || \'industry-tech\' in topics';

// See documentation on defining a message payload.
const message = {
  notification: {
    title: '$FooCorp up 1.43% on the day',
    body: '$FooCorp gained 11.80 points to close at 835.67, up 1.43% on the day.'
  },
  condition: condition
};

// Send a message to devices subscribed to the combination of topics
// specified by the provided condition.
getMessaging().send(message)
  .then((response) => {
    // Response is a message ID string.
    console.log('Successfully sent message:', response);
  })
  .catch((error) => {
    console.log('Error sending message:', error);
  });
// Define a condition which will send to devices which are subscribed
// to either the Google stock or the tech industry topics.
String condition = "'stock-GOOG' in topics || 'industry-tech' in topics";
// See documentation on defining a message payload.
Message message = Message.builder()
.setNotification(Notification.builder()
.setTitle("$GOOG up 1.43% on the day")
.setBody("$GOOG gained 11.80 points to close at 835.67, up 1.43% on the day.")
.build())
.setCondition(condition)
.build();
// Send a message to devices subscribed to the combination of topics
// specified by the provided condition.
String response = FirebaseMessaging.getInstance().send(message);
// Response is a message ID string.
System.out.println("Successfully sent message: " + response);
# Define a condition which will send to devices which are subscribed
# to either the Google stock or the tech industry topics.
condition = "'stock-GOOG' in topics || 'industry-tech' in topics"
# See documentation on defining a message payload.
message = messaging.Message(
notification=messaging.Notification(
title='$GOOG up 1.43% on the day',
body='$GOOG gained 11.80 points to close at 835.67, up 1.43% on the day.',
),
condition=condition,
)
# Send a message to devices subscribed to the combination of topics
# specified by the provided condition.
response = messaging.send(message)
# Response is a message ID string.
print('Successfully sent message:', response)
// Define a condition which will send to devices which are subscribed
// to either the Google stock or the tech industry topics.
condition := "'stock-GOOG' in topics || 'industry-tech' in topics"
// See documentation on defining a message payload.
message := &messaging.Message{
Data: map[string]string{
"score": "850",
"time": "2:45",
},
Condition: condition,
}
// Send a message to devices subscribed to the combination of topics
// specified by the provided condition.
response, err := client.Send(ctx, message)
if err != nil {
log.Fatalln(err)
}
// Response is a message ID string.
fmt.Println("Successfully sent message:", response)
// Define a condition which will send to devices which are subscribed
// to either the Google stock or the tech industry topics.
var condition = "'stock-GOOG' in topics || 'industry-tech' in topics";

// See documentation on defining a message payload.
var message = new Message()
{
    Notification = new Notification()
    {
        Title = "$GOOG up 1.43% on the day",
        Body = "$GOOG gained 11.80 points to close at 835.67, up 1.43% on the day.",
    },
    Condition = condition,
};

// Send a message to devices subscribed to the combination of topics
// specified by the provided condition.
string response = await FirebaseMessaging.DefaultInstance.SendAsync(message);
// Response is a message ID string.
Console.WriteLine("Successfully sent message: " + response);
POST https://fcm.googleapis.com/v1/projects/myproject-b5ae1/messages:send HTTP/1.1

Content-Type: application/json
Authorization: Bearer ya29.ElqKBGN2Ri_Uz...HnS_uNreA
{
   "message":{
    "condition": "'dogs' in topics || 'cats' in topics",
    "notification" : {
      "body" : "This is a Firebase Cloud Messaging Topic Message!",
      "title" : "FCM Message",
    }
  }
}
cURL कमांड:
curl -X POST -H "Authorization: Bearer ya29.ElqKBGN2Ri_Uz...HnS_uNreA" -H "Content-Type: application/json" -d '{
  "notification": {
    "title": "FCM Message",
    "body": "This is a Firebase Cloud Messaging Topic Message!",
  },
  "condition": "'dogs' in topics || 'cats' in topics"
}' https://fcm.googleapis.com/v1/projects/myproject-b5ae1/messages:send HTTP/1.1
डिवाइस ग्रुप को मैसेज भेजना
डिवाइस ग्रुप को मैसेज भेजने के लिए, एचटीटीपी v1 API का इस्तेमाल करें. अगर फ़िलहाल, एचटीटीपी या एक्सएमपीपी के लिए, इस्तेमाल नहीं किए जा रहे लेगसी सेंड एपीआई का इस्तेमाल करके डिवाइस ग्रुप को मैसेज भेजे जा रहे हैं या लेगसी प्रोटोकॉल के आधार पर, Node.js के लिए Firebase Admin SDK के किसी पुराने वर्शन का इस्तेमाल किया जा रहा है, तो हमारा सुझाव है कि आप जल्द से जल्द एचटीटीपी v1 एपीआई पर माइग्रेट करें. ईमेल भेजने के लिए इस्तेमाल होने वाले लेगसी एपीआई, जून 2024 में बंद कर दिए जाएंगे और हटा दिए जाएंगे.
किसी डिवाइस ग्रुप को मैसेज भेजना, किसी एक डिवाइस को मैसेज भेजने जैसा ही है. मैसेज भेजने के अनुरोधों को अनुमति देने के लिए, एक ही तरीके का इस्तेमाल किया जाता है. token
फ़ील्ड को ग्रुप सूचना कुंजी पर सेट करें:
POST https://fcm.googleapis.com/v1/projects/myproject-b5ae1/messages:send HTTP/1.1

Content-Type: application/json
Authorization: Bearer ya29.ElqKBGN2Ri_Uz...HnS_uNreA

{
   "message":{
      "token":"APA91bGHXQBB...9QgnYOEURwm0I3lmyqzk2TXQ",
      "data":{
        "hello": "This is a Firebase Cloud Messaging device group message!"
      }
   }
}
curl -X POST -H "Authorization: Bearer ya29.ElqKBGN2Ri_Uz...HnS_uNreA" -H "Content-Type: application/json" -d '{
"message":{
   "data":{
     "hello": "This is a Firebase Cloud Messaging device group message!"
   },
   "token":"APA91bGHXQBB...9QgnYOEURwm0I3lmyqzk2TXQ"
}}' https://fcm.googleapis.com/v1/projects/myproject-b5ae1/messages:send
एक साथ कई मैसेज भेजना
एडमिन SDK टूल, एक साथ कई मैसेज भेजने की सुविधा देते हैं. ज़्यादा से ज़्यादा 500 मैसेज को एक बैच में ग्रुप किया जा सकता है और उन्हें एक ही एपीआई कॉल में भेजा जा सकता है. इससे हर मैसेज के लिए अलग-अलग एचटीटीपी अनुरोध भेजने की तुलना में, परफ़ॉर्मेंस में काफ़ी सुधार होता है.
इस सुविधा का इस्तेमाल करके, मैसेज का कस्टमाइज़ किया गया सेट बनाया जा सकता है और उन्हें अलग-अलग लोगों को भेजा जा सकता है. इनमें विषय या खास डिवाइस रजिस्ट्रेशन टोकन शामिल हैं. उदाहरण के लिए, इस सुविधा का इस्तेमाल तब करें, जब आपको एक साथ कई ऑडियंस को मैसेज भेजने हों और मैसेज के मुख्य हिस्से में थोड़ी अलग जानकारी हो.
// Create a list containing up to 500 messages.
const messages = [];
messages.push({
  notification: { title: 'Price drop', body: '5% off all electronics' },
  token: registrationToken,
});
messages.push({
  notification: { title: 'Price drop', body: '2% off all books' },
  topic: 'readers-club',
});

getMessaging().sendAll(messages)
  .then((response) => {
    console.log(response.successCount + ' messages were sent successfully');
  });
// Create a list containing up to 500 messages.
List<Message> messages = Arrays.asList(
Message.builder()
.setNotification(Notification.builder()
.setTitle("Price drop")
.setBody("5% off all electronics")
.build())
.setToken(registrationToken)
.build(),
// ...
Message.builder()
.setNotification(Notification.builder()
.setTitle("Price drop")
.setBody("2% off all books")
.build())
.setTopic("readers-club")
.build()
);
BatchResponse response = FirebaseMessaging.getInstance().sendAll(messages);
// See the BatchResponse reference documentation
// for the contents of response.
System.out.println(response.getSuccessCount() + " messages were sent successfully");
# Create a list containing up to 500 messages.
messages = [
messaging.Message(
notification=messaging.Notification('Price drop', '5% off all electronics'),
token=registration_token,
),
# ...
messaging.Message(
notification=messaging.Notification('Price drop', '2% off all books'),
topic='readers-club',
),
]
response = messaging.send_all(messages)
# See the BatchResponse reference documentation
# for the contents of response.
print('{0} messages were sent successfully'.format(response.success_count))
// Create a list containing up to 500 messages.
messages := []*messaging.Message{
{
Notification: &messaging.Notification{
Title: "Price drop",
Body: "5% off all electronics",
},
Token: registrationToken,
},
{
Notification: &messaging.Notification{
Title: "Price drop",
Body: "2% off all books",
},
Topic: "readers-club",
},
}
br, err := client.SendAll(context.Background(), messages)
if err != nil {
log.Fatalln(err)
}
// See the BatchResponse reference documentation
// for the contents of response.
fmt.Printf("%d messages were sent successfully\n", br.SuccessCount)
// Create a list containing up to 500 messages.
var messages = new List<Message>()
{
new Message()
{
Notification = new Notification()
{
Title = "Price drop",
Body = "5% off all electronics",
},
Token = registrationToken,
},
new Message()
{
Notification = new Notification()
{
Title = "Price drop",
Body = "2% off all books",
},
Topic = "readers-club",
},
};
var response = await FirebaseMessaging.DefaultInstance.SendEachAsync(messages);
// See the BatchResponse reference documentation
// for the contents of response.
Console.WriteLine($"{response.SuccessCount} messages were sent successfully");
डिवाइस के चालू होने पर डायरेक्ट मैसेज भेजना (सिर्फ़ Android के लिए)
डायरेक्ट बूट मोड में डिवाइसों को मैसेज भेजने के लिए, एचटीटीपी v1 या लेगसी एचटीटीपी एपीआई का इस्तेमाल किया जा सकता है. डिवाइसों पर डायरेक्ट बूट मोड में मैसेज भेजने से पहले, पक्का करें कि आपने क्लाइंट डिवाइसों को डायरेक्ट बूट मोड में FCM मैसेज पाने की सुविधा देने के लिए, सभी चरणों को पूरा कर लिया हो.
FCM v1 एचटीटीपी एपीआई का इस्तेमाल करके भेजना
मैसेज के अनुरोध में, अनुरोध के मुख्य भाग के AndroidConfig विकल्पों में "direct_boot_ok" : true कुंजी शामिल होनी चाहिए. उदाहरण के लिए:
https://fcm.googleapis.com/v1/projects/myproject-b5ae1/messages:send
Content-Type:application/json
Authorization: Bearer ya29.ElqKBGN2Ri_Uz...HnS_uNreA

{
  "message":{
    "token" : "bk3RNwTe3H0:CI2k_HHwgIpoDKCIZvvDMExUdFQ3P1..."
    "data": {
      "score": "5x1",
      "time": "15:10"
    },
    "android": {
      "direct_boot_ok": true,
    },
}
अलग-अलग प्लैटफ़ॉर्म पर मैसेज को पसंद के मुताबिक बनाना
Firebase Admin SDK और FCM v1 एचटीटीपी प्रोटोकॉल, दोनों ही आपके मैसेज के अनुरोधों को message ऑब्जेक्ट में उपलब्ध सभी फ़ील्ड सेट करने की अनुमति देते हैं. इसमें इस तरह का कॉन्टेंट शामिल है:
- फ़ील्ड का एक सामान्य सेट, जिसे मैसेज पाने वाले सभी ऐप्लिकेशन इंस्टेंस के हिसाब से समझा जाना चाहिए.
AndroidConfigऔरWebpushConfigजैसे फ़ील्ड के प्लैटफ़ॉर्म के हिसाब से सेट, जिन्हें सिर्फ़ तय किए गए प्लैटफ़ॉर्म पर चल रहे ऐप्लिकेशन इंस्टेंस ही समझते हैं.
प्लैटफ़ॉर्म के हिसाब से ब्लॉक करने की सुविधा की मदद से, अलग-अलग प्लैटफ़ॉर्म के लिए मैसेज को पसंद के मुताबिक बनाया जा सकता है. इससे यह पक्का किया जा सकता है कि मैसेज मिलने पर उन्हें सही तरीके से मैनेज किया जाए. FCM बैकएंड, तय किए गए सभी पैरामीटर को ध्यान में रखेगा और हर प्लैटफ़ॉर्म के लिए मैसेज को पसंद के मुताबिक बनाएगा.
सामान्य फ़ील्ड का इस्तेमाल कब करना चाहिए
सामान्य फ़ील्ड का इस्तेमाल तब करें, जब:
- Apple, Android, और वेब जैसे सभी प्लैटफ़ॉर्म पर ऐप्लिकेशन इंस्टेंस को टारगेट करना
- विषयों पर मैसेज भेजना
सभी ऐप्लिकेशन इंस्टेंस, प्लैटफ़ॉर्म के बावजूद, इन सामान्य फ़ील्ड का इस्तेमाल कर सकते हैं:
प्लैटफ़ॉर्म के हिसाब से फ़ील्ड का इस्तेमाल कब करना चाहिए
प्लैटफ़ॉर्म के हिसाब से फ़ील्ड का इस्तेमाल तब करें, जब आपको:
- सिर्फ़ कुछ प्लैटफ़ॉर्म पर फ़ील्ड भेजना
- सामान्य फ़ील्ड के अलावा, प्लैटफ़ॉर्म के हिसाब से फ़ील्ड भेजना
जब आपको सिर्फ़ चुनिंदा प्लैटफ़ॉर्म पर वैल्यू भेजनी हों, तो सामान्य फ़ील्ड का इस्तेमाल न करें. इसके बजाय, प्लैटफ़ॉर्म के हिसाब से फ़ील्ड का इस्तेमाल करें. उदाहरण के लिए, सिर्फ़ Apple प्लैटफ़ॉर्म और वेब पर सूचना भेजने के लिए, आपको फ़ील्ड के दो अलग-अलग सेट इस्तेमाल करने होंगे. एक सेट Apple के लिए और दूसरा वेब के लिए.
जब किसी खास डिलीवरी के विकल्प के साथ मैसेज भेजे जा रहे हों, तो उन्हें सेट करने के लिए, प्लैटफ़ॉर्म के हिसाब से फ़ील्ड का इस्तेमाल करें. अगर आप चाहें, तो हर प्लैटफ़ॉर्म के लिए अलग-अलग वैल्यू तय की जा सकती हैं. हालांकि, अगर आपको सभी प्लैटफ़ॉर्म पर एक ही वैल्यू सेट करनी है, तब भी आपको प्लैटफ़ॉर्म के हिसाब से फ़ील्ड का इस्तेमाल करना होगा. ऐसा इसलिए है, क्योंकि हर प्लैटफ़ॉर्म पर वैल्यू को थोड़ा अलग तरीके से समझा जा सकता है. उदाहरण के लिए, Android पर 'सेवा के बंद होने का समय', सेकंड में खत्म होने का समय के तौर पर सेट होता है, जबकि Apple पर इसे खत्म होने की तारीख के तौर पर सेट किया जाता है.
उदाहरण: रंग और आइकॉन के विकल्पों के साथ सूचना मैसेज
इस उदाहरण में, सभी प्लैटफ़ॉर्म पर एक जैसी सूचना का टाइटल और कॉन्टेंट भेजा जाता है. हालांकि, यह Android डिवाइसों पर प्लैटफ़ॉर्म के हिसाब से कुछ बदलाव भी भेजता है.
Android के लिए, अनुरोध में Android डिवाइसों पर दिखाने के लिए एक खास आइकॉन और रंग सेट किया जाता है. AndroidNotification के रेफ़रंस में बताया गया है कि रंग #rrggbb फ़ॉर्मैट में दिया गया है. साथ ही, इमेज, Android ऐप्लिकेशन में मौजूद ड्रॉबल आइकॉन रिसॉर्स होनी चाहिए.
उपयोगकर्ता के डिवाइस पर विज़ुअल इफ़ेक्ट का अनुमानित असर यहां बताया गया है:
![]()
const topicName = 'industry-tech';

const message = {
  notification: {
    title: '`$FooCorp` up 1.43% on the day',
    body: 'FooCorp gained 11.80 points to close at 835.67, up 1.43% on the day.'
  },
  android: {
    notification: {
      icon: 'stock_ticker_update',
      color: '#7e55c3'
    }
  },
  topic: topicName,
};

getMessaging().send(message)
  .then((response) => {
    // Response is a message ID string.
    console.log('Successfully sent message:', response);
  })
  .catch((error) => {
    console.log('Error sending message:', error);
  });
Message message = Message.builder()
.setNotification(Notification.builder()
.setTitle("$GOOG up 1.43% on the day")
.setBody("$GOOG gained 11.80 points to close at 835.67, up 1.43% on the day.")
.build())
.setAndroidConfig(AndroidConfig.builder()
.setTtl(3600 * 1000)
.setNotification(AndroidNotification.builder()
.setIcon("stock_ticker_update")
.setColor("#f45342")
.build())
.build())
.setApnsConfig(ApnsConfig.builder()
.setAps(Aps.builder()
.setBadge(42)
.build())
.build())
.setTopic("industry-tech")
.build();
message = messaging.Message(
notification=messaging.Notification(
title='$GOOG up 1.43% on the day',
body='$GOOG gained 11.80 points to close at 835.67, up 1.43% on the day.',
),
android=messaging.AndroidConfig(
ttl=datetime.timedelta(seconds=3600),
priority='normal',
notification=messaging.AndroidNotification(
icon='stock_ticker_update',
color='#f45342'
),
),
apns=messaging.APNSConfig(
payload=messaging.APNSPayload(
aps=messaging.Aps(badge=42),
),
),
topic='industry-tech',
)
oneHour := time.Duration(1) * time.Hour
badge := 42
message := &messaging.Message{
Notification: &messaging.Notification{
Title: "$GOOG up 1.43% on the day",
Body: "$GOOG gained 11.80 points to close at 835.67, up 1.43% on the day.",
},
Android: &messaging.AndroidConfig{
TTL: &oneHour,
Notification: &messaging.AndroidNotification{
Icon: "stock_ticker_update",
Color: "#f45342",
},
},
APNS: &messaging.APNSConfig{
Payload: &messaging.APNSPayload{
Aps: &messaging.Aps{
Badge: &badge,
},
},
},
Topic: "industry-tech",
}
var message = new Message
{
Notification = new Notification()
{
Title = "$GOOG up 1.43% on the day",
Body = "$GOOG gained 11.80 points to close at 835.67, up 1.43% on the day.",
},
Android = new AndroidConfig()
{
TimeToLive = TimeSpan.FromHours(1),
Notification = new AndroidNotification()
{
Icon = "stock_ticker_update",
Color = "#f45342",
},
},
Apns = new ApnsConfig()
{
Aps = new Aps()
{
Badge = 42,
},
},
Topic = "industry-tech",
};
POST https://fcm.googleapis.com/v1/projects/myproject-b5ae1/messages:send HTTP/1.1

Content-Type: application/json
Authorization: Bearer ya29.ElqKBGN2Ri_Uz...HnS_uNreA
{
  "message":{
     "topic":"industry-tech",
     "notification":{
       "title":"`$FooCorp` up 1.43% on the day",
       "body":"FooCorp gained 11.80 points to close at 835.67, up 1.43% on the day."
     },
     "android":{
       "notification":{
         "icon":"stock_ticker_update",
         "color":"#7e55c3"
       }
     }
   }
 }
मैसेज के मुख्य हिस्से में, प्लैटफ़ॉर्म के हिसाब से ब्लॉक में उपलब्ध कुंजियों के बारे में पूरी जानकारी पाने के लिए, एचटीटीपी v1 का रेफ़रंस दस्तावेज़ देखें.
उदाहरण: पसंद के मुताबिक इमेज वाली सूचना
नीचे दिए गए उदाहरण में, सूचना भेजने का अनुरोध सभी प्लैटफ़ॉर्म पर एक ही टाइटल के साथ भेजा जाता है. हालांकि, इसमें एक इमेज भी भेजी जाती है. उपयोगकर्ता के डिवाइस पर विज़ुअल इफ़ेक्ट का अनुमानित असर यहां दिया गया है:

const topicName = 'industry-tech';

const message = {
  notification: {
    title: 'Sparky says hello!'
  },
  android: {
    notification: {
      imageUrl: 'https://foo.bar.pizza-monster.png'
    }
  },
  apns: {
    payload: {
      aps: {
        'mutable-content': 1
      }
    },
    fcm_options: {
      image: 'https://foo.bar.pizza-monster.png'
    }
  },
  webpush: {
    headers: {
      image: 'https://foo.bar.pizza-monster.png'
    }
  },
  topic: topicName,
};

getMessaging().send(message)
  .then((response) => {
    // Response is a message ID string.
    console.log('Successfully sent message:', response);
  })
  .catch((error) => {
    console.log('Error sending message:', error);
  });
POST https://fcm.googleapis.com/v1/projects/myproject-b5ae1/messages:send HTTP/1.1

Content-Type: application/json
Authorization: Bearer ya29.ElqKBGN2Ri_Uz...HnS_uNreA
{
  "message":{
     "topic":"industry-tech",
     "notification":{
       "title":"Sparky says hello!",
     },
     "android":{
       "notification":{
         "image":"https://foo.bar/pizza-monster.png"
       }
     },
     "apns":{
       "payload":{
         "aps":{
           "mutable-content":1
         }
       },
       "fcm_options": {
           "image":"https://foo.bar/pizza-monster.png"
       }
     },
     "webpush":{
       "headers":{
         "image":"https://foo.bar/pizza-monster.png"
       }
     }
   }
 }
मैसेज के मुख्य हिस्से में, प्लैटफ़ॉर्म के हिसाब से ब्लॉक में उपलब्ध कुंजियों के बारे में पूरी जानकारी पाने के लिए, एचटीटीपी v1 का रेफ़रंस दस्तावेज़ देखें.
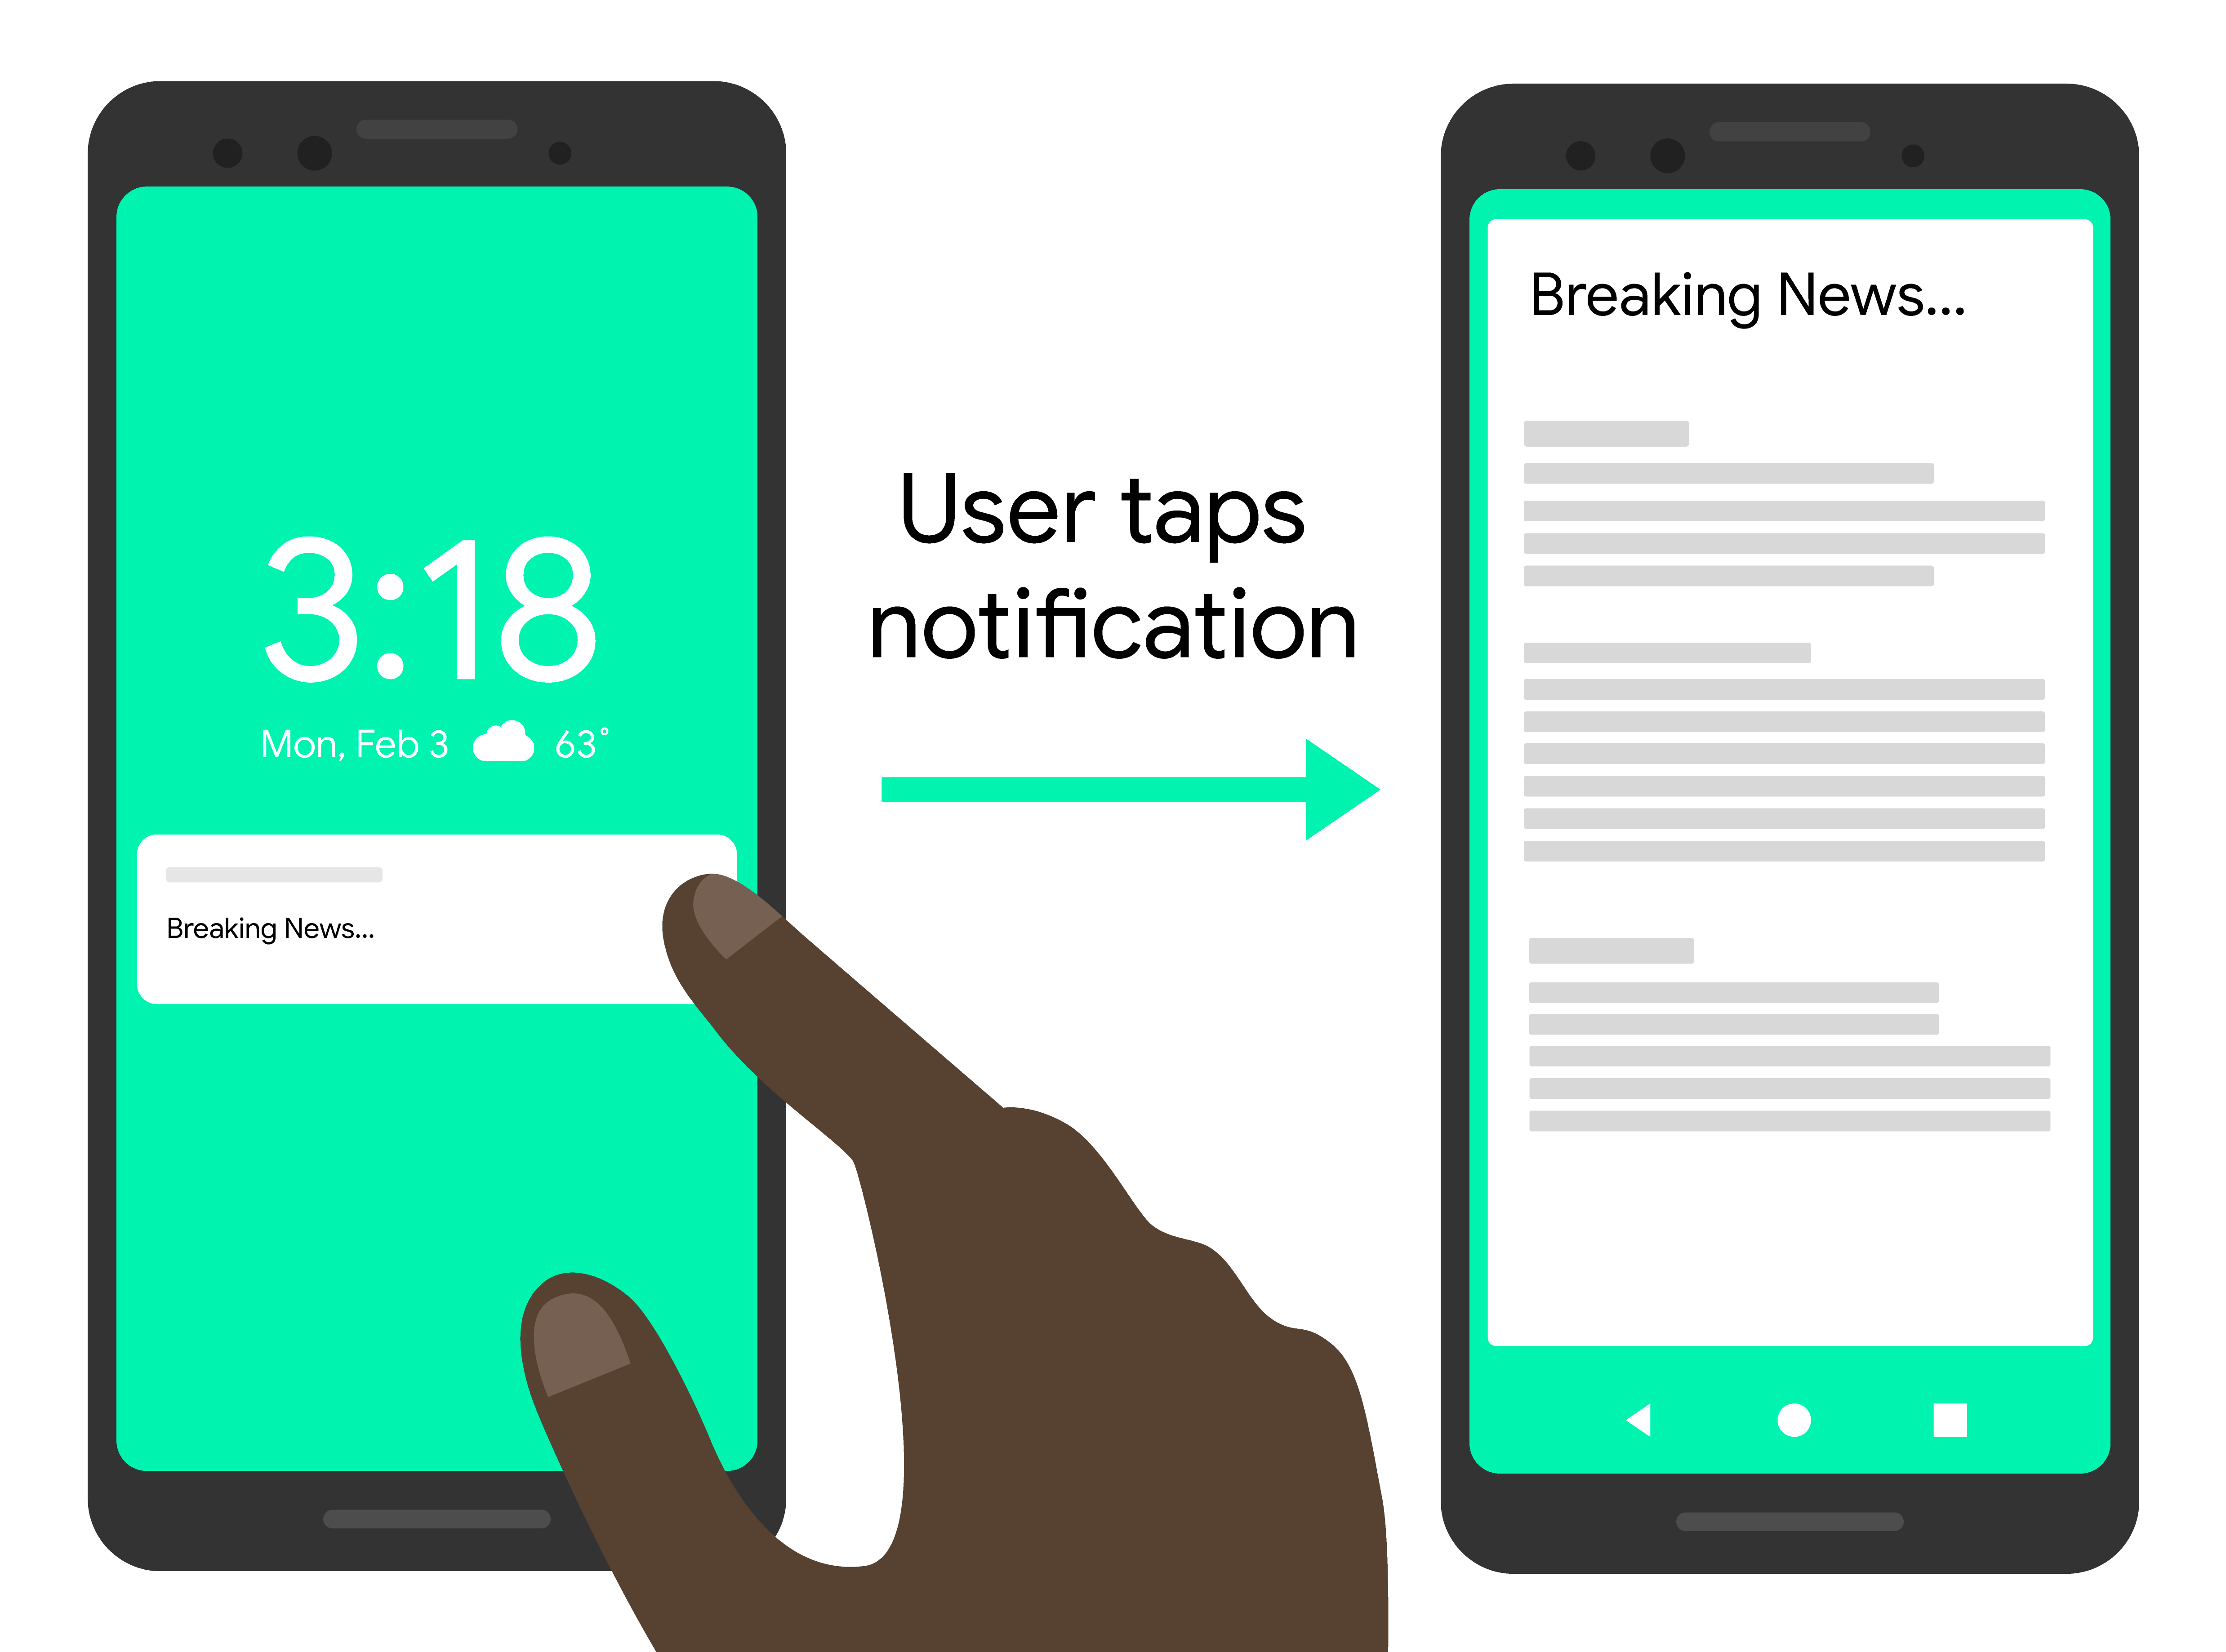
उदाहरण: क्लिक ऐक्शन के साथ सूचना मैसेज
यहां दिए गए उदाहरण में, सूचना भेजने का अनुरोध सभी प्लैटफ़ॉर्म पर एक ही टाइटल के साथ भेजा जाता है. हालांकि, यह ऐप्लिकेशन के लिए एक कार्रवाई भी भेजता है, ताकि उपयोगकर्ता सूचना के साथ इंटरैक्ट करने पर ऐप्लिकेशन उस कार्रवाई को पूरा कर सके. उपयोगकर्ता के डिवाइस पर विज़ुअल इफ़ेक्ट का अनुमानित असर यहां बताया गया है:
const topicName = 'industry-tech';

const message = {
  notification: {
    title: 'Breaking News....'
  },
  android: {
    notification: {
      clickAction: 'news_intent'
    }
  },
  apns: {
    payload: {
      aps: {
        'category': 'INVITE_CATEGORY'
      }
    }
  },
  webpush: {
    fcmOptions: {
      link: 'breakingnews.html'
    }
  },
  topic: topicName,
};

getMessaging().send(message)
  .then((response) => {
    // Response is a message ID string.
    console.log('Successfully sent message:', response);
  })
  .catch((error) => {
    console.log('Error sending message:', error);
  });
POST https://fcm.googleapis.com/v1/projects/myproject-b5ae1/messages:send HTTP/1.1

Content-Type: application/json
Authorization: Bearer ya29.ElqKBGN2Ri_Uz...HnS_uNreA
{
  "message":{
     "topic":"industry-tech",
     "notification":{
       "title":"Breaking News...",
     },
     "android":{
       "notification":{
         "click_action":"news_intent"
       }
     },
     "apns":{
       "payload":{
         "aps":{
           "category" : "INVITE_CATEGORY"
         }
       },
     },
     "webpush":{
       "fcm_options":{
         "link":"breakingnews.html"
       }
     }
   }
 }
मैसेज के मुख्य हिस्से में, प्लैटफ़ॉर्म के हिसाब से ब्लॉक में उपलब्ध कुंजियों के बारे में पूरी जानकारी पाने के लिए, एचटीटीपी v1 का रेफ़रंस दस्तावेज़ देखें.
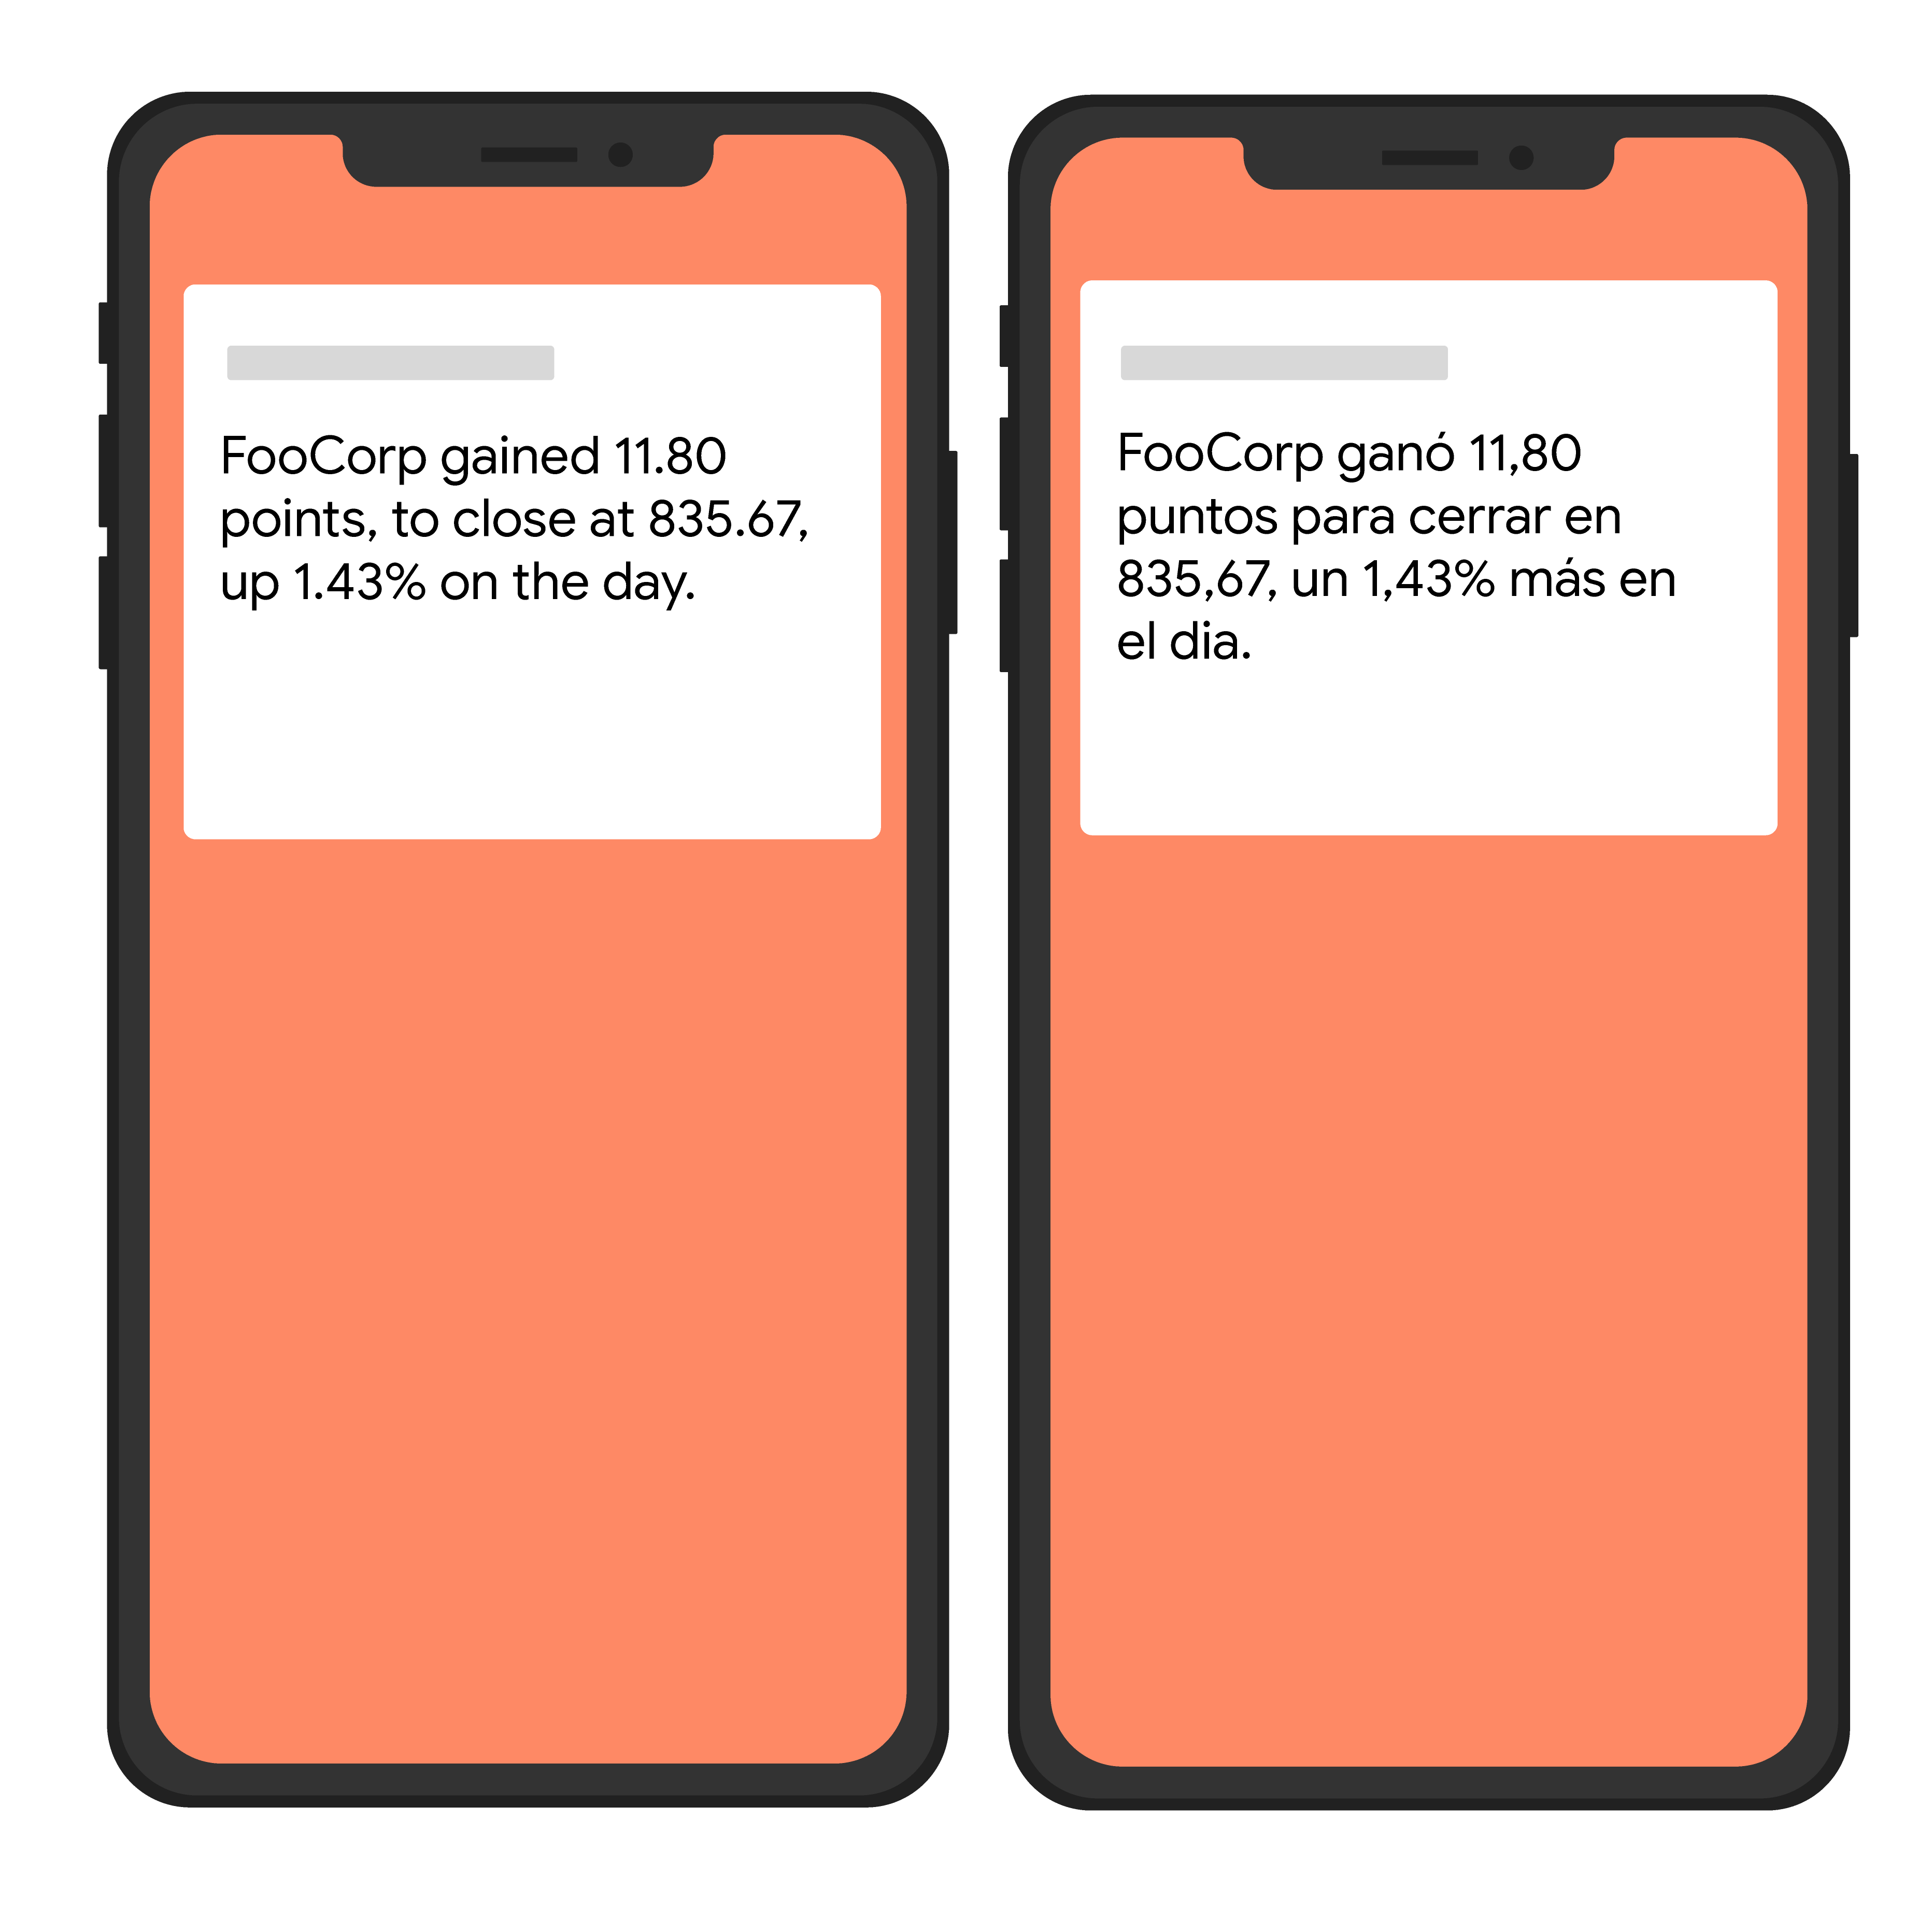
उदाहरण: स्थानीय भाषा में अनुवाद करने के विकल्पों के साथ सूचना मैसेज
नीचे दिए गए उदाहरण में, क्लाइंट को स्थानीय भाषा में मैसेज दिखाने के लिए, स्थानीय भाषा में अनुवाद करने के विकल्प भेजे जाते हैं. यहां उपयोगकर्ता के डिवाइस पर विज़ुअल इफ़ेक्ट का अनुमानित डेटा दिया गया है:
var topicName = 'industry-tech';

var message = {
  android: {
    ttl: 3600000,
    notification: {
      bodyLocKey: 'STOCK_NOTIFICATION_BODY',
      bodyLocArgs: ['FooCorp', '11.80', '835.67', '1.43']
    }
  },
  apns: {
    payload: {
      aps: {
        alert: {
          locKey: 'STOCK_NOTIFICATION_BODY',
          locArgs: ['FooCorp', '11.80', '835.67', '1.43']
        }
      }
    }
  },
  topic: topicName,
};

getMessaging().send(message)
  .then((response) => {
    // Response is a message ID string.
    console.log('Successfully sent message:', response);
  })
  .catch((error) => {
    console.log('Error sending message:', error);
  });
POST https://fcm.googleapis.com/v1/projects/myproject-b5ae1/messages:send HTTP/1.1

Content-Type: application/json
Authorization: Bearer ya29.ElqKBGN2Ri_Uz...HnS_uNreA
{
  "message":{
             "topic":"Tech",
             "android":{
               "ttl":"3600s",
               "notification":{
                 "body_loc_key": "STOCK_NOTIFICATION_BODY",
                 "body_loc_args":  ["FooCorp", "11.80", "835.67", "1.43"],
               },
             },
             "apns":{
               "payload":{
                 "aps":{
                   "alert" : {
                     "loc-key": "STOCK_NOTIFICATION_BODY",
                     "loc-args":  ["FooCorp", "11.80", "835.67", "1.43"],
                    },
                 },
               },
             },
  },
}'
मैसेज के मुख्य हिस्से में, प्लैटफ़ॉर्म के हिसाब से ब्लॉक में उपलब्ध कुंजियों के बारे में पूरी जानकारी पाने के लिए, एचटीटीपी v1 का रेफ़रंस दस्तावेज़ देखें.
एचटीटीपी v1 API के लिए, गड़बड़ी के REST कोड
एचटीटीपी v1 एपीआई के लिए, एचटीटीपी गड़बड़ी के रिस्पॉन्स में गड़बड़ी का कोड, गड़बड़ी का मैसेज, और गड़बड़ी की स्थिति शामिल होती है. इनमें गड़बड़ी के बारे में ज़्यादा जानकारी देने वाला details कलेक्शन भी शामिल हो सकता है.
गड़बड़ी के जवाब के दो सैंपल यहां दिए गए हैं:
पहला उदाहरण: एचटीटीपी v1 एपीआई अनुरोध से गड़बड़ी का रिस्पॉन्स, जिसमें डेटा मैसेज में अमान्य वैल्यू है
{
  "error": {
    "code": 400,
    "message": "Invalid value at 'message.data[0].value' (TYPE_STRING), 12",
    "status": "INVALID_ARGUMENT",
    "details": [
      {
        "@type": "type.googleapis.com/google.rpc.BadRequest",
        "fieldViolations": [
          {
            "field": "message.data[0].value",
            "description": "Invalid value at 'message.data[0].value' (TYPE_STRING), 12"
          }
        ]
      }
    ]
  }
}
दूसरा उदाहरण: अमान्य रजिस्ट्रेशन टोकन वाले एचटीटीपी v1 एपीआई अनुरोध से मिला गड़बड़ी का रिस्पॉन्स
{
  "error": {
    "code": 400,
    "message": "The registration token is not a valid FCM registration token",
    "status": "INVALID_ARGUMENT",
    "details": [
      {
        "@type": "type.googleapis.com/google.firebase.fcm.v1.FcmError",
        "errorCode": "INVALID_ARGUMENT"
      }
    ]
   }
}
ध्यान दें कि दोनों मैसेज का कोड और स्टेटस एक जैसा है, लेकिन 'जानकारी' कलेक्शन में अलग-अलग तरह की वैल्यू हैं. पहले उदाहरण में type.googleapis.com/google.rpc.BadRequest टाइप है, जो अनुरोध की वैल्यू में गड़बड़ी का पता चलता है. type.googleapis.com/google.firebase.fcm.v1.FcmError टाइप वाले दूसरे उदाहरण में, FCM से जुड़ी गड़बड़ी है. कई गड़बड़ियों के लिए, ज़्यादा जानकारी वाले कलेक्शन में वह जानकारी होती है जिसकी ज़रूरत आपको गड़बड़ी को डीबग करने और उसे ठीक करने के लिए होती है.
नीचे दी गई टेबल में, FCM v1 REST API के गड़बड़ी कोड और उनके ब्यौरे दिए गए हैं.
| त्रुटि कोड | जानकारी और समस्या को हल करने का तरीका |
|---|---|
UNSPECIFIED_ERROR इस गड़बड़ी के बारे में कोई और जानकारी उपलब्ध नहीं है. |
कोई नहीं. |
INVALID_ARGUMENT (एचटीटीपी गड़बड़ी कोड = 400) अनुरोध पैरामीटर अमान्य थे. कौनसा फ़ील्ड अमान्य है, यह बताने के लिए google.rpc.BadRequest टाइप का एक्सटेंशन दिखाया जाता है. |
इसकी संभावित वजहें ये हो सकती हैं: अमान्य रजिस्ट्रेशन, अमान्य पैकेज का नाम, बहुत बड़ा मैसेज, अमान्य डेटा कुंजी, अमान्य टीटीएल या अन्य अमान्य पैरामीटर. रजिस्ट्रेशन अमान्य है: सर्वर को भेजे गए रजिस्ट्रेशन टोकन का फ़ॉर्मैट देखें. पक्का करें कि यह उस रजिस्ट्रेशन टोकन से मेल खाता हो जो क्लाइंट ऐप्लिकेशन को FCM के साथ रजिस्टर करने पर मिलता है. टोकन को छोटा न करें या उसमें अतिरिक्त वर्ण न जोड़ें. पैकेज का नाम अमान्य है: पक्का करें कि मैसेज, उस रजिस्ट्रेशन टोकन को भेजा गया हो जिसका पैकेज का नाम, अनुरोध में दी गई वैल्यू से मेल खाता हो. मैसेज का साइज़ बहुत ज़्यादा है: देखें कि मैसेज में शामिल पेलोड डेटा का कुल साइज़, FCM की तय सीमा से ज़्यादा न हो: ज़्यादातर मैसेज के लिए 4,096 बाइट या विषयों के लिए मैसेज के मामले में 2,048 बाइट. इसमें कुंजियां और वैल्यू, दोनों शामिल होती हैं. अमान्य डेटा कुंजी: पक्का करें कि पेलोड डेटा में कोई ऐसी कुंजी (जैसे, from, gcm या google से शुरू होने वाली कोई वैल्यू) शामिल न हो जिसका इस्तेमाल FCM अंदरूनी तौर पर करता है. ध्यान दें कि FCM में भी कुछ शब्दों (जैसे, collapse_key) का इस्तेमाल किया जाता है. हालांकि, इन्हें पेलोड में इस्तेमाल करने की अनुमति है. ऐसे में, पेलोड की वैल्यू को FCM की वैल्यू से बदल दिया जाएगा. अमान्य टीटीएल: पक्का करें कि ttl में इस्तेमाल की गई वैल्यू, सेकंड में कुल समय को दिखाने वाली कोई पूर्णांक हो. यह समय 0 से 2,419,200 (चार हफ़्ते) के बीच होना चाहिए. अमान्य पैरामीटर: देखें कि दिए गए पैरामीटर का नाम और टाइप सही है या नहीं. |
UNREGISTERED (एचटीटीपी गड़बड़ी कोड = 404) ऐप्लिकेशन इंस्टेंस को FCM से अनरजिस्टर कर दिया गया था. आम तौर पर, इसका मतलब है कि इस्तेमाल किया गया टोकन अब मान्य नहीं है और इसका इस्तेमाल नहीं किया जा सकता. |
यह गड़बड़ी, रजिस्ट्रेशन टोकन मौजूद न होने या रजिस्ट्रेशन नहीं किए गए टोकन की वजह से हो सकती है. रजिस्ट्रेशन मौजूद नहीं है: अगर मैसेज का टारगेट token वैल्यू है, तो देखें कि अनुरोध में रजिस्ट्रेशन टोकन शामिल है या नहीं.रजिस्टर नहीं किया गया: कई मामलों में, मौजूदा रजिस्ट्रेशन टोकन अमान्य हो सकता है. जैसे: - अगर क्लाइंट ऐप्लिकेशन, FCM के साथ अनरजिस्टर हो जाता है. - अगर क्लाइंट ऐप्लिकेशन अपने-आप अनरजिस्टर हो जाता है. ऐसा तब हो सकता है, जब उपयोगकर्ता ऐप्लिकेशन को अनइंस्टॉल कर दे. उदाहरण के लिए, iOS पर, अगर APNs फ़ीडबैक सेवा ने APNs टोकन को अमान्य बताया है. - अगर रजिस्टर करने के लिए इस्तेमाल किए जाने वाले टोकन की समयसीमा खत्म हो जाती है. उदाहरण के लिए, Google रजिस्टर करने के लिए इस्तेमाल किए जाने वाले टोकन को रीफ़्रेश कर सकता है या iOS डिवाइसों के लिए APNs टोकन की समयसीमा खत्म हो सकती है. - अगर क्लाइंट ऐप्लिकेशन अपडेट हो गया है, लेकिन नया वर्शन मैसेज पाने के लिए कॉन्फ़िगर नहीं किया गया है. इन सभी मामलों में, ऐप्लिकेशन सर्वर से इस रजिस्ट्रेशन टोकन को हटा दें और मैसेज भेजने के लिए इसका इस्तेमाल बंद कर दें. |
SENDER_ID_MISMATCH (एचटीटीपी गड़बड़ी कोड = 403) पुष्टि किया गया ईमेल पता, रजिस्ट्रेशन टोकन के लिए ईमेल पते से अलग है. |
रजिस्ट्रेशन टोकन, ईमेल भेजने वाले लोगों के किसी खास ग्रुप से जुड़ा होता है. जब कोई क्लाइंट ऐप्लिकेशन, FCM के लिए रजिस्टर करता है, तो उसे यह बताना होगा कि किन लोगों को मैसेज भेजने की अनुमति है. क्लाइंट ऐप्लिकेशन पर मैसेज भेजते समय, आपको इनमें से किसी एक ईमेल पते का इस्तेमाल करना चाहिए. किसी दूसरे ईमेल पते का इस्तेमाल करने पर, मौजूदा रजिस्ट्रेशन टोकन काम नहीं करेंगे. |
QUOTA_EXCEEDED (एचटीटीपी गड़बड़ी कोड = 429) मैसेज टारगेट के लिए, भेजने की सीमा पार हो गई है. किस कोटे को पार किया गया है, यह बताने के लिए google.rpc.QuotaFailure टाइप का एक्सटेंशन दिखाया जाता है. |
यह गड़बड़ी, मैसेज भेजने की दर का कोटा पार होने, डिवाइस के लिए मैसेज भेजने की दर का कोटा पार होने या विषय के लिए मैसेज भेजने की दर का कोटा पार होने की वजह से हो सकती है. मैसेज भेजने की दर ज़्यादा है: मैसेज भेजने की दर बहुत ज़्यादा है. आपको मैसेज भेजने की कुल दर कम करनी होगी. अस्वीकार किए गए मैसेज को फिर से भेजने के लिए, एक्सपोनेंशियल बैकऑफ़ का इस्तेमाल करें. इसमें, शुरुआती देरी कम से कम एक मिनट होनी चाहिए. डिवाइस पर मैसेज भेजने की दर ज़्यादा है: किसी डिवाइस पर मैसेज भेजने की दर बहुत ज़्यादा है. किसी एक डिवाइस पर मैसेज भेजने की दर की सीमा देखें. इस डिवाइस पर भेजे जाने वाले मैसेज की संख्या कम करें. साथ ही, मैसेज भेजने की कोशिश फिर से करने के लिए, एक्सपोनेंशियल बैकऑफ़ का इस्तेमाल करें. किसी विषय के लिए मैसेज भेजने की दर तय सीमा से ज़्यादा है: किसी विषय के लिए, सदस्यों को भेजे जाने वाले मैसेज की दर बहुत ज़्यादा है. इस विषय के लिए भेजे गए मैसेज की संख्या कम करें. साथ ही, मैसेज भेजने की कोशिश फिर से करने के लिए, एक्सपोनेंशियल बैकऑफ़ का इस्तेमाल करें. इसमें, शुरुआती देरी कम से कम एक मिनट की होनी चाहिए. |
UNAVAILABLE (एचटीटीपी गड़बड़ी कोड = 503) सर्वर पर ज़्यादा अनुरोध हैं. |
सर्वर, अनुरोध को समय पर प्रोसेस नहीं कर सका. उसी अनुरोध को फिर से भेजें. हालांकि, आपको ये काम करने होंगे: - अगर FCM कनेक्शन सर्वर के रिस्पॉन्स में 'फिर से कोशिश करें' हेडर शामिल है, तो उसे लागू करें. - फिर से कोशिश करने की सुविधा में एक्सपोनेंशियल बैकऑफ़ लागू करें. उदाहरण के लिए, अगर आपने पहली बार फिर से कोशिश करने से पहले एक सेकंड इंतज़ार किया है, तो अगली बार कम से कम दो सेकंड इंतज़ार करें. इसके बाद, चार सेकंड और इसी तरह इंतज़ार करें. अगर एक से ज़्यादा मैसेज भेजे जा रहे हैं, तो जटरिंग लागू करें. ज़्यादा जानकारी के लिए, फिर से कोशिश करने की सुविधा को मैनेज करनादेखें. इसके अलावा, FCM का स्टेटस डैशबोर्ड देखकर यह पता लगाया जा सकता है कि क्या सेवा में कोई रुकावट आ रही है, जिससे FCM पर असर पड़ रहा है. ईमेल भेजने वाले जिन लोगों या कंपनियों की वजह से समस्याएं आती हैं उन्हें ब्लैकलिस्ट किया जा सकता है. |
INTERNAL (एचटीटीपी गड़बड़ी कोड = 500) कोई अनजान अंदरूनी गड़बड़ी हुई. |
अनुरोध को प्रोसेस करते समय सर्वर में गड़बड़ी हुई. फिर से कोशिश करने से जुड़ी समस्या हल करना में दिए गए सुझावों का पालन करके, उसी अनुरोध को फिर से भेजा जा सकता है या FCM स्टेटस डैशबोर्ड देखकर ऐसा किया जा सकता है. पर जाएं. इससे आपको पता चलेगा कि क्या सेवा में कोई रुकावट आ रही है, जिससे FCM पर असर पड़ रहा है. अगर गड़बड़ी बनी रहती है, तो कृपया Firebase की सहायता टीम से संपर्क करें. |
THIRD_PARTY_AUTH_ERROR (एचटीटीपी गड़बड़ी कोड = 401) APNs सर्टिफ़िकेट या वेब पुश की पुष्टि करने वाली कुंजी अमान्य थी या मौजूद नहीं थी. |
iOS डिवाइस या वेब पर पुश नोटिफ़िकेशन के ज़रिए रजिस्टर करने वाले लोगों को टारगेट किया गया मैसेज नहीं भेजा जा सका. देखें कि आपके डेवलपमेंट और प्रोडक्शन क्रेडेंशियल मान्य हैं या नहीं. |
एडमिन के लिए गड़बड़ी के कोड
यहां दी गई टेबल में, Firebase Admin FCM API के गड़बड़ी कोड और उनके बारे में जानकारी दी गई है. साथ ही, समस्या को हल करने के लिए सुझाए गए तरीके भी दिए गए हैं.
| त्रुटि कोड | जानकारी और समस्या को हल करने का तरीका |
|---|---|
messaging/invalid-argument |
FCM तरीके के लिए अमान्य आर्ग्युमेंट दिया गया था. गड़बड़ी के मैसेज में ज़्यादा जानकारी होनी चाहिए. |
messaging/invalid-recipient |
मैसेज पाने वाले व्यक्ति का ईमेल पता अमान्य है. गड़बड़ी के मैसेज में, अतिरिक्त जानकारी होनी चाहिए. |
messaging/invalid-payload |
मैसेज का अमान्य पेलोड ऑब्जेक्ट दिया गया था. गड़बड़ी के मैसेज में, अतिरिक्त जानकारी होनी चाहिए. |
messaging/invalid-data-payload-key |
डेटा मैसेज पेलोड में अमान्य कुंजी है. पाबंदी वाली कुंजियों के लिए,
DataMessagePayload के रेफ़रंस दस्तावेज़ देखें.
|
messaging/payload-size-limit-exceeded |
मैसेज का दिया गया पेलोड, FCM की साइज़ सीमा से ज़्यादा है. ज़्यादातर मैसेज के लिए, साइज़ की सीमा 4,096 बाइट होती है. विषयों पर भेजे जाने वाले मैसेज के लिए, 2048 बाइट की सीमा होती है. पेलोड के कुल साइज़ में, कुंजियां और वैल्यू, दोनों शामिल होती हैं. |
messaging/invalid-options |
मैसेज के विकल्पों का अमान्य ऑब्जेक्ट दिया गया था. गड़बड़ी के मैसेज में, अतिरिक्त जानकारी होनी चाहिए. |
messaging/invalid-registration-token |
रजिस्ट्रेशन के लिए दिया गया टोकन अमान्य है. पक्का करें कि यह FCM के साथ रजिस्टर करने पर, क्लाइंट ऐप्लिकेशन को मिले रजिस्ट्रेशन टोकन से मेल खाता हो. इसमें कोई और वर्ण न जोड़ें या इसे छोटा न करें. |
messaging/registration-token-not-registered |
दिया गया रजिस्ट्रेशन टोकन रजिस्टर नहीं है. पहले मान्य रहा रजिस्ट्रेशन टोकन, कई वजहों से रजिस्ट्रेशन से हटाया जा सकता है. इनमें ये वजहें शामिल हैं:
|
messaging/invalid-package-name |
मैसेज, ऐसे रजिस्ट्रेशन टोकन के लिए था जिसका पैकेज का नाम, दिए गए
restrictedPackageName विकल्प से मेल नहीं खाता.
|
messaging/message-rate-exceeded |
किसी खास टारगेट को भेजे गए मैसेज की दर बहुत ज़्यादा है. इस डिवाइस या विषय पर भेजे जाने वाले मैसेज की संख्या कम करें और इस टारगेट पर तुरंत मैसेज भेजने की कोशिश न करें. |
messaging/device-message-rate-exceeded |
किसी खास डिवाइस पर मैसेज भेजने की दर बहुत ज़्यादा है. इस डिवाइस पर भेजे जाने वाले मैसेज की संख्या कम करें और इस डिवाइस पर तुरंत मैसेज भेजने की कोशिश न करें. |
messaging/topics-message-rate-exceeded |
किसी खास विषय के लिए, सदस्यों को भेजे जाने वाले मैसेज की दर बहुत ज़्यादा है. इस विषय के लिए भेजे गए मैसेज की संख्या कम करें और तुरंत इस विषय पर मैसेज भेजने की कोशिश न करें. |
messaging/too-many-topics |
रजिस्टर करने के लिए इस्तेमाल किए गए टोकन की मदद से, ज़्यादा से ज़्यादा विषयों की सदस्यता ली जा सकती है. इसके बाद, किसी और विषय की सदस्यता नहीं ली जा सकती. |
messaging/invalid-apns-credentials |
Apple डिवाइस को टारगेट किया गया मैसेज इसलिए नहीं भेजा जा सका, क्योंकि ज़रूरी APNs एसएसएल सर्टिफ़िकेट अपलोड नहीं किया गया था या उसकी समयसीमा खत्म हो गई है. देखें कि आपके डेवलपमेंट और प्रोडक्शन सर्टिफ़िकेट की समयसीमा खत्म तो नहीं हो गई है. |
messaging/mismatched-credential |
इस SDK की पुष्टि करने के लिए इस्तेमाल किए गए क्रेडेंशियल के पास, दिए गए रजिस्ट्रेशन टोकन से जुड़े डिवाइस पर मैसेज भेजने की अनुमति नहीं है. पक्का करें कि क्रेडेंशियल और रजिस्ट्रेशन टोकन, दोनों एक ही Firebase प्रोजेक्ट से जुड़े हों. Firebase Admin SDK की पुष्टि करने का तरीका जानने के लिए, अपने ऐप्लिकेशन में Firebase जोड़ें लेख पढ़ें. |
messaging/authentication-error |
SDK, FCM सर्वर की पुष्टि नहीं कर सका. पक्का करें कि आपने Firebase Admin SDK की पुष्टि, ऐसे क्रेडेंशियल से की हो जिसके पास FCM मैसेज भेजने की सही अनुमतियां हों. Firebase Admin SDK की पुष्टि करने का तरीका जानने के लिए, अपने ऐप्लिकेशन में Firebase जोड़ें लेख पढ़ें. |
messaging/server-unavailable |
FCM सर्वर, अनुरोध को समय पर प्रोसेस नहीं कर सका. आपको
उसी अनुरोध को फिर से भेजना चाहिए. हालांकि, इसके लिए आपको ये काम करने होंगे:
|
messaging/internal-error |
FCM सर्वर को अनुरोध को प्रोसेस करते समय कोई गड़बड़ी हुई. ऊपर messaging/server-unavailable लाइन में दी गई ज़रूरी शर्तों का पालन करके, उसी अनुरोध को फिर से किया जा सकता है. अगर गड़बड़ी बनी रहती है, तो कृपया गड़बड़ी की शिकायत करने के लिए बने हमारे सहायता चैनल पर समस्या की शिकायत करें.
|
messaging/unknown-error |
सर्वर में कोई अज्ञात गड़बड़ी हुई. ज़्यादा जानकारी के लिए, गड़बड़ी के मैसेज में, सर्वर का रॉ रिस्पॉन्स देखें. अगर आपको गड़बड़ी का यह मैसेज मिलता है, तो कृपया गड़बड़ी की शिकायत वाले हमारे सहायता चैनल पर, गड़बड़ी का पूरा मैसेज बताएं. |