
Before you jump in with Firebase Local Emulator Suite, make sure you've created a Firebase project, set up your development environment, and selected and installed Firebase SDKs for your platform according to the Get started with Firebase topics for your platform: Apple, Android or Web.
Prototype and test
The Local Emulator Suite contains several product emulators, as described in Introduction to Firebase Local Emulator Suite. You can prototype and test with individual emulators as well as combinations of emulators, as you see fit, corresponding to which Firebase products you're using in production.
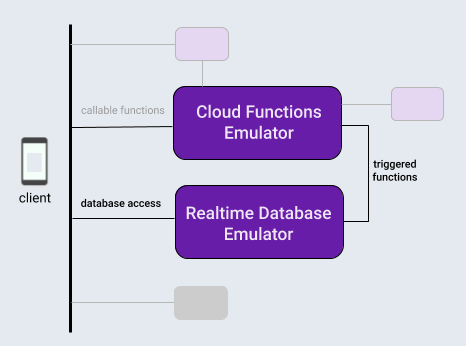
For this topic, to introduce the Local Emulator Suite workflow, let's assume you're working on an app that uses a typical combination of products: a Firebase database and cloud functions triggered by operations on that database.
After you locally initialize your Firebase project, the development cycle using Local Emulator Suite will typically have three steps:
Prototype features interactively with the emulators and Emulator Suite UI.
If you're using a database emulator or the Cloud Functions emulator, perform a one-time step to connect your app to the emulators.
Automate your tests with the emulators and custom scripts.
Locally initialize a Firebase project
Make sure that you install the CLI or update to its latest version.
curl -sL firebase.tools | bash
If you haven't already done so, initialize the current working directory as a Firebase project, following the onscreen prompts to specify you're using Cloud Functions and either Cloud Firestore or Realtime Database:
firebase init
Your project directory will now contain Firebase configuration files, a
Firebase Security Rules definition file for the database, a functions directory
containing cloud functions code, and other supporting files.
Prototype interactively
Local Emulator Suite is designed to let you quickly prototype new features, and the Suite's built-in user interface is one of its most useful prototyping tools. It's a bit like having the Firebase console running locally.
Using Emulator Suite UI, you can iterate the design of a database, try out different dataflows involving cloud functions, evaluate Security Rules changes, check logs to confirm how your back-end services are performing, and more. Then, if you want to start over, just clear your database and start fresh with a new design idea.
It's all available when you start the Local Emulator Suite with:
firebase emulators:start
To prototype our hypothetical app, let's set up and test a basic cloud function to modify text entries in a database, and both create and populate that database in the Emulator Suite UI to trigger it.
- Create a cloud function triggered by database writes by editing the
functions/index.jsfile in your project directory. Replace the contents of the existing file with the following snippet. This function listens for changes to nodes in themessageshierarchy, converts the contents of the node'soriginalproperty to uppercase, and stores the result in that node'suppercaseproperty. - Launch the Local Emulator Suite with
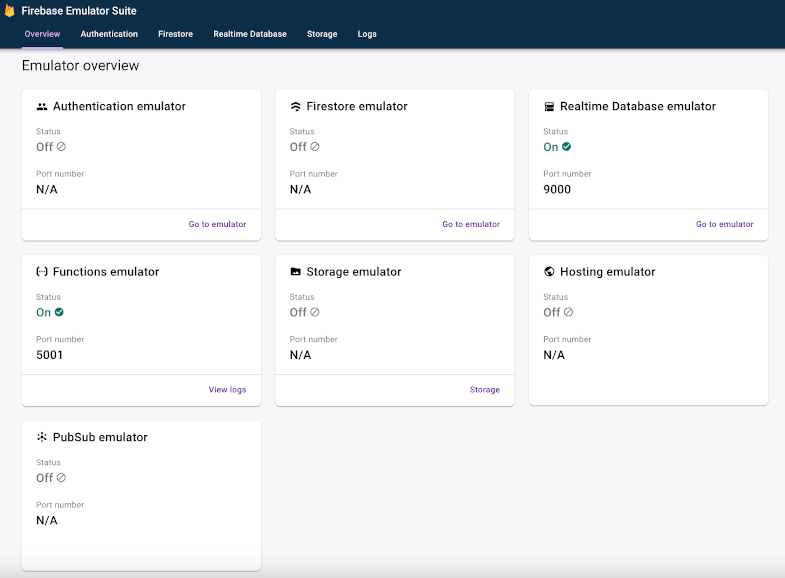
firebase emulators:start. The Cloud Functions and database emulators start up, automatically configured to interoperate. - View the UI in your browser at
http://localhost:4000. Port 4000 is the default for the UI, but check terminal messages output by the Firebase CLI. Note the status of available emulators. In our case, the Cloud Functions and Realtime Database emulators will be running.
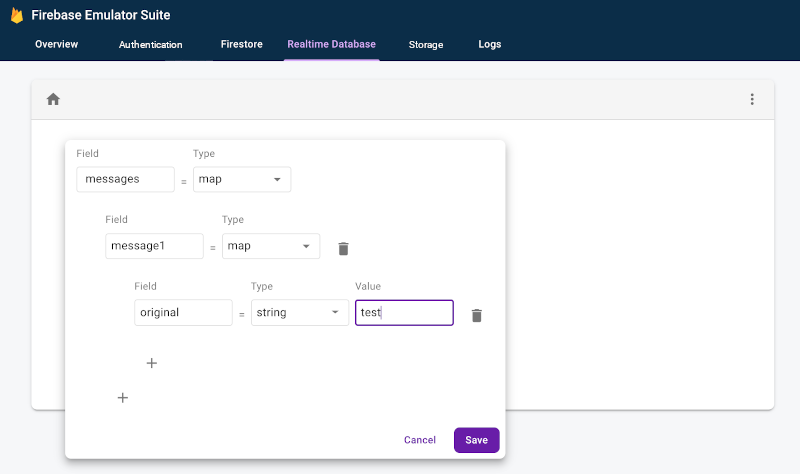
- In the UI, on the Realtime Database tab, use the database content
editor controls to create a set of nodes with a
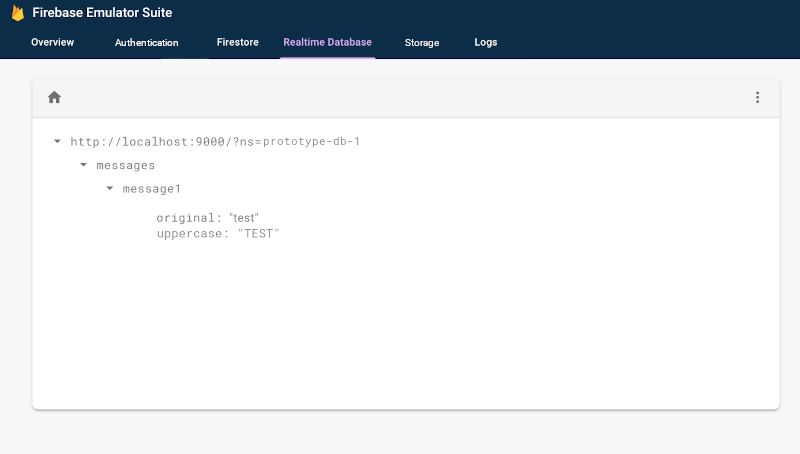
messagesnode containing amessage1node, in turn containing a node with key set tooriginaland value set totest. This triggers our cloud function. Observe that a newuppercaseproperty appears shortly, with valueTEST.
- Check the Logs tab to confirm your function did not run inot errors as it updated the database.
  const functions = require('firebase-functions');

  exports.makeUppercase = functions.database.ref('/messages/{pushId}/original')
      .onCreate((snapshot, context) => {
        const original = snapshot.val();
        console.log('Uppercasing', context.params.pushId, original);
        const uppercase = original.toUpperCase();
        return snapshot.ref.parent.child('uppercase').set(uppercase);
      });
You can easily iterate between your cloud function code and interactive database edits until you get the data flow you're looking for, without touching in-app database access code, recompiling and re-running test suites.
Connect your app to the emulators
When you've made good progress with interactive prototyping and have settled on a design, you'll be ready to add database access code to your app using the appropriate SDK. You'll keep using the database tab and, for functions, the Logs tab in Emulator Suite UI to confirm that your app's behavior is correct.
Remember that the Local Emulator Suite is a local development tool. Writes to your production databases will not trigger functions you are prototyping locally.
To switch over to having your app make writes to the database, you'll need to point your test classes or in-app configuration at the Realtime Database emulator.
Kotlin+KTX
// 10.0.2.2 is the special IP address to connect to the 'localhost' of
// the host computer from an Android emulator.
val database = Firebase.database
database.useEmulator("10.0.2.2", 9000)
Java
// 10.0.2.2 is the special IP address to connect to the 'localhost' of
// the host computer from an Android emulator.
FirebaseDatabase database = FirebaseDatabase.getInstance();
database.useEmulator("10.0.2.2", 9000);
Swift
// In almost all cases the ns (namespace) is your project ID.
let db = Database.database(url:"http://127.0.0.1:9000?ns=YOUR_DATABASE_NAMESPACE")
Web modular API
import { getDatabase, connectDatabaseEmulator } from "firebase/database";
const db = getDatabase();
if (location.hostname === "localhost") {
// Point to the RTDB emulator running on localhost.
connectDatabaseEmulator(db, "127.0.0.1", 9000);
}
Web namespaced API
var db = firebase.database();
if (location.hostname === "localhost") {
// Point to the RTDB emulator running on localhost.
db.useEmulator("127.0.0.1", 9000);
}
Automate your tests with custom scripts
Now for the last overall workflow step. Once you've prototyped your feature
in-app and it looks promising on all your platforms, you can turn to final
implementation and testing. For unit testing and CI workflows, you can start up
emulators, run scripted tests, and shut down emulators in a single call with
the exec command:
firebase emulators:exec "./testdir/test.sh"
Explore individual emulators in more depth
Now that you've seen what the basic client-side workflow looks like, you can continue with details about the individual emulators in the Suite, including how to use them for server-side app development:
- Add the Authentication emulator to your prototyping workflows
- Learn about Realtime Database emulator features in depth
- Learn about Cloud Storage for Firebase emulator features in depth
- Learn about Cloud Firestore emulator features in depth
- Connect your app to the Cloud Functions emulator
- Evaluate Firebase Extensions while minimizing billing costs with the Extensions emulator
What next?
Be sure to read the topics related to specific emulators linked above. Then:
- For a curated set of videos and detailed how-to examples, follow the Firebase Emulators Training Playlist.
- Investigate advanced use cases involving Security Rules testing and the Firebase Test SDK: Test Security Rules (Cloud Firestore) , Test Security Rules (Realtime Database), and Test Security Rules (Cloud Storage for Firebase).