
Uygulamanızı Uygulama Kontrolü'ne kaydettikten sonra, bu ortamlar geçerli cihaz olarak kabul edilmediğinden uygulamanız normalde bir emülatörde veya sürekli entegrasyon (CI) ortamında çalışmaz. Geliştirme ve test sırasında uygulamanızı bu tür bir ortamda çalıştırmak istiyorsanız uygulamanızın hata ayıklama derlemesini oluşturabilirsiniz. Bu derleme, gerçek bir onay sağlayıcı yerine Uygulama Kontrolü hata ayıklama sağlayıcısını kullanır.
Apple platformları
Uygulamanızı simülatörde etkileşimli olarak (ör. geliştirme sırasında) çalıştırırken hata ayıklama sağlayıcısını kullanmak için aşağıdakileri yapın:
Firebase uygulamanızı başlattıktan hemen sonra hata ayıklama sağlayıcısıyla Uygulama Kontrolü'nü etkinleştirin:
import 'package:flutter/material.dart';
import 'package:firebase_core/firebase_core.dart';

// Import the firebase_app_check plugin
import 'package:firebase_app_check/firebase_app_check.dart';

Future<void> main() async {
  WidgetsFlutterBinding.ensureInitialized();
  await Firebase.initializeApp();
  await FirebaseAppCheck.instance.activate(
    // Set appleProvider to `AppleProvider.debug`
    appleProvider: AppleProvider.debug,
  );
  runApp(App());
}
Xcode projenizde hata ayıklama günlük kaydını etkinleştirin (v11.0 veya daha yeni sürümler):
- Product (Ürün) > Scheme (Şema) > Edit scheme (Şemayı düzenle)'yi açın.
- Soldaki menüden Run'ı (Çalıştır) ve ardından Arguments (Bağımsız değişkenler) sekmesini seçin.
- Arguments Passed on Launch (Başlatmada İletilen Parametreler) bölümüne
-FIRDebugEnabledifadesini ekleyin.
ios/Runner.xcworkspacedosyasını Xcode ile açın ve uygulamanızı simülatörde çalıştırın. Firebase, arka uca istek göndermeye çalıştığında uygulamanız hata ayıklama çıkışına yerel bir hata ayıklama jetonu yazdırır. Örneğin:Firebase App Check Debug Token: 123a4567-b89c-12d3-e456-789012345678
Firebase konsolunda Güvenlik > App Check > Uygulamalar'a gidin.
Az önce kaydettiğiniz hata ayıklama jetonunuzu kaydedin.
- Uygulamanızın taşma menüsünden Hata ayıklama jetonlarını yönet'i seçin.
- Hata ayıklama jetonunuzu kaydetmek için ekrandaki talimatları uygulayın.
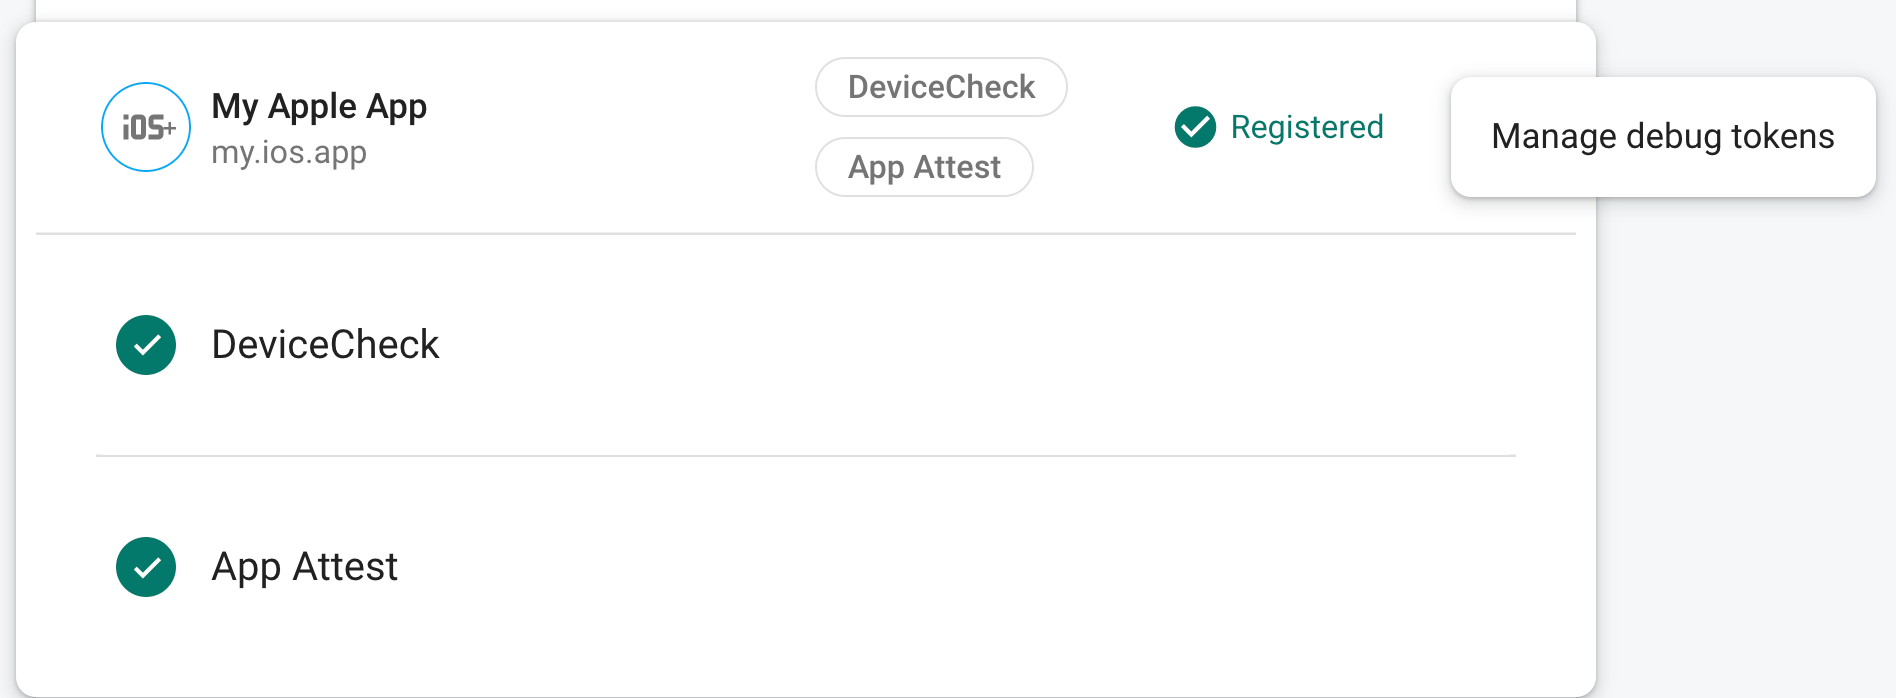
Jetonu kaydettikten sonra Firebase arka uç hizmetleri bunu geçerli olarak kabul eder.
Bu jeton, geçerli bir cihaz olmadan Firebase kaynaklarınıza erişime izin verdiğinden gizli tutmanız çok önemlidir. Herkese açık bir depoya işlemeyin ve kayıtlı bir jetonun güvenliği ihlal edilirse Firebase konsolunda hemen iptal edin.
Android
Flutter uygulamanızı Android ortamında çalıştırırken hata ayıklama sağlayıcısını kullanmak için Flutter uygulamanızda aşağıdaki kodu uygulayın:
import 'package:flutter/material.dart';
import 'package:firebase_core/firebase_core.dart';

// Import the firebase_app_check plugin
import 'package:firebase_app_check/firebase_app_check.dart';

Future<void> main() async {
  WidgetsFlutterBinding.ensureInitialized();
  await Firebase.initializeApp();
  await FirebaseAppCheck.instance.activate(
    webRecaptchaSiteKey: 'recaptcha-v3-site-key',
    // Set androidProvider to `AndroidProvider.debug`
    androidProvider: AndroidProvider.debug,
  );
  runApp(App());
}
Firebase, arka uca istek göndermeye çalıştığında uygulamanız hata ayıklama çıkışına yerel bir hata ayıklama jetonu yazdırır. Örneğin:
D DebugAppCheckProvider: Enter this debug secret into the allow list in
the Firebase Console for your project: 123a4567-b89c-12d3-e456-789012345678
Firebase konsolunda Güvenlik > App Check > Uygulamalar'a gidin.
Az önce kaydettiğiniz hata ayıklama jetonunuzu kaydedin.
- Uygulamanızın taşma menüsünden Hata ayıklama jetonlarını yönet'i seçin.
- Hata ayıklama jetonunuzu kaydetmek için ekrandaki talimatları uygulayın.
Jetonu kaydettikten sonra Firebase arka uç hizmetleri bunu geçerli olarak kabul eder.
Web
Uygulamanızı localhost üzerinden çalıştırırken (örneğin, geliştirme sırasında) hata ayıklama sağlayıcısını kullanmak için aşağıdakileri yapın:
web/index.htmldosyasında,self.FIREBASE_APPCHECK_DEBUG_TOKENdeğerinitrueolarak ayarlayarak hata ayıklama modunu etkinleştirin:<body> <script> self.FIREBASE_APPCHECK_DEBUG_TOKEN = true; </script> ... </body>Web uygulamanızı yerel olarak çalıştırın ve tarayıcının geliştirici aracını açın. Hata ayıklama konsolunda bir hata ayıklama jetonu görürsünüz:
AppCheck debug token: "123a4567-b89c-12d3-e456-789012345678". You will
need to safelist it in the Firebase console for it to work.
Bu jeton tarayıcınızda yerel olarak depolanır ve uygulamanızı aynı makinede aynı tarayıcıda her kullandığınızda kullanılır. Jetonu başka bir tarayıcıda veya makinede kullanmak istiyorsanız
self.FIREBASE_APPCHECK_DEBUG_TOKENdeğerinitrueyerine jeton dizesi olarak ayarlayın.Firebase konsolunda Güvenlik > App Check > Uygulamalar'a gidin.
Az önce kaydettiğiniz hata ayıklama jetonunuzu kaydedin.
- Uygulamanızın taşma menüsünden Hata ayıklama jetonlarını yönet'i seçin.
- Hata ayıklama jetonunuzu kaydetmek için ekrandaki talimatları uygulayın.
Jetonu kaydettikten sonra Firebase arka uç hizmetleri bunu geçerli olarak kabul eder.
Bu jeton, geçerli bir cihaz olmadan Firebase kaynaklarınıza erişime izin verdiğinden gizli tutmanız çok önemlidir. Herkese açık bir depoya işlemeyin ve kayıtlı bir jetonun güvenliği ihlal edilirse Firebase konsolunda hemen iptal edin.