
Wenn Sie eine vorhandene Next.js- oder Angular-App (Next.js-Version 13.5.x+ oder Angular-Version 18.2.x+) in einem GitHub-Repository haben, können Sie ganz einfach mit App Hosting beginnen. Erstellen Sie dazu ein App Hosting-Backend und starten Sie dann die Einführung mit einem Push in Ihren Live-Zweig. Wenn Sie keine App haben, können Sie eine unserer Beispiel-Apps verwenden, um die in diesem Leitfaden beschriebenen Schritte auszuführen.
In diesem Leitfaden wird beschrieben, wie Sie App Hosting in der Firebase-Konsole einrichten, damit bei jedem neuen Commit in einem GitHub-Repository automatisch eine Bereitstellung erfolgt. Am Ende dieses Ablaufs haben Sie eine Live-Beispiel-App für Next.js oder Angular, die jedes Mal neu bereitgestellt wird, wenn Sie eine neue Änderung im main-Zweig Ihres GitHub-Repositorys committen.
In dieser Anleitung wird der empfohlene Firebase-Konsolenablauf beschrieben. Es gibt jedoch weitere Möglichkeiten zum Bereitstellen, z. B. die Verwendung der Firebase-Befehlszeile zum Bereitstellen von lokalem Code ohne GitHub-Verbindung.
Schritt 1: Demo-Repository forken
Rufen Sie https://github.com/firebase/apphosting-adapters auf und wählen Sie Fork aus.
Schritt 2: App Hosting-Backend erstellen
Rufen Sie in der Firebase-Konsole Hosting & Serverless > App-Hosting auf.
Klicken Sie auf Jetzt starten.
Wenn Sie dazu aufgefordert werden, führen Sie ein Upgrade auf das Blaze-Preismodell (Pay as you go) durch, um App Hosting zu verwenden.
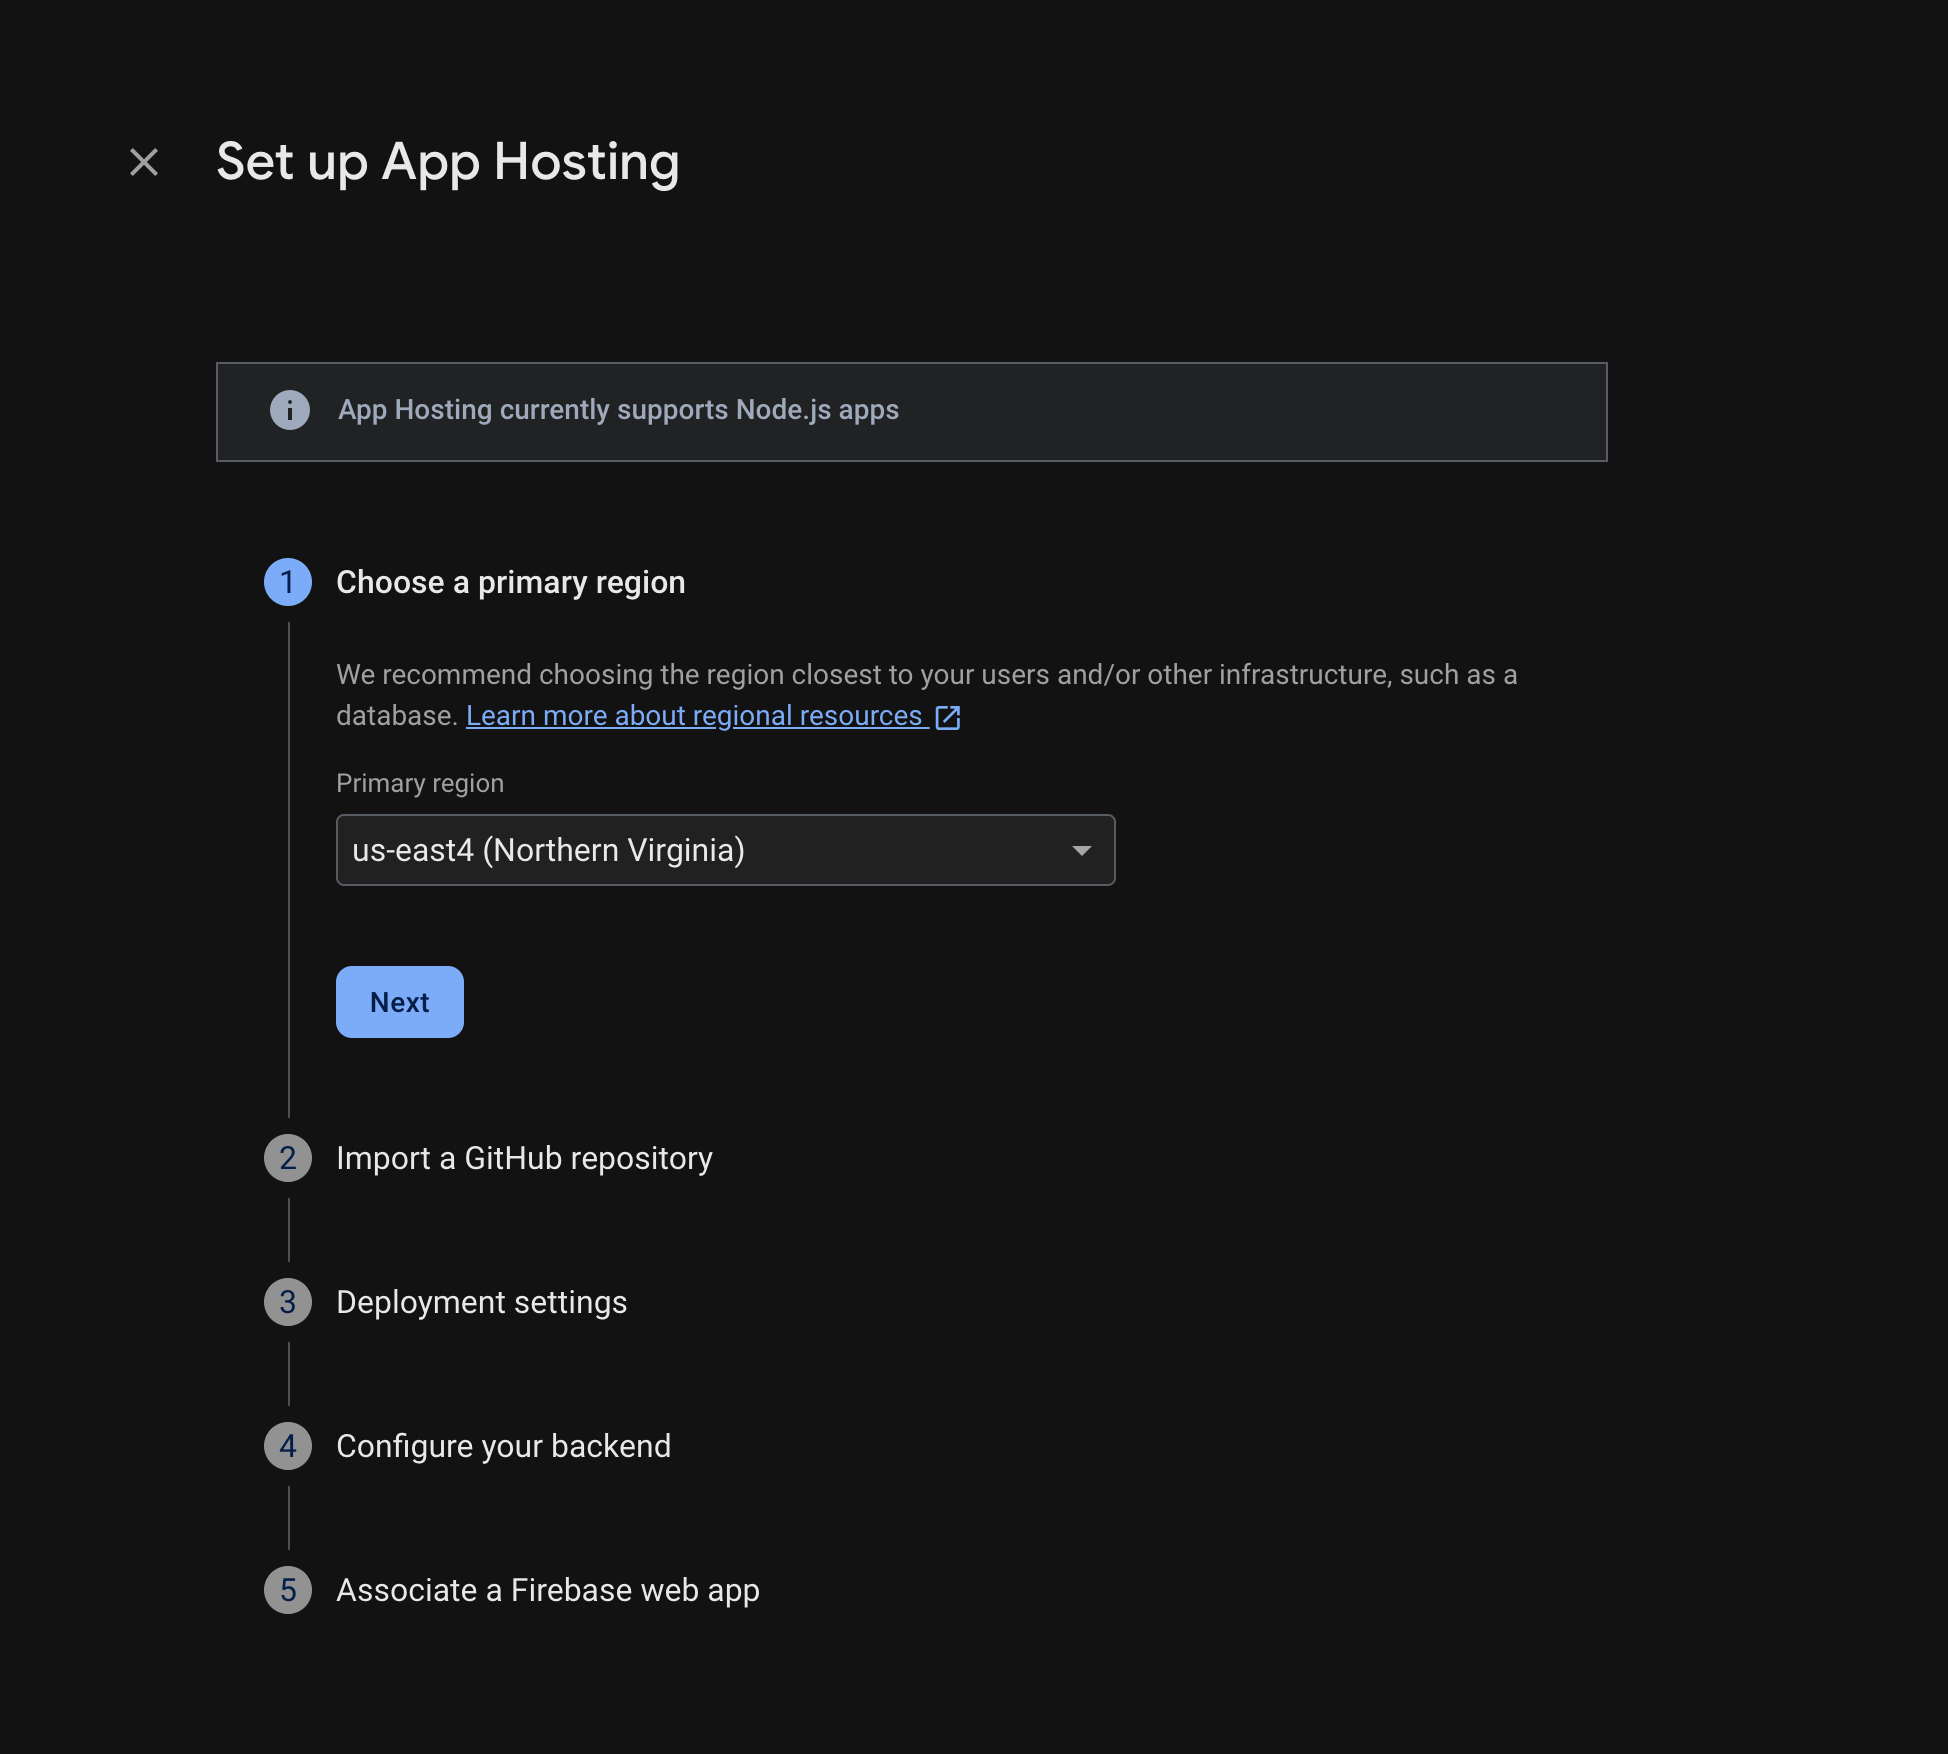
Folgen Sie der Anleitung, um diese Schritte auszuführen:
- Wählen Sie eine primäre Region aus (in der Regel die Region, die Ihren Nutzern am nächsten ist).
- Verbindung zu GitHub herstellen Wählen Sie das Repository aus, das Sie gerade durch Forking des Repositorys „firebase-framework-tools“ erstellt haben.
- Legen Sie das Stammverzeichnis Ihrer App auf eines der folgenden Verzeichnisse fest:
- Legen Sie den Live-Zweig als main fest.
- Aktivieren Sie automatische Roll-outs (automatische Roll-outs sind standardmäßig aktiviert).
- Weisen Sie Ihrem Backend einen Namen zu.
- Wählen Sie Ihre Laufzeitumgebung aus. Standardmäßig ist die neueste empfohlene Node.js-Version für Sie vorausgewählt.
- Konfigurieren Sie automatische Basis-Image-Updates (Automatic Base Image Updates, ABIU). ABIU ist standardmäßig aktiviert und wendet automatisch Sicherheitspatches auf Ihre zugrunde liegende Umgebung an. Sie können ABIU deaktivieren, indem Sie für Ihre Laufzeit „Nicht angegeben“ auswählen.
- Erstellen Sie eine neue Firebase-Web-App.
Wählen Sie Fertigstellen und bereitstellen aus.
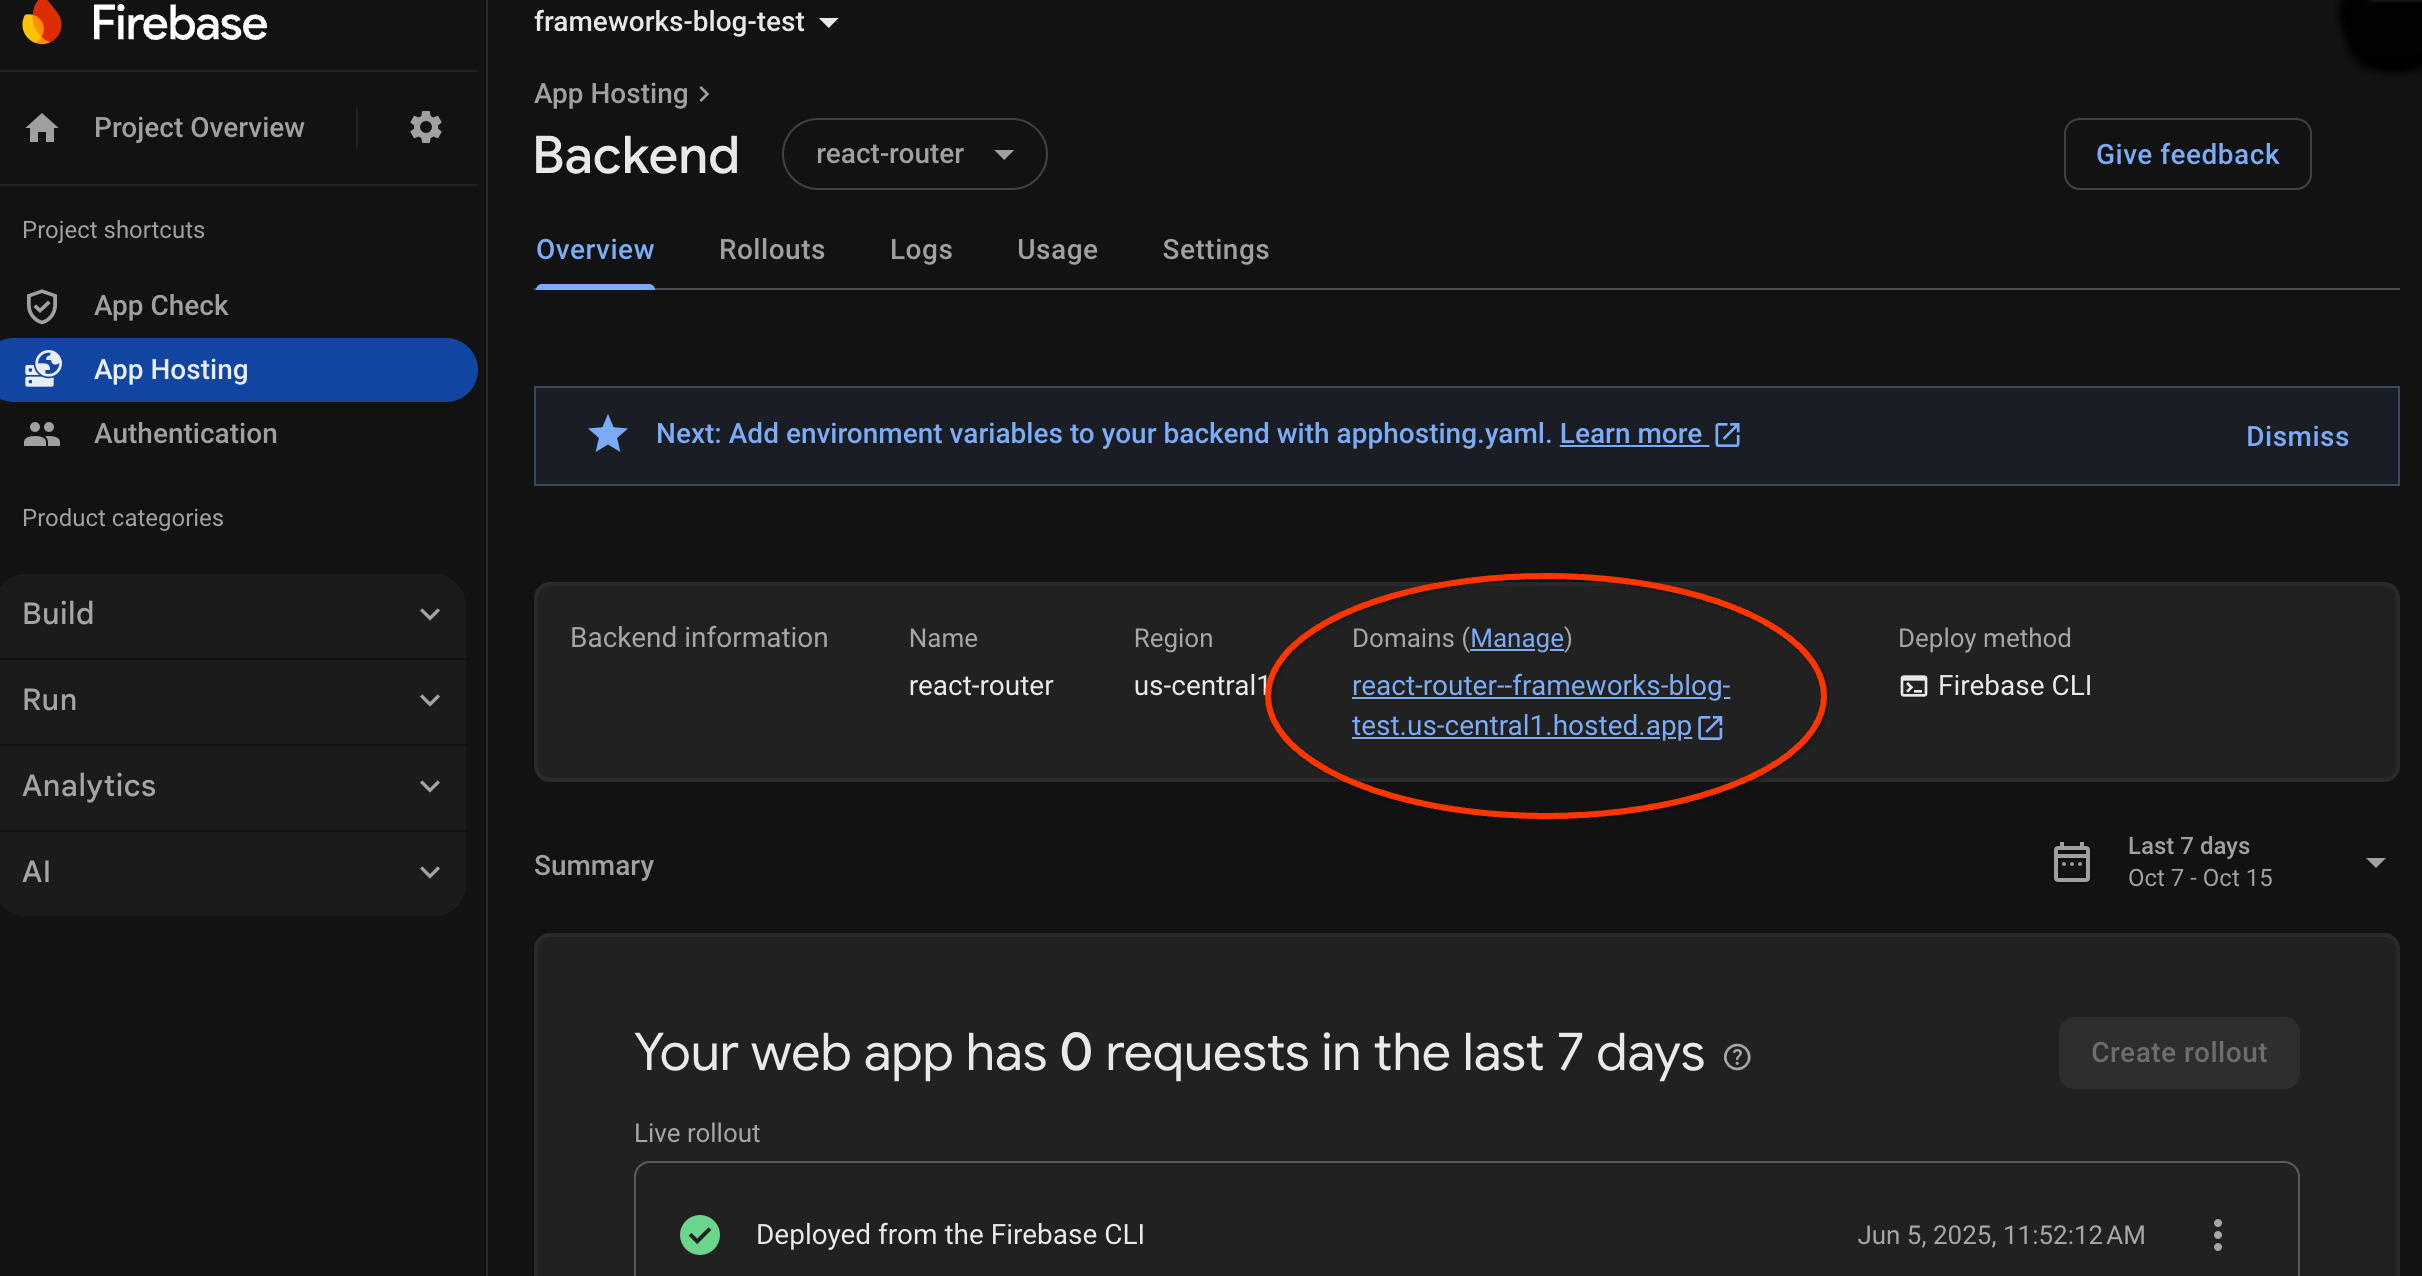
Schritt 3: Bereitgestellte App ansehen
Wenn Sie ein Backend erstellen, stellt Firebase Ihnen eine kostenlose Subdomain zur Verfügung, über die Endnutzer Ihre Web-App aufrufen können. Das Format ist backend-id--project-id.us-central1.hosted.app.
Wählen Sie in der Zeile Backend-Informationen im Dashboard für Ihr Backend den Link zu Ihrem Live-Backend aus, um Ihre neue Website aufzurufen:
Schritt 4: Roll-out durch Änderung auslösen
Sobald Ihr Backend erstellt wurde und Sie eine Live-URL haben, können Sie die Einführung einer neuen Version Ihrer Web-App auslösen, wenn Sie Änderungen in den Live-Zweig Ihres GitHub-Repositorys übertragen. So testen Sie die Einrichtung von App Hosting:
Rufen Sie in Ihrem Fork des Demo-GitHub-Repositorys den Quellcode der Startseite der Demo-App auf, nehmen Sie eine beliebige erkennbare Änderung vor und übertragen Sie die Änderung dann per Push in den Hauptzweig. So rufen Sie Ihre Startseite auf:
- Next.js:
/starters/nextjs/basic/src/app/page.tsx - Angular:
/starters/angular/basic/src/app/pages/home/home.component.html
- Next.js:
Behalten Sie in der Firebase-Konsole App Hosting im Blick, während Ihre neue Änderung in der Produktion eingeführt wird. Wenn die Einführung abgeschlossen ist, können Sie die Änderung auf der Startseite der App sehen.
Nächste Schritte
- Weitere Informationen finden Sie in einem Firebase-Codelab, in dem eine gehostete App mit Firebase Authentication- und Google AI-Funktionen integriert wird: Next.js | Angular
- Benutzerdefinierte Domain verbinden
- Backend konfigurieren: Umgebungsvariablen festlegen, geheime Parameter speichern usw.
- Rollouts, Website-Nutzung und Logs im Blick behalten: