
在開始使用 Firebase 本機模擬器套件之前,請確保您已建立 Firebase 專案、設定開發環境,並根據適合您平台的 Firebase 入門主題選擇並安裝適合您平台的 Firebase SDK: Apple 、 Android或網路。
原型和測試
本機模擬器套件包含多個產品模擬器,如Firebase 本機模擬器套件簡介中所述。您可以根據您在生產中使用的 Firebase 產品,根據您認為合適的情況,使用單一模擬器以及模擬器組合進行原型設計和測試。
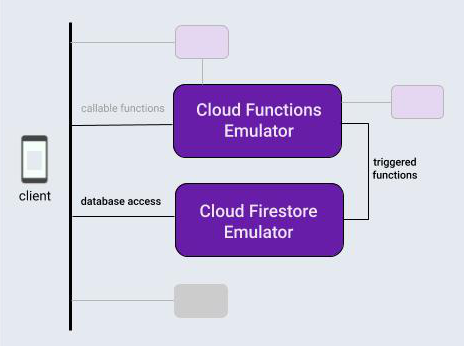
對於這個主題,為了介紹本機模擬器套件工作流程,我們假設您正在開發一個使用典型產品組合的應用程式:Firebase 資料庫和由該資料庫上的操作觸發的雲端函數。
在本機初始化 Firebase 專案後,使用本機模擬器套件的開發週期通常包含三個步驟:
原型具有與模擬器和模擬器套件 UI 互動的功能。
如果您使用的是資料庫模擬器或 Cloud Functions 模擬器,請執行一次性步驟將您的應用程式連接到模擬器。
使用模擬器和自訂腳本自動化您的測試。
本地初始化 Firebase 項目
curl -sL firebase.tools | bash
如果您尚未執行此操作,請將目前工作目錄初始化為 Firebase 項目,請依照螢幕上的提示指定您正在使用Cloud Functions以及Cloud Firestore或Realtime Database :
firebase init
您的專案目錄現在將包含 Firebase 設定檔、資料庫的 Firebase 安全性規則定義檔、包含雲端函數程式碼的functions目錄以及其他支援檔案。
互動式原型
本地模擬器套件旨在讓您快速建立新功能的原型,該套件的內建使用者介面是其最有用的原型設計工具之一。這有點像在本機運行 Firebase 控制台。
使用模擬器套件 UI,您可以迭代資料庫的設計、嘗試涉及雲端功能的不同資料流、評估安全規則變更、檢查日誌以確認後端服務的執行情況等等。然後,如果您想重新開始,只需清除資料庫並以新的設計理念重新開始即可。
當您使用以下命令啟動本機模擬器套件時,所有這些都可用:
firebase emulators:start
為了對我們假設的應用程式進行原型設計,讓我們設定並測試一個基本的雲端函數來修改資料庫中的文字條目,並在模擬器套件 UI 中建立並填充該資料庫以觸發它。
- 透過編輯專案目錄中的
functions/index.js檔案來建立由資料庫寫入觸發的雲端函數。將現有文件的內容替換為以下程式碼片段。此函數偵聽messages集合中文件的更改,將文件original欄位的內容轉換為大寫,並將結果儲存在該文件的uppercase欄位中。 - 使用
firebase emulators:start啟動本機模擬器套件。 Cloud Functions 和資料庫模擬器啟動,自動配置為互通。 - 在瀏覽器中查看 UI
http://localhost:4000。端口 4000 是 UI 的預設端口,但請檢查 Firebase CLI 輸出的終端訊息。請注意可用模擬器的狀態。在我們的範例中,Cloud Functions 和 Cloud Firestore 模擬器將會運作。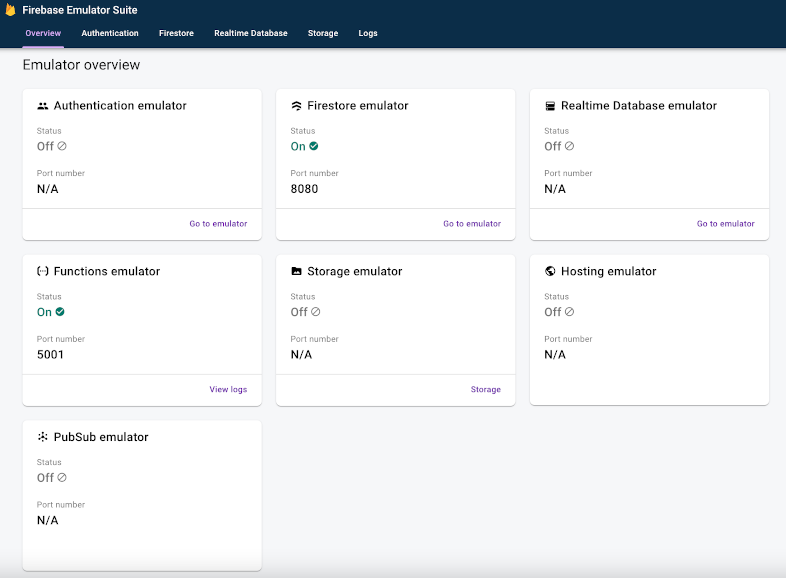
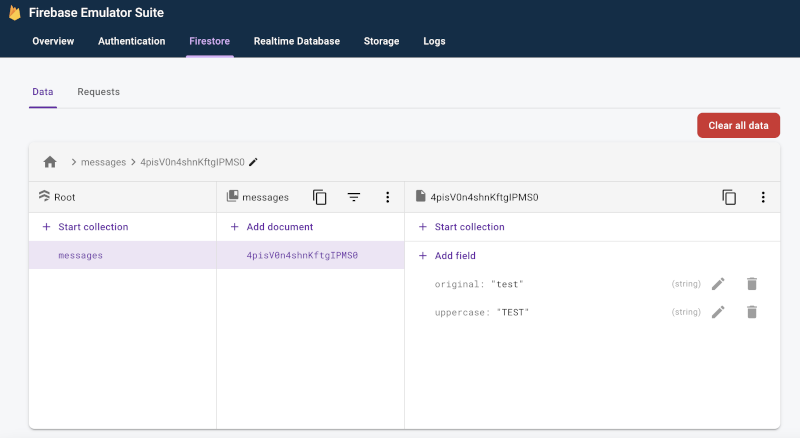
- 在 UI 中的Firestore > 資料標籤上,按一下開始收集並按照提示在
messages集合中建立一個新文檔,其中欄位名為original,值為test。這會觸發我們的雲端功能。您會發現很快就會出現一個新的uppercase字段,其中填充了字串“TEST”。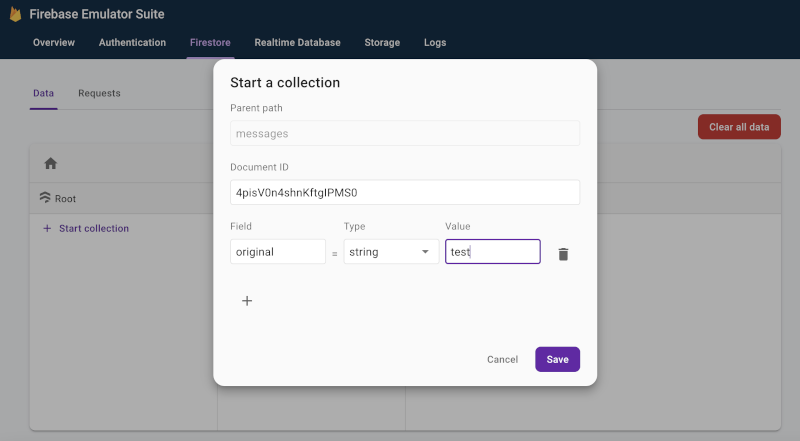
- 在Firestore > 請求標籤上,檢查向模擬資料庫發出的請求,包括為滿足這些請求而執行的所有 Firebase 安全規則評估。
- 檢查“日誌”標籤以確認您的函數在更新資料庫時沒有遇到錯誤。
  const functions = require('firebase-functions');

  exports.makeUppercase = functions.firestore.document('/messages/{documentId}')
      .onCreate((snap, context) => {
        const original = snap.data().original;
        console.log('Uppercasing', context.params.documentId, original);
        const uppercase = original.toUpperCase();
        return snap.ref.set({uppercase}, {merge: true});
      });
您可以輕鬆地在雲端函數程式碼和互動式資料庫編輯之間進行迭代,直到您獲得所需的資料流,而無需觸及應用程式內資料庫存取程式碼、重新編譯和重新執行測試套件。
將您的應用程式連接到模擬器
當您在互動式原型設計方面取得了良好進展並確定了設計後,您就可以使用適當的 SDK 將資料庫存取程式碼新增至您的應用程式。您將繼續使用模擬器套件 UI 中的資料庫標籤和日誌標籤(對於功能)來確認您的應用程式的行為是否正確。
請記住,本地模擬器套件是本地開發工具。寫入生產資料庫不會觸發您在本機進行原型設計的函數。
要切換到讓您的應用程式寫入資料庫,您需要將測試類別或應用程式內配置指向 Cloud Firestore 模擬器。
Kotlin+KTX
// 10.0.2.2 is the special IP address to connect to the 'localhost' of
// the host computer from an Android emulator.
val firestore = Firebase.firestore
firestore.useEmulator("10.0.2.2", 8080)
firestore.firestoreSettings = firestoreSettings {
isPersistenceEnabled = false
}
Java
// 10.0.2.2 is the special IP address to connect to the 'localhost' of
// the host computer from an Android emulator.
FirebaseFirestore firestore = FirebaseFirestore.getInstance();
firestore.useEmulator("10.0.2.2", 8080);
FirebaseFirestoreSettings settings = new FirebaseFirestoreSettings.Builder()
.setPersistenceEnabled(false)
.build();
firestore.setFirestoreSettings(settings);
迅速
let settings = Firestore.firestore().settings settings.host = "127.0.0.1:8080" settings.cacheSettings = MemoryCacheSettings() settings.isSSLEnabled = false Firestore.firestore().settings = settings
Web modular API
import { getFirestore, connectFirestoreEmulator } from "firebase/firestore";
// firebaseApps previously initialized using initializeApp()
const db = getFirestore();
connectFirestoreEmulator(db, '127.0.0.1', 8080);Web namespaced API
// Firebase previously initialized using firebase.initializeApp().
var db = firebase.firestore();
if (location.hostname === "localhost") {
db.useEmulator("127.0.0.1", 8080);
}使用自訂腳本自動化您的測試
現在是整個工作流程的最後一個步驟。一旦您在應用程式中對功能進行了原型設計並且它在所有平台上看起來都很有前景,您就可以轉向最終的實現和測試。對於單元測試和 CI 工作流程,您可以使用exec命令在一次呼叫中啟動模擬器、執行腳本測試和關閉模擬器:
firebase emulators:exec "./testdir/test.sh"
更深入地探索各個模擬器
現在您已經了解了基本的客戶端工作流程,您可以繼續了解套件中各個模擬器的詳細信息,包括如何將它們用於伺服器端應用程式開發:
- 將身份驗證模擬器新增至您的原型設計工作流程中
- 深入了解即時資料庫模擬器功能
- 深入了解 Cloud Storage for Firebase 模擬器功能
- 深入了解 Cloud Firestore 模擬器功能
- 將您的應用程式連接到 Cloud Functions 模擬器
- 使用 Extensions 模擬器評估 Firebase Extensions,同時最大限度地降低計費成本
接下來是什麼?
請務必閱讀上面連結的與特定模擬器相關的主題。然後:
- 如需一組精選影片和詳細操作範例,請關注Firebase 模擬器訓練播放清單。
- 研究涉及安全規則測試和 Firebase 測試 SDK 的高級用例:測試安全規則 (Cloud Firestore) 、測試安全規則 (即時資料庫)和測試安全規則 (Cloud Storage for Firebase) 。