
Google ログインをアプリに統合することで、ユーザーは Firebase での認証に Google アカウントを使用できるようになります。
始める前に
Swift Package Manager を使用して Firebase の依存関係のインストールと管理を行います。
- Xcode でアプリのプロジェクトを開いたまま、[File] > [Add Packages] の順に移動します。
- プロンプトが表示されたら、Firebase Apple プラットフォーム SDK リポジトリを追加します。
- Firebase Authentication ライブラリを選択します。
- ターゲットのビルド設定の [Other Linker Flags] セクションに
-ObjCフラグを追加します。 - 上記の作業が完了すると、Xcode は依存関係の解決とバックグラウンドでのダウンロードを自動的に開始します。
https://github.com/firebase/firebase-ios-sdk.git
Google ログイン SDK をプロジェクトに追加する
Xcode でアプリのプロジェクトを開いたまま、[File] > [Add Packages] の順に移動します。
プロンプトが表示されたら、Google ログイン SDK リポジトリを追加します。
https://github.com/google/GoogleSignIn-iOS上記の作業が完了すると、Xcode は依存関係の解決とバックグラウンドでのダウンロードを自動的に開始します。
Firebase プロジェクトで Google ログインを有効にする
ユーザーが Google ログインを使用してログインできるようにするには、まず Firebase プロジェクトで Google ログイン プロバイダを有効にする必要があります。
- Firebase コンソールで [Authentication] セクションを開きます。
- [Sign-in method] タブで、[Google] プロバイダを有効にします。
[保存] をクリックします。
プロジェクトの
GoogleService-Info.plistファイルの新しいコピーをダウンロードして、Xcode プロジェクトにコピーします。既存のバージョンをすべて新しいバージョンで上書きします(Firebase を iOS プロジェクトに追加するをご覧ください)。
必須ヘッダー ファイルをインポートする
まず Firebase SDK と Google ログイン SDK のヘッダー ファイルをアプリにインポートします。
Swift
import FirebaseAuth
import GoogleSignIn
Objective-C
@import FirebaseCore;
@import GoogleSignIn;
Google ログインを実装する
Google ログインを実装する手順は次のとおりです。iOS で Google ログインを使用する方法について詳しくは、Google ログインに関するデベロッパー向けドキュメントをご覧ください。
- Xcode プロジェクトにカスタム URL スキームを追加します。
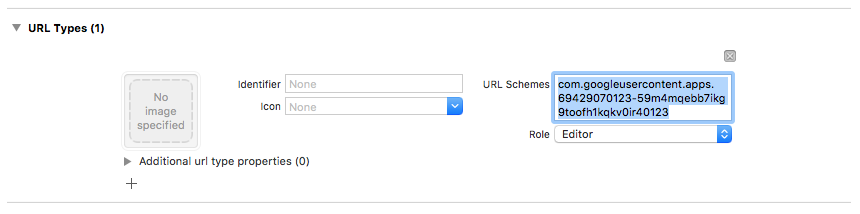
- プロジェクト構成を開きます(左側のツリービューでプロジェクト名をクリックします)。[TARGETS] セクションでアプリを選択し、[Info] タブを開いて [URL Types] セクションを展開します。
- [+] ボタンをクリックし、反転クライアント ID の URL スキームを追加します。この値を確認するには、
GoogleService-Info.plist REVERSED_CLIENT_IDキーを探します。見つかったキーの値をコピーし、構成ページの [URL Schemes] ボックスに貼り付けます。 他のフィールドはそのままにします。完了すると、構成は次のようになります(ただし、値はアプリケーションによって異なります)。
- アプリのデリゲートの
application:didFinishLaunchingWithOptions:メソッドで、FirebaseAppオブジェクトを構成します。Swift
// Use Firebase library to configure APIs
FirebaseApp.configure()
Objective-C
// Use Firebase library to configure APIs
[FIRApp configure];
- アプリのデリゲートに
application:openURL:options:メソッドを実装します。このメソッドはGIDSignInインスタンスのhandleURLメソッドを呼び出します。これによって、認証プロセスの最後にアプリが受け取る URL が正しく処理されます。Swift
func scene(_ scene: UIScene, openURLContexts URLContexts: Set<UIOpenURLContext>) {
  // ...
}
  return GIDSignIn.sharedInstance.handle(url)
}
Objective-C
- (BOOL)application:(nonnull UIApplication *)application
            openURL:(nonnull NSURL *)url
            options:(nonnull NSDictionary<NSString *, id> *)options {
  return [[GIDSignIn sharedInstance] handleURL:url];
}
- アプリのプレゼンティング ビュー コントローラとクライアント ID を Google ログイン プロバイダの
signInメソッドに渡して、結果として得られる Google 認証トークンから Firebase Authentication の認証情報を作成します。Swift
guard let clientID = FirebaseApp.app()?.options.clientID else { return }

// Create Google Sign In configuration object.
let config = GIDConfiguration(clientID: clientID)
GIDSignIn.sharedInstance.configuration = config

// Start the sign in flow!
GIDSignIn.sharedInstance.signIn(withPresenting: viewController) { result, error in
  guard error == nil else {
    // ...
    return
  }

  guard let user = result?.user,
        let idToken = user.idToken?.tokenString
  else {
    // ...
    return
  }

  let credential = GoogleAuthProvider.credential(withIDToken: idToken,
                                                 accessToken: user.accessToken.tokenString)
  self.signIn(with: credential)
}
Objective-C
GIDConfiguration *config = [[GIDConfiguration alloc] initWithClientID:[FIRApp defaultApp].options.clientID];
[GIDSignIn.sharedInstance setConfiguration:config];

__weak __auto_type weakSelf = self;
[GIDSignIn.sharedInstance signInWithPresentingViewController:self
      completion:^(GIDSignInResult * _Nullable result, NSError * _Nullable error) {
  __auto_type strongSelf = weakSelf;
  if (strongSelf == nil) { return; }

  if (error == nil) {
    FIRAuthCredential *credential =
    [FIRGoogleAuthProvider credentialWithIDToken:result.user.idToken.tokenString
                                     accessToken:result.user.accessToken.tokenString];
    // ...
  } else {
    // ...
  }
}];
GIDSignInButtonをストーリーボードまたは XIB ファイルに追加するか、プログラムによって初期化します。このボタンをストーリーボードまたは XIB ファイルに追加するには、ビューを追加して、そのカスタムクラスをGIDSignInButtonに設定します。- 省略可: このボタンをカスタマイズする方法は次のとおりです。
Swift
- ビュー コントローラで、ログインボタンをプロパティとして宣言します。
@IBOutlet weak var signInButton: GIDSignInButton!
- 宣言した
signInButtonプロパティにボタンを接続します。 - GIDSignInButton オブジェクトのプロパティを設定してボタンをカスタマイズします。
Objective-C
- ビュー コントローラのヘッダー ファイルで、ログインボタンをプロパティとして宣言します。
@property(weak, nonatomic) IBOutlet GIDSignInButton *signInButton;
- 宣言した
signInButtonプロパティにボタンを接続します。 - GIDSignInButton オブジェクトのプロパティを設定してボタンをカスタマイズします。
- ビュー コントローラで、ログインボタンをプロパティとして宣言します。
Firebase で認証する
最後に、前の手順で作成した認証情報を使用して Firebase ログイン プロセスを完了します。
Swift
Auth.auth().signIn(with: credential) { result, error in
  guard error == nil else {
    // ...
    return
  }

  // At this point, our user is signed in
}
Objective-C
[[FIRAuth auth] signInWithCredential:credential
                          completion:^(FIRAuthDataResult * _Nullable authResult,
                                       NSError * _Nullable error) {
    if (isMFAEnabled && error && error.code == FIRAuthErrorCodeSecondFactorRequired) {
      FIRMultiFactorResolver *resolver = error.userInfo[FIRAuthErrorUserInfoMultiFactorResolverKey];
      NSMutableString *displayNameString = [NSMutableString string];
      for (FIRMultiFactorInfo *tmpFactorInfo in resolver.hints) {
        [displayNameString appendString:tmpFactorInfo.displayName];
        [displayNameString appendString:@" "];
      }
      [self showTextInputPromptWithMessage:[NSString stringWithFormat:@"Select factor to sign in\n%@", displayNameString]
                           completionBlock:^(BOOL userPressedOK, NSString *_Nullable displayName) {
       FIRPhoneMultiFactorInfo* selectedHint;
       for (FIRMultiFactorInfo *tmpFactorInfo in resolver.hints) {
         if ([displayName isEqualToString:tmpFactorInfo.displayName]) {
           selectedHint = (FIRPhoneMultiFactorInfo *)tmpFactorInfo;
         }
       }
       [FIRPhoneAuthProvider.provider
        verifyPhoneNumberWithMultiFactorInfo:selectedHint
        UIDelegate:nil
        multiFactorSession:resolver.session
        completion:^(NSString * _Nullable verificationID, NSError * _Nullable error) {
          if (error) {
            [self showMessagePrompt:error.localizedDescription];
          } else {
            [self showTextInputPromptWithMessage:[NSString stringWithFormat:@"Verification code for %@", selectedHint.displayName]
                                 completionBlock:^(BOOL userPressedOK, NSString *_Nullable verificationCode) {
             FIRPhoneAuthCredential *credential =
                 [[FIRPhoneAuthProvider provider] credentialWithVerificationID:verificationID
                                                              verificationCode:verificationCode];
             FIRMultiFactorAssertion *assertion = [FIRPhoneMultiFactorGenerator assertionWithCredential:credential];
             [resolver resolveSignInWithAssertion:assertion completion:^(FIRAuthDataResult * _Nullable authResult, NSError * _Nullable error) {
               if (error) {
                 [self showMessagePrompt:error.localizedDescription];
               } else {
                 NSLog(@"Multi factor finanlize sign in succeeded.");
               }
             }];
           }];
          }
        }];
     }];
    }
  else if (error) {
    // ...
    return;
  }
  // User successfully signed in. Get user data from the FIRUser object
  if (authResult == nil) { return; }
  FIRUser *user = authResult.user;
  // ...
}];
次のステップ
ユーザーが初めてログインすると、新しいユーザー アカウントが作成され、ユーザーがログイン時に使用した認証情報(ユーザー名とパスワード、電話番号、または認証プロバイダ情報)にアカウントがリンクされます。この新しいアカウントは Firebase プロジェクトの一部として保存され、ユーザーのログイン方法にかかわらず、プロジェクトのすべてのアプリでユーザーを識別するために使用できます。
-
アプリでは、
Userオブジェクトからユーザーの基本的なプロフィール情報を取得できます。ユーザーを管理するをご覧ください。 Firebase Realtime Database と Cloud Storage のセキュリティ ルールでは、ログイン済みユーザーの一意のユーザー ID を
auth変数から取得し、それを使用して、ユーザーがアクセスできるデータを制御できます。
既存のユーザー アカウントに認証プロバイダの認証情報をリンクすることで、ユーザーは複数の認証プロバイダを使用してアプリにログインできるようになります。
ユーザーのログアウトを行うには、signOut: を呼び出します。
Swift
let firebaseAuth = Auth.auth()
do {
  try firebaseAuth.signOut()
} catch let signOutError as NSError {
  print("Error signing out: %@", signOutError)
}
Objective-C
NSError *signOutError;
BOOL status = [[FIRAuth auth] signOut:&signOutError];
if (!status) {
  NSLog(@"Error signing out: %@", signOutError);
  return;
}
さまざまな認証エラーに対応できるようにエラー処理コードを追加することもできます。エラーの処理をご覧ください。