
คุณสามารถอนุญาตให้ผู้ใช้ตรวจสอบสิทธิ์กับ Firebase โดยใช้บัญชี Google ของตนเองได้ด้วยการผสานรวม Google Sign-In เข้ากับแอป
ก่อนเริ่มต้น
ใช้ Swift Package Manager เพื่อติดตั้งและจัดการทรัพยากร Dependency ของ Firebase
- เปิดโปรเจ็กต์แอปใน Xcode แล้วไปที่ File > Add Packages
- เมื่อได้รับข้อความแจ้ง ให้เพิ่มที่เก็บ Firebase Apple Platforms SDK ดังนี้
- เลือกไลบรารี Firebase Authentication
- เพิ่มแฟล็ก
-ObjCลงในส่วน Other Linker Flags ของการตั้งค่าบิลด์ของเป้าหมาย - เมื่อเสร็จแล้ว Xcode จะเริ่มจับคู่ข้อมูลและดาวน์โหลด ทรัพยากร Dependency ในเบื้องหลังโดยอัตโนมัติ
https://github.com/firebase/firebase-ios-sdk.git
เพิ่ม Google Sign-In SDK ลงในโปรเจ็กต์
เปิดโปรเจ็กต์แอปใน Xcode แล้วไปที่ File > Add Packages
เมื่อได้รับข้อความแจ้ง ให้เพิ่มที่เก็บ Google Sign-In SDK ดังนี้
https://github.com/google/GoogleSignIn-iOSเมื่อเสร็จแล้ว Xcode จะเริ่มจับคู่ข้อมูลและดาวน์โหลดทรัพยากร Dependency ในเบื้องหลังโดยอัตโนมัติ
เปิดใช้ Google Sign-In สำหรับโปรเจ็กต์ Firebase
หากต้องการอนุญาตให้ผู้ใช้ลงชื่อเข้าใช้โดยใช้ Google Sign-In คุณต้องเปิดใช้ผู้ให้บริการ Google Sign-In สำหรับโปรเจ็กต์ Firebase ก่อน โดยทำดังนี้
ในคอนโซล Firebase ให้ไปที่ความปลอดภัย > การตรวจสอบสิทธิ์
ในแท็บวิธีการลงชื่อเข้าใช้ ให้เปิดใช้ผู้ให้บริการ Google
คลิกบันทึก
ดาวน์โหลดสำเนาใหม่ของไฟล์
GoogleService-Info.plistของโปรเจ็กต์ แล้วคัดลอกไฟล์ดังกล่าวลงในโปรเจ็กต์ Xcode เขียนทับเวอร์ชันที่มีอยู่ด้วยเวอร์ชันใหม่ (ดู เพิ่ม Firebase ลงในโปรเจ็กต์ iOS)
นำเข้าไฟล์ส่วนหัวที่จำเป็น
ขั้นแรก คุณต้องนำเข้าไฟล์ส่วนหัวของ Firebase SDK และ Google Sign-In SDK ลงในแอป
Swift
import FirebaseAuth
import GoogleSignIn
Objective-C
@import FirebaseCore;
@import GoogleSignIn;
นำ Google Sign-In ไปใช้
นำ Google Sign-In ไปใช้โดยทำตามขั้นตอนต่อไปนี้ ดูรายละเอียดเกี่ยวกับการใช้ Google Sign-In กับ iOS ได้ในเอกสารประกอบสำหรับนักพัฒนาแอป Google Sign-In
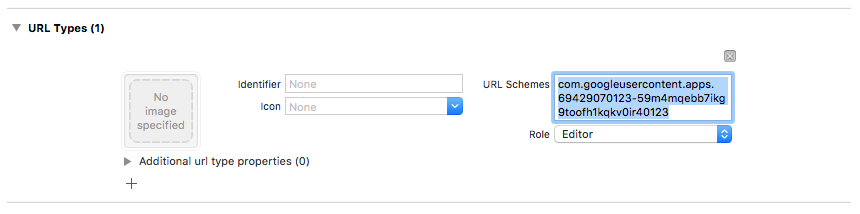
- เพิ่ม URL Scheme ที่กำหนดเองลงในโปรเจ็กต์ Xcode โดยทำดังนี้
- เปิดการกำหนดค่าโปรเจ็กต์โดยคลิกชื่อโปรเจ็กต์ในมุมมองแบบต้นไม้ทางด้านซ้าย เลือกแอปจากส่วน TARGETS แล้ว เลือกแท็บ Info และขยายส่วน URL Types
- คลิกปุ่ม + แล้วเพิ่ม URL Scheme สำหรับ Client ID แบบย้อนกลับ
หากต้องการค้นหาค่านี้ ให้เปิดไฟล์การกำหนดค่า
GoogleService-Info.plist REVERSED_CLIENT_IDคัดลอกค่าของคีย์ดังกล่าว แล้ววางลงในช่อง URL Schemes ในหน้าการกำหนดค่า ปล่อยช่องอื่นๆ ไว้โดยไม่ต้องแก้ไขเมื่อเสร็จแล้ว การกำหนดค่าควรมีลักษณะคล้ายกับตัวอย่างต่อไปนี้ (แต่มีค่าเฉพาะของแอปพลิเคชัน)
- กำหนดค่าออบเจ็กต์
FirebaseAppในเมธอดapplication:didFinishLaunchingWithOptions:ของ App DelegateSwift
// Use Firebase library to configure APIs
FirebaseApp.configure()
Objective-C
// Use Firebase library to configure APIs
[FIRApp configure];
- ใช้เมธอด
application:openURL:options:ของ App Delegate เมธอดควรเรียกเมธอดhandleURLของGIDSignInอินสแตนซ์ ซึ่งจะจัดการ URL ที่ แอปพลิเคชันได้รับอย่างเหมาะสมเมื่อสิ้นสุดกระบวนการตรวจสอบสิทธิ์Swift
func scene(_ scene: UIScene, openURLContexts URLContexts: Set<UIOpenURLContext>) {
  // ...
}
  return GIDSignIn.sharedInstance.handle(url)
}
Objective-C
- (BOOL)application:(nonnull UIApplication *)application
            openURL:(nonnull NSURL *)url
            options:(nonnull NSDictionary<NSString *, id> *)options {
  return [[GIDSignIn sharedInstance] handleURL:url];
}
- ส่งตัวควบคุมมุมมองที่แสดงและ Client ID ของแอปไปยังเมธอด
signInของผู้ให้บริการ Google Sign-In แล้วสร้างข้อมูลเข้าสู่ระบบการตรวจสอบสิทธิ์ Firebase จากโทเค็นการตรวจสอบสิทธิ์ Google ที่ได้Swift
guard let clientID = FirebaseApp.app()?.options.clientID else { return }

// Create Google Sign In configuration object.
let config = GIDConfiguration(clientID: clientID)
GIDSignIn.sharedInstance.configuration = config

// Start the sign in flow!
GIDSignIn.sharedInstance.signIn(withPresenting: viewController) { result, error in
  guard error == nil else {
    // ...
    return
  }

  guard let user = result?.user,
        let idToken = user.idToken?.tokenString
  else {
    // ...
    return
  }

  let credential = GoogleAuthProvider.credential(withIDToken: idToken,
                                                 accessToken: user.accessToken.tokenString)
  self.signIn(with: credential)
}
Objective-C
GIDConfiguration *config = [[GIDConfiguration alloc] initWithClientID:[FIRApp defaultApp].options.clientID];
[GIDSignIn.sharedInstance setConfiguration:config];

__weak __auto_type weakSelf = self;
[GIDSignIn.sharedInstance signInWithPresentingViewController:self
      completion:^(GIDSignInResult * _Nullable result, NSError * _Nullable error) {
  __auto_type strongSelf = weakSelf;
  if (strongSelf == nil) { return; }

  if (error == nil) {
    FIRAuthCredential *credential =
    [FIRGoogleAuthProvider credentialWithIDToken:result.user.idToken.tokenString
                                     accessToken:result.user.accessToken.tokenString];
    // ...
  } else {
    // ...
  }
}];
- เพิ่ม
GIDSignInButtonลงใน Storyboard, ไฟล์ XIB หรือ สร้างอินสแตนซ์แบบเป็นโปรแกรม หากต้องการเพิ่มปุ่มลงใน Storyboard หรือไฟล์ XIB ให้เพิ่มมุมมองแล้วตั้งค่าคลาสที่กำหนดเองเป็นGIDSignInButton - ไม่บังคับ: หากต้องการปรับแต่งปุ่ม ให้ทำดังนี้
Swift
- ประกาศปุ่มลงชื่อเข้าใช้เป็นพร็อพเพอร์ตี้ในตัวควบคุมมุมมอง
@IBOutlet weak var signInButton: GIDSignInButton!
- เชื่อมต่อปุ่มกับพร็อพเพอร์ตี้
signInButtonที่คุณเพิ่ง ประกาศ - ปรับแต่งปุ่มโดยตั้งค่าพร็อพเพอร์ตี้ของ GIDSignInButton ออบเจ็กต์
Objective-C
- ประกาศปุ่มลงชื่อเข้าใช้เป็น
พร็อพเพอร์ตี้ในไฟล์ส่วนหัวของตัวควบคุมมุมมอง
@property(weak, nonatomic) IBOutlet GIDSignInButton *signInButton;
- เชื่อมต่อปุ่มกับพร็อพเพอร์ตี้
signInButtonที่คุณเพิ่ง ประกาศ - ปรับแต่งปุ่มโดยตั้งค่าพร็อพเพอร์ตี้ของ GIDSignInButton ออบเจ็กต์
- ประกาศปุ่มลงชื่อเข้าใช้เป็นพร็อพเพอร์ตี้ในตัวควบคุมมุมมอง
ตรวจสอบสิทธิ์กับ Firebase
สุดท้าย ให้ดำเนินการตามขั้นตอนการเข้าสู่ระบบ Firebase ให้เสร็จสมบูรณ์ด้วยข้อมูลเข้าสู่ระบบการตรวจสอบสิทธิ์ที่สร้างขึ้น ในขั้นตอนก่อนหน้า
Swift
Auth.auth().signIn(with: credential) { result, error in
  guard error == nil else {
    // ...
    return
  }

  // At this point, our user is signed in
}
Objective-C
[[FIRAuth auth] signInWithCredential:credential
                          completion:^(FIRAuthDataResult * _Nullable authResult,
                                       NSError * _Nullable error) {
    if (isMFAEnabled && error && error.code == FIRAuthErrorCodeSecondFactorRequired) {
      FIRMultiFactorResolver *resolver = error.userInfo[FIRAuthErrorUserInfoMultiFactorResolverKey];
      NSMutableString *displayNameString = [NSMutableString string];
      for (FIRMultiFactorInfo *tmpFactorInfo in resolver.hints) {
        [displayNameString appendString:tmpFactorInfo.displayName];
        [displayNameString appendString:@" "];
      }
      [self showTextInputPromptWithMessage:[NSString stringWithFormat:@"Select factor to sign in\n%@", displayNameString]
                           completionBlock:^(BOOL userPressedOK, NSString *_Nullable displayName) {
       FIRPhoneMultiFactorInfo* selectedHint;
       for (FIRMultiFactorInfo *tmpFactorInfo in resolver.hints) {
         if ([displayName isEqualToString:tmpFactorInfo.displayName]) {
           selectedHint = (FIRPhoneMultiFactorInfo *)tmpFactorInfo;
         }
       }
       [FIRPhoneAuthProvider.provider
        verifyPhoneNumberWithMultiFactorInfo:selectedHint
        UIDelegate:nil
        multiFactorSession:resolver.session
        completion:^(NSString * _Nullable verificationID, NSError * _Nullable error) {
          if (error) {
            [self showMessagePrompt:error.localizedDescription];
          } else {
            [self showTextInputPromptWithMessage:[NSString stringWithFormat:@"Verification code for %@", selectedHint.displayName]
                                 completionBlock:^(BOOL userPressedOK, NSString *_Nullable verificationCode) {
             FIRPhoneAuthCredential *credential =
                 [[FIRPhoneAuthProvider provider] credentialWithVerificationID:verificationID
                                                              verificationCode:verificationCode];
             FIRMultiFactorAssertion *assertion = [FIRPhoneMultiFactorGenerator assertionWithCredential:credential];
             [resolver resolveSignInWithAssertion:assertion completion:^(FIRAuthDataResult * _Nullable authResult, NSError * _Nullable error) {
               if (error) {
                 [self showMessagePrompt:error.localizedDescription];
               } else {
                 NSLog(@"Multi factor finanlize sign in succeeded.");
               }
             }];
           }];
          }
        }];
     }];
    }
  else if (error) {
    // ...
    return;
  }
  // User successfully signed in. Get user data from the FIRUser object
  if (authResult == nil) { return; }
  FIRUser *user = authResult.user;
  // ...
}];
ขั้นตอนถัดไป
หลังจากที่ผู้ใช้ลงชื่อเข้าใช้เป็นครั้งแรก ระบบจะสร้างบัญชีผู้ใช้ใหม่และลิงก์กับข้อมูลเข้าสู่ระบบที่ผู้ใช้ลงชื่อเข้าใช้ด้วย เช่น ชื่อผู้ใช้และรหัสผ่าน หมายเลขโทรศัพท์ หรือข้อมูลผู้ให้บริการตรวจสอบสิทธิ์ ระบบจะจัดเก็บบัญชีใหม่นี้ไว้เป็นส่วนหนึ่งของโปรเจ็กต์ Firebase และใช้เพื่อระบุผู้ใช้ในทุกแอปของโปรเจ็กต์ได้ ไม่ว่าผู้ใช้จะลงชื่อเข้าใช้ด้วยวิธีใดก็ตาม
-
ในแอป คุณสามารถรับข้อมูลโปรไฟล์พื้นฐานของผู้ใช้จากออบเจ็กต์
Userดูจัดการผู้ใช้ ใน Firebase Realtime Database และ Cloud Storage กฎความปลอดภัย คุณสามารถ รับ User ID ที่ไม่ซ้ำกันของผู้ใช้ที่ลงชื่อเข้าใช้จากตัวแปร
authและใช้ตัวแปรดังกล่าวเพื่อควบคุมข้อมูลที่ผู้ใช้เข้าถึงได้
คุณสามารถอนุญาตให้ผู้ใช้ลงชื่อเข้าใช้แอปโดยใช้ผู้ให้บริการตรวจสอบสิทธิ์หลายรายได้ด้วยการลิงก์ข้อมูลเข้าสู่ระบบของผู้ให้บริการตรวจสอบสิทธิ์กับบัญชีผู้ใช้ที่มีอยู่
หากต้องการออกจากระบบของผู้ใช้ ให้เรียก
signOut:
Swift
let firebaseAuth = Auth.auth()
do {
  try firebaseAuth.signOut()
} catch let signOutError as NSError {
  print("Error signing out: %@", signOutError)
}
Objective-C
NSError *signOutError;
BOOL status = [[FIRAuth auth] signOut:&signOutError];
if (!status) {
  NSLog(@"Error signing out: %@", signOutError);
  return;
}
นอกจากนี้ คุณอาจต้องการเพิ่มโค้ดการจัดการข้อผิดพลาดสำหรับข้อผิดพลาดในการตรวจสอบสิทธิ์ทั้งหมด ดูจัดการข้อผิดพลาด