
ウェブベースの汎用 OAuth ログインをアプリに統合し、Firebase SDK を使用してエンドツーエンドのログインフローを実行することで、ユーザーが Firebase での認証に Microsoft Azure Active Directory などの OAuth プロバイダを使用できるようになります。
始める前に
Microsoft アカウント(Azure Active Directory アカウントや Microsoft の個人アカウント)を使用してユーザーをログインさせるには、まず Firebase プロジェクトのログイン プロバイダとして Microsoft を有効にする必要があります。
- Apple プロジェクトに Firebase を追加します。
- Firebase コンソールで [Auth] セクションを開きます。
- [Sign-in method] タブで、[Microsoft] プロバイダを有効にします。
- そのプロバイダのデベロッパー コンソールで取得したクライアント ID とクライアント シークレットをプロバイダ構成に追加します。
- クイックスタート: Azure Active Directory v2.0 エンドポイントを使用してアプリを登録するの手順で、Microsoft OAuth クライアントを登録します。 このエンドポイントは、Azure Active Directory アカウントだけでなく、Microsoft の個人アカウントを使用したログインもサポートしています。Azure Active Directory v2.0 に関する詳細をご確認ください。
- こうしたプロバイダにアプリを登録するときは、必ずプロジェクトの
*.firebaseapp.comドメインをアプリのリダイレクト ドメインとして登録してください。
- [保存] をクリックします。
Firebase SDK を使用したログインフローの処理
Firebase Apple プラットフォーム SDK でログインフローを処理する手順は次のとおりです。
Xcode プロジェクトにカスタム URL スキームを追加します。
- プロジェクト構成を開きます(左側のツリービューでプロジェクト名をダブルクリックします)。[TARGETS] セクションでアプリを選択し、[Info] タブを開いて [URL Types] セクションを展開します。
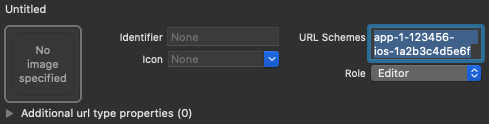
- [+] ボタンをクリックし、エンコードされたアプリ ID を URL スキームとして追加します。エンコードされたアプリ ID は、Firebase コンソールの [全般設定] ページで、iOS アプリのセクションで確認できます。その他のフィールドは空白にしておきます。
完了すると、構成は次のようになります(ただし、値はアプリケーションによって異なります)。
プロバイダ ID OAuthProvider を使用して、OAuthProvider のインスタンスを作成します。
Swift
var provider = OAuthProvider(providerID: "microsoft.com")
Objective-C
FIROAuthProvider *provider = [FIROAuthProvider providerWithProviderID:@"microsoft.com"];
省略可: OAuth リクエストと一緒に送信したい追加のカスタム OAuth パラメータを指定します。
Swift
    provider.customParameters = [
      "prompt": "consent",
      "login_hint": "user@firstadd.onmicrosoft.com"
    ]
Objective-C
[provider setCustomParameters:@{@"prompt": @"consent", @"login_hint": @"user@firstadd.onmicrosoft.com"}];
Microsoft がサポートするパラメータについては、Microsoft の OAuth に関するドキュメントをご覧ください。
setCustomParametersで Firebase の必須パラメータを渡すことはできません。該当するパラメータは、client_id、response_type、redirect_uri、state、scope、response_mode です。Azure AD テナントのわかりやすいドメイン名またはテナントの GUID 識別子を使用して、特定の Azure AD テナントのユーザーのみがアプリケーションにログインするようにできます。これは、カスタム パラメータ オブジェクトの「tenant」フィールドを指定することによって実行できます。
Swift
    provider.customParameters = [
      // Optional "tenant" parameter in case you are using an Azure AD
      // tenant. eg. '8eaef023-2b34-4da1-9baa-8bc8c9d6a490' or
      // 'contoso.onmicrosoft.com' or "common" for tenant-independent
      // tokens. The default value is "common".
      "tenant": "TENANT_ID"
    ]
Objective-C
    // Optional "tenant" parameter in case you are using an Azure AD tenant.
    // eg. '8eaef023-2b34-4da1-9baa-8bc8c9d6a490' or
    // 'contoso.onmicrosoft.com' or "common" for tenant-independent tokens.
    // The default value is "common".
    provider.customParameters = @{@"tenant": @"TENANT_ID"};
省略可: 認証プロバイダにリクエストする、基本的なプロフィール以外の追加の OAuth 2.0 スコープを指定します。
Swift
provider.scopes = ["mail.read", "calendars.read"]
Objective-C
[provider setScopes:@[@"mail.read", @"calendars.read"]];
詳しくは、Microsoft のアクセス許可と同意に関するドキュメントをご覧ください。
省略可: アプリがユーザーに reCAPTCHA を表示する際の
SFSafariViewControllerまたはUIWebViewの提示方法をカスタマイズするには、AuthUIDelegateプロトコルに従ったカスタムクラスを作成して、そのクラスをcredentialWithUIDelegateに渡します。OAuth プロバイダ オブジェクトを使用して Firebase での認証を行います。
Swift
    // Replace nil with the custom class that conforms to AuthUIDelegate
    // you created in last step to use a customized web view.
    provider.getCredentialWith(nil) { credential, error in
      if error != nil {
        // Handle error.
      }
      if credential != nil {
        Auth().signIn(with: credential) { authResult, error in
          if error != nil {
            // Handle error.
          }
          // User is signed in.
          // IdP data available in authResult.additionalUserInfo.profile.
          // OAuth access token can also be retrieved:
          // (authResult.credential as? OAuthCredential)?.accessToken
          // OAuth ID token can also be retrieved:
          // (authResult.credential as? OAuthCredential)?.idToken
        }
      }
    }
Objective-C
    [provider getCredentialWithUIDelegate:nil
                               completion:^(FIRAuthCredential *_Nullable credential, NSError *_Nullable error) {
      if (error) {
       // Handle error.
      }
      if (credential) {
        [[FIRAuth auth] signInWithCredential:credential
                                  completion:^(FIRAuthDataResult *_Nullable authResult, NSError *_Nullable error) {
          if (error) {
            // Handle error.
          }
          // User is signed in.
          // IdP data available in authResult.additionalUserInfo.profile.
          // OAuth access token can also be retrieved:
          // ((FIROAuthCredential *)authResult.credential).accessToken
          // OAuth ID token can also be retrieved:
          // ((FIROAuthCredential *)authResult.credential).idToken
        }];
      }
    }];
OAuth アクセス トークンを使用して、Microsoft Graph API を呼び出せます。
たとえば、基本的なプロフィール情報を取得するには、
Authorizationヘッダーにアクセス トークンを渡して REST API を呼び出します。https://graph.microsoft.com/v1.0/me
Firebase Auth でサポートされている他のプロバイダとは異なり、Microsoft では写真の URL が提供されないため、代わりにプロフィール写真のバイナリデータを Microsoft Graph API を介してリクエストする必要があります。
OAuth アクセス トークンに加えて、ユーザーの OAuth ID トークンも
OAuthCredentialオブジェクトから取得できます。ID トークン内のsubクレームはアプリ固有のものであり、Firebase Auth で使用される連携ユーザー識別子(user.providerData[0].uidを通じてアクセス可能)とは一致しません。代わりにoidクレーム フィールドを使用する必要があります。Azure AD テナントを使用してログインする場合は、oidクレームと完全に一致します。ただし、テナント以外のケースについては、oidフィールドはパディングされます。連携 ID が4b2eabcdefghijklの場合、oidの形式は00000000-0000-0000-4b2e-abcdefghijklのようになります。上の例ではログインフローを中心に説明していますが、
linkWithCredentialを使用して Microsoft プロバイダを既存のユーザーにリンクすることもできます。たとえば、複数のプロバイダを同じユーザーにリンクして、どれでもログインを可能にできます。Swift
    Auth().currentUser.link(withCredential: credential) { authResult, error in
      if error != nil {
        // Handle error.
      }
      // Microsoft credential is linked to the current user.
      // IdP data available in authResult.additionalUserInfo.profile.
      // OAuth access token can also be retrieved:
      // (authResult.credential as? OAuthCredential)?.accessToken
      // OAuth ID token can also be retrieved:
      // (authResult.credential as? OAuthCredential)?.idToken
    }
Objective-C
    [[FIRAuth auth].currentUser
        linkWithCredential:credential
                completion:^(FIRAuthDataResult * _Nullable authResult, NSError * _Nullable error) {
      if (error) {
        // Handle error.
      }
      // Microsoft credential is linked to the current user.
      // IdP data available in authResult.additionalUserInfo.profile.
      // OAuth access token can also be retrieved:
      // ((FIROAuthCredential *)authResult.credential).accessToken
      // OAuth ID token can also be retrieved:
      // ((FIROAuthCredential *)authResult.credential).idToken
    }];
同じパターンを
reauthenticateWithCredentialでも使用できます。これは、ログインしてから短時間のうちに行うべき機密性の高い操作のために、最新の認証情報を取得するのに使われます。Swift
    Auth().currentUser.reauthenticateWithCredential(withCredential: credential) { authResult, error in
      if error != nil {
        // Handle error.
      }
      // User is re-authenticated with fresh tokens minted and
      // should be able to perform sensitive operations like account
      // deletion and email or password update.
      // IdP data available in result.additionalUserInfo.profile.
      // Additional OAuth access token can also be retrieved:
      // (authResult.credential as? OAuthCredential)?.accessToken
      // OAuth ID token can also be retrieved:
      // (authResult.credential as? OAuthCredential)?.idToken
    }
Objective-C
    [[FIRAuth auth].currentUser
        reauthenticateWithCredential:credential
                          completion:^(FIRAuthDataResult * _Nullable authResult, NSError * _Nullable error) {
      if (error) {
        // Handle error.
      }
      // User is re-authenticated with fresh tokens minted and
      // should be able to perform sensitive operations like account
      // deletion and email or password update.
      // IdP data available in result.additionalUserInfo.profile.
      // Additional OAuth access token can also be retrieved:
      // ((FIROAuthCredential *)authResult.credential).accessToken
      // OAuth ID token can also be retrieved:
      // ((FIROAuthCredential *)authResult.credential).idToken
    }];
ユーザーが初めてログインすると、新しいユーザー アカウントが作成され、ユーザーがログインに使用した認証情報(ユーザー名とパスワード、電話番号、または認証プロバイダ情報)にアカウントがリンクされます。この新しいアカウントは Firebase プロジェクトの一部として保存され、ユーザーのログイン方法にかかわらず、プロジェクトのすべてのアプリでユーザーを識別するために使用できます。
-
アプリでは、
Userオブジェクトからユーザーの基本的なプロフィール情報を取得できます。ユーザーを管理するをご覧ください。 Firebase Realtime Database と Cloud Storage のセキュリティ ルールでは、ログイン済みユーザーの一意のユーザー ID を
auth変数から取得し、それを使用して、ユーザーがアクセスできるデータを制御できます。
既存のユーザー アカウントに認証プロバイダの認証情報をリンクすることで、ユーザーは複数の認証プロバイダを使用してアプリにログインできるようになります。
ユーザーのログアウトを行うには、signOut: を呼び出します。
Swift
let firebaseAuth = Auth.auth()
do {
  try firebaseAuth.signOut()
} catch let signOutError as NSError {
  print("Error signing out: %@", signOutError)
}
Objective-C
NSError *signOutError;
BOOL status = [[FIRAuth auth] signOut:&signOutError];
if (!status) {
  NSLog(@"Error signing out: %@", signOutError);
  return;
}
さまざまな認証エラーに対応できるようにエラー処理コードを追加することもできます。エラーの処理をご覧ください。