
您可以透過 Firebase Authentication 將簡訊傳送至使用者手機,讓使用者登入。使用者透過簡訊中的一次性代碼登入。
如要為應用程式新增電話號碼登入功能,最簡單的方法是使用 FirebaseUI,其中包含可置入的登入小工具,可實作電話號碼登入、密碼登入和聯合登入的登入流程。本文說明如何使用 Firebase SDK 導入手機號碼登入流程。
事前準備
- 如果尚未將應用程式連結至 Firebase 專案,請從 Firebase 控制台進行連結。
-
使用 Swift Package Manager 安裝及管理 Firebase 依附元件。
- 在 Xcode 中保持開啟應用程式專案,然後依序點選「File」(檔案) 和「Add Packages」(新增 Package)。
- 系統提示時,請新增 Firebase Apple 平台 SDK 存放區:
- 選擇 Firebase Authentication 程式庫。
- 將
-ObjC標記新增至目標建構設定的「Other Linker Flags」 部分。 - 完成後,Xcode 會自動開始在背景中解析並下載依附元件。
https://github.com/firebase/firebase-ios-sdk.git
安全疑慮
僅使用電話號碼驗證雖然方便,但安全性不如其他可用方法,因為電話號碼很容易在使用者之間轉移。此外,在有多個使用者設定檔的裝置上,只要能接收簡訊,任何使用者都能使用裝置的電話號碼登入帳戶。
如果應用程式採用電話號碼登入方式,請一併提供更安全的登入方式,並告知使用者使用電話號碼登入的安全性考量。
為 Firebase 專案啟用電話號碼登入功能
如要透過簡訊登入使用者,請先為 Firebase 專案啟用電話號碼登入方法:
- 在 Firebase 控制台中,依序前往「安全性」 > 「驗證」。
- 在「登入方式」分頁中,啟用「電話」登入供應商。
-
針對要允許或拒絕傳送簡訊的區域設定政策。設定簡訊區域政策有助於保護應用程式,防範簡訊濫用行為。對於新專案,預設政策不允許任何區域。
- 在 Firebase 控制台中,依序前往「安全性」 >「驗證」 >「設定」分頁標籤。
- 在「簡訊區域政策」部分,設定簡訊區域政策。
啟用應用程式驗證
如要使用電話號碼驗證功能,Firebase 必須能夠驗證電話號碼登入要求是否來自您的應用程式。Firebase Firebase Authentication 可透過兩種方式達成此目的:
- 無聲 APNs 通知:當您在裝置上首次使用電話號碼登入使用者時,Firebase Authentication 會透過無聲推播通知將權杖傳送至裝置。如果應用程式成功收到 Firebase 的通知,即可繼續進行電話號碼登入程序。
對於 iOS 8.0 以上版本,無聲通知不需要使用者明確同意,因此使用者在應用程式中拒絕接收 APNs 通知,不會影響無聲通知。因此,導入 Firebase 電話號碼驗證時,應用程式不需要要求使用者授予接收推播通知的權限。
- reCAPTCHA 驗證:如果無法傳送或接收無聲推播通知 (例如使用者已停用應用程式的背景重新整理功能,或是在 iOS 模擬器上測試應用程式),Firebase Authentication 會使用 reCAPTCHA 驗證完成手機登入流程。使用者通常不必回答任何問題,即可完成 reCAPTCHA 驗證。
如果無聲推播通知設定正確,只有極少數使用者會遇到 reCAPTCHA 流程。不過,無論是否提供無聲推播通知,您都應確保電話號碼登入功能正常運作。
開始接收低擾式通知
如要啟用 APNs 通知,以便搭配 Firebase Authentication 使用,請按照下列步驟操作:
- 在 Xcode 中,為專案 啟用推播通知。
-
將 APNs 驗證金鑰上傳至 Firebase。如果沒有 APNs 驗證金鑰,請務必在 Apple 開發人員會員中心建立。
-
在 Firebase 控制台中,依序前往「設定」
>「一般」。然後按一下「雲端通訊」分頁標籤。 - 在「iOS 應用程式設定」下方的「APN 驗證金鑰」中,按一下「上傳」,上傳開發或正式版驗證金鑰,或同時上傳兩者。至少須提供一個。
- 瀏覽至您儲存金鑰的位置,選取金鑰,然後按一下「開啟」。新增金鑰的 ID (可在 Apple Developer Member Center 中取得),然後按一下「上傳」。
如果您已有 APN 憑證,可以改為上傳憑證。
-
在 Firebase 控制台中,依序前往「設定」
- 在 Xcode 中, 為專案啟用「Background Modes」功能,然後選取「Background fetch」和「Remote notifications」模式的核取方塊。
設定 reCAPTCHA 驗證
如要啟用 Firebase SDK 的 reCAPTCHA 驗證功能,請按照下列步驟操作:
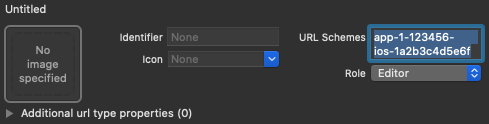
- 在 Xcode 專案中新增自訂網址配置:
- 開啟專案設定:在左側樹狀檢視中,按兩下專案名稱。從「目標」部分選取應用程式,然後選取「資訊」分頁標籤,並展開「網址類型」部分。
-
按一下 +按鈕,然後將已編碼的應用程式 ID 新增為網址配置。將其他欄位留空。
您可以在 Firebase 控制台中找到編碼後的應用程式 ID:依序前往「
設定 」>「一般」分頁標籤,然後向下捲動至「您的應用程式」部分,即可查看 iOS 應用程式的詳細資料。完成後,您的設定應如下所示 (但會使用應用程式專屬值):
- 選用:如要在向使用者顯示 reCAPTCHA 時自訂應用程式呈現
SFSafariViewController的方式,請建立符合AuthUIDelegate協定的自訂類別,並將其傳遞至verifyPhoneNumber(_:uiDelegate:completion:)。
將驗證碼傳送至使用者的手機
如要啟動電話號碼登入程序,請向使用者顯示介面,提示他們提供電話號碼,然後呼叫 verifyPhoneNumber(_:uiDelegate:completion:),要求 Firebase 透過簡訊將驗證碼傳送至使用者的手機:
-
取得使用者的電話號碼。
法律要求因國家/地區而異,但為了提供最佳做法並讓使用者瞭解相關資訊,您應告知使用者,如果他們使用電話號碼登入,可能會收到驗證簡訊,且須支付一般簡訊費用。
- 呼叫
verifyPhoneNumber(_:uiDelegate:completion:),並將使用者的電話號碼傳遞給該函式。Swift
PhoneAuthProvider.provider()
  .verifyPhoneNumber(phoneNumber, uiDelegate: nil) { verificationID, error in
      if let error = error {
        self.showMessagePrompt(error.localizedDescription)
        return
      }
      // Sign in using the verificationID and the code sent to the user
      // ...
  }
Objective-C
[[FIRPhoneAuthProvider provider] verifyPhoneNumber:userInput
                                        UIDelegate:nil
                                        completion:^(NSString * _Nullable verificationID, NSError * _Nullable error) {
  if (error) {
    [self showMessagePrompt:error.localizedDescription];
    return;
  }
  // Sign in using the verificationID and the code sent to the user
  // ...
}];
verifyPhoneNumber方法是可重入的:如果您多次呼叫此方法 (例如在檢視區塊的onAppear方法中),除非原始要求逾時,否則verifyPhoneNumber方法不會傳送第二則簡訊。當您呼叫
verifyPhoneNumber(_:uiDelegate:completion:)時,Firebase 會傳送無聲推播通知給應用程式,或向使用者發出 reCAPTCHA 驗證問題。應用程式收到通知或使用者完成 reCAPTCHA 驗證問題後,Firebase 會將內含驗證碼的簡訊傳送至指定電話號碼,並將驗證 ID 傳遞至完成函式。您需要驗證碼和驗證 ID,才能登入使用者帳戶。您也可以透過 Auth 執行個體上的
languageCode屬性指定驗證語言,讓 Firebase 傳送的簡訊採用該語言。Swift
 // Change language code to french.
 Auth.auth().languageCode = "fr";
Objective-C
 // Change language code to french.
 [FIRAuth auth].languageCode = @"fr";
-
儲存驗證 ID,並在應用程式載入時還原。這麼做可確保在使用者完成登入流程前 (例如切換到訊息應用程式時),即使應用程式終止,您仍有有效的驗證 ID。
您可以透過任何方式保留驗證 ID。簡單的方法是使用
NSUserDefaults物件儲存驗證 ID:Swift
UserDefaults.standard.set(verificationID, forKey: "authVerificationID")
Objective-C
NSUserDefaults *defaults = [NSUserDefaults standardUserDefaults];
[defaults setObject:verificationID forKey:@"authVerificationID"];
接著,您可以還原儲存的值:
Swift
let verificationID = UserDefaults.standard.string(forKey: "authVerificationID")
Objective-C
NSString *verificationID = [defaults stringForKey:@"authVerificationID"];
如果對 verifyPhoneNumber(_:uiDelegate:completion:) 的呼叫成功,您可以在使用者收到簡訊驗證碼時,提示他們輸入驗證碼。
使用驗證碼登入使用者
使用者在簡訊中提供驗證碼給應用程式後,請從驗證碼和驗證 ID 建立 FIRPhoneAuthCredential 物件,並將該物件傳遞至 signInWithCredential:completion:,藉此登入使用者。
- 向使用者索取驗證碼。
- 根據驗證碼和驗證 ID 建立
FIRPhoneAuthCredential物件。Swift
let credential = PhoneAuthProvider.provider().credential(
  withVerificationID: verificationID,
  verificationCode: verificationCode
)
Objective-C
FIRAuthCredential *credential = [[FIRPhoneAuthProvider provider]
    credentialWithVerificationID:verificationID
                verificationCode:userInput];
- 使用
FIRPhoneAuthCredential物件登入使用者:Swift
Auth.auth().signIn(with: credential) { authResult, error in
    if let error = error {
      let authError = error as NSError
      if isMFAEnabled, authError.code == AuthErrorCode.secondFactorRequired.rawValue {
        // The user is a multi-factor user. Second factor challenge is required.
        let resolver = authError
          .userInfo[AuthErrorUserInfoMultiFactorResolverKey] as! MultiFactorResolver
        var displayNameString = ""
        for tmpFactorInfo in resolver.hints {
          displayNameString += tmpFactorInfo.displayName ?? ""
          displayNameString += " "
        }
        self.showTextInputPrompt(
          withMessage: "Select factor to sign in\n\(displayNameString)",
          completionBlock: { userPressedOK, displayName in
            var selectedHint: PhoneMultiFactorInfo?
            for tmpFactorInfo in resolver.hints {
              if displayName == tmpFactorInfo.displayName {
                selectedHint = tmpFactorInfo as? PhoneMultiFactorInfo
              }
            }
            PhoneAuthProvider.provider()
              .verifyPhoneNumber(with: selectedHint!, uiDelegate: nil,
                                 multiFactorSession: resolver
                                   .session) { verificationID, error in
                if error != nil {
                  print(
                    "Multi factor start sign in failed. Error: \(error.debugDescription)"
                  )
                } else {
                  self.showTextInputPrompt(
                    withMessage: "Verification code for \(selectedHint?.displayName ?? "")",
                    completionBlock: { userPressedOK, verificationCode in
                      let credential: PhoneAuthCredential? = PhoneAuthProvider.provider()
                        .credential(withVerificationID: verificationID!,
                                    verificationCode: verificationCode!)
                      let assertion: MultiFactorAssertion? = PhoneMultiFactorGenerator
                        .assertion(with: credential!)
                      resolver.resolveSignIn(with: assertion!) { authResult, error in
                        if error != nil {
                          print(
                            "Multi factor finanlize sign in failed. Error: \(error.debugDescription)"
                          )
                        } else {
                          self.navigationController?.popViewController(animated: true)
                        }
                      }
                    }
                  )
                }
              }
          }
        )
      } else {
        self.showMessagePrompt(error.localizedDescription)
        return
      }
      // ...
      return
    }
    // User is signed in
    // ...
}
Objective-C
[[FIRAuth auth] signInWithCredential:credential
                          completion:^(FIRAuthDataResult * _Nullable authResult,
                                       NSError * _Nullable error) {
    if (isMFAEnabled && error && error.code == FIRAuthErrorCodeSecondFactorRequired) {
      FIRMultiFactorResolver *resolver = error.userInfo[FIRAuthErrorUserInfoMultiFactorResolverKey];
      NSMutableString *displayNameString = [NSMutableString string];
      for (FIRMultiFactorInfo *tmpFactorInfo in resolver.hints) {
        [displayNameString appendString:tmpFactorInfo.displayName];
        [displayNameString appendString:@" "];
      }
      [self showTextInputPromptWithMessage:[NSString stringWithFormat:@"Select factor to sign in\n%@", displayNameString]
                           completionBlock:^(BOOL userPressedOK, NSString *_Nullable displayName) {
       FIRPhoneMultiFactorInfo* selectedHint;
       for (FIRMultiFactorInfo *tmpFactorInfo in resolver.hints) {
         if ([displayName isEqualToString:tmpFactorInfo.displayName]) {
           selectedHint = (FIRPhoneMultiFactorInfo *)tmpFactorInfo;
         }
       }
       [FIRPhoneAuthProvider.provider
        verifyPhoneNumberWithMultiFactorInfo:selectedHint
        UIDelegate:nil
        multiFactorSession:resolver.session
        completion:^(NSString * _Nullable verificationID, NSError * _Nullable error) {
          if (error) {
            [self showMessagePrompt:error.localizedDescription];
          } else {
            [self showTextInputPromptWithMessage:[NSString stringWithFormat:@"Verification code for %@", selectedHint.displayName]
                                 completionBlock:^(BOOL userPressedOK, NSString *_Nullable verificationCode) {
             FIRPhoneAuthCredential *credential =
                 [[FIRPhoneAuthProvider provider] credentialWithVerificationID:verificationID
                                                              verificationCode:verificationCode];
             FIRMultiFactorAssertion *assertion = [FIRPhoneMultiFactorGenerator assertionWithCredential:credential];
             [resolver resolveSignInWithAssertion:assertion completion:^(FIRAuthDataResult * _Nullable authResult, NSError * _Nullable error) {
               if (error) {
                 [self showMessagePrompt:error.localizedDescription];
               } else {
                 NSLog(@"Multi factor finanlize sign in succeeded.");
               }
             }];
           }];
          }
        }];
     }];
    }
  else if (error) {
    // ...
    return;
  }
  // User successfully signed in. Get user data from the FIRUser object
  if (authResult == nil) { return; }
  FIRUser *user = authResult.user;
  // ...
}];
使用虛構電話號碼進行測試
您可以使用 Firebase 控制台,為開發作業設定虛構電話號碼。使用虛構電話號碼測試可帶來以下好處:
- 測試電話號碼驗證功能,不會耗用配額。
- 測試電話號碼驗證功能,不必傳送實際的簡訊。
- 使用相同電話號碼連續執行測試,不會受到節流限制。如果審查人員在測試時使用相同的電話號碼,這樣就能盡量避免在應用程式商店審查程序中遭到拒絕。
- 在開發環境中輕鬆測試,不必費心進行額外作業,例如在 iOS 模擬器或 Android 模擬器中開發,不必使用 Google Play 服務。
- 編寫整合測試時,不會受到通常在正式環境中對真實電話號碼套用的安全檢查阻礙。
虛構電話號碼必須符合下列規定:
- 請務必使用虛構的電話號碼,且該號碼不得已存在。 Firebase Authentication 不允許您將真實使用者使用的現有電話號碼設為測試號碼。 其中一個方法是使用以 555 為前置號碼的美國測試電話號碼,例如: +1 650-555-3434
- 電話號碼的長度和其他限制必須符合正確格式。系統仍會對這些號碼進行與真實使用者電話號碼相同的驗證。
- 您最多可以新增 10 個開發用電話號碼。
- 使用難以猜測的測試電話號碼/代碼,並經常變更。
建立虛構的電話號碼和驗證碼
- 在 Firebase 控制台中,依序前往「安全性」>「驗證」。
- 在「登入方式」分頁中,啟用「電話」登入供應商 (如果尚未啟用)。
- 展開「測試用電話號碼」部分。
-
提供要測試的電話號碼,例如:
+1 650-555-3434。 -
提供該號碼的 6 位數驗證碼,例如:
654321。 - 為每個號碼按一下「新增」。如要刪除電話號碼和驗證碼,請將游標懸停在對應列上,然後按一下垃圾桶圖示。
手動測試
您可以在應用程式中直接使用虛構電話號碼。這樣一來,您就能在開發階段執行手動測試,而不必擔心配額問題或節流。您也可以直接從 iOS 模擬器或 Android Emulator 進行測試,不必安裝 Google Play 服務。
提供虛構電話號碼並傳送驗證碼時,系統不會傳送實際的簡訊。請改為提供先前設定的驗證碼,完成登入程序。
登入完成後,系統會使用該電話號碼建立 Firebase 使用者。使用者行為和屬性與實際電話號碼使用者相同,存取 Realtime Database/Cloud Firestore 和其他服務的方式也相同。在此程序中產生的 ID 權杖,與實際電話號碼使用者的簽章相同。
如要進一步限制存取權,也可以透過這些使用者的自訂聲明設定測試角色,將他們區分為虛假使用者。
整合測試
除了手動測試之外,Firebase Authentication 也提供 API,協助您編寫電話號碼驗證測試的整合測試。這些 API 會停用應用程式驗證,方法是停用網頁中的 reCAPTCHA 需求,以及 iOS 中的無聲推播通知。因此您可以在這些流程中進行自動化測試,且實作起來更加容易。此外,這些 API 也可協助您在 Android 上測試即時驗證流程。
在 iOS 上,必須先將 appVerificationDisabledForTesting 設定為 TRUE,才能呼叫 verifyPhoneNumber。這項程序不需要任何 APNs 權杖,也不會在背景傳送無聲推播通知,因此在模擬器中測試時會更加輕鬆。這麼做也會停用 reCAPTCHA 備用流程。
請注意,停用應用程式驗證後,使用非虛構電話號碼將無法完成登入。這個 API 只能使用虛構電話號碼。
Swift
let phoneNumber = "+16505554567"

// This test verification code is specified for the given test phone number in the developer console.
let testVerificationCode = "123456"

Auth.auth().settings.isAppVerificationDisabledForTesting = true
PhoneAuthProvider.provider().verifyPhoneNumber(phoneNumber, uiDelegate:nil) {
                                                            verificationID, error in
    if let error = error {
      // Handles error
      self.handleError(error)
      return
    }
    let credential = PhoneAuthProvider.provider().credential(withVerificationID: verificationID ?? "",
                                                               verificationCode: testVerificationCode)
    Auth.auth().signIn(with: credential) { authResult, error in
      if let error = error {
        // Handles error
        self.handleError(error)
        return
      }
      _user = authResult.user
    };
};
Objective-C
NSString *phoneNumber = @"+16505554567";

// This test verification code is specified for the given test phone number in the developer console.
NSString *testVerificationCode = @"123456";

[FIRAuth auth].settings.appVerificationDisabledForTesting = YES;
[[FIRPhoneAuthProvider provider] verifyPhoneNumber:phoneNumber
                                        completion:^(NSString *_Nullable verificationID,
                                                     NSError *_Nullable error) {
    if (error) {
      // Handles error
      [self handleError:error];
      return;
    }
    FIRAuthCredential *credential =
        [FIRPhoneAuthProvider credentialWithVerificationID:verificationID
                                          verificationCode:testVerificationCode];
    [FIRAuth auth] signInWithAndRetrieveDataWithCredential:credential
                                                completion:^(FIRUser *_Nullable user,
                                                             NSError *_Nullable error) {
      if (error) {
        // Handles error
        [self handleError:error];
        return;
      }
      _user = user;
    }];
}];
附錄:使用手機登入,不必進行 Swizzling
Firebase Authentication 會使用方法交換,自動取得應用程式的 APNs 權杖、處理 Firebase 傳送至應用程式的無聲推播通知,以及在驗證期間自動攔截 reCAPTCHA 驗證頁面的自訂配置重新導向。
如不想使用 Swizzling,請在應用程式的 Info.plist 檔案中新增 FirebaseAppDelegateProxyEnabled 標記,並將其設為 NO,即可停用這項功能。請注意,將這個旗標設為 NO
也會停用其他 Firebase 產品 (包括 Firebase Cloud Messaging) 的交換。
如果停用 Swizzling,您必須明確將 APNs 裝置權杖、推播通知和自訂配置重新導向網址傳遞至 Firebase Authentication。
如果您要建構 SwiftUI 應用程式,也應明確將 APNs 裝置權杖、推播通知和自訂配置重新導向網址傳遞至 Firebase Authentication。
如要取得 APNs 裝置權杖,請實作 application(_:didRegisterForRemoteNotificationsWithDeviceToken:) 方法,並在該方法中將裝置權杖傳遞至 Auth 的 setAPNSToken(_:type:) 方法。
Swift
func application(_ application: UIApplication, didRegisterForRemoteNotificationsWithDeviceToken deviceToken: Data) {
  // Pass device token to auth
  Auth.auth().setAPNSToken(deviceToken, type: .unknown)

  // Further handling of the device token if needed by the app
  // ...
}
Objective-C
- (void)application:(UIApplication *)application
    didRegisterForRemoteNotificationsWithDeviceToken:(NSData *)deviceToken {
  // Pass device token to auth.
  [[FIRAuth auth] setAPNSToken:deviceToken type:FIRAuthAPNSTokenTypeProd];
  // Further handling of the device token if needed by the app.
}
如要處理推播通知,請在 application(_:didReceiveRemoteNotification:fetchCompletionHandler:): 方法中呼叫 Auth 的 canHandleNotification(_:) 方法,檢查 Firebase 驗證相關通知。
Swift
func application(_ application: UIApplication,
    didReceiveRemoteNotification notification: [AnyHashable : Any],
    fetchCompletionHandler completionHandler: @escaping (UIBackgroundFetchResult) -> Void) {
  if Auth.auth().canHandleNotification(notification) {
    completionHandler(.noData)
    return
  }
  // This notification is not auth related; it should be handled separately.
}
Objective-C
- (void)application:(UIApplication *)application
    didReceiveRemoteNotification:(NSDictionary *)notification
          fetchCompletionHandler:(void (^)(UIBackgroundFetchResult))completionHandler {
  // Pass notification to auth and check if they can handle it.
  if ([[FIRAuth auth] canHandleNotification:notification]) {
    completionHandler(UIBackgroundFetchResultNoData);
    return;
  }
  // This notification is not auth related; it should be handled separately.
}
如要處理自訂配置重新導向網址,請實作 application(_:open:options:) 方法,並在其中將網址傳遞至 Auth 的 canHandleURL(_:) 方法。
Swift
func application(_ application: UIApplication, open url: URL,
    options: [UIApplicationOpenURLOptionsKey : Any]) -> Bool {
  if Auth.auth().canHandle(url) {
    return true
  }
  // URL not auth related; it should be handled separately.
}
Objective-C
- (BOOL)application:(UIApplication *)app
            openURL:(NSURL *)url
            options:(NSDictionary<UIApplicationOpenURLOptionsKey, id> *)options {
  if ([[FIRAuth auth] canHandleURL:url]) {
    return YES;
  }
  // URL not auth related; it should be handled separately.
}
如果您使用 SwiftUI 或 UISceneDelegate,請實作 scene(_:openURLContexts:) 方法來處理重新導向網址,並在這些方法中將網址傳遞至 Auth 的 canHandleURL(_:) 方法。
Swift
func scene(_ scene: UIScene, openURLContexts URLContexts: Set<UIOpenURLContext>) { for urlContext in URLContexts { let url = urlContext.url _ = Auth.auth().canHandle(url) } // URL not auth related; it should be handled separately. }
Objective-C
- (void)scene:(UIScene *)scene openURLContexts:(NSSet<UIOpenURLContext *> *)URLContexts { for (UIOpenURLContext *urlContext in URLContexts) { [FIRAuth.auth canHandleURL:urlContext.url]; // URL not auth related; it should be handled separately. } }
後續步驟
使用者首次登入後,系統會建立新的使用者帳戶,並連結至使用者登入時使用的憑證 (即使用者名稱和密碼、電話號碼或驗證供應商資訊)。這個新帳戶會儲存在 Firebase 專案中,可用於識別專案中每個應用程式的使用者,無論使用者登入方式為何。
在 Firebase Realtime Database和 Cloud Storage 安全規則中,您可以從
auth變數取得已登入使用者的專屬使用者 ID, 並使用該 ID 控制使用者可存取的資料。
您可以將驗證供應商憑證連結至現有使用者帳戶,允許使用者透過多個驗證供應商登入應用程式。
如要登出使用者,請呼叫
signOut:。
Swift
let firebaseAuth = Auth.auth()
do {
  try firebaseAuth.signOut()
} catch let signOutError as NSError {
  print("Error signing out: %@", signOutError)
}
Objective-C
NSError *signOutError;
BOOL status = [[FIRAuth auth] signOut:&signOutError];
if (!status) {
  NSLog(@"Error signing out: %@", signOutError);
  return;
}
您也可以新增錯誤處理程式碼,處理各種驗證錯誤。請參閱「處理錯誤」。