提示工程是應用程式開發人員影響生成式 AI 模型輸出內容的主要方式。舉例來說,使用 LLM 時,您可以設計提示,影響模型回應的語氣、格式、長度和其他特徵。
您撰寫這些提示的方式取決於所使用的模型;為某個模型撰寫的提示,在用於其他模型時可能無法發揮良好成效。同樣地,您設定的模型參數 (溫度、前 K 個等) 也會根據模型而對輸出結果產生不同的影響。
要讓這三個因素 (模型、模型參數和提示) 共同產生您想要的輸出內容,通常需要大量的疊代和實驗。Genkit 提供名為 Dotprompt 的程式庫和檔案格式,旨在讓這個迭代作業更快速、更方便。
Dotprompt 的設計理念是「提示是程式碼」。您可以將提示與其所用模型和模型參數定義為與應用程式程式碼分開的項目。接著,您 (或甚至是未參與編寫應用程式程式碼的人員) 可以使用 Genkit Developer UI 快速重複執行提示和模型參數。提示功能運作正常後,您可以將其匯入應用程式,並使用 Genkit 執行。
提示定義會分別放在副檔名為 .prompt 的檔案中。以下是這些檔案的範例:
---
model: googleai/gemini-1.5-flash
config:
  temperature: 0.9
input:
  schema:
    location: string
    style?: string
    name?: string
  default:
    location: a restaurant
---

You are the world's most welcoming AI assistant and are currently working at {{location}}.

Greet a guest{{#if name}} named {{name}}{{/if}}{{#if style}} in the style of {{style}}{{/if}}.
三條線段中的部分內容是 YAML 前言,類似 GitHub Markdown 和 Jekyll 所使用的前言格式;檔案的其餘部分是提示,可選擇使用 Handlebars 範本。以下各節將進一步說明組成 .prompt 檔案的各個部分,以及如何使用這些部分。
事前準備
閱讀本頁之前,請先熟悉「使用 AI 模型產生內容」頁面所涵蓋的內容。
如果您想執行本頁的程式碼範例,請先完成「開始使用」指南中的步驟。所有範例都假設您已將 Genkit 設為專案中的依附元件。
建立提示檔案
雖然 Dotprompt 提供多種不同的方式建立及載入提示,但專案的提示會以 .prompt 檔案的形式,在單一目錄 (或其子目錄) 中進行整理,因此 Dotprompt 可為這類專案提供最佳化服務。本節將說明如何使用此建議設定建立及載入提示。
建立提示目錄
Dotprompt 程式庫會在專案根目錄的目錄中尋找提示,並自動載入找到的任何提示。根據預設,這個目錄的名稱為 prompts。舉例來說,如果使用預設的目錄名稱,專案結構可能會像這樣:
your-project/
├── lib/
├── node_modules/
├── prompts/
│   └── hello.prompt
├── src/
├── package-lock.json
├── package.json
└── tsconfig.json
如果您想使用其他目錄,可以在設定 Genkit 時指定:
const ai = genkit({
  promptDir: './llm_prompts',
  // (Other settings...)
});
建立提示檔案
您可以透過兩種方式建立 .prompt 檔案:使用文字編輯器或開發人員 UI。
使用文字編輯器
如果您想使用文字編輯器建立提示檔案,請在提示目錄中建立使用 .prompt 副檔名的文字檔,例如 prompts/hello.prompt。
以下是提示檔案的最小範例:
---
model: vertexai/gemini-1.5-flash
---
You are the world's most welcoming AI assistant. Greet the user and offer your assistance.
虛線內的部分是 YAML 前言,類似於 GitHub Markdown 和 Jekyll 使用的前言格式;檔案的其餘部分是提示,可選擇使用 Handlebars 範本。前言部分為選用項目,但大多數提示檔案至少會包含指定模型的中繼資料。本頁的其餘部分會說明如何進一步使用 Dotprompt 功能,並在提示檔案中使用 Dotprompt 功能。
使用開發人員 UI
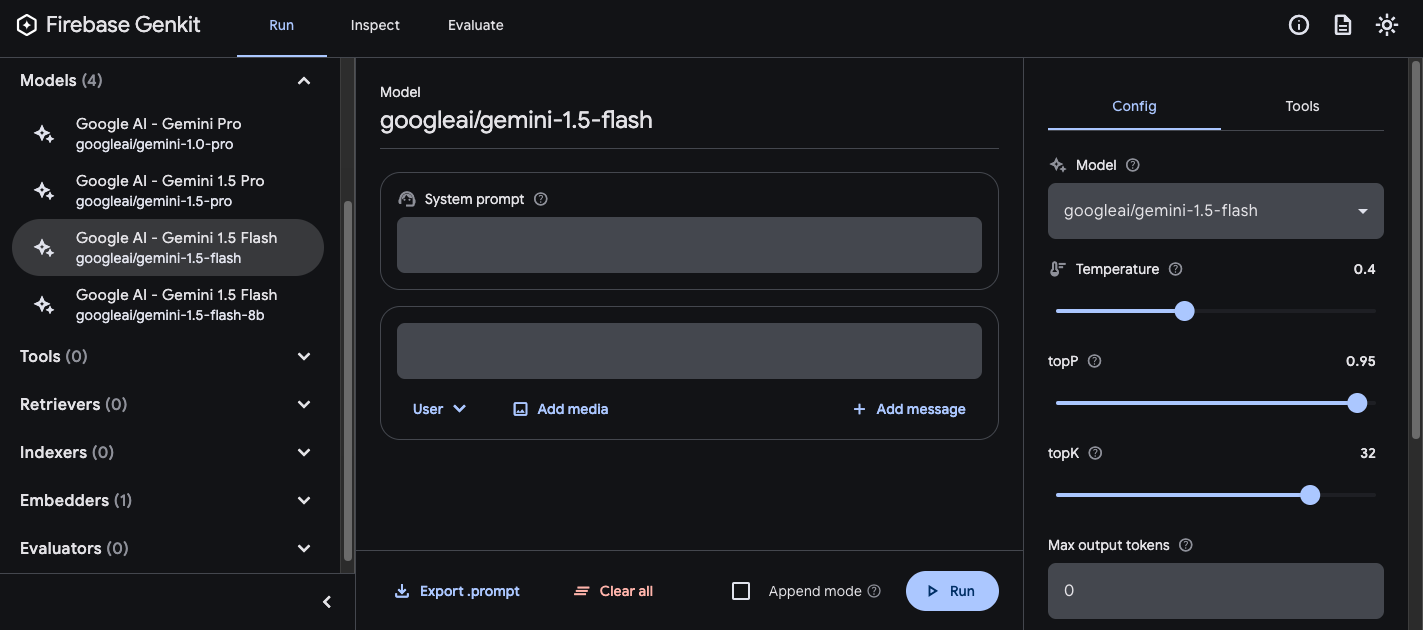
您也可以在開發人員 UI 中使用模型執行程式建立提示檔案。請先從應用程式程式碼開始,匯入 Genkit 程式庫,並將其設為使用您感興趣的模型外掛程式。例如:
import { genkit } from 'genkit';

// Import the model plugins you want to use.
import { googleAI } from '@genkit-ai/googleai';

const ai = genkit({
  // Initialize and configure the model plugins.
  plugins: [
    googleAI({
      apiKey: 'your-api-key', // Or (preferred): export GOOGLE_GENAI_API_KEY=...
    }),
  ],
});
檔案中含有其他程式碼也沒關係,但上述程式碼是必要條件。
在同一個專案中載入開發人員 UI:
genkit start -- tsx --watch src/your-code.ts在「Models」(模型) 部分,從外掛程式提供的模型清單中選擇要使用的模型。

接著,請嘗試使用提示和設定,直到獲得滿意的結果為止。準備就緒後,請按下「Export」按鈕,並將檔案儲存至提示目錄。
執行提示
建立提示檔案後,您可以透過應用程式程式碼或 Genkit 提供的工具執行這些檔案。無論您要如何執行提示,請先從應用程式程式碼開始,匯入 Genkit 程式庫和您感興趣的模型外掛程式。例如:
import { genkit } from 'genkit';

// Import the model plugins you want to use.
import { googleAI } from '@genkit-ai/googleai';

const ai = genkit({
  // Initialize and configure the model plugins.
  plugins: [
    googleAI({
      apiKey: 'your-api-key', // Or (preferred): export GOOGLE_GENAI_API_KEY=...
    }),
  ],
});
檔案中含有其他程式碼也沒關係,但上述程式碼是必要條件。如果您將提示儲存在預設目錄以外的目錄中,請務必在設定 Genkit 時指定該目錄。
透過程式碼執行提示
如要使用提示,請先使用 prompt('file_name') 方法載入提示:
const helloPrompt = ai.prompt('hello');
載入後,您可以像呼叫函式一樣呼叫提示:
const response = await helloPrompt();

// Alternatively, use destructuring assignments to get only the properties
// you're interested in:
const { text } = await helloPrompt();
可呼叫的提示會採用兩個選用參數:提示的輸入內容 (請參閱下文的「指定輸入結構定義」一節),以及與 generate() 方法相似的設定物件。例如:
const response2 = await helloPrompt(
  // Prompt input:
  { name: 'Ted' },

  // Generation options:
  {
    config: {
      temperature: 0.4,
    },
  }
);
您傳遞至提示呼叫的任何參數,都會覆寫提示檔案中指定的相同參數。
如要瞭解可用的選項,請參閱「運用 AI 模型產生內容」。
使用開發人員 UI
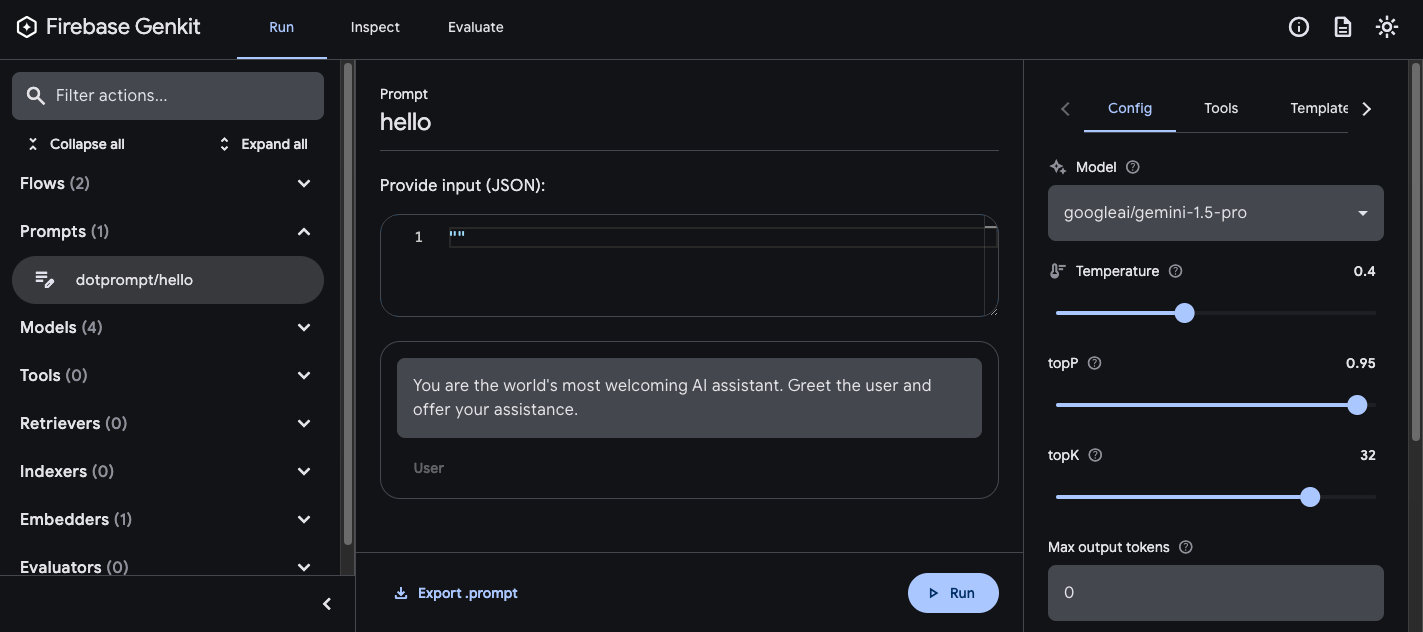
在精進應用程式提示時,您可以在 Genkit 開發人員 UI 中執行提示,快速重複提示和模型設定,不受應用程式程式碼影響。
從專案目錄載入開發人員 UI:
genkit start -- tsx --watch src/your-code.ts
將提示載入開發人員 UI 後,您可以使用不同的輸入值執行提示,並嘗試變更提示用語或設定參數,瞭解對模型輸出內容的影響。滿意結果後,您可以按一下「匯出提示」按鈕,將修改過的提示儲存回專案目錄。
模型設定
您可以在提示檔案的前置區塊中,選擇為提示指定模型設定值:
---
model: googleai/gemini-1.5-flash
config:
  temperature: 1.4
  topK: 50
  topP: 0.4
  maxOutputTokens: 400
  stopSequences:
    -   "<end>"
    -   "<fin>"
---
這些值會直接對應至可呼叫提示所接受的 config 參數:
const response3 = await helloPrompt(
  {},
  {
    config: {
      temperature: 1.4,
      topK: 50,
      topP: 0.4,
      maxOutputTokens: 400,
      stopSequences: ['<end>', '<fin>'],
    },
  }
);
如要瞭解可用的選項,請參閱「運用 AI 模型產生內容」。
輸入和輸出結構定義
您可以在前置資料部分定義提示的輸入和輸出結構定義:
---
model: googleai/gemini-1.5-flash
input:
  schema:
    theme?: string
  default:
    theme: "pirate"
output:
  schema:
    dishname: string
    description: string
    calories: integer
    allergens(array): string
---
Invent a menu item for a {{theme}} themed restaurant.
這些結構定義的使用方式與傳遞至 generate() 要求或流程定義的結構定義非常相似。舉例來說,上述定義的提示會產生結構化輸出內容:
const menuPrompt = ai.prompt('menu');
const { data } = await menuPrompt({ theme: 'medieval' });

const dishName = data['dishname'];
const description = data['description'];
您可以在 .prompt 檔案中定義結構定義,方法有以下幾種:Dotprompt 專屬的結構定義格式 Picoschema;標準 JSON 結構定義;或應用程式程式碼中定義的結構定義參照。以下各節將詳細說明這些選項。
Picoschema
上例中的結構定義是以 Picoschema 格式定義。Picoschema 是一種簡潔的 YAML 最佳化結構定義格式,可讓您輕鬆定義 LLM 使用情形中結構最重要的屬性。以下是較長的架構範例,其中指定應用程式可能儲存的文章相關資訊:
schema:
  title: string # string, number, and boolean types are defined like this
  subtitle?: string # optional fields are marked with a `?`
  draft?: boolean, true when in draft state
  status?(enum, approval status): [PENDING, APPROVED]
  date: string, the date of publication e.g. '2024-04-09' # descriptions follow a comma
  tags(array, relevant tags for article): string # arrays are denoted via parentheses
  authors(array):
    name: string
    email?: string
  metadata?(object): # objects are also denoted via parentheses
    updatedAt?: string, ISO timestamp of last update
    approvedBy?: integer, id of approver
  extra?: any, arbitrary extra data
  (*): string, wildcard field
上述結構定義等同於下列 TypeScript 介面:
interface Article {
  title: string;
  subtitle?: string | null;
  /** true when in draft state */
  draft?: boolean | null;
  /** approval status */
  status?: 'PENDING' | 'APPROVED' | null;
  /** the date of publication e.g. '2024-04-09' */
  date: string;
  /** relevant tags for article */
  tags: string[];
  authors: {
    name: string;
    email?: string | null;
  }[];
  metadata?: {
    /** ISO timestamp of last update */
    updatedAt?: string | null;
    /** id of approver */
    approvedBy?: number | null;
  } | null;
  /** arbitrary extra data */
  extra?: any;
  /** wildcard field */

}
Picoschema 支援純量型別 string、integer、number、boolean 和 any。物件、陣列和列舉會以欄位名稱後方的括號表示。
除非使用 ? 表示屬性為選用屬性,否則 Picoschema 定義的物件都會要求所有屬性,且不允許額外屬性。當屬性標示為選填時,也會設為可為空值,讓 LLM 更寬鬆地返回空值,而非省略欄位。
在物件定義中,您可以使用特殊鍵 (*) 宣告「萬用字」欄位定義。這會比對任何額外屬性,但不包含明確鍵所提供的屬性。
JSON 結構定義
Picoschema 不支援完整 JSON 結構定義的許多功能。如果您需要更強大的結構定義,可以改為提供 JSON 結構定義:
output:
  schema:
    type: object
    properties:
      field1:
        type: number
        minimum: 20
在程式碼中定義的 Zod 結構定義
除了直接在 .prompt 檔案中定義結構定義外,您也可以依名稱參照已在 defineSchema() 註冊的結構定義。如果您使用的是 TypeScript,這個方法可讓您在使用提示時,充分利用該語言的靜態類型檢查功能。
如要註冊結構定義,請按照下列步驟操作:
import { z } from 'genkit';

const MenuItemSchema = ai.defineSchema(
  'MenuItemSchema',
  z.object({
    dishname: z.string(),
    description: z.string(),
    calories: z.coerce.number(),
    allergens: z.array(z.string()),
  })
);
在提示中提供已註冊結構定義的名稱:
---
model: googleai/gemini-1.5-flash-latest
output:
  schema: MenuItemSchema
---
Dotprompt 程式庫會自動將名稱解析為底層已註冊的 Zod 結構定義。接著,您可以使用結構定義來為 Dotprompt 的輸出內容指定強型別:
const menuPrompt = ai.prompt<
  z.ZodTypeAny, // Input schema
  typeof MenuItemSchema, // Output schema
  z.ZodTypeAny // Custom options schema
>('menu');
const { data } = await menuPrompt({ theme: 'medieval' });

// Now data is strongly typed as MenuItemSchema:
const dishName = data?.dishname;
const description = data?.description;
提示範本
.prompt 檔案中位於前置內容 (如有) 後方的部分就是提示本身,會傳遞至模型。雖然這項提示可以是簡單的文字字串,但您通常會將使用者輸入內容納入提示中。如要這麼做,您可以使用 Handlebars 模板語言指定提示。提示範本可包含預留位置,參照提示輸入結構定義的值。
您在輸入和輸出結構定義的部分已看到這項功能的實際運作情形:
---
model: googleai/gemini-1.5-flash
config:
  temperature: 1.4
  topK: 50
  topP: 0.4
  maxOutputTokens: 400
  stopSequences:
    -   "<end>"
    -   "<fin>"
---
在這個範例中,當您執行提示時,Handlebars 運算式 {{theme}} 會解析為輸入內容的 theme 屬性值。如要將輸入內容傳遞至提示,請呼叫提示,如以下範例所示:
const menuPrompt = ai.prompt('menu');
const { data } = await menuPrompt({ theme: 'medieval' });
請注意,由於輸入結構定義宣告 theme 屬性為選用屬性並提供預設值,因此您可以省略該屬性,系統會使用預設值解決提示。
Handlebars 範本也支援一些有限的邏輯結構。舉例來說,您可以使用 Handlebars 的 #if 輔助程式定義提示,而非提供預設值:
---
model: googleai/gemini-1.5-flash
input:
  schema:
    theme?: string
---
Invent a menu item for a {{#if theme}}{{theme}} themed{{/if}} restaurant.
在這個範例中,如果未指定 theme 屬性,提示會顯示為「Invent a menu item for a restaurant」。
如需所有內建邏輯輔助函式的相關資訊,請參閱 Handlebars 說明文件。
除了輸入結構定義定義的屬性外,範本也可以參照 Genkit 自動定義的值。接下來幾節將說明這些自動定義的值,以及如何使用這些值。
多則訊息提示
根據預設,Dotprompt 會建構具有「user」角色的單一訊息。不過,某些提示最好以多個訊息組合的方式呈現,例如系統提示。
{{role}} 輔助程式提供簡單的方法,可建構多個訊息提示:
---
model: vertexai/gemini-1.5-flash
input:
  schema:
    userQuestion: string
---
{{role "system"}}
You are a helpful AI assistant that really loves to talk about food. Try to work
food items into all of your conversations.
{{role "user"}}
{{userQuestion}}
多模態提示
如果模型支援多模態輸入 (例如圖片和文字),您可以使用 {{media}} 輔助程式:
---
model: vertexai/gemini-1.5-flash
input:
  schema:
    photoUrl: string
---
Describe this image in a detailed paragraph:

{{media url=photoUrl}}
網址可以是 https: 或 base64 編碼的 data: URI,用於「內嵌」圖片。在程式碼中,這會是:
const multimodalPrompt = ai.prompt('multimodal');
const { text } = await multimodalPrompt({
  photoUrl: 'https://example.com/photo.jpg',
});
如要瞭解如何建構 data: 網址,請參閱「模型」頁面中的「多模態輸入」一節。
部分
區塊是可重複使用的範本,可納入任何提示中。對於共用常見行為的相關提示,部分內容特別實用。
載入提示目錄時,任何前置字串為底線 (_) 的檔案都會視為部分檔案。因此,檔案 _personality.prompt 可能包含:
You should speak like a {{#if style}}{{style}}{{else}}helpful assistant.{{/else}}.
您可以將這項資訊加入其他提示:
---
model: googleai/gemini-1.5-flash
input:
  schema:
    name: string
    style?: string
---
{{ role "system" }}
{{>personality style=style}}

{{ role "user" }}
Give the user a friendly greeting.

User's Name: {{name}}
插入的部分會使用 {{>NAME_OF_PARTIAL args...}} 語法。如果未向子項提供引數,則會以與父項提示相同的內容執行。
區塊會接受上述命名引數,或代表情境的單一位置引數。這對於轉譯清單成員等工作很有幫助。
_destination.prompt
- {{name}} ({{country}})
chooseDestination.prompt
---
model: googleai/gemini-1.5-flash-latest
input:
  schema:
    destinations(array):
      name: string
      country: string
---
Help the user decide between these vacation destinations:

{{#each destinations}}
{{>destination this}}
{{/each}}
在程式碼中定義分頁
您也可以使用 definePartial 在程式碼中定義部分:
ai.definePartial(
  'personality',
  'Talk like a {{#if style}}{{style}}{{else}}helpful assistant{{/if}}.'
);
所有提示都支援程式碼定義的部分檔案。
定義自訂輔助程式
您可以定義自訂輔助程式,用於處理提示中的資料並加以管理。輔助程式會使用 defineHelper 在全球註冊:
ai.defineHelper('shout', (text: string) => text.toUpperCase());
定義輔助程式後,您可以在任何提示中使用它:
---
model: googleai/gemini-1.5-flash
input:
  schema:
    name: string
---

HELLO, {{shout name}}!!!
提示變化版本
由於提示檔案只是文字,因此您可以 (而且應該!) 將這些檔案提交至版本管控系統,方便您輕鬆比較長期變化。通常,您只能在實際工作環境中,將經過調整的提示與現有版本並列,才能全面測試。Dotprompt 透過其變數功能支援這項功能。
如要建立變化版本,請建立 [name].[variant].prompt 檔案。舉例來說,如果您在提示中使用 Gemini 1.5 Flash,但想瞭解 Gemini 1.5 Pro 的效能是否更好,可以建立兩個檔案:
my_prompt.prompt:「baseline」提示my_prompt.gemini15pro.prompt:名為gemini15pro的變化版本
如要使用提示變化版本,請在載入時指定變化版本選項:
const myPrompt = ai.prompt('my_prompt', { variant: 'gemini15pro' });
變化版本的名稱會納入產生追蹤記錄的中繼資料,因此您可以在 Genkit 追蹤記錄檢視器中比較及對比變化版本的實際效能。
在程式碼中定義提示
到目前為止,我們討論的所有範例都假設提示是在單一目錄 (或其子目錄) 中的個別 .prompt 檔案中定義,且應用程式可在執行階段存取這些檔案。Dotprompt 是依據這種設定設計,作者認為這是整體最佳的開發人員體驗。
不過,如果您有用途不受此設定支援,也可以使用 definePrompt() 函式在程式碼中定義提示:
這個函式的第一個參數類似 .prompt 檔案的前置區塊;第二個參數可以是 Handlebars 範本字串 (如提示檔案),或傳回 GenerateRequest 的函式:
const myPrompt = ai.definePrompt(
  {
    name: 'myPrompt',
    model: 'googleai/gemini-1.5-flash',
    input: {
      schema: z.object({
        name: z.string(),
      }),
    },
  },
  'Hello, {{name}}. How are you today?'
);
const myPrompt = ai.definePrompt(
  {
    name: 'myPrompt',
    model: 'googleai/gemini-1.5-flash',
    input: {
      schema: z.object({
        name: z.string(),
      }),
    },
  },
  async (input): Promise<GenerateRequest> => {
    return {
      messages: [
        {
          role: 'user',
          content: [{ text: `Hello, ${input.name}. How are you today?` }],
        },
      ],
    };
  }
);

