
You can use Firebase Authentication to sign in a user by sending an SMS message to the user's phone. The user signs in using a one-time code contained in the SMS message.
The easiest way to add phone number sign-in to your app is to use FirebaseUI, which includes a drop-in sign-in widget that implements sign-in flows for phone number sign-in, as well as password-based and federated sign-in. This document describes how to implement a phone number sign-in flow using the Firebase SDK.
Before you begin
- If you haven't yet connected your app to your Firebase project, do so from the Firebase console.
-
Use Swift Package Manager to install and manage Firebase dependencies.
- In Xcode, with your app project open, navigate to File > Add Packages.
- When prompted, add the Firebase Apple platforms SDK repository:
- Choose the Firebase Authentication library.
- Add the
-ObjCflag to the Other Linker Flags section of your target's build settings. - When finished, Xcode will automatically begin resolving and downloading your dependencies in the background.
https://github.com/firebase/firebase-ios-sdk.git
Security concerns
Authentication using only a phone number, while convenient, is less secure than the other available methods, because possession of a phone number can be easily transferred between users. Also, on devices with multiple user profiles, any user that can receive SMS messages can sign in to an account using the device's phone number.
If you use phone number based sign-in in your app, you should offer it alongside more secure sign-in methods, and inform users of the security tradeoffs of using phone number sign-in.
Enable Phone Number sign-in for your Firebase project
To sign in users by SMS, you must first enable the Phone Number sign-in method for your Firebase project:
- In the Firebase console, go to Security > Authentication.
- In the Sign-in method tab, enable the Phone sign-in provider.
-
Set a policy on the regions to which you want to allow or deny
SMS messages to be sent. Setting an SMS region policy can help protect your
apps from SMS abuse. For new projects, the default policy allows no regions.
- In the Firebase console, go to the Security > Authentication > Settings tab.
- In the SMS region policy section, set up your SMS region policy.
Enable app verification
To use phone number authentication, Firebase must be able to verify that phone number sign-in requests are coming from your app. There are two ways Firebase Authentication accomplishes this:
- Silent APNs notifications: When you sign in a user with their
phone number for the first time on a device, Firebase Authentication sends a
token to the device using a silent push notification. If your app
successfully receives the notification from Firebase, phone number
sign-in can proceed.
For iOS 8.0 and newer, silent notifications do not require explicit user consent and is therefore unaffected by a user declining to receive APNs notifications in the app. Thus, the app does not need to request user permission to receive push notifications when implementing Firebase phone number auth.
- reCAPTCHA verification: In the event that sending or receiving a silent push notification is not possible, such as when the user has disabled background refresh for your app, or when testing your app on an iOS simulator, Firebase Authentication uses reCAPTCHA verification to complete the phone sign-in flow. The reCAPTCHA challenge can often be completed without the user having to solve anything.
When silent push notifications are properly configured, only a very small percentage of users will experience the reCAPTCHA flow. Nonetheless, you should ensure that phone number sign-in functions correctly whether or not silent push notifications are available.
Start receiving silent notifications
To enable APNs notifications for use with Firebase Authentication:
- In Xcode, enable push notifications for your project.
-
Upload your APNs authentication key to Firebase. If you don't already have an APNs authentication key, make sure to create one in the Apple Developer Member Center.
-
In the Firebase console, go to
Settings > General. Then, click the Cloud Messaging tab. - In APNs authentication key under iOS app configuration, click Upload to upload your development authentication key, or production authentication key, or both. At least one is required.
- Browse to the location where you saved your key, select it, and click Open. Add the key ID for the key (available in the Apple Developer Member Center) and click Upload.
If you already have an APNs certificate, you can upload the certificate instead.
-
In the Firebase console, go to
- In Xcode, enable the Background Modes capability for your project, and then select the checkboxes for the Background fetch and Remote notifications modes.
Set up reCAPTCHA verification
To enable the Firebase SDK to use reCAPTCHA verification:
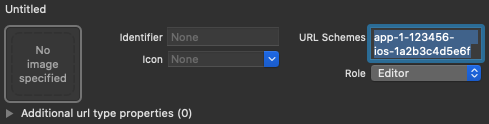
- Add custom URL schemes to your Xcode project:
- Open your project configuration: double-click the project name in the left tree view. Select your app from the TARGETS section, then select the Info tab, and expand the URL Types section.
-
Click the + button, and add your Encoded App ID as a URL scheme.
Leave the other fields blank.
You can find your Encoded App ID in the Firebase console: go to the
Settings > General tab, then scroll down to the Your apps section to view details about your iOS app.When completed, your config should look something similar to the following (but with your application-specific values):
- Optional: If you want to customize the way your app presents the
SFSafariViewControllerwhen displaying the reCAPTCHA to the user, create a custom class that conforms to theAuthUIDelegateprotocol, and pass it toverifyPhoneNumber(_:uiDelegate:completion:).
Send a verification code to the user's phone
To initiate phone number sign-in, present the user an interface that prompts
them to provide their phone number, and then call
verifyPhoneNumber(_:uiDelegate:completion:) to request that Firebase
send an authentication code to the user's phone by SMS:
-
Get the user's phone number.
Legal requirements vary, but as a best practice and to set expectations for your users, you should inform them that if they use phone sign-in, they might receive an SMS message for verification and standard rates apply.
- Call
verifyPhoneNumber(_:uiDelegate:completion:), passing to it the user's phone number.Swift
PhoneAuthProvider.provider()
  .verifyPhoneNumber(phoneNumber, uiDelegate: nil) { verificationID, error in
      if let error = error {
        self.showMessagePrompt(error.localizedDescription)
        return
      }
      // Sign in using the verificationID and the code sent to the user
      // ...
  }
Objective-C
[[FIRPhoneAuthProvider provider] verifyPhoneNumber:userInput
                                        UIDelegate:nil
                                        completion:^(NSString * _Nullable verificationID, NSError * _Nullable error) {
  if (error) {
    [self showMessagePrompt:error.localizedDescription];
    return;
  }
  // Sign in using the verificationID and the code sent to the user
  // ...
}];
The
verifyPhoneNumbermethod is reentrant: if you call it multiple times, such as in a view’sonAppearmethod, theverifyPhoneNumbermethod will not send a second SMS unless the original request has timed out.When you call
verifyPhoneNumber(_:uiDelegate:completion:), Firebase sends a silent push notification to your app, or issues a reCAPTCHA challenge to the user. After your app receives the notification or the user completes the reCAPTCHA challenge, Firebase sends an SMS message containing an authentication code to the specified phone number and passes a verification ID to your completion function. You will need both the verification code and the verification ID to sign in the user.The SMS message sent by Firebase can also be localized by specifying the auth language via the
languageCodeproperty on your Auth instance.Swift
 // Change language code to french.
 Auth.auth().languageCode = "fr";
Objective-C
 // Change language code to french.
 [FIRAuth auth].languageCode = @"fr";
-
Save the verification ID and restore it when your app loads. By doing so, you can ensure that you still have a valid verification ID if your app is terminated before the user completes the sign-in flow (for example, while switching to the SMS app).
You can persist the verification ID any way you want. A simple way is to save the verification ID with the
NSUserDefaultsobject:Swift
UserDefaults.standard.set(verificationID, forKey: "authVerificationID")
Objective-C
NSUserDefaults *defaults = [NSUserDefaults standardUserDefaults];
[defaults setObject:verificationID forKey:@"authVerificationID"];
Then, you can restore the saved value:
Swift
let verificationID = UserDefaults.standard.string(forKey: "authVerificationID")
Objective-C
NSString *verificationID = [defaults stringForKey:@"authVerificationID"];
If the call to verifyPhoneNumber(_:uiDelegate:completion:)
succeeds, you can prompt the user to type the verification code when they
receive it in the SMS message.
Sign in the user with the verification code
After the user provides your app with the verification code from the SMS
message, sign the user in by creating a FIRPhoneAuthCredential
object from the verification code and verification ID and passing that object
to signInWithCredential:completion:.
- Get the verification code from the user.
- Create a
FIRPhoneAuthCredentialobject from the verification code and verification ID.Swift
let credential = PhoneAuthProvider.provider().credential(
  withVerificationID: verificationID,
  verificationCode: verificationCode
)
Objective-C
FIRAuthCredential *credential = [[FIRPhoneAuthProvider provider]
    credentialWithVerificationID:verificationID
                verificationCode:userInput];
- Sign in the user with the
FIRPhoneAuthCredentialobject:Swift
Auth.auth().signIn(with: credential) { authResult, error in
    if let error = error {
      let authError = error as NSError
      if isMFAEnabled, authError.code == AuthErrorCode.secondFactorRequired.rawValue {
        // The user is a multi-factor user. Second factor challenge is required.
        let resolver = authError
          .userInfo[AuthErrorUserInfoMultiFactorResolverKey] as! MultiFactorResolver
        var displayNameString = ""
        for tmpFactorInfo in resolver.hints {
          displayNameString += tmpFactorInfo.displayName ?? ""
          displayNameString += " "
        }
        self.showTextInputPrompt(
          withMessage: "Select factor to sign in\n\(displayNameString)",
          completionBlock: { userPressedOK, displayName in
            var selectedHint: PhoneMultiFactorInfo?
            for tmpFactorInfo in resolver.hints {
              if displayName == tmpFactorInfo.displayName {
                selectedHint = tmpFactorInfo as? PhoneMultiFactorInfo
              }
            }
            PhoneAuthProvider.provider()
              .verifyPhoneNumber(with: selectedHint!, uiDelegate: nil,
                                 multiFactorSession: resolver
                                   .session) { verificationID, error in
                if error != nil {
                  print(
                    "Multi factor start sign in failed. Error: \(error.debugDescription)"
                  )
                } else {
                  self.showTextInputPrompt(
                    withMessage: "Verification code for \(selectedHint?.displayName ?? "")",
                    completionBlock: { userPressedOK, verificationCode in
                      let credential: PhoneAuthCredential? = PhoneAuthProvider.provider()
                        .credential(withVerificationID: verificationID!,
                                    verificationCode: verificationCode!)
                      let assertion: MultiFactorAssertion? = PhoneMultiFactorGenerator
                        .assertion(with: credential!)
                      resolver.resolveSignIn(with: assertion!) { authResult, error in
                        if error != nil {
                          print(
                            "Multi factor finanlize sign in failed. Error: \(error.debugDescription)"
                          )
                        } else {
                          self.navigationController?.popViewController(animated: true)
                        }
                      }
                    }
                  )
                }
              }
          }
        )
      } else {
        self.showMessagePrompt(error.localizedDescription)
        return
      }
      // ...
      return
    }
    // User is signed in
    // ...
}
Objective-C
[[FIRAuth auth] signInWithCredential:credential
                          completion:^(FIRAuthDataResult * _Nullable authResult,
                                       NSError * _Nullable error) {
    if (isMFAEnabled && error && error.code == FIRAuthErrorCodeSecondFactorRequired) {
      FIRMultiFactorResolver *resolver = error.userInfo[FIRAuthErrorUserInfoMultiFactorResolverKey];
      NSMutableString *displayNameString = [NSMutableString string];
      for (FIRMultiFactorInfo *tmpFactorInfo in resolver.hints) {
        [displayNameString appendString:tmpFactorInfo.displayName];
        [displayNameString appendString:@" "];
      }
      [self showTextInputPromptWithMessage:[NSString stringWithFormat:@"Select factor to sign in\n%@", displayNameString]
                           completionBlock:^(BOOL userPressedOK, NSString *_Nullable displayName) {
       FIRPhoneMultiFactorInfo* selectedHint;
       for (FIRMultiFactorInfo *tmpFactorInfo in resolver.hints) {
         if ([displayName isEqualToString:tmpFactorInfo.displayName]) {
           selectedHint = (FIRPhoneMultiFactorInfo *)tmpFactorInfo;
         }
       }
       [FIRPhoneAuthProvider.provider
        verifyPhoneNumberWithMultiFactorInfo:selectedHint
        UIDelegate:nil
        multiFactorSession:resolver.session
        completion:^(NSString * _Nullable verificationID, NSError * _Nullable error) {
          if (error) {
            [self showMessagePrompt:error.localizedDescription];
          } else {
            [self showTextInputPromptWithMessage:[NSString stringWithFormat:@"Verification code for %@", selectedHint.displayName]
                                 completionBlock:^(BOOL userPressedOK, NSString *_Nullable verificationCode) {
             FIRPhoneAuthCredential *credential =
                 [[FIRPhoneAuthProvider provider] credentialWithVerificationID:verificationID
                                                              verificationCode:verificationCode];
             FIRMultiFactorAssertion *assertion = [FIRPhoneMultiFactorGenerator assertionWithCredential:credential];
             [resolver resolveSignInWithAssertion:assertion completion:^(FIRAuthDataResult * _Nullable authResult, NSError * _Nullable error) {
               if (error) {
                 [self showMessagePrompt:error.localizedDescription];
               } else {
                 NSLog(@"Multi factor finanlize sign in succeeded.");
               }
             }];
           }];
          }
        }];
     }];
    }
  else if (error) {
    // ...
    return;
  }
  // User successfully signed in. Get user data from the FIRUser object
  if (authResult == nil) { return; }
  FIRUser *user = authResult.user;
  // ...
}];
Test with fictional phone numbers
You can set up fictional phone numbers for development using the Firebase console. Testing with fictional phone numbers provides these benefits:
- Test phone number authentication without consuming your usage quota.
- Test phone number authentication without sending an actual SMS message.
- Run consecutive tests with the same phone number without getting throttled. This minimizes the risk of rejection during App store review process if the reviewer happens to use the same phone number for testing.
- Test readily in development environments without any additional effort, such as the ability to develop in an iOS simulator or an Android emulator without Google Play Services.
- Write integration tests without being blocked by security checks normally applied on real phone numbers in a production environment.
Fictional phone numbers must meet these requirements:
- Make sure you use phone numbers that are indeed fictional, and do not already exist. Firebase Authentication does not allow you to set existing phone numbers used by real users as test numbers. One option is to use 555 prefixed numbers as US test phone numbers, for example: +1 650-555-3434
- Phone numbers have to be correctly formatted for length and other constraints. They will still go through the same validation as a real user's phone number.
- You can add up to 10 phone numbers for development.
- Use test phone numbers/codes that are hard to guess and change those frequently.
Create fictional phone numbers and verification codes
- In the Firebase console, go to Security > Authentication.
- In the Sign-in method tab, enable the Phone sign-in provider if you haven't already.
- Expand the Phone numbers for testing section.
-
Provide the phone number you want to test, for example:
+1 650-555-3434. -
Provide the 6-digit verification code for that specific number, for example:
654321. - Click Add for each number. If needed, you can delete the phone number and its code by hovering over the corresponding row and clicking the trash icon.
Manual testing
You can directly start using a fictional phone number in your application. This allows you to perform manual testing during development stages without running into quota issues or throttling. You can also test directly from an iOS simulator or Android emulator without Google Play Services installed.
When you provide the fictional phone number and send the verification code, no actual SMS is sent. Instead, you need to provide the previously configured verification code to complete the sign in.
On sign-in completion, a Firebase user is created with that phone number. The user has the same behavior and properties as a real phone number user, and can access Realtime Database/Cloud Firestore and other services the same way. The ID token minted during this process has the same signature as a real phone number user.
Another option is to set a test role via custom claims on these users to differentiate them as fake users if you want to further restrict access.
Integration testing
In addition to manual testing, Firebase Authentication provides APIs to help write integration tests for phone auth testing. These APIs disable app verification by disabling the reCAPTCHA requirement in web and silent push notifications in iOS. This makes automation testing possible in these flows and easier to implement. In addition, they help provide the ability to test instant verification flows on Android.
On iOS, the appVerificationDisabledForTesting setting has to be set to
TRUE before calling verifyPhoneNumber. This is processed without requiring
any APNs token or sending silent push notifications in the background, making it easier to test
in a simulator. This also disables the reCAPTCHA fallback flow.
Note that when app verification is disabled, using a non-fictional phone number will fail to complete sign in. Only fictional phone numbers can be used with this API.
Swift
let phoneNumber = "+16505554567"

// This test verification code is specified for the given test phone number in the developer console.
let testVerificationCode = "123456"

Auth.auth().settings.isAppVerificationDisabledForTesting = true
PhoneAuthProvider.provider().verifyPhoneNumber(phoneNumber, uiDelegate:nil) {
                                                            verificationID, error in
    if let error = error {
      // Handles error
      self.handleError(error)
      return
    }
    let credential = PhoneAuthProvider.provider().credential(withVerificationID: verificationID ?? "",
                                                               verificationCode: testVerificationCode)
    Auth.auth().signIn(with: credential) { authResult, error in
      if let error = error {
        // Handles error
        self.handleError(error)
        return
      }
      _user = authResult.user
    };
};
Objective-C
NSString *phoneNumber = @"+16505554567";

// This test verification code is specified for the given test phone number in the developer console.
NSString *testVerificationCode = @"123456";

[FIRAuth auth].settings.appVerificationDisabledForTesting = YES;
[[FIRPhoneAuthProvider provider] verifyPhoneNumber:phoneNumber
                                        completion:^(NSString *_Nullable verificationID,
                                                     NSError *_Nullable error) {
    if (error) {
      // Handles error
      [self handleError:error];
      return;
    }
    FIRAuthCredential *credential =
        [FIRPhoneAuthProvider credentialWithVerificationID:verificationID
                                          verificationCode:testVerificationCode];
    [FIRAuth auth] signInWithAndRetrieveDataWithCredential:credential
                                                completion:^(FIRUser *_Nullable user,
                                                             NSError *_Nullable error) {
      if (error) {
        // Handles error
        [self handleError:error];
        return;
      }
      _user = user;
    }];
}];
Appendix: Using phone sign-in without swizzling
Firebase Authentication uses method swizzling to automatically obtain your app's APNs token, to handle the silent push notifications that Firebase sends to your app, and to automatically intercept the custom scheme redirect from the reCAPTCHA verification page during verification.
If you prefer not to use swizzling, you can disable it by adding the flag
FirebaseAppDelegateProxyEnabled to your app's Info.plist file and
setting it to NO. Note that setting this flag to NO
also disables swizzling for other Firebase products, including
Firebase Cloud Messaging.
If you disable swizzling, you must explicitly pass the APNs device token, push notifications, and the custom scheme redirect URL to Firebase Authentication.
If you are building a SwiftUI application, you should also explicitly pass the APNs device token, push notifications, and the custom scheme redirect URL to Firebase Authentication.
To obtain the APNs device token, implement the
application(_:didRegisterForRemoteNotificationsWithDeviceToken:)
method, and in it, pass the device token to Auth's
setAPNSToken(_:type:) method.
Swift
func application(_ application: UIApplication, didRegisterForRemoteNotificationsWithDeviceToken deviceToken: Data) {
  // Pass device token to auth
  Auth.auth().setAPNSToken(deviceToken, type: .unknown)

  // Further handling of the device token if needed by the app
  // ...
}
Objective-C
- (void)application:(UIApplication *)application
    didRegisterForRemoteNotificationsWithDeviceToken:(NSData *)deviceToken {
  // Pass device token to auth.
  [[FIRAuth auth] setAPNSToken:deviceToken type:FIRAuthAPNSTokenTypeProd];
  // Further handling of the device token if needed by the app.
}
To handle push notifications, in the
application(_:didReceiveRemoteNotification:fetchCompletionHandler:):
method, check for Firebase auth related notifications by calling
Auth's canHandleNotification(_:) method.
Swift
func application(_ application: UIApplication,
    didReceiveRemoteNotification notification: [AnyHashable : Any],
    fetchCompletionHandler completionHandler: @escaping (UIBackgroundFetchResult) -> Void) {
  if Auth.auth().canHandleNotification(notification) {
    completionHandler(.noData)
    return
  }
  // This notification is not auth related; it should be handled separately.
}
Objective-C
- (void)application:(UIApplication *)application
    didReceiveRemoteNotification:(NSDictionary *)notification
          fetchCompletionHandler:(void (^)(UIBackgroundFetchResult))completionHandler {
  // Pass notification to auth and check if they can handle it.
  if ([[FIRAuth auth] canHandleNotification:notification]) {
    completionHandler(UIBackgroundFetchResultNoData);
    return;
  }
  // This notification is not auth related; it should be handled separately.
}
To handle the custom scheme redirect URL, implement the
application(_:open:options:) method, and in them, pass the URL to Auth's
canHandleURL(_:) method.
Swift
func application(_ application: UIApplication, open url: URL,
    options: [UIApplicationOpenURLOptionsKey : Any]) -> Bool {
  if Auth.auth().canHandle(url) {
    return true
  }
  // URL not auth related; it should be handled separately.
}
Objective-C
- (BOOL)application:(UIApplication *)app
            openURL:(NSURL *)url
            options:(NSDictionary<UIApplicationOpenURLOptionsKey, id> *)options {
  if ([[FIRAuth auth] canHandleURL:url]) {
    return YES;
  }
  // URL not auth related; it should be handled separately.
}
If you're using SwiftUI or UISceneDelegate, to handle the redirect URL, implement the
scene(_:openURLContexts:) method, and in them, pass the URL to Auth's
canHandleURL(_:) method.
Swift
func scene(_ scene: UIScene, openURLContexts URLContexts: Set<UIOpenURLContext>) { for urlContext in URLContexts { let url = urlContext.url _ = Auth.auth().canHandle(url) } // URL not auth related; it should be handled separately. }
Objective-C
- (void)scene:(UIScene *)scene openURLContexts:(NSSet<UIOpenURLContext *> *)URLContexts { for (UIOpenURLContext *urlContext in URLContexts) { [FIRAuth.auth canHandleURL:urlContext.url]; // URL not auth related; it should be handled separately. } }
Next steps
After a user signs in for the first time, a new user account is created and linked to the credentials—that is, the user name and password, phone number, or auth provider information—the user signed in with. This new account is stored as part of your Firebase project, and can be used to identify a user across every app in your project, regardless of how the user signs in.
-
In your apps, you can get the user's basic profile information from the
Userobject. See Manage Users. In your Firebase Realtime Database and Cloud Storage Security Rules, you can get the signed-in user's unique user ID from the
authvariable, and use it to control what data a user can access.
You can allow users to sign in to your app using multiple authentication providers by linking auth provider credentials to an existing user account.
To sign out a user, call
signOut:.
Swift
let firebaseAuth = Auth.auth()
do {
  try firebaseAuth.signOut()
} catch let signOutError as NSError {
  print("Error signing out: %@", signOutError)
}
Objective-C
NSError *signOutError;
BOOL status = [[FIRAuth auth] signOut:&signOutError];
if (!status) {
  NSLog(@"Error signing out: %@", signOutError);
  return;
}
You may also want to add error handling code for the full range of authentication errors. See Handle Errors.