開始使用 Firebase 本機模擬器套件前,請確認您已根據自家平台 (Apple、Android 或網路) 開始使用 Firebase 主題,建立 Firebase 專案、設定開發環境,以及為自家平台選取並安裝 Firebase SDK。
原型與測試
本機模擬器套件包含多個產品模擬器,如「Firebase 本機模擬器套件簡介」所述。您可以根據自己的需求,使用個別模擬器和模擬器的組合設計原型和測試,而這些模擬器與您在實際工作環境中使用的 Firebase 產品相對應。

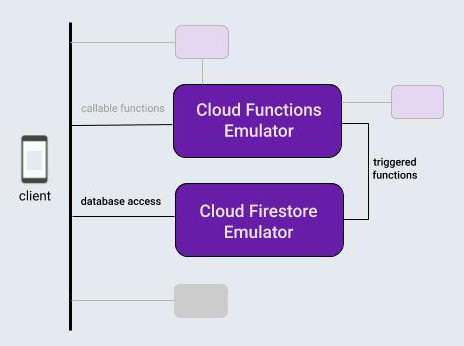
本主題為了介紹本機模擬器套件工作流程,假設您正在建構的應用程式使用一般產品組合:由該資料庫作業觸發的 Firebase 資料庫和雲端函式。
在本機初始化 Firebase 專案後,使用本機模擬器套件的開發週期一般會有三個步驟:
使用模擬器和模擬器套件 UI,以互動方式設計功能原型。
如果您使用的是資料庫模擬器或 Cloud Functions 模擬器,請執行一次性步驟,將應用程式連線至模擬器。
使用模擬器和自訂指令碼自動執行測試。
在本機初始化 Firebase 專案
curl -sL firebase.tools | bash
如果您尚未將目前的工作目錄初始化,做為 Firebase 專案,請按照畫面上的提示,指明您正使用 Cloud Functions 與 Cloud Firestore 或即時資料庫:
firebase init
您的專案目錄現在包含 Firebase 設定檔、資料庫的 Firebase 安全性規則定義檔、包含 Cloud 函式程式碼的 functions 目錄,以及其他支援檔案。
以互動方式設計原型
本機模擬器套件旨在協助您快速設計新功能的原型,而套件內建的使用者介面是最實用的原型設計工具之一。看起來像在本機執行 Firebase 控制台。
透過模擬器套件 UI,您可以疊代資料庫設計、試用涉及雲端函式的不同資料流、評估安全性規則變更、檢查記錄以確認後端服務的效能等等。接著,如果您想重新開始,可以清除資料庫,以新的設計概念重新開始。
使用下列項目啟動本機模擬器套件時即可使用:
firebase emulators:start
為了設計假應用程式的原型,請設定並測試基本的 Cloud 函式,以修改資料庫中的文字項目,並且在 Emulator 套件 UI 中建立並填入該資料庫,藉此觸發應用程式的原型。
- 在專案目錄中編輯
functions/index.js檔案,建立由資料庫寫入觸發的 Cloud 函式。使用下列程式碼片段取代現有檔案的內容。這個函式會監聽messages集合中文件的變更,將文件original欄位的內容轉換為大寫,並將結果儲存在文件的uppercase欄位。 - 使用
firebase emulators:start啟動本機模擬器套件。Cloud Functions 和資料庫模擬器會啟動,並自動設定為互通。 - 在瀏覽器中前往
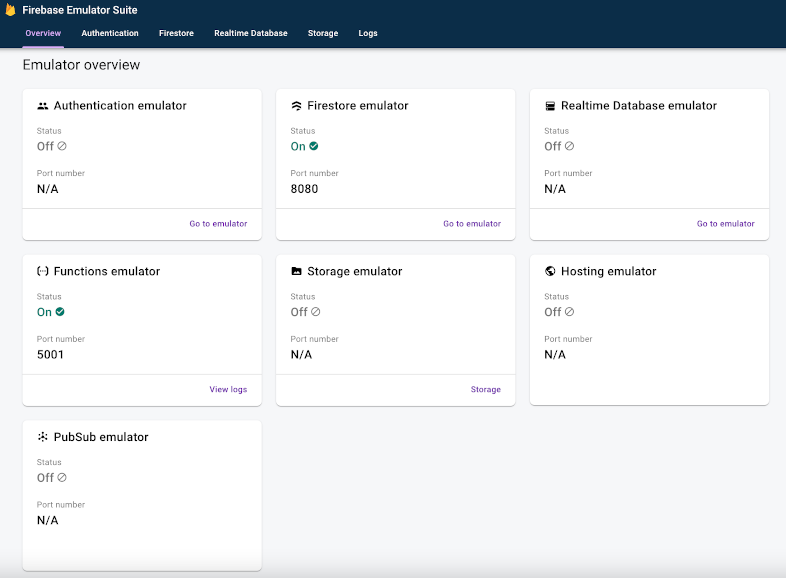
http://localhost:4000查看 UI。UI 的預設通訊埠 4000,但請檢查 Firebase CLI 輸出的終端機訊息。記下可用模擬器的狀態。在我們的案例中,Cloud Functions 和 Cloud Firestore 模擬器會開始執行。

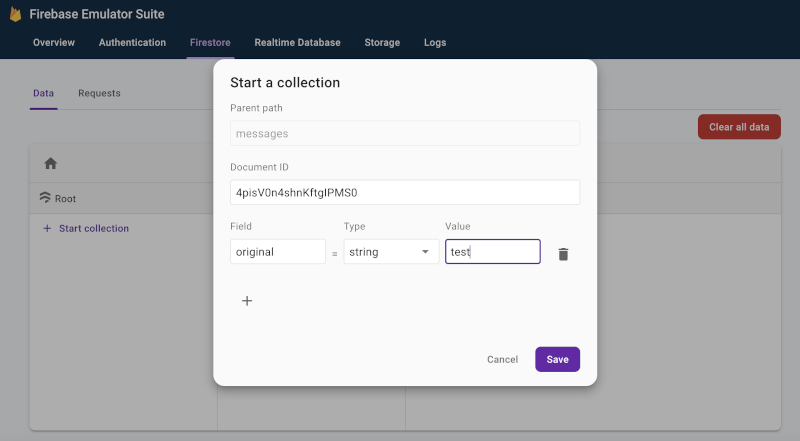
- 在使用者介面的「Firestore」>「Data」分頁中,按一下「Start collection」,然後按照提示在
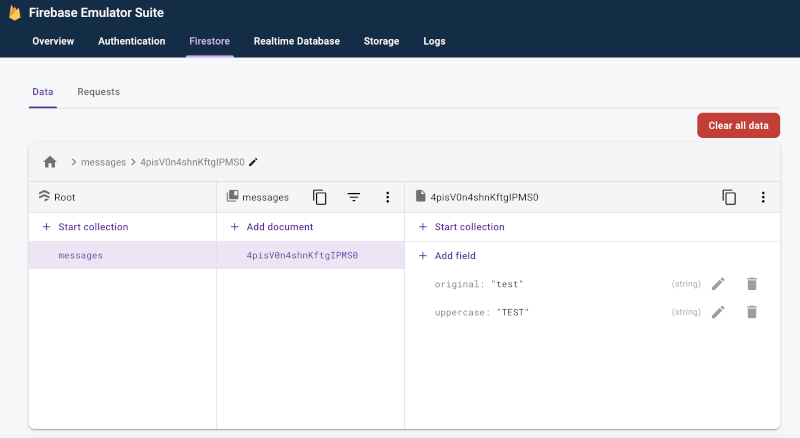
messages集合中建立新文件,並將欄位名稱設為original和值為test。這會觸發 Cloud 函式。您會發現新的uppercase欄位很快就會顯示,並填入了「TEST」字串。


- 在「Firestore」>「Request」分頁中,查看傳送至模擬資料庫的要求,包括在執行要求時執行的所有 Firebase 安全性規則評估。
- 請查看「記錄檔」分頁,確認函式在更新資料庫後並未執行錯誤。
  const functions = require('firebase-functions');

  exports.makeUppercase = functions.firestore.document('/messages/{documentId}')
      .onCreate((snap, context) => {
        const original = snap.data().original;
        console.log('Uppercasing', context.params.documentId, original);
        const uppercase = original.toUpperCase();
        return snap.ref.set({uppercase}, {merge: true});
      });
您可以輕鬆地在 Cloud 函式程式碼和互動式資料庫編輯作業之間進行疊代,直到取得所需資料流程為止,不必輕觸應用程式內資料庫存取程式碼、重新編譯和重新執行測試套件。
將應用程式連結至模擬器
如果您已透過互動式原型設計取得良好進展,並著手進行設計,即可使用適當的 SDK 將資料庫存取程式碼新增至應用程式。您將繼續使用「資料庫」分頁;若是函式,則須使用模擬器套件 UI 中的「Logs」(記錄) 分頁,確認應用程式的行為正確無誤。
提醒您,本機模擬器套件是本機開發工具。寫入實際工作環境的資料庫不會觸發您在本機設計原型的函式。
如要切換讓應用程式寫入資料庫,您需要將測試類別或應用程式內設定指向 Cloud Firestore 模擬器。
Kotlin+KTX
// 10.0.2.2 is the special IP address to connect to the 'localhost' of
// the host computer from an Android emulator.
val firestore = Firebase.firestore
firestore.useEmulator("10.0.2.2", 8080)
firestore.firestoreSettings = firestoreSettings {
isPersistenceEnabled = false
}
Java
// 10.0.2.2 is the special IP address to connect to the 'localhost' of
// the host computer from an Android emulator.
FirebaseFirestore firestore = FirebaseFirestore.getInstance();
firestore.useEmulator("10.0.2.2", 8080);
FirebaseFirestoreSettings settings = new FirebaseFirestoreSettings.Builder()
.setPersistenceEnabled(false)
.build();
firestore.setFirestoreSettings(settings);
Swift
let settings = Firestore.firestore().settings settings.host = "127.0.0.1:8080" settings.cacheSettings = MemoryCacheSettings() settings.isSSLEnabled = false Firestore.firestore().settings = settings
Web
import { getFirestore, connectFirestoreEmulator } from "firebase/firestore";
// firebaseApps previously initialized using initializeApp()
const db = getFirestore();
connectFirestoreEmulator(db, '127.0.0.1', 8080);
Web
// Firebase previously initialized using firebase.initializeApp().
var db = firebase.firestore();
if (location.hostname === "localhost") {
db.useEmulator("127.0.0.1", 8080);
}
使用自訂指令碼自動執行測試
接下來是最後一個工作流程步驟在應用程式內完成功能的原型設計,且在所有平台上看起來很有潛力後,您就可以進行最終實作和測試。如果是單元測試和 CI 工作流程,您可以使用 exec 指令在單次呼叫中啟動模擬器、執行指令碼測試,以及關閉模擬器:
firebase emulators:exec "./testdir/test.sh"
深入探索個別模擬器
現在您已瞭解基本用戶端工作流程的樣貌,可以繼續瞭解套件中個別模擬器的詳細資料,包括如何使用模擬器開發伺服器端應用程式:
- 在原型設計工作流程中加入驗證模擬器
- 深入瞭解即時資料庫模擬器功能
- 深入瞭解 Cloud Storage for Firebase 模擬器功能
- 深入瞭解 Cloud Firestore 模擬器功能
- 將應用程式連線至 Cloud Functions 模擬器
- 使用 Extensions 模擬器評估 Firebase Extensions,盡可能降低帳單費用
接下來呢?
請務必詳閱與上方連結中的特定模擬器相關的主題。接著:
- 如需一系列精選影片和詳細教學範例,請參閱「 Firebase 模擬器訓練播放清單」。
- 調查涉及安全性規則測試和 Firebase 測試 SDK 的進階用途:測試安全性規則 (Cloud Firestore)、測試安全性規則 (即時資料庫) 和測試安全性規則 (Cloud Storage for Firebase)。

