
If you've upgraded to Firebase Authentication with Identity Platform, you can add SMS multi-factor authentication to your iOS app.
Multi-factor authentication increases the security of your app. While attackers often compromise passwords and social accounts, intercepting a text message is more difficult.
Before you begin
Enable at least one provider that supports multi-factor authentication. Every provider supports MFA, except phone auth, anonymous auth, and Apple Game Center.
Ensure your app is verifying user emails. MFA requires email verification. This prevents malicious actors from registering for a service with an email they don't own, and then locking out the real owner by adding a second factor.
Enabling multi-factor authentication
Open the Authentication > Sign-in method page of the Firebase console.
In the Advanced section, enable SMS Multi-factor Authentication.
You should also enter the phone numbers you'll be testing your app with. While optional, registering test phone numbers is strongly recommended to avoid throttling during development.
If you haven't already authorized your app's domain, add it to the allow list on the Authentication > Settings page of the Firebase console.
Verifying your app
Firebase needs to verify that SMS requests are coming from your app. You can do this in two ways:
Silent APNs notifications: When you sign in a user for the first time, Firebase can send a silent push notification to the user's device. Authentication can proceed if the app receives the notification. Note that beginning with iOS 8.0, you don't need to ask the user to allow push notifications to use this method.
reCAPTCHA verification: If you can't send a silent notification (for example, because the user has disabled background refresh, or you are testing your app in the iOS simulator), you can use reCAPTCHA. In many cases, the reCAPTCHA will solve itself automatically with no user interaction.
Using silent notifications
To enable APNs notifications for use with Firebase:
In Xcode, enable push notifications for your project.
Upload your APNs authentication key using the Firebase Console (your changes will automatically carry over to Google Cloud Firebase). If you don't already have your APNs authentication key, see Configuring APNs with FCM to learn how to obtain it.
Open the Firebase Console.
Navigate to Project Settings.
Select the Cloud Messaging tab.
Under APNs authentication key, in the iOS app configuration section, click Upload.
Select your key.
Add the key ID for the key. You can find the key ID under Certificates, Identifiers & Profiles in the Apple Developer Member Center.
Click Upload.
If you already have an APNs certificate, you can upload the certificate instead.
Using reCAPTCHA verification
To enable the client SDK to use reCAPTCHA:
Open your project configuration in Xcode.
Double-click the project name in the left tree view.
Select your app from the Targets section.
Select the Info tab.
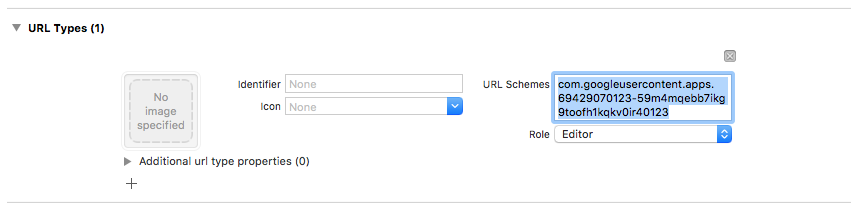
Expand the URL Types section.
Click the + button.
Enter your reversed client ID in the URL Schemes field. You can find this value listed in the
GoogleService-Info.plistconfiguration file asREVERSED_CLIENT_ID.
When complete, your configuration should look similar to the following:
Optionally, you can customize the way your app presents the
SFSafariViewController or UIWebView when displaying the reCAPTCHA. To do
this, create a custom class that conforms to the FIRAuthUIDelegate protocol,
and pass it to verifyPhoneNumber:UIDelegate:completion:.
Choosing an enrollment pattern
You can choose whether your app requires multi-factor authentication, and how and when to enroll your users. Some common patterns include:
Enroll the user's second factor as part of registration. Use this method if your app requires multi-factor authentication for all users. Note that an account must have a verified email address to enroll a second factor, so your registration flow will have to accommodate this.
Offer a skippable option to enroll a second factor during registration. Apps that want to encourage, but not require, multi-factor authentication may prefer this approach.
Provide the ability to add a second factor from the user's account or profile management page, instead of the sign up screen. This minimizes friction during the registration process, while still making multi-factor authentication available for security-sensitive users.
Require adding a second factor incrementally when the user wants to access features with increased security requirements.
Enrolling a second factor
To enroll a new secondary factor for a user:
Re-authenticate the user.
Ask the user enter their phone number.
Get a multi-factor session for the user:
Swift
authResult.user.multiFactor.getSessionWithCompletion() { (session, error) in
  // ...
}
Objective-C
[authResult.user.multiFactor
  getSessionWithCompletion:^(FIRMultiFactorSession * _Nullable session,
                            NSError * _Nullable error) {
    // ...
}];
Send a verification message to the user's phone. Ensure the phone number is formatted with a leading
+and no other punctuation or whitespace (for example:+15105551234)Swift
// Send SMS verification code.
PhoneAuthProvider.provider().verifyPhoneNumber(
  phoneNumber,
  uiDelegate: nil,
  multiFactorSession: session) { (verificationId, error) in
    // verificationId will be needed for enrollment completion.
}
Objective-C
// Send SMS verification code.
[FIRPhoneAuthProvider.provider verifyPhoneNumber:phoneNumber
                                      UIDelegate:nil
                              multiFactorSession:session
                                      completion:^(NSString * _Nullable verificationID,
                                                    NSError * _Nullable error) {
    // verificationId will be needed for enrollment completion.
}];
While not required, it's a best practice to inform users beforehand that they will receive an SMS message, and that standard rates apply.
The
verifyPhoneNumber()method starts app verification process in the background using silent push notification. If silent push notification is not available,a reCAPTCHA challenge is issued instead.Once the SMS code is sent, ask the user to verify the code. Then, use their response to build a
PhoneAuthCredential:Swift
// Ask user for the verification code. Then:
let credential = PhoneAuthProvider.provider().credential(
  withVerificationID: verificationId,
  verificationCode: verificationCode)
Objective-C
// Ask user for the SMS verification code. Then:
FIRPhoneAuthCredential *credential = [FIRPhoneAuthProvider.provider
                                       credentialWithVerificationID:verificationID
                                       verificationCode:kPhoneSecondFactorVerificationCode];
Initialize an assertion object:
Swift
let assertion = PhoneMultiFactorGenerator.assertion(with: credential)Objective-C
FIRMultiFactorAssertion *assertion = [FIRPhoneMultiFactorGenerator assertionWithCredential:credential];Complete the enrollment. Optionally, you can specify a display name for the second factor. This is useful for users with multiple second factors, since the phone number is masked during the authentication flow (for example, +1******1234).
Swift
// Complete enrollment. This will update the underlying tokens
// and trigger ID token change listener.
user.multiFactor.enroll(with: assertion, displayName: displayName) { (error) in
  // ...
}
Objective-C
// Complete enrollment. This will update the underlying tokens
// and trigger ID token change listener.
[authResult.user.multiFactor enrollWithAssertion:assertion
                                     displayName:nil
                                      completion:^(NSError * _Nullable error) {
    // ...
}];
The code below shows a complete example of enrolling a second factor:
Swift
let user = Auth.auth().currentUser
user?.multiFactor.getSessionWithCompletion({ (session, error) in
  // Send SMS verification code.
  PhoneAuthProvider.provider().verifyPhoneNumber(
    phoneNumber,
    uiDelegate: nil,
    multiFactorSession: session
  ) { (verificationId, error) in
    // verificationId will be needed for enrollment completion.
    // Ask user for the verification code.
    let credential = PhoneAuthProvider.provider().credential(
      withVerificationID: verificationId!,
      verificationCode: phoneSecondFactorVerificationCode)
    let assertion = PhoneMultiFactorGenerator.assertion(with: credential)
    // Complete enrollment. This will update the underlying tokens
    // and trigger ID token change listener.
    user?.multiFactor.enroll(with: assertion, displayName: displayName) { (error) in
      // ...
    }
  }
})
Objective-C
FIRUser *user = FIRAuth.auth.currentUser;
[user.multiFactor getSessionWithCompletion:^(FIRMultiFactorSession * _Nullable session,
                                              NSError * _Nullable error) {
    // Send SMS verification code.
    [FIRPhoneAuthProvider.provider
      verifyPhoneNumber:phoneNumber
      UIDelegate:nil
      multiFactorSession:session
      completion:^(NSString * _Nullable verificationID, NSError * _Nullable error) {
        // verificationId will be needed for enrollment completion.

        // Ask user for the verification code.
        // ...

        // Then:
        FIRPhoneAuthCredential *credential =
            [FIRPhoneAuthProvider.provider credentialWithVerificationID:verificationID
                                                        verificationCode:kPhoneSecondFactorVerificationCode];
        FIRMultiFactorAssertion *assertion =
            [FIRPhoneMultiFactorGenerator assertionWithCredential:credential];

        // Complete enrollment. This will update the underlying tokens
        // and trigger ID token change listener.
        [user.multiFactor enrollWithAssertion:assertion
                                  displayName:displayName
                                    completion:^(NSError * _Nullable error) {
            // ...
        }];
    }];
}];
Congratulations! You successfully registered a second authentication factor for a user.
Signing users in with a second factor
To sign in a user with two-factor SMS verification:
Sign the user in with their first factor, then catch an error indicating multi-factor authentication is required. This error contains a resolver, hints on the enrolled second factors, and an underlying session proving the user successfully authenticated with the first factor.
For example, if the user's first factor was an email and password:
Swift
Auth.auth().signIn(
  withEmail: email,
  password: password
) { (result, error) in
  let authError = error as NSError
  if authError?.code == AuthErrorCode.secondFactorRequired.rawValue {
    // The user is a multi-factor user. Second factor challenge is required.
    let resolver =
      authError!.userInfo[AuthErrorUserInfoMultiFactorResolverKey] as! MultiFactorResolver
    // ...
  } else {
    // Handle other errors such as wrong password.
  }
}
Objective-C
[FIRAuth.auth signInWithEmail:email
                     password:password
                   completion:^(FIRAuthDataResult * _Nullable authResult,
                                NSError * _Nullable error) {
    if (error == nil || error.code != FIRAuthErrorCodeSecondFactorRequired) {
        // User is not enrolled with a second factor and is successfully signed in.
        // ...
    } else {
        // The user is a multi-factor user. Second factor challenge is required.
    }
}];
If the user's first factor is a federated provider, such as OAuth, catch the error after calling
getCredentialWith().If the user has multiple secondary factors enrolled, ask them which one to use. You can get the masked phone number with
resolver.hints[selectedIndex].phoneNumberand the display name withresolver.hints[selectedIndex].displayName.Swift
// Ask user which second factor to use. Then:
if resolver.hints[selectedIndex].factorID == PhoneMultiFactorID {
  // User selected a phone second factor.
  // ...
} else if resolver.hints[selectedIndex].factorID == TotpMultiFactorID {
  // User selected a TOTP second factor.
  // ...
} else {
  // Unsupported second factor.
}
Objective-C
FIRMultiFactorResolver *resolver =
    (FIRMultiFactorResolver *) error.userInfo[FIRAuthErrorUserInfoMultiFactorResolverKey];

// Ask user which second factor to use. Then:
FIRPhoneMultiFactorInfo *hint = (FIRPhoneMultiFactorInfo *) resolver.hints[selectedIndex];
if (hint.factorID == FIRPhoneMultiFactorID) {
  // User selected a phone second factor.
  // ...
} else if (hint.factorID == FIRTOTPMultiFactorID) {
  // User selected a TOTP second factor.
  // ...
} else {
  // Unsupported second factor.
}
Send a verification message to the user's phone:
Swift
// Send SMS verification code.
let hint = resolver.hints[selectedIndex] as! PhoneMultiFactorInfo
PhoneAuthProvider.provider().verifyPhoneNumber(
  with: hint,
  uiDelegate: nil,
  multiFactorSession: resolver.session
) { (verificationId, error) in
  // verificationId will be needed for sign-in completion.
}
Objective-C
// Send SMS verification code
[FIRPhoneAuthProvider.provider
  verifyPhoneNumberWithMultiFactorInfo:hint
  UIDelegate:nil
  multiFactorSession:resolver.session
  completion:^(NSString * _Nullable verificationID, NSError * _Nullable error) {
    if (error != nil) {
        // Failed to verify phone number.
    }
}];
Once the SMS code is sent, ask the user to verify the code and use it to build a
PhoneAuthCredential:Swift
// Ask user for the verification code. Then:
let credential = PhoneAuthProvider.provider().credential(
  withVerificationID: verificationId!,
  verificationCode: verificationCodeFromUser)
Objective-C
// Ask user for the SMS verification code. Then:
FIRPhoneAuthCredential *credential =
    [FIRPhoneAuthProvider.provider
      credentialWithVerificationID:verificationID
                  verificationCode:verificationCodeFromUser];
Initialize an assertion object with the credential:
Swift
let assertion = PhoneMultiFactorGenerator.assertion(with: credential)Objective-C
FIRMultiFactorAssertion *assertion =
    [FIRPhoneMultiFactorGenerator assertionWithCredential:credential];
Resolve the sign-in. You can then access the original sign-in result, which includes the standard provider-specific data and authentication credentials:
Swift
// Complete sign-in. This will also trigger the Auth state listeners.
resolver.resolveSignIn(with: assertion) { (authResult, error) in
  // authResult will also contain the user, additionalUserInfo, optional
  // credential (null for email/password) associated with the first factor sign-in.

  // For example, if the user signed in with Google as a first factor,
  // authResult.additionalUserInfo will contain data related to Google provider that
  // the user signed in with.

  // user.credential contains the Google OAuth credential.
  // user.credential.accessToken contains the Google OAuth access token.
  // user.credential.idToken contains the Google OAuth ID token.
}
Objective-C
// Complete sign-in.
[resolver resolveSignInWithAssertion:assertion
                          completion:^(FIRAuthDataResult * _Nullable authResult,
                                        NSError * _Nullable error) {
    if (error != nil) {
        // User successfully signed in with the second factor phone number.
    }
}];
The code below shows a complete example of signing in a multi-factor user:
Swift
Auth.auth().signIn(
  withEmail: email,
  password: password
) { (result, error) in
  let authError = error as NSError?
  if authError?.code == AuthErrorCode.secondFactorRequired.rawValue {
    let resolver =
      authError!.userInfo[AuthErrorUserInfoMultiFactorResolverKey] as! MultiFactorResolver

    // Ask user which second factor to use.
    // ...

    // Then:
    let hint = resolver.hints[selectedIndex] as! PhoneMultiFactorInfo

    // Send SMS verification code
    PhoneAuthProvider.provider().verifyPhoneNumber(
      with: hint,
      uiDelegate: nil,
      multiFactorSession: resolver.session
    ) { (verificationId, error) in
      if error != nil {
        // Failed to verify phone number.
      }
      // Ask user for the SMS verification code.
      // ...

      // Then:
      let credential = PhoneAuthProvider.provider().credential(
        withVerificationID: verificationId!,
        verificationCode: verificationCodeFromUser)
      let assertion = PhoneMultiFactorGenerator.assertion(with: credential)

      // Complete sign-in.
      resolver.resolveSignIn(with: assertion) { (authResult, error) in
        if error != nil {
          // User successfully signed in with the second factor phone number.
        }
      }
    }
  }
}
Objective-C
[FIRAuth.auth signInWithEmail:email
                     password:password
                   completion:^(FIRAuthDataResult * _Nullable authResult,
                               NSError * _Nullable error) {
    if (error == nil || error.code != FIRAuthErrorCodeSecondFactorRequired) {
        // User is not enrolled with a second factor and is successfully signed in.
        // ...
    } else {
        FIRMultiFactorResolver *resolver =
            (FIRMultiFactorResolver *) error.userInfo[FIRAuthErrorUserInfoMultiFactorResolverKey];

        // Ask user which second factor to use.
        // ...

        // Then:
        FIRPhoneMultiFactorInfo *hint = (FIRPhoneMultiFactorInfo *) resolver.hints[selectedIndex];

        // Send SMS verification code
        [FIRPhoneAuthProvider.provider
          verifyPhoneNumberWithMultiFactorInfo:hint
                                    UIDelegate:nil
                            multiFactorSession:resolver.session
                                    completion:^(NSString * _Nullable verificationID,
                                                NSError * _Nullable error) {
            if (error != nil) {
                // Failed to verify phone number.
            }

            // Ask user for the SMS verification code.
            // ...

            // Then:
            FIRPhoneAuthCredential *credential =
                [FIRPhoneAuthProvider.provider
                  credentialWithVerificationID:verificationID
                              verificationCode:kPhoneSecondFactorVerificationCode];
            FIRMultiFactorAssertion *assertion =
                [FIRPhoneMultiFactorGenerator assertionWithCredential:credential];

            // Complete sign-in.
            [resolver resolveSignInWithAssertion:assertion
                                      completion:^(FIRAuthDataResult * _Nullable authResult,
                                                    NSError * _Nullable error) {
                if (error != nil) {
                    // User successfully signed in with the second factor phone number.
                }
            }];
        }];
    }
}];
Congratulations! You successfully signed in a user using multi-factor authentication.
What's next
- Manage multi-factor users programmatically with the Admin SDK.