
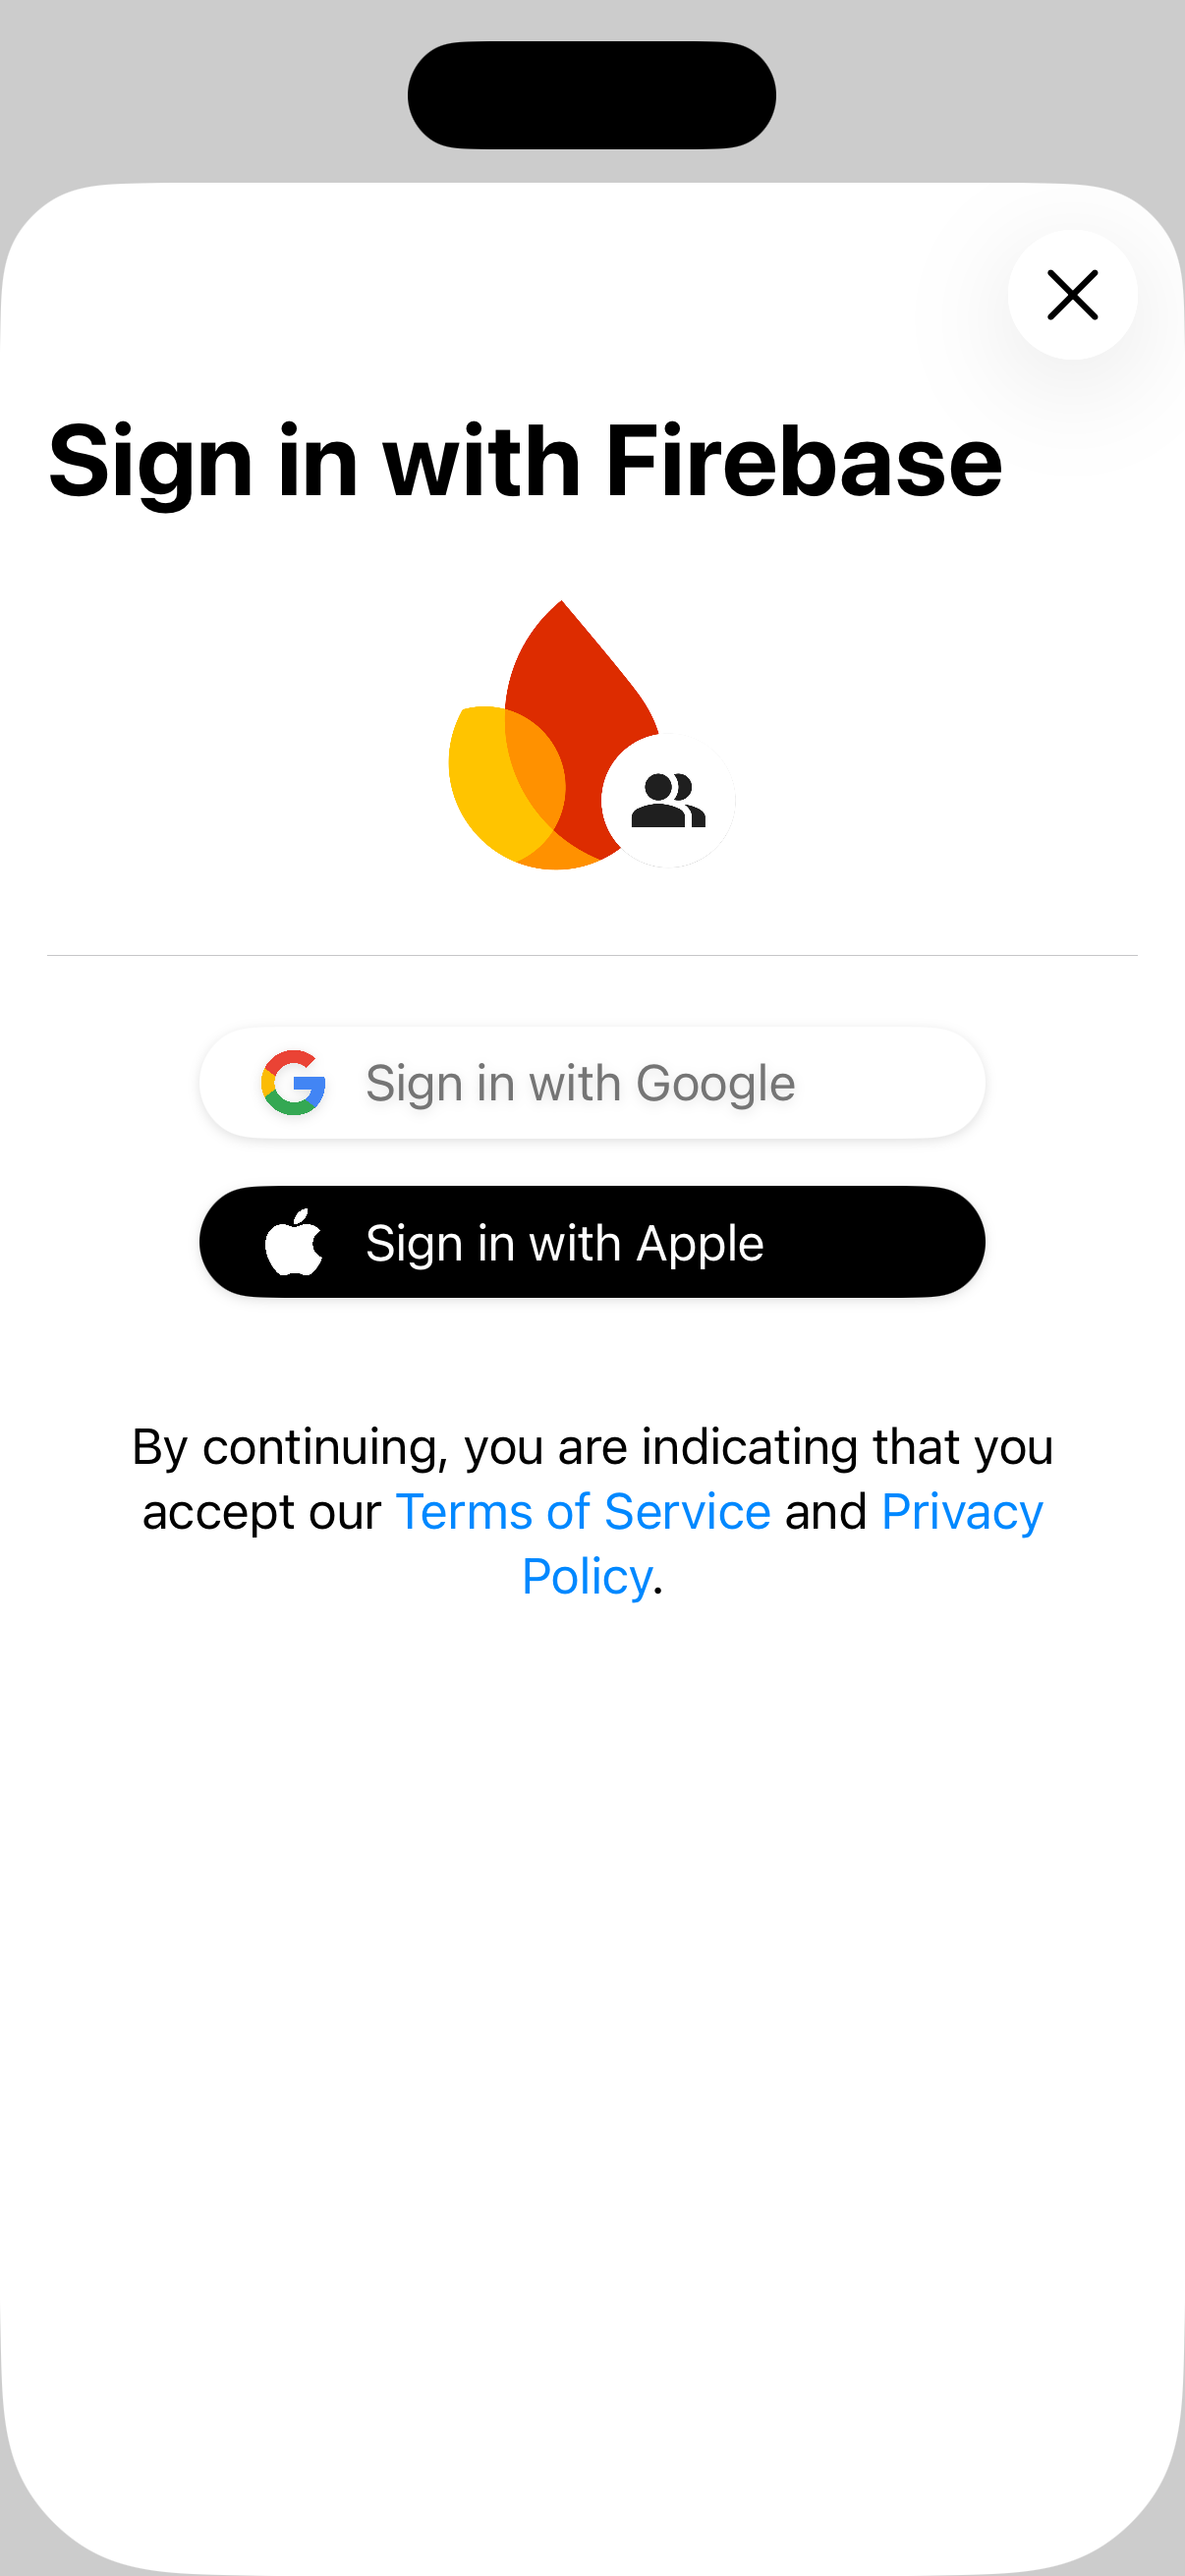
FirebaseUI for SwiftUI is a modern, SwiftUI-first library built on top of Firebase Authentication that provides prebuilt sign-in flows to your app.
FirebaseUI for SwiftUI has the following benefits:
- Opinionated default UI: add a complete sign-in flow with
AuthPickerView. - Customizable: render the default buttons in your own layout, or build a fully custom experience.
- Anonymous account linking: optionally upgrade anonymous users instead of replacing them.
- Account management: built-in flows for sign-up, password recovery, and account management.
- Multiple providers: email/password, email link, phone authentication, Apple, Google, Facebook, Twitter, and standard OAuth2/OIDC providers.
- Modern auth features: built-in support for multi-factor authentication (MFA) and async/await APIs.
Before you begin
Add Firebase to your Apple project. Be sure to complete the SwiftUI steps.
Make sure your app targets iOS 17 or later.
Installation
FirebaseUI for SwiftUI is provided as a Swift package. To install the package in your Xcode project, do the following:
In Xcode, click File > Add Package Dependencies.
Enter the package URL:
https://github.com/firebase/FirebaseUI-iOSIn the Dependency Rule menu, select Up to Next Major Version and set the minimum version to the latest release.
Click Add Package, then select the libraries to add to your project.
The following library is always required. It includes the core dependencies as well as support for email-password sign-in and email link sign-in.
FirebaseAuthSwiftUI
If you want to support other sign-in methods, also select one or more of the following libraries:
FirebaseAppleSwiftUI(Sign in with Apple)FirebaseGoogleSwiftUI(Sign in with Google)FirebaseFacebookSwiftUI(Sign in with Facebook)FirebasePhoneAuthSwiftUI(Phone authentication)FirebaseTwitterSwiftUI(Sign in with Twitter)FirebaseOAuthSwiftUI(Standard OAuth and OIDC providers like GitHub, Microsoft, Yahoo)
Click Add Package to install the selected libraries.
Configure FirebaseUI's
AuthServicein the initializer of your top-levelViewand pass the service to child views using the environment.import FirebaseAuthSwiftUI import SwiftUI struct ContentView: View { let authService: AuthService init() { let configuration = AuthConfiguration() authService = AuthService(configuration: configuration) .withEmailSignIn() // Or whatever sign-in methods you want to support. // See the next section. } var body: some View { AuthPickerView { // AuthPickerView (the prebuilt View) or a custom View. Text("Welcome to your app!") } .environment(authService) } }
Set up sign-in methods
Each of the supported sign-in methods require some additional setup steps. Expand the sections below and follow the instructions to set up individual providers.
Email address and password
From the Security > Authentication > Sign-in method section of the Firebase console, enable the Email/Password provider.
Register the provider in your
AuthServiceinstance:let authService = AuthService() .withEmailSignIn()
Email link authentication
To use passwordless email link sign-in:
From the Security > Authentication > Sign-in method section of the Firebase console, enable Email/Password, then enable email link sign-in. Note that email or password sign-in must be enabled to use email link sign-in.
Add the link domain to Authorized domains.
Configure
ActionCodeSettings, pass it intoAuthConfigurationand register the provider:let actionCodeSettings = ActionCodeSettings() actionCodeSettings.handleCodeInApp = true actionCodeSettings.url = URL(string: "https://yourapp.firebaseapp.com") guard let bundleID = Bundle.main.bundleIdentifier else { fatalError("Missing bundle identifier for email link authentication setup.") } actionCodeSettings.setIOSBundleID(bundleID) let configuration = AuthConfiguration( emailLinkSignInActionCodeSettings: actionCodeSettings ) let authService = AuthService(configuration: configuration) .withEmailLinkSignIn()In the same
AppDelegatein which you callFirebaseApp.configure(), add logic to theapplication(_:open:options:)method that returnstruewhen the URL opened is a Firebase Authentication sign-in link. This logic indicates that the link was handled by FirebaseUI and shouldn't be processed by other link handlers.import FacebookCore import FirebaseAuth import UIKit class AppDelegate: NSObject, UIApplicationDelegate { func application( _ application: UIApplication, didFinishLaunchingWithOptions launchOptions: [UIApplication.LaunchOptionsKey: Any]? ) -> Bool { FirebaseApp.configure() return true } func application( _ application: UIApplication, open url: URL, options: [UIApplication.OpenURLOptionsKey: Any] = [:] ) -> Bool { if Auth.auth().canHandle(url) { return true } return false } }If you build custom views, call
authService.handleSignInLink(url:)when the link opens your app.
Apple
To use Sign in with Apple:
Configure Sign In with Apple:
- Enable Sign In with Apple for your app on the Certificates, Identifiers & Profiles page of Apple's developer site.
- Associate your website with your app as described in the first section
of Configure Sign In with Apple for the web. When prompted, register the
following URL as a Return URL:
https://YOUR_FIREBASE_PROJECT_ID.firebaseapp.com/__/auth/handler
- Create a Sign In with Apple private key. You'll need your new private key and key ID in the next section.
- If you use any of Firebase Authentication's features that send emails to users,
including email link sign-in, email address verification, account change
revocation, and others, configure the Apple private email relay service
and register
noreply@YOUR_FIREBASE_PROJECT_ID.firebaseapp.com(or your customized email template domain) so Apple can relay emails sent by Firebase Authentication to anonymized Apple email addresses.
From the Security > Authentication > Sign-in method section of the Firebase console, enable Apple.
- Specify the Service ID you created in the previous section.
- In the OAuth code flow configuration section, specify your Apple Team ID and the private key and key ID you created in the previous section.
In Xcode, open the Signing & Capabilities section of the project editor and add the Sign in with Apple capability.
Register the provider in your
AuthServiceinstance:let authService = AuthService() .withAppleSignIn()
To use Google Sign-In:
From the Security > Authentication > Sign-in method section of the Firebase console, enable the Google provider.
Download a new copy of your project's
GoogleService-Info.plistfile and copy it to your Xcode project. Overwrite any existing versions with the new one.Add custom URL schemes to your Xcode project:
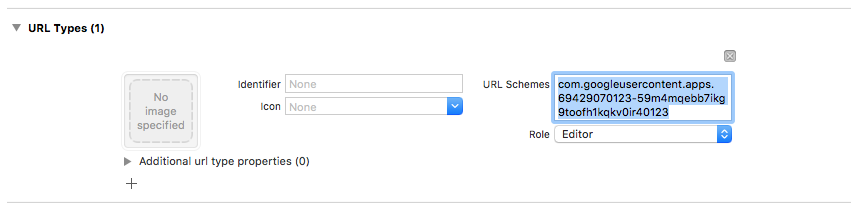
Open your project configuration: click the project name in the left tree view. Select your app from the TARGETS section, then select the Info tab, and expand the URL Types section.
Click the + button, and add a URL scheme for your reversed client ID. To find this value, open the
GoogleService-Info.plist REVERSED_CLIENT_IDkey. Copy the value of that key, and paste it into the URL Schemes box on the configuration page. Leave the other fields untouched.When completed, your config should look something similar to the following (but with your application-specific values):
Register the provider in your
AuthServiceinstance:let authService = AuthService() .withGoogleSignIn()
To use Facebook Login:
Set up the Facebook Login for iOS SDK by following the instructions on the Meta for Developers site. Skip the final step, "Add Facebook Login to Your Code".
From the Security > Authentication > Sign-in method section of the Firebase console, enable the Facebook provider. You will need the Facebook App ID and App Secret from the Meta for Developers site.
Register the provider in your
AuthServiceinstance:let authService = AuthService() .withFacebookSignIn()
Phone number
To use phone authentication:
From the Security > Authentication > Sign-in method section of the Firebase console, enable the Phone provider.
Configure APNs for your app as instructed in the Start receiving silent notifications section.
Add custom URL schemes to your Xcode project:
Open your project configuration: click the project name in the left tree view. Select your app from the TARGETS section, then select the Info tab, and expand the URL Types section.
Click the + button, and add your Encoded App ID as a URL scheme. To find this value, open Settings > General in the Firebase console.
When completed, your config should look something similar to the following (but with your application-specific values):
In the same
AppDelegatein which you callFirebaseApp.configure(), add APNs token handlers:import FacebookCore import FirebaseAuth import UIKit class AppDelegate: NSObject, UIApplicationDelegate { func application( _ application: UIApplication, didFinishLaunchingWithOptions launchOptions: [UIApplication.LaunchOptionsKey: Any]? ) -> Bool { FirebaseApp.configure() return true } func application( _ application: UIApplication, didRegisterForRemoteNotificationsWithDeviceToken deviceToken: Data ) { #if DEBUG Auth.auth().setAPNSToken(deviceToken, type: .sandbox) #else Auth.auth().setAPNSToken(deviceToken, type: .prod) #endif } }Register the provider in your
AuthServiceinstance:let authService = AuthService() .withPhoneSignIn()
Twitter (X)
To use Twitter Login:
Generate X API credentials by following the instructions on the X Developers site.
From the Security > Authentication > Sign-in method section of the Firebase console, enable the Twitter provider. You will need the API key and API secret from the X Developer console.
Register the provider in your
AuthServiceinstance:let authService = AuthService() .withTwitterSignIn()
Standard OAuth2 and OIDC providers
FirebaseUI also supports built-in OAuth providers such as GitHub, Microsoft, and Yahoo, as well as custom OIDC providers configured in Firebase Authentication.
 let authService = AuthService()
  .withOAuthSignIn(OAuthProviderSwift.github())
  .withOAuthSignIn(OAuthProviderSwift.microsoft())
  .withOAuthSignIn(OAuthProviderSwift.yahoo())
For custom OIDC providers, configure the provider first in Firebase
Authentication, then create an OAuthProviderSwift with your provider ID and
button configuration:
let lineProvider = OAuthProviderSwift(
  providerId: "oidc.line",
  buttonLabel: "Sign in with LINE",
  displayName: "LINE",
  iconSystemName: "person.crop.circle.badge.checkmark",
  buttonBackgroundColor: .green,
  buttonForegroundColor: .white
)

let authService = AuthService()
  .withOAuthSignIn(lineProvider)
Using the prebuilt authentication view
FirebaseUI for SwiftUI provides AuthPickerView, a prebuilt, opinionated
authentication UI that handles the entire authentication flow for you. This is
the easiest way to add authentication to your app.
Example
Here's an example of AuthPickerView in use, with multiple providers and
configuration options:
import FirebaseAppleSwiftUI
import FirebaseAuthSwiftUI
import FirebaseGoogleSwiftUI
import SwiftUI

struct ContentView: View {
  let authService: AuthService

  init() {
    // Create configuration with options
    let configuration = AuthConfiguration(
      tosUrl: URL(string: "https://example.com/tos"),
      privacyPolicyUrl: URL(string: "https://example.com/privacy"),
      shouldAutoUpgradeAnonymousUsers: true
    )

    // Initialize AuthService with multiple providers
    authService = AuthService(configuration: configuration)
      .withEmailSignIn()
      .withAppleSignIn()
      .withGoogleSignIn()
  }

  var body: some View {
    AuthPickerView {
      authenticatedContent
    }
    .environment(authService)
  }

  var authenticatedContent: some View {
    NavigationStack {
      VStack(spacing: 20) {
        if authService.authenticationState == .authenticated {
          Text("Authenticated")

          Button("Manage Account") {
            authService.isPresented = true
          }
          .buttonStyle(.bordered)

          Button("Sign Out") {
            Task {
              try? await authService.signOut()
            }
          }
          .buttonStyle(.borderedProminent)
        } else {
          Text("Not Authenticated")

          Button("Sign In") {
            authService.isPresented = true
          }
          .buttonStyle(.borderedProminent)
        }
      }
      .navigationTitle("My App")
    }
    .onChange(of: authService.authenticationState) { _, newValue in
      // Automatically show auth UI when not authenticated
      if newValue != .authenticating {
        authService.isPresented = (newValue == .unauthenticated)
      }
    }
  }
}
Typical customization
Although all of the AuthConfiguration parameters are optional, most apps
customize the following settings at a minimum:
let configuration = AuthConfiguration(
    logo: ImageResource.exampleLogoAsset,
    customStringsBundle: .main,
    tosUrl: URL(string: "https://example.com/tos"),
    privacyPolicyUrl: URL(string: "https://example.com/privacy"),
)
logo: the logo image displayed on the authentication sheet. For information on including your own image asset, see Adding images to your Xcode project.customStringsBundle: use custom strings from the specified Bundle. This is used for localization, but also for customizing the default strings used byAuthPickerView. For example, to set the message displayed at the top of the authentication sheet, createLocalizable.stringswith the contents:"Sign in with Firebase" = "Sign in to use ExampleApp";
What's included in the prebuilt view
When you use AuthPickerView, you get:
- Sheet Presentation: Authentication UI appears as a modal sheet
- Built-in Navigation: Automatic navigation between sign-in, password recovery, MFA, email link, and phone verification screens
- Authentication State Management: Automatically switches between auth UI and your content based on
authService.authenticationState - Control via
isPresented: Control when the auth sheet appears by settingauthService.isPresented = true/false
Opinionated behaviors
The default AuthPickerView is opinionated about how to handle several complex
scenarios:
1. Account conflict resolution
When an account conflict occurs (e.g., signing in with a credential that's already linked to another account), AuthPickerView automatically handles it:
- Anonymous Upgrade Conflicts: If
shouldAutoUpgradeAnonymousUsersis enabled and a conflict occurs during anonymous upgrade, the system automatically signs out the anonymous user and signs in with the new credential. - Other Conflicts: For credential conflicts between non-anonymous accounts, the system stores the pending credential and attempts to link it after successful sign-in.
This is handled by the AccountConflictModifier applied at the NavigationStack level.
2. Multi-factor authentication (MFA)
When MFA is enabled in your configuration:
- Automatically detects when MFA is required during sign-in
- Presents appropriate MFA resolution screens (SMS or TOTP)
- Handles MFA enrollment and management flows
- Supports both SMS-based and Time-based One-Time Password (TOTP) factors
3. Error handling
The default views include built-in error handling:
- Displays user-friendly error messages in alert dialogs
- Automatically filters out errors that are handled internally (e.g., cancellation errors, auto-handled conflicts)
- Uses localized error messages via
StringUtils - Errors are propagated through the
reportErrorenvironment key
4. Email link sign-in
When email link sign-in is configured:
- Automatically stores the email address in app storage
- Handles deep link navigation from email
- Manages the complete email verification flow
- Supports anonymous user upgrades via email link
5. Anonymous user auto-upgrade
When shouldAutoUpgradeAnonymousUsers is enabled:
- Automatically attempts to link anonymous accounts with new sign-in credentials
- Preserves user data by upgrading instead of replacing anonymous sessions
- Handles upgrade conflicts gracefully
6. Reauthentication in default views
Sensitive operations like deleting accounts, updating passwords, or unenrolling MFA factors require recent authentication. When using default views, reauthentication is handled automatically based on the user's sign-in provider.
When a sensitive operation requires reauthentication, the default views automatically:
OAuth Providers (Google, Apple, Facebook, Twitter, etc.): Display an alert asking the user to confirm, then automatically obtain fresh credentials and complete the operation.
Email/Password: Present a sheet prompting the user to enter their password before continuing.
Email Link: Show an alert asking to send a verification email, then present a sheet with instructions to check email. The user taps the link in their email to complete reauthentication.
Phone: Show an alert explaining verification is needed, then present a sheet for SMS code verification.
The operation automatically retries after successful reauthentication. No additional code is required when using AuthPickerView or the built-in account management views (UpdatePasswordView, SignedInView, etc.).
Advanced: Building custom auth views
If you need more control over the UI or navigation flow, you can build your own
custom authentication views while still leveraging the AuthService for
authentication logic.
You can mix elements of FirebaseUI with custom logic in many ways. The following sections contain examples of some of the customization approaches you might use.
Approach 1: Custom buttons with registerProvider()
For complete control over button appearance, you can create your own custom AuthProviderUI implementation that wraps any provider and returns your custom button view.
Creating a custom provider UI
Here's how to create a custom Twitter button as an example:
import FirebaseAuthSwiftUI
import FirebaseTwitterSwiftUI
import SwiftUI

// Step 1: Create your custom button view
struct CustomTwitterButton: View {
  let provider: TwitterProviderSwift
  @Environment(AuthService.self) private var authService
  @Environment(\.mfaHandler) private var mfaHandler

  var body: some View {
    Button {
      Task {
        do {
          let outcome = try await authService.signIn(provider)

          // Handle MFA if required
          if case let .mfaRequired(mfaInfo) = outcome,
             let onMFA = mfaHandler {
            onMFA(mfaInfo)
          }
        } catch {
          // Do Something Else
        }
      }
    } label: {
      HStack { // Your custom icon
        Text("Sign in with Twitter")
          .fontWeight(.semibold)
      }
      .frame(maxWidth: .infinity)
      .padding()
      .background(
        LinearGradient(
          colors: [Color.blue, Color.cyan],
          startPoint: .leading,
          endPoint: .trailing
        )
      )
      .foregroundColor(.white)
      .cornerRadius(12)
      .shadow(radius: 4)
    }
  }
}

// Step 2: Create a custom AuthProviderUI wrapper
class CustomTwitterProviderAuthUI: AuthProviderUI {
  private let typedProvider: TwitterProviderSwift
  var provider: AuthProviderSwift { typedProvider }
  let id: String = "twitter.com"

  init(provider: TwitterProviderSwift = TwitterProviderSwift()) {
    typedProvider = provider
  }

  @MainActor func authButton() -> AnyView {
    AnyView(CustomTwitterButton(provider: typedProvider))
  }
}

// Step 3: Use it in your app
struct ContentView: View {
  let authService: AuthService

  init() {
    let configuration = AuthConfiguration()
    authService = AuthService(configuration: configuration)

    // Register your custom provider UI
    authService.registerProvider(
      providerWithButton: CustomTwitterProviderAuthUI()
    )
    authService.isPresented = true
  }

  var body: some View {
    AuthPickerView {
      usersApp
    }
    .environment(authService)
  }

  var usersApp: some View {
    NavigationStack {
      VStack {
        Button {
          authService.isPresented = true
        } label: {
          Text("Authenticate")
        }
      }
    }
  }
}
Simplified custom button example
You can also create simpler custom buttons for any provider:
import FirebaseAuthSwiftUI
import FirebaseGoogleSwiftUI
import FirebaseAppleSwiftUI
import SwiftUI

// Custom Google Provider UI
class CustomGoogleProviderAuthUI: AuthProviderUI {
  private let typedProvider: GoogleProviderSwift
  var provider: AuthProviderSwift { typedProvider }
  let id: String = "google.com"

  init() {
    typedProvider = GoogleProviderSwift()
  }

  @MainActor func authButton() -> AnyView {
    AnyView(CustomGoogleButton(provider: typedProvider))
  }
}

struct CustomGoogleButton: View {
  let provider: GoogleProviderSwift
  @Environment(AuthService.self) private var authService

  var body: some View {
    Button {
      Task {
        try? await authService.signIn(provider)
      }
    } label: {
      HStack {
        Image(systemName: "g.circle.fill")
        Text("My Custom Google Button")
      }
      .frame(maxWidth: .infinity)
      .padding()
      .background(Color.purple) // Your custom color
      .foregroundColor(.white)
      .cornerRadius(10)
    }
  }
}

// Then use it
struct ContentView: View {
  let authService: AuthService

  init() {
    let configuration = AuthConfiguration()
    authService = AuthService(configuration: configuration)
      .withAppleSignIn() // Use default Apple button

    // Use custom Google button
    authService.registerProvider(
      providerWithButton: CustomGoogleProviderAuthUI()
    )
  }

  var body: some View {
    AuthPickerView {
      Text("App Content")
    }
    .environment(authService)
  }
}
This approach works for all providers: Google, Apple, Twitter, Facebook, Phone, and OAuth providers. Simply create your custom button view and wrap it in a class conforming to AuthProviderUI.
Approach 2: Default buttons with custom views
You can use AuthService.renderButtons() and bypass AuthPickerView to render the default authentication buttons while providing your own layout and navigation:
import FirebaseAuthSwiftUI
import FirebaseGoogleSwiftUI
import FirebaseAppleSwiftUI
import SwiftUI

struct CustomAuthView: View {
  @Environment(AuthService.self) private var authService

  var body: some View {
    VStack(spacing: 30) {
      // Your custom logo/branding
      Image("app-logo")
        .resizable()
        .frame(width: 150, height: 150)

      Text("Welcome to My App")
        .font(.largeTitle)
        .fontWeight(.bold)

      Text("Sign in to continue")
        .font(.subheadline)
        .foregroundStyle(.secondary)

      // Render default auth buttons
      authService.renderButtons(spacing: 12)
        .padding()
    }
    .padding()
  }
}

struct ContentView: View {
  init() {
    let configuration = AuthConfiguration()

    authService = AuthService(configuration: configuration)
      .withGoogleSignIn()
      .withAppleSignIn()
  }

  let authService: AuthService

  var body: some View {
    NavigationStack {
      if authService.authenticationState == .authenticated {
        Text("Authenticated!")
      } else {
        CustomAuthView()
      }
    }
    .environment(authService)
  }
}
Approach 3: Custom views with custom navigation
For complete control over the entire flow, you can bypass AuthPickerView and build your own navigation system:
import FirebaseAuth
import FirebaseAuthSwiftUI
import FirebaseGoogleSwiftUI
import SwiftUI

enum CustomAuthRoute {
  case signIn
  case phoneVerification
  case mfaResolution
}

struct ContentView: View {
  private let authService: AuthService
  @State private var navigationPath: [CustomAuthRoute] = []
  @State private var errorMessage: String?

  init() {
    let configuration = AuthConfiguration()
    self.authService = AuthService(configuration: configuration)
      .withGoogleSignIn()
      .withPhoneSignIn()
  }

  var body: some View {
    NavigationStack(path: $navigationPath) {
      Group {
        if authService.authenticationState == .authenticated {
          authenticatedView
        } else {
          customSignInView
        }
      }
      .navigationDestination(for: CustomAuthRoute.self) { route in
        switch route {
        case .signIn:
          customSignInView
        case .phoneVerification:
          customPhoneVerificationView
        case .mfaResolution:
          customMFAView
        }
      }
    }
    .environment(authService)
    .alert("Error", isPresented: .constant(errorMessage != nil)) {
      Button("OK") {
        errorMessage = nil
      }
    } message: {
      Text(errorMessage ?? "")
    }
  }

  var customSignInView: some View {
    VStack(spacing: 20) {
      Text("Custom Sign In")
        .font(.title)

      Button("Sign in with Google") {
        Task {
          do {
            let provider = GoogleProviderSwift(clientID: Auth.auth().app?.options.clientID ?? "")
            let outcome = try await authService.signIn(provider)

            // Handle MFA if required
            if case .mfaRequired = outcome {
              navigationPath.append(.mfaResolution)
            }
          } catch {
            errorMessage = error.localizedDescription
          }
        }
      }
      .buttonStyle(.borderedProminent)

      Button("Phone Sign In") {
        navigationPath.append(.phoneVerification)
      }
      .buttonStyle(.bordered)
    }
    .padding()
  }

  var customPhoneVerificationView: some View {
    Text("Custom Phone Verification View")
    // Implement your custom phone auth UI here
  }

  var customMFAView: some View {
    Text("Custom MFA Resolution View")
    // Implement your custom MFA UI here
  }

  var authenticatedView: some View {
    VStack(spacing: 20) {
      Text("Welcome!")
      Text("Email: \(authService.currentUser?.email ?? "N/A")")

      Button("Sign Out") {
        Task {
          try? await authService.signOut()
        }
      }
      .buttonStyle(.borderedProminent)
    }
  }
}
Important considerations for custom views
When building custom views, you need to handle several things yourself that AuthPickerView handles automatically:
- Account Conflicts: Implement your own conflict resolution strategy using
AuthServiceError.accountConflict - MFA Handling: Check
SignInOutcomefor.mfaRequiredand handle MFA resolution manually - Anonymous User Upgrades: Handle the linking of anonymous accounts if
shouldAutoUpgradeAnonymousUsersis enabled - Navigation State: Manage navigation between different auth screens (phone verification, password recovery, etc.)
- Loading States: Show loading indicators during async authentication operations by observing
authService.authenticationState - Reauthentication: Handle reauthentication errors for sensitive operations (see Reauthentication in Custom Views below)
Reauthentication in custom views
When building custom views, handle reauthentication by catching specific errors and implementing your own flow. Sensitive operations throw four types of reauthentication errors, each containing context information.
Implementation patterns
OAuth Providers (Google, Apple, Facebook, Twitter, etc.):
Catch the error and call reauthenticate(context:) which automatically handles the OAuth flow:
do {
  try await authService.deleteUser()
} catch let error as AuthServiceError {
  if case .oauthReauthenticationRequired(let context) = error {
    try await authService.reauthenticate(context: context)
    try await authService.deleteUser() // Retry operation
  }
}
Email/Password:
Catch the error, prompt for password, create credential, and call reauthenticate(with:):
do {
  try await authService.updatePassword(to: newPassword)
} catch let error as AuthServiceError {
  if case .emailReauthenticationRequired(let context) = error {
    // Show your password prompt UI
    let password = await promptUserForPassword()
    let credential = EmailAuthProvider.credential(
      withEmail: context.email,
      password: password
    )
    try await authService.reauthenticate(with: credential)
    try await authService.updatePassword(to: newPassword) // Retry
  }
}
Phone:
Catch the error, verify phone, create credential, and call reauthenticate(with:):
do {
  try await authService.deleteUser()
} catch let error as AuthServiceError {
  if case .phoneReauthenticationRequired(let context) = error {
    // Send verification code
    let verificationId = try await authService.verifyPhoneNumber(
      phoneNumber: context.phoneNumber
    )
    // Show your SMS code input UI
    let code = await promptUserForSMSCode()
    let credential = PhoneAuthProvider.provider().credential(
      withVerificationID: verificationId,
      verificationCode: code
    )
    try await authService.reauthenticate(with: credential)
    try await authService.deleteUser() // Retry
  }
}
Email Link:
Catch the error, send verification email, and handle the incoming URL:
do {
  try await authService.updatePassword(to: newPassword)
} catch let error as AuthServiceError {
  if case .emailLinkReauthenticationRequired(let context) = error {
    // Send verification email
    try await authService.sendEmailSignInLink(
      email: context.email,
      isReauth: true
    )
    // Show your "Check your email" UI
    await showCheckEmailUI()
    // When user taps the link, it opens your app with a URL
    // Handle it in your URL handler:
    // try await authService.handleSignInLink(url: url)
    // The handleSignInLink method automatically completes reauthentication
    try await authService.updatePassword(to: newPassword) // Retry
  }
}
All reauthentication context objects include a .displayMessage property for user-facing text.
Custom OAuth providers
You can create custom OAuth providers for services beyond the built-in ones:
⚠️ Important: OIDC (OpenID Connect) providers must be configured in your Firebase project's Authentication settings before they can be used. In the Firebase Console, go to Authentication → Sign-in method and add your OIDC provider with the required credentials (Client ID, Client Secret, Issuer URL). You must also register the OAuth redirect URI provided by Firebase in your provider's developer console. See the Firebase OIDC documentation for detailed setup instructions.
import FirebaseAuthSwiftUI
import FirebaseOAuthSwiftUI
import SwiftUI

struct ContentView: View {
  let authService: AuthService

  init() {
    let configuration = AuthConfiguration()

    authService = AuthService(configuration: configuration)
      .withOAuthSignIn(
        OAuthProviderSwift(
          providerId: "oidc.line",  // LINE OIDC provider
          scopes: ["profile", "openid", "email"],  // LINE requires these scopes
          displayName: "Sign in with LINE",
          buttonIcon: Image("line-logo"),
          buttonBackgroundColor: .green,
          buttonForegroundColor: .white
        )
      )
      .withOAuthSignIn(
        OAuthProviderSwift(
          providerId: "oidc.custom-provider",
          scopes: ["profile", "openid"],
          displayName: "Sign in with Custom",
          buttonIcon: Image(systemName: "person.circle"),
          buttonBackgroundColor: .purple,
          buttonForegroundColor: .white
        )
      )
  }

  var body: some View {
    AuthPickerView {
      Text("App Content")
    }
    .environment(authService)
  }
}