

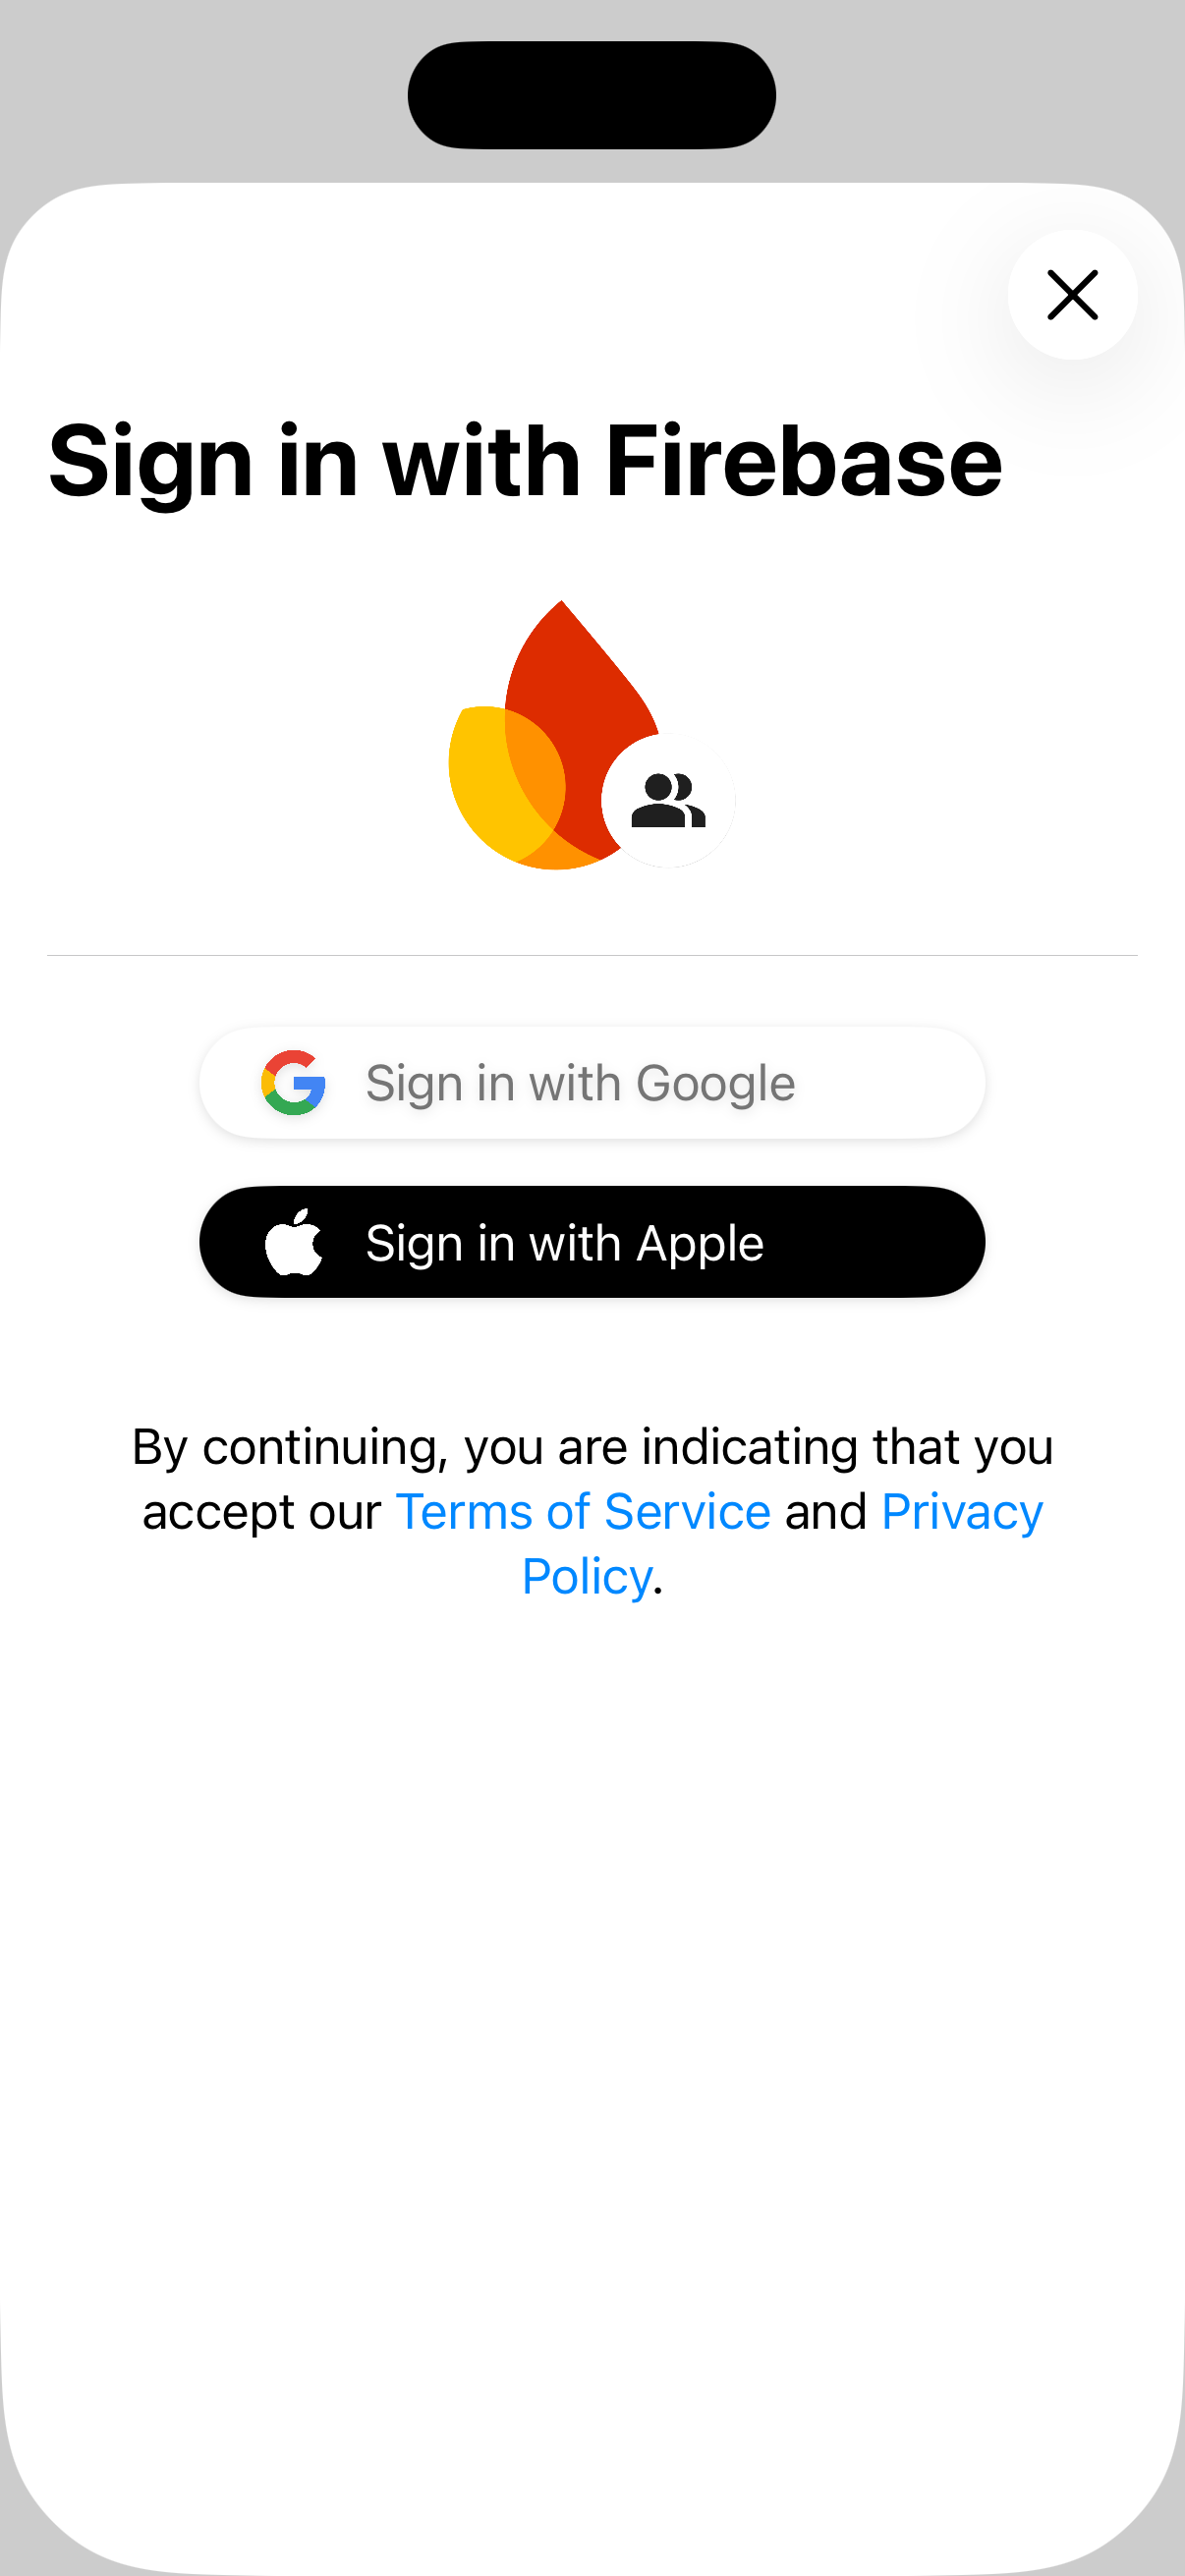
SwiftUI 的 FirebaseUI 是以 Firebase Authentication 為基礎建構的新式 SwiftUI 優先程式庫,可為應用程式提供預先建構的登入流程。
SwiftUI 專用 FirebaseUI 具備下列優點:
- 預設 UI:使用
AuthPickerView新增完整的登入流程。 - 可自訂:在自己的版面配置中顯示預設按鈕,或打造完全自訂的體驗。
- 匿名帳戶連結:可選擇升級匿名使用者,而非取代。
- 帳戶管理:內建註冊、密碼救援和帳戶管理流程。
- 多個提供者:電子郵件/密碼、電子郵件連結、電話驗證、Apple、Google、Facebook、Twitter 和標準 OAuth2/OIDC 提供者。
- 新式驗證功能:內建支援多重驗證 (MFA) 和 async/await API。
事前準備
將 Firebase 新增至 Apple 專案。請務必完成 SwiftUI 步驟。
確認應用程式指定 iOS 17 以上版本。
安裝項目
FirebaseUI for SwiftUI 是以 Swift 套件的形式提供。如要在 Xcode 專案中安裝套件,請按照下列步驟操作:
在 Xcode 中,依序點選「File」>「Add Package Dependencies」。
輸入套件網址:
https://github.com/firebase/FirebaseUI-iOS在「Dependency Rule」選單中,選取「Up to Next Major Version」,並將最低版本設為最新版本。
按一下「Add Package」,然後選取要新增至專案的程式庫。
下列程式庫一律為必要。其中包含核心依附元件,以及電子郵件密碼登入和電子郵件連結登入的支援。
FirebaseAuthSwiftUI
如要支援其他登入方式,請一併選取下列一或多個程式庫:
FirebaseAppleSwiftUI(使用 Apple 帳戶登入)FirebaseGoogleSwiftUI(使用 Google 帳戶登入)FirebaseFacebookSwiftUI(使用 Facebook 帳戶登入)FirebasePhoneAuthSwiftUI(手機驗證)FirebaseTwitterSwiftUI(使用 Twitter 帳戶登入)FirebaseOAuthSwiftUI(標準 OAuth 和 OIDC 供應商,例如 GitHub、Microsoft、Yahoo)
按一下「Add Package」,安裝所選程式庫。
在頂層
View的初始化器中設定 FirebaseUI 的AuthService,並使用環境將服務傳遞至子檢視畫面。import FirebaseAuthSwiftUI import SwiftUI struct ContentView: View { let authService: AuthService init() { let configuration = AuthConfiguration() authService = AuthService(configuration: configuration) .withEmailSignIn() // Or whatever sign-in methods you want to support. // See the next section. } var body: some View { AuthPickerView { // AuthPickerView (the prebuilt View) or a custom View. Text("Welcome to your app!") } .environment(authService) } }
設定登入方式
每種支援的登入方式都需要額外的設定步驟。展開下方各節,並按照操作說明設定個別供應商。
電子郵件地址和密碼
電子郵件連結驗證
如要使用無密碼電子郵件連結登入,請按照下列步驟操作:
在 Firebase 控制台的「Security」>「Authentication」>「登入方式」部分,依序啟用「Email/Password」和電子郵件連結登入功能。請注意,您必須啟用電子郵件或密碼登入功能,才能使用電子郵件連結登入。
將連結網域新增至「已授權網域」。
設定
ActionCodeSettings,將其傳遞至AuthConfiguration並註冊提供者:let actionCodeSettings = ActionCodeSettings() actionCodeSettings.handleCodeInApp = true actionCodeSettings.url = URL(string: "https://yourapp.firebaseapp.com") guard let bundleID = Bundle.main.bundleIdentifier else { fatalError("Missing bundle identifier for email link authentication setup.") } actionCodeSettings.setIOSBundleID(bundleID) let configuration = AuthConfiguration( emailLinkSignInActionCodeSettings: actionCodeSettings ) let authService = AuthService(configuration: configuration) .withEmailLinkSignIn()在呼叫
FirebaseApp.configure()的同一個AppDelegate中,將邏輯新增至application(_:open:options:)方法,以便在開啟的網址是 Firebase Authentication 登入連結時傳回true。這項邏輯表示連結是由 FirebaseUI 處理,不應由其他連結處理常式處理。import FacebookCore import FirebaseAuth import UIKit class AppDelegate: NSObject, UIApplicationDelegate { func application( _ application: UIApplication, didFinishLaunchingWithOptions launchOptions: [UIApplication.LaunchOptionsKey: Any]? ) -> Bool { FirebaseApp.configure() return true } func application( _ application: UIApplication, open url: URL, options: [UIApplication.OpenURLOptionsKey: Any] = [:] ) -> Bool { if Auth.auth().canHandle(url) { return true } return false } }如果您建構自訂檢視畫面,請在連結開啟應用程式時呼叫
authService.handleSignInLink(url:)。
Apple
如要使用「透過 Apple 登入」功能,請按照下列步驟操作:
設定「使用 Apple 帳戶登入」:
- 在 Apple 開發人員網站的「Certificates, Identifiers & Profiles」頁面,為應用程式啟用「使用 Apple 帳戶登入」功能。
- 按照「設定 Apple 網頁版登入功能」第一節的說明,將網站與應用程式建立關聯。系統提示時,請將下列網址註冊為 Return URL:
https://YOUR_FIREBASE_PROJECT_ID.firebaseapp.com/__/auth/handler
- 建立「使用 Apple 帳戶登入」私密金鑰。 在下一節中,您會需要新的私密金鑰和金鑰 ID。
- 如果您使用 Firebase Authentication 的任何功能向使用者傳送電子郵件,包括電子郵件連結登入、電子郵件地址驗證、帳戶變更撤銷等,請設定 Apple 私人電子郵件轉送服務並註冊
noreply@YOUR_FIREBASE_PROJECT_ID.firebaseapp.com(或自訂電子郵件範本網域),讓 Apple 將 Firebase Authentication 傳送的電子郵件轉送至匿名 Apple 電子郵件地址。
在 Firebase 控制台的「Security」>「Authentication」>「登入方式」部分,啟用「Apple」。
- 指定您在上一節建立的服務 ID。
- 在「OAuth code flow configuration」(OAuth 程式碼流程設定) 部分,指定 Apple 團隊 ID,以及您在上一節建立的私密金鑰和金鑰 ID。
在 Xcode 中,開啟專案編輯器的「Signing & Capabilities」部分,然後新增「Sign in with Apple」功能。
在
AuthService執行個體中註冊供應商:let authService = AuthService() .withAppleSignIn()
如要使用 Google 登入功能,請按照下列步驟操作:
在 Firebase 控制台的「Security」>「Authentication」>「登入方式」部分,啟用「Google」供應商。
下載專案
GoogleService-Info.plist檔案的新副本,並複製到 Xcode 專案。以新版本覆寫任何現有版本。在 Xcode 專案中新增自訂網址配置:
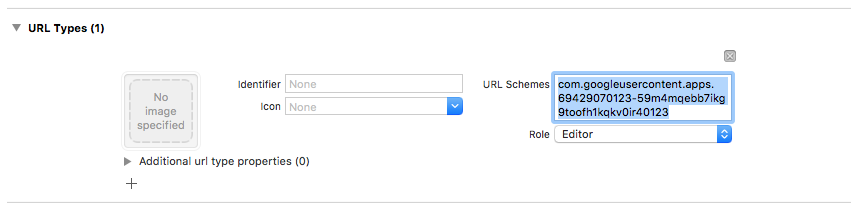
開啟專案設定:按一下左側樹狀檢視中的專案名稱。從「TARGETS」部分選取應用程式,然後選取「Info」分頁標籤,並展開「URL Types」部分。
按一下「+」按鈕,然後為反向用戶端 ID 新增網址配置。如要找出這個值,請開啟
GoogleService-Info.plist REVERSED_CLIENT_ID鍵。複製該鍵的值,並貼到設定頁面的「URL Schemes」(網址配置) 方塊中。其他欄位則維持不變。完成後,設定應與下方類似 (但包含應用程式專屬值):
在
AuthService執行個體中註冊供應商:let authService = AuthService() .withGoogleSignIn()
如要使用 Facebook 登入功能:
請按照 Meta for Developers 網站上的操作說明,設定 Facebook Login for iOS SDK。略過最後一個步驟「Add Facebook Login to Your Code」(在程式碼中加入 Facebook 登入功能)。
在 Firebase 控制台的「Security」>「Authentication」>「登入方式」部分,啟用「Facebook」供應商。您需要 Meta for Developers 網站上的 Facebook 應用程式 ID 和應用程式密鑰。
在
AuthService執行個體中註冊供應商:let authService = AuthService() .withFacebookSignIn()
電話號碼
如要使用電話驗證功能,請按照下列步驟操作:
在 Firebase 控制台的「Security」>「Authentication」>「登入方式」部分,啟用「Phone」供應商。
按照「開始接收靜音通知」一節的指示,為應用程式設定 APN。
在 Xcode 專案中新增自訂網址配置:
開啟專案設定:按一下左側樹狀檢視中的專案名稱。從「TARGETS」部分選取應用程式,然後選取「Info」分頁標籤,並展開「URL Types」部分。
按一下「+」按鈕,然後將編碼應用程式 ID 新增為網址配置。 如要查看這個值,請在 Firebase 控制台中依序前往「Settings」(設定) >「General」(一般)。
完成後,設定應與下方類似 (但包含應用程式專屬值):
在呼叫
FirebaseApp.configure()的同一個AppDelegate中,新增 APNs 權杖處理常式:import FacebookCore import FirebaseAuth import UIKit class AppDelegate: NSObject, UIApplicationDelegate { func application( _ application: UIApplication, didFinishLaunchingWithOptions launchOptions: [UIApplication.LaunchOptionsKey: Any]? ) -> Bool { FirebaseApp.configure() return true } func application( _ application: UIApplication, didRegisterForRemoteNotificationsWithDeviceToken deviceToken: Data ) { #if DEBUG Auth.auth().setAPNSToken(deviceToken, type: .sandbox) #else Auth.auth().setAPNSToken(deviceToken, type: .prod) #endif } }在
AuthService執行個體中註冊供應商:let authService = AuthService() .withPhoneSignIn()
Twitter (X)
如要使用 Twitter 登入:
按照 X 開發人員網站上的操作說明,產生 X API 憑證。
在 Firebase 控制台的「Security」>「Authentication」>「登入方式」部分,啟用「Twitter」供應商。您需要 X 開發人員控制台的 API 金鑰和 API 密鑰。
在
AuthService執行個體中註冊供應商:let authService = AuthService() .withTwitterSignIn()
標準 OAuth2 和 OIDC 供應商
FirebaseUI 也支援內建的 OAuth 供應商 (例如 GitHub、Microsoft 和 Yahoo),以及在 Firebase 驗證中設定的自訂 OIDC 供應商。
 let authService = AuthService()
  .withOAuthSignIn(OAuthProviderSwift.github())
  .withOAuthSignIn(OAuthProviderSwift.microsoft())
  .withOAuthSignIn(OAuthProviderSwift.yahoo())
如果是自訂 OIDC 供應商,請先在 Firebase Authentication 中設定供應商,然後使用供應商 ID 和按鈕設定建立 OAuthProviderSwift:
let lineProvider = OAuthProviderSwift(
  providerId: "oidc.line",
  buttonLabel: "Sign in with LINE",
  displayName: "LINE",
  iconSystemName: "person.crop.circle.badge.checkmark",
  buttonBackgroundColor: .green,
  buttonForegroundColor: .white
)

let authService = AuthService()
  .withOAuthSignIn(lineProvider)
使用預先建構的驗證檢視畫面
SwiftUI 適用的 FirebaseUI 提供 AuthPickerView,這是一個預先建構、有特定設計理念的驗證 UI,可為您處理整個驗證流程。這是為應用程式新增驗證機制最簡單的方法。
範例
以下是使用 AuthPickerView 的範例,其中包含多個供應商和設定選項:
import FirebaseAppleSwiftUI
import FirebaseAuthSwiftUI
import FirebaseGoogleSwiftUI
import SwiftUI

struct ContentView: View {
  let authService: AuthService

  init() {
    // Create configuration with options
    let configuration = AuthConfiguration(
      tosUrl: URL(string: "https://example.com/tos"),
      privacyPolicyUrl: URL(string: "https://example.com/privacy"),
      shouldAutoUpgradeAnonymousUsers: true
    )

    // Initialize AuthService with multiple providers
    authService = AuthService(configuration: configuration)
      .withEmailSignIn()
      .withAppleSignIn()
      .withGoogleSignIn()
  }

  var body: some View {
    AuthPickerView {
      authenticatedContent
    }
    .environment(authService)
  }

  var authenticatedContent: some View {
    NavigationStack {
      VStack(spacing: 20) {
        if authService.authenticationState == .authenticated {
          Text("Authenticated")

          Button("Manage Account") {
            authService.isPresented = true
          }
          .buttonStyle(.bordered)

          Button("Sign Out") {
            Task {
              try? await authService.signOut()
            }
          }
          .buttonStyle(.borderedProminent)
        } else {
          Text("Not Authenticated")

          Button("Sign In") {
            authService.isPresented = true
          }
          .buttonStyle(.borderedProminent)
        }
      }
      .navigationTitle("My App")
    }
    .onChange(of: authService.authenticationState) { _, newValue in
      // Automatically show auth UI when not authenticated
      if newValue != .authenticating {
        authService.isPresented = (newValue == .unauthenticated)
      }
    }
  }
}
一般自訂
雖然所有 AuthConfiguration 參數都是選用,但大多數應用程式至少會自訂下列設定:
let configuration = AuthConfiguration(
    logo: ImageResource.exampleLogoAsset,
    customStringsBundle: .main,
    tosUrl: URL(string: "https://example.com/tos"),
    privacyPolicyUrl: URL(string: "https://example.com/privacy"),
)
logo:驗證工作表上顯示的標誌圖片。如要瞭解如何加入自己的圖片素材資源,請參閱「在 Xcode 專案中加入圖片」。customStringsBundle:使用指定 Bundle 中的自訂字串。這項設定可用於本地化,也可用於自訂AuthPickerView使用的預設字串。舉例來說,如要設定驗證工作表頂端顯示的訊息,請建立Localizable.strings,並加入以下內容:"Sign in with Firebase" = "Sign in to use ExampleApp";
預建檢視畫面包含哪些內容
使用 AuthPickerView 可享以下福利:
- 工作表呈現:驗證 UI 會顯示為互動視窗工作表
- 內建導覽:自動在登入、密碼救援、MFA、電子郵件連結和電話驗證畫面之間切換
- 驗證狀態管理:根據
authService.authenticationState,自動在驗證 UI 和內容之間切換 - 透過
isPresented控制:設定authService.isPresented = true/false,控制驗證表的顯示時機
預設行為
預設的 AuthPickerView 對於如何處理多個複雜情境有特定做法:
1. 解決帳戶衝突
發生帳戶衝突時 (例如使用已連結至其他帳戶的憑證登入),AuthPickerView 會自動處理:
- 匿名升級衝突:如果啟用
shouldAutoUpgradeAnonymousUsers,且在匿名升級期間發生衝突,系統會自動登出匿名使用者,並使用新憑證登入。 - 其他衝突:如果非匿名帳戶之間發生憑證衝突,系統會儲存待處理的憑證,並在成功登入後嘗試連結。
這項作業是由套用至 NavigationStack 層級的 AccountConflictModifier 處理。
2. 多重驗證 (MFA)
在設定中啟用多重驗證後:
- 自動偵測登入時是否需要多重驗證
- 顯示適當的多重驗證解決畫面 (簡訊或時間型動態密碼)
- 處理多重驗證註冊和管理流程
- 支援簡訊和限時動態密碼 (TOTP) 驗證
3. 錯誤處理
預設檢視畫面包含內建錯誤處理機制:
- 在快訊對話方塊中顯示容易使用的錯誤訊息
- 自動篩除內部處理的錯誤 (例如取消錯誤、自動處理的衝突)
- 透過
StringUtils使用本地化錯誤訊息 - 錯誤會透過
reportError環境金鑰傳播
4. 電子郵件連結登入
設定電子郵件連結登入功能後:
- 自動將電子郵件地址儲存在應用程式儲存空間
- 處理電子郵件中的深層連結導覽
- 管理完整的電子郵件驗證流程
- 支援透過電子郵件連結升級匿名使用者
5. 匿名使用者自動升級
啟用shouldAutoUpgradeAnonymousUsers後:
- 自動嘗試將匿名帳戶與新的登入憑證連結
- 升級匿名工作階段,而非取代,藉此保留使用者資料
- 妥善處理升級衝突
6. 在預設檢視畫面中重新驗證
刪除帳戶、更新密碼或取消註冊多重驗證因素等敏感操作,都需要近期驗證。使用預設檢視畫面時,系統會根據使用者的登入供應商自動處理重新驗證。
當敏感操作需要重新驗證時,預設檢視畫面會自動:
OAuth 供應商 (Google、Apple、Facebook、Twitter 等):顯示快訊,要求使用者確認,然後自動取得新的憑證並完成作業。
電子郵件/密碼:顯示工作表,提示使用者輸入密碼,再繼續操作。
電子郵件連結:顯示快訊,要求傳送驗證電子郵件,然後顯示操作說明,引導使用者查看電子郵件。使用者輕觸電子郵件中的連結,完成重新驗證。
手機:顯示快訊,說明需要驗證,然後顯示簡訊驗證碼驗證表單。
重新驗證成功後,系統會自動重試。使用 AuthPickerView 或內建帳戶管理檢視畫面 (UpdatePasswordView、SignedInView 等) 時,不需要額外程式碼。
進階:建構自訂驗證檢視畫面
如要進一步控管 UI 或導覽流程,您可以自行建構自訂驗證檢視畫面,同時仍使用 AuthService 處理驗證邏輯。
您可以透過多種方式,將 FirebaseUI 元素與自訂邏輯結合。以下各節提供一些您可能使用的自訂方法範例。
做法 1:使用 registerProvider() 的自訂按鈕
如要完全控管按鈕外觀,您可以建立自訂 AuthProviderUI 實作項目,包裝任何供應器並傳回自訂按鈕檢視畫面。
建立自訂供應器 UI
以下舉例說明如何建立自訂 Twitter 按鈕:
import FirebaseAuthSwiftUI
import FirebaseTwitterSwiftUI
import SwiftUI

// Step 1: Create your custom button view
struct CustomTwitterButton: View {
  let provider: TwitterProviderSwift
  @Environment(AuthService.self) private var authService
  @Environment(\.mfaHandler) private var mfaHandler

  var body: some View {
    Button {
      Task {
        do {
          let outcome = try await authService.signIn(provider)

          // Handle MFA if required
          if case let .mfaRequired(mfaInfo) = outcome,
             let onMFA = mfaHandler {
            onMFA(mfaInfo)
          }
        } catch {
          // Do Something Else
        }
      }
    } label: {
      HStack { // Your custom icon
        Text("Sign in with Twitter")
          .fontWeight(.semibold)
      }
      .frame(maxWidth: .infinity)
      .padding()
      .background(
        LinearGradient(
          colors: [Color.blue, Color.cyan],
          startPoint: .leading,
          endPoint: .trailing
        )
      )
      .foregroundColor(.white)
      .cornerRadius(12)
      .shadow(radius: 4)
    }
  }
}

// Step 2: Create a custom AuthProviderUI wrapper
class CustomTwitterProviderAuthUI: AuthProviderUI {
  private let typedProvider: TwitterProviderSwift
  var provider: AuthProviderSwift { typedProvider }
  let id: String = "twitter.com"

  init(provider: TwitterProviderSwift = TwitterProviderSwift()) {
    typedProvider = provider
  }

  @MainActor func authButton() -> AnyView {
    AnyView(CustomTwitterButton(provider: typedProvider))
  }
}

// Step 3: Use it in your app
struct ContentView: View {
  let authService: AuthService

  init() {
    let configuration = AuthConfiguration()
    authService = AuthService(configuration: configuration)

    // Register your custom provider UI
    authService.registerProvider(
      providerWithButton: CustomTwitterProviderAuthUI()
    )
    authService.isPresented = true
  }

  var body: some View {
    AuthPickerView {
      usersApp
    }
    .environment(authService)
  }

  var usersApp: some View {
    NavigationStack {
      VStack {
        Button {
          authService.isPresented = true
        } label: {
          Text("Authenticate")
        }
      }
    }
  }
}
簡化自訂按鈕範例
您也可以為任何供應商建立更簡單的自訂按鈕:
import FirebaseAuthSwiftUI
import FirebaseGoogleSwiftUI
import FirebaseAppleSwiftUI
import SwiftUI

// Custom Google Provider UI
class CustomGoogleProviderAuthUI: AuthProviderUI {
  private let typedProvider: GoogleProviderSwift
  var provider: AuthProviderSwift { typedProvider }
  let id: String = "google.com"

  init() {
    typedProvider = GoogleProviderSwift()
  }

  @MainActor func authButton() -> AnyView {
    AnyView(CustomGoogleButton(provider: typedProvider))
  }
}

struct CustomGoogleButton: View {
  let provider: GoogleProviderSwift
  @Environment(AuthService.self) private var authService

  var body: some View {
    Button {
      Task {
        try? await authService.signIn(provider)
      }
    } label: {
      HStack {
        Image(systemName: "g.circle.fill")
        Text("My Custom Google Button")
      }
      .frame(maxWidth: .infinity)
      .padding()
      .background(Color.purple) // Your custom color
      .foregroundColor(.white)
      .cornerRadius(10)
    }
  }
}

// Then use it
struct ContentView: View {
  let authService: AuthService

  init() {
    let configuration = AuthConfiguration()
    authService = AuthService(configuration: configuration)
      .withAppleSignIn() // Use default Apple button

    // Use custom Google button
    authService.registerProvider(
      providerWithButton: CustomGoogleProviderAuthUI()
    )
  }

  var body: some View {
    AuthPickerView {
      Text("App Content")
    }
    .environment(authService)
  }
}
這個方法適用於所有供應商:Google、Apple、Twitter、Facebook、手機和 OAuth 供應商。只要建立自訂按鈕檢視畫面,並將其包裝在符合 AuthProviderUI 的類別中即可。
方法 2:使用自訂檢視畫面的預設按鈕
您可以使用 AuthService.renderButtons() 並略過 AuthPickerView,在提供自己的版面配置和導覽時,轉譯預設驗證按鈕:
import FirebaseAuthSwiftUI
import FirebaseGoogleSwiftUI
import FirebaseAppleSwiftUI
import SwiftUI

struct CustomAuthView: View {
  @Environment(AuthService.self) private var authService

  var body: some View {
    VStack(spacing: 30) {
      // Your custom logo/branding
      Image("app-logo")
        .resizable()
        .frame(width: 150, height: 150)

      Text("Welcome to My App")
        .font(.largeTitle)
        .fontWeight(.bold)

      Text("Sign in to continue")
        .font(.subheadline)
        .foregroundStyle(.secondary)

      // Render default auth buttons
      authService.renderButtons(spacing: 12)
        .padding()
    }
    .padding()
  }
}

struct ContentView: View {
  init() {
    let configuration = AuthConfiguration()

    authService = AuthService(configuration: configuration)
      .withGoogleSignIn()
      .withAppleSignIn()
  }

  let authService: AuthService

  var body: some View {
    NavigationStack {
      if authService.authenticationState == .authenticated {
        Text("Authenticated!")
      } else {
        CustomAuthView()
      }
    }
    .environment(authService)
  }
}
方法 3:使用自訂導覽的自訂檢視畫面
如要完全控管整個流程,您可以略過 AuthPickerView,自行建構導覽系統:
import FirebaseAuth
import FirebaseAuthSwiftUI
import FirebaseGoogleSwiftUI
import SwiftUI

enum CustomAuthRoute {
  case signIn
  case phoneVerification
  case mfaResolution
}

struct ContentView: View {
  private let authService: AuthService
  @State private var navigationPath: [CustomAuthRoute] = []
  @State private var errorMessage: String?

  init() {
    let configuration = AuthConfiguration()
    self.authService = AuthService(configuration: configuration)
      .withGoogleSignIn()
      .withPhoneSignIn()
  }

  var body: some View {
    NavigationStack(path: $navigationPath) {
      Group {
        if authService.authenticationState == .authenticated {
          authenticatedView
        } else {
          customSignInView
        }
      }
      .navigationDestination(for: CustomAuthRoute.self) { route in
        switch route {
        case .signIn:
          customSignInView
        case .phoneVerification:
          customPhoneVerificationView
        case .mfaResolution:
          customMFAView
        }
      }
    }
    .environment(authService)
    .alert("Error", isPresented: .constant(errorMessage != nil)) {
      Button("OK") {
        errorMessage = nil
      }
    } message: {
      Text(errorMessage ?? "")
    }
  }

  var customSignInView: some View {
    VStack(spacing: 20) {
      Text("Custom Sign In")
        .font(.title)

      Button("Sign in with Google") {
        Task {
          do {
            let provider = GoogleProviderSwift(clientID: Auth.auth().app?.options.clientID ?? "")
            let outcome = try await authService.signIn(provider)

            // Handle MFA if required
            if case .mfaRequired = outcome {
              navigationPath.append(.mfaResolution)
            }
          } catch {
            errorMessage = error.localizedDescription
          }
        }
      }
      .buttonStyle(.borderedProminent)

      Button("Phone Sign In") {
        navigationPath.append(.phoneVerification)
      }
      .buttonStyle(.bordered)
    }
    .padding()
  }

  var customPhoneVerificationView: some View {
    Text("Custom Phone Verification View")
    // Implement your custom phone auth UI here
  }

  var customMFAView: some View {
    Text("Custom MFA Resolution View")
    // Implement your custom MFA UI here
  }

  var authenticatedView: some View {
    VStack(spacing: 20) {
      Text("Welcome!")
      Text("Email: \(authService.currentUser?.email ?? "N/A")")

      Button("Sign Out") {
        Task {
          try? await authService.signOut()
        }
      }
      .buttonStyle(.borderedProminent)
    }
  }
}
自訂檢視畫面的重要注意事項
建構自訂檢視畫面時,您需要自行處理 AuthPickerView 自動處理的幾項作業:
- 帳戶衝突:使用
AuthServiceError.accountConflict實作自己的衝突解決策略 - 多重驗證處理:檢查
SignInOutcome是否有.mfaRequired,並手動處理多重驗證 - 匿名使用者升級:如果啟用
shouldAutoUpgradeAnonymousUsers,則處理匿名帳戶的連結 - 導覽狀態:管理不同驗證畫面 (電話驗證、密碼救援等) 之間的導覽
- 載入狀態:觀察
authService.authenticationState,在非同步驗證作業期間顯示載入指標 - 重新驗證:處理敏感作業的重新驗證錯誤 (請參閱下方的「自訂檢視畫面中的重新驗證」)
在自訂檢視畫面中重新驗證
建構自訂檢視畫面時,請擷取特定錯誤並實作自己的流程,藉此處理重新驗證。敏感作業會擲回四種重新驗證錯誤,每種錯誤都包含情境資訊。
實作模式
OAuth 供應商 (Google、Apple、Facebook、Twitter 等):
擷取錯誤並呼叫 reauthenticate(context:),系統會自動處理 OAuth 流程:
do {
  try await authService.deleteUser()
} catch let error as AuthServiceError {
  if case .oauthReauthenticationRequired(let context) = error {
    try await authService.reauthenticate(context: context)
    try await authService.deleteUser() // Retry operation
  }
}
電子郵件/密碼:
擷取錯誤、提示輸入密碼、建立憑證,然後呼叫 reauthenticate(with:):
do {
  try await authService.updatePassword(to: newPassword)
} catch let error as AuthServiceError {
  if case .emailReauthenticationRequired(let context) = error {
    // Show your password prompt UI
    let password = await promptUserForPassword()
    let credential = EmailAuthProvider.credential(
      withEmail: context.email,
      password: password
    )
    try await authService.reauthenticate(with: credential)
    try await authService.updatePassword(to: newPassword) // Retry
  }
}
電話:
擷取錯誤、驗證手機、建立憑證,並呼叫 reauthenticate(with:):
do {
  try await authService.deleteUser()
} catch let error as AuthServiceError {
  if case .phoneReauthenticationRequired(let context) = error {
    // Send verification code
    let verificationId = try await authService.verifyPhoneNumber(
      phoneNumber: context.phoneNumber
    )
    // Show your SMS code input UI
    let code = await promptUserForSMSCode()
    let credential = PhoneAuthProvider.provider().credential(
      withVerificationID: verificationId,
      verificationCode: code
    )
    try await authService.reauthenticate(with: credential)
    try await authService.deleteUser() // Retry
  }
}
電子郵件連結:
擷取錯誤、傳送驗證電子郵件,並處理傳入的網址:
do {
  try await authService.updatePassword(to: newPassword)
} catch let error as AuthServiceError {
  if case .emailLinkReauthenticationRequired(let context) = error {
    // Send verification email
    try await authService.sendEmailSignInLink(
      email: context.email,
      isReauth: true
    )
    // Show your "Check your email" UI
    await showCheckEmailUI()
    // When user taps the link, it opens your app with a URL
    // Handle it in your URL handler:
    // try await authService.handleSignInLink(url: url)
    // The handleSignInLink method automatically completes reauthentication
    try await authService.updatePassword(to: newPassword) // Retry
  }
}
所有重新驗證情境物件都包含 .displayMessage 屬性,用於面向使用者顯示文字。
自訂 OAuth 供應商
您可以為內建服務以外的服務建立自訂 OAuth 供應商:
⚠️ 重要事項:您必須先在 Firebase 專案的驗證設定中,設定 OIDC (OpenID Connect) 供應商,才能使用這些供應商。在 Firebase 控制台中,前往「驗證」→「登入方式」,然後新增 OIDC 供應商,並提供必要憑證 (用戶端 ID、用戶端密鑰、核發者網址)。您也必須在供應商的開發人員控制台中,註冊 Firebase 提供的 OAuth 重新導向 URI。如需詳細設定操作說明,請參閱 Firebase OIDC 說明文件。
import FirebaseAuthSwiftUI
import FirebaseOAuthSwiftUI
import SwiftUI

struct ContentView: View {
  let authService: AuthService

  init() {
    let configuration = AuthConfiguration()

    authService = AuthService(configuration: configuration)
      .withOAuthSignIn(
        OAuthProviderSwift(
          providerId: "oidc.line",  // LINE OIDC provider
          scopes: ["profile", "openid", "email"],  // LINE requires these scopes
          displayName: "Sign in with LINE",
          buttonIcon: Image("line-logo"),
          buttonBackgroundColor: .green,
          buttonForegroundColor: .white
        )
      )
      .withOAuthSignIn(
        OAuthProviderSwift(
          providerId: "oidc.custom-provider",
          scopes: ["profile", "openid"],
          displayName: "Sign in with Custom",
          buttonIcon: Image(systemName: "person.circle"),
          buttonBackgroundColor: .purple,
          buttonForegroundColor: .white
        )
      )
  }

  var body: some View {
    AuthPickerView {
      Text("App Content")
    }
    .environment(authService)
  }
}