
Firebase SDK를 통해 엔드 투 엔드 로그인 과정을 실행하는 앱에 일반 OAuth 로그인을 통합하여 사용자가 GitHub와 같은 OAuth 제공업체를 통해 Firebase로 인증하도록 허용할 수 있습니다.
시작하기 전에
사용자가 GitHub 계정을 통해 로그인하도록 하려면 먼저 Firebase 프로젝트에 GitHub를 로그인 제공업체로 사용 설정해야 합니다.
Swift Package Manager를 사용해 Firebase 종속 항목을 설치하고 관리하세요.
- 앱 프로젝트를 연 상태로 Xcode에서 File(파일) > Add Packages(패키지 추가)로 이동합니다.
- 메시지가 표시되면 Firebase Apple 플랫폼 SDK 저장소를 추가합니다.
- Firebase Authentication 라이브러리를 선택합니다.
- 타겟 빌드 설정의 Other Linker Flags(기타 링커 플래그) 섹션에
-ObjC플래그를 추가합니다. - 완료되면 Xcode가 백그라운드에서 자동으로 종속 항목을 확인하고 다운로드하기 시작합니다.
https://github.com/firebase/firebase-ios-sdk.git
이제 몇 가지 구성 단계를 수행합니다.
- Firebase Console에서 인증 섹션을 엽니다.
- 로그인 방법 탭에서 GitHub 제공업체를 사용 설정합니다.
- 해당 제공업체의 개발자 콘솔에서 제공되는 클라이언트 ID 및 클라이언트 보안 비밀번호를 제공업체 구성에 추가합니다.
- GitHub에서 개발자 애플리케이션으로 앱을 등록하고 앱의 OAuth 2.0 클라이언트 ID와 클라이언트 보안 비밀번호를 가져옵니다.
- GitHub 앱 구성의 앱 설정 페이지에서 Firebase OAuth 리디렉션 URI(예:
my-app-12345.firebaseapp.com/__/auth/handler)가 승인 콜백 URL로 설정되어 있는지 확인합니다.
- 저장을 클릭합니다.
Firebase SDK로 로그인 과정 처리
Firebase Apple 플랫폼 SDK로 로그인 과정을 처리하려면 다음 단계를 따르세요.
다음과 같이 Xcode 프로젝트에 커스텀 URL 스킴을 추가합니다.
- 왼쪽 트리 보기에서 프로젝트 이름을 더블클릭하여 프로젝트 구성을 엽니다. 대상 섹션에서 앱을 선택하고 정보 탭을 선택한 후 URL 유형 섹션을 펼칩니다.
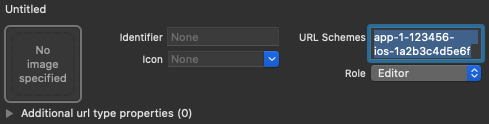
- + 버튼을 클릭하고 인코딩된 앱 ID를 URL 스키마로 추가합니다. 인코딩된 앱 ID는 Firebase Console의 일반 설정 페이지에 있는 iOS 앱 섹션에서 찾을 수 있습니다. 다른 필드는 비워 둡니다.
완성된 구성은 다음과 같은 형태이며 애플리케이션별 값이 적용됩니다.
제공업체 ID OAuthProvider을 사용하여 OAuthProvider 인스턴스를 만듭니다.
Swift
var provider = OAuthProvider(providerID: "github.com")
Objective-C
FIROAuthProvider *provider = [FIROAuthProvider providerWithProviderID:@"github.com"];
선택사항: OAuth 요청과 함께 전송하고자 하는 맞춤 OAuth 매개변수를 추가로 지정합니다.
Swift
    provider.customParameters = [
      "allow_signup": "false"
    ]
Objective-C
[provider setCustomParameters:@{@"allow_signup": @"false"}];
GitHub가 지원하는 매개변수 정보는 GitHub OAuth 문서를 참조하세요. Firebase에서 요구하는 매개변수를
setCustomParameters와 함께 전달할 수 없으며, 이러한 매개변수에는 client_id, redirect_uri, response_type, scope, state가 있습니다.선택사항: 인증 제공업체에 요청하고자 하는 기본 프로필 범위를 넘는 OAuth 2.0 범위를 추가로 지정합니다. 애플리케이션에서 GitHub API의 비공개 사용자 데이터에 대한 액세스가 필요한 경우 GitHub 개발자 콘솔의 API 권한에서 GitHub API에 대한 액세스 권한을 요청해야 합니다. 요청한 OAuth 범위는 앱의 API 권한에서 사전 구성된 범위와 정확하게 일치해야 합니다.
Swift
    // Request read access to a user's email addresses.
    // This must be preconfigured in the app's API permissions.
    provider.scopes = ["user:email"]
Objective-C
    // Request read access to a user's email addresses.
    // This must be preconfigured in the app's API permissions.
    [provider setScopes:@[@"user:email"]];
자세한 내용은 GitHub 범위 문서를 참조하세요.
선택사항: 사용자에게 reCAPTCHA가 사용자에게 표시될 때 앱에서
SFSafariViewController또는UIWebView를 표시하는 방식을 맞춤설정하려면AuthUIDelegate프로토콜을 준수하는 커스텀 클래스를 만들어credentialWithUIDelegate에 전달합니다.OAuth 제공업체 객체를 사용해 Firebase에 인증합니다.
Swift
    provider.getCredentialWith(nil) { credential, error in
      if error != nil {
        // Handle error.
      }
      if credential != nil {
        Auth().signIn(with: credential) { authResult, error in
          if error != nil {
            // Handle error.
          }
          // User is signed in.
          // IdP data available in authResult.additionalUserInfo.profile.

          guard let oauthCredential = authResult.credential as? OAuthCredential else { return }
          // GitHub OAuth access token can also be retrieved by:
          // oauthCredential.accessToken
          // GitHub OAuth ID token can be retrieved by calling:
          // oauthCredential.idToken
        }
      }
    }
Objective-C
    [provider getCredentialWithUIDelegate:nil
                               completion:^(FIRAuthCredential *_Nullable credential,
                                            NSError *_Nullable error) {
      if (error) {
       // Handle error.
      }
      if (credential) {
        [[FIRAuth auth] signInWithCredential:credential
                                  completion:^(FIRAuthDataResult *_Nullable authResult,
                                            NSError *_Nullable error) {
          if (error) {
            // Handle error.
          }
          // User is signed in.
          // IdP data available in authResult.additionalUserInfo.profile.

          FIROAuthCredential *oauthCredential = (FIROAuthCredential *)authResult.credential;
          // GitHub OAuth access token can also be retrieved by:
          // oauthCredential.accessToken
          // GitHub OAuth ID token can be retrieved by calling:
          // oauthCredential.idToken
        }];
      }
    }];
OAuth 액세스 토큰을 사용하면 GitHub API를 호출할 수 있습니다.
예를 들어 기본 프로필 정보를 가져오려면
Authorization헤더에 액세스 토큰을 전달하여 REST API를 호출하면 됩니다.https://api.github.com/user
위 예시는 로그인 과정에 중점을 두고 있지만 GitHub 제공업체를 기존 사용자에 연결할 수도 있습니다. 예를 들어 여러 제공업체를 동일한 사용자에 연결하여 그중 하나로 로그인하도록 허용할 수 있습니다.
Swift
    Auth().currentUser.link(withCredential: credential) { authResult, error in
      if error != nil {
        // Handle error.
      }
      // GitHub credential is linked to the current user.
      // IdP data available in authResult.additionalUserInfo.profile.
      // GitHub OAuth access token can also be retrieved by:
      // (authResult.credential as? OAuthCredential)?.accessToken
      // GitHub OAuth ID token can be retrieved by calling:
      // (authResult.credential as? OAuthCredential)?.idToken
    }
Objective-C
    [[FIRAuth auth].currentUser
        linkWithCredential:credential
                completion:^(FIRAuthDataResult * _Nullable authResult, NSError * _Nullable error) {
      if (error) {
        // Handle error.
      }
      // GitHub credential is linked to the current user.
      // IdP data available in authResult.additionalUserInfo.profile.
      // GitHub OAuth access token is can also be retrieved by:
      // ((FIROAuthCredential *)authResult.credential).accessToken
      // GitHub OAuth ID token can be retrieved by calling:
      // ((FIROAuthCredential *)authResult.credential).idToken
    }];
최근 로그인한 적이 있어야 진행할 수 있는 중요한 작업에 대해 새로운 사용자 인증 정보를 검색하는 데 사용할 수 있는
reauthenticateWithCredential와 동일한 패턴을 사용할 수 있습니다.Swift
    Auth().currentUser.reauthenticateWithCredential(withCredential: credential) { authResult, error in
      if error != nil {
        // Handle error.
      }
      // User is re-authenticated with fresh tokens minted and
      // should be able to perform sensitive operations like account
      // deletion and email or password update.
      // IdP data available in result.additionalUserInfo.profile.
      // Additional OAuth access token is can also be retrieved by:
      // (authResult.credential as? OAuthCredential)?.accessToken
      // GitHub OAuth ID token can be retrieved by calling:
      // (authResult.credential as? OAuthCredential)?.idToken
    }
Objective-C
    [[FIRAuth auth].currentUser
        reauthenticateWithCredential:credential
                          completion:^(FIRAuthDataResult * _Nullable authResult, NSError * _Nullable error) {
      if (error) {
        // Handle error.
      }
      // User is re-authenticated with fresh tokens minted and
      // should be able to perform sensitive operations like account
      // deletion and email or password update.
      // IdP data available in result.additionalUserInfo.profile.
      // Additional OAuth access token is can also be retrieved by:
      // ((FIROAuthCredential *)authResult.credential).accessToken
      // GitHub OAuth ID token can be retrieved by calling:
      // ((FIROAuthCredential *)authResult.credential).idToken
    }];
다음 단계
사용자가 처음으로 로그인하면 신규 사용자 계정이 생성되고 사용자가 로그인할 때 사용한 사용자 인증 정보(사용자 이름과 비밀번호, 전화번호 또는 인증 제공업체 정보)에 연결됩니다. 이 신규 계정은 Firebase 프로젝트의 일부로 저장되며 사용자의 로그인 방법에 관계없이 프로젝트 내 모든 앱에서 사용자를 식별하는 데 사용될 수 있습니다.
Firebase Realtime Database와 Cloud Storage 보안 규칙의
auth변수에서 로그인한 사용자의 고유 사용자 ID를 가져온 후 이 ID를 통해 사용자가 액세스할 수 있는 데이터를 관리할 수 있습니다.
인증 제공업체의 사용자 인증 정보를 기존 사용자 계정에 연결하면 사용자가 여러 인증 제공업체를 통해 앱에 로그인할 수 있습니다.
사용자를 로그아웃시키려면 signOut:을 호출합니다.
Swift
let firebaseAuth = Auth.auth()
do {
  try firebaseAuth.signOut()
} catch let signOutError as NSError {
  print("Error signing out: %@", signOutError)
}
Objective-C
NSError *signOutError;
BOOL status = [[FIRAuth auth] signOut:&signOutError];
if (!status) {
  NSLog(@"Error signing out: %@", signOutError);
  return;
}
또한 모든 인증 오류에 대한 오류 처리 코드를 추가할 수도 있습니다. 오류 처리를 참조하세요.