
只要在應用程式中整合 Google 登入功能,使用者就能透過 Google 帳戶使用 Firebase 驗證服務。
事前準備
使用 Swift Package Manager 安裝及管理 Firebase 依附元件。
- 在 Xcode 中保持開啟應用程式專案,然後依序點選「File」(檔案) 和「Add Packages」(新增 Package)。
- 系統提示時,請新增 Firebase Apple 平台 SDK 存放區:
- 選擇 Firebase Authentication 程式庫。
- 將
-ObjC標記加進目標建構設定的「Other Linker Flags」部分。 - 完成後,Xcode 會自動開始在背景中解析並下載依附元件。
https://github.com/firebase/firebase-ios-sdk.git
在專案中新增 Google 登入 SDK
在 Xcode 中保持開啟應用程式專案,然後依序點選「File」(檔案) 和「Add Packages」(新增 Package)。
系統提示時,請新增 Google 登入 SDK 存放區:
https://github.com/google/GoogleSignIn-iOS完成後,Xcode 會自動開始在背景中解析並下載依附元件。
為 Firebase 專案啟用 Google 登入
如要允許使用者透過 Google 登入功能登入,請先為 Firebase 專案啟用 Google 登入供應商:
- 在 Firebase 控制台中,開啟「驗證」部分。
- 在「登入方式」分頁中,啟用「Google」供應器。
按一下 [儲存]。
下載專案的
GoogleService-Info.plist檔案副本,並複製到 Xcode 專案。以新版本覆寫現有版本。(請參閱「將 Firebase 新增至 iOS 專案」一文)。
匯入必要的標頭檔案
首先,您必須將 Firebase SDK 和 Google 登入 SDK 標頭檔案匯入應用程式。
Swift
import FirebaseAuth
import GoogleSignIn
Objective-C
@import FirebaseCore;
@import GoogleSignIn;
設定 Google 登入
請按照下列步驟實作 Google 登入。如要瞭解如何在 iOS 中使用 Google 登入,請參閱 Google 登入開發人員說明文件。
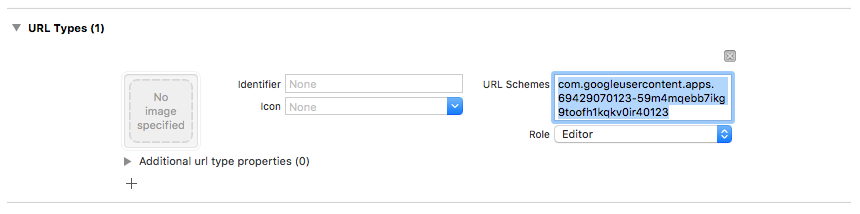
- 在 Xcode 專案中新增自訂網址架構:
- 開啟專案設定:按一下左側樹狀檢視中的專案名稱。在「目標」部分選取您的應用程式,然後選取「資訊」分頁標籤,並展開「網址類型」部分。
- 按一下 + 按鈕,然後為反向用戶端 ID 新增網址配置。如要找出這個值,請開啟
GoogleService-Info.plist REVERSED_CLIENT_ID鍵。複製該鍵的值,然後貼到設定頁面的「URL Schemes」(網址架構) 方塊中。其他欄位則維持不變。完成後,您的設定應如下所示 (但會使用應用程式專屬值):
- 在應用程式委派的
application:didFinishLaunchingWithOptions:方法中,設定FirebaseApp物件。Swift
// Use Firebase library to configure APIs
FirebaseApp.configure()
Objective-C
// Use Firebase library to configure APIs
[FIRApp configure];
- 實作應用程式委派的
application:openURL:options:方法。這個方法應呼叫GIDSignIn例項的handleURL方法,以便正確處理應用程式在驗證程序結束時收到的網址。Swift
func scene(_ scene: UIScene, openURLContexts URLContexts: Set<UIOpenURLContext>) {
  // ...
}
  return GIDSignIn.sharedInstance.handle(url)
}
Objective-C
- (BOOL)application:(nonnull UIApplication *)application
            openURL:(nonnull NSURL *)url
            options:(nonnull NSDictionary<NSString *, id> *)options {
  return [[GIDSignIn sharedInstance] handleURL:url];
}
- 將應用程式的顯示檢視畫面控制器和用戶端 ID 傳遞至 Google 登入供應商的
signIn方法,並從產生的 Google 驗證權杖建立 Firebase 驗證憑證:Swift
guard let clientID = FirebaseApp.app()?.options.clientID else { return }

// Create Google Sign In configuration object.
let config = GIDConfiguration(clientID: clientID)
GIDSignIn.sharedInstance.configuration = config

// Start the sign in flow!
GIDSignIn.sharedInstance.signIn(withPresenting: viewController) { result, error in
  guard error == nil else {
    // ...
    return
  }

  guard let user = result?.user,
        let idToken = user.idToken?.tokenString
  else {
    // ...
    return
  }

  let credential = GoogleAuthProvider.credential(withIDToken: idToken,
                                                 accessToken: user.accessToken.tokenString)
  self.signIn(with: credential)
}
Objective-C
GIDConfiguration *config = [[GIDConfiguration alloc] initWithClientID:[FIRApp defaultApp].options.clientID];
[GIDSignIn.sharedInstance setConfiguration:config];

__weak __auto_type weakSelf = self;
[GIDSignIn.sharedInstance signInWithPresentingViewController:self
      completion:^(GIDSignInResult * _Nullable result, NSError * _Nullable error) {
  __auto_type strongSelf = weakSelf;
  if (strongSelf == nil) { return; }

  if (error == nil) {
    FIRAuthCredential *credential =
    [FIRGoogleAuthProvider credentialWithIDToken:result.user.idToken.tokenString
                                     accessToken:result.user.accessToken.tokenString];
    // ...
  } else {
    // ...
  }
}];
- 將
GIDSignInButton新增至分鏡腳本、XIB 檔案,或以程式輔助方式例項化。如要將按鈕新增至分鏡腳本或 XIB 檔案,請新增檢視區塊,並將自訂類別設為GIDSignInButton。 - 選用:如要自訂按鈕,請執行下列操作:
Swift
- 在檢視畫面控制器中,將登入按鈕宣告為屬性。
@IBOutlet weak var signInButton: GIDSignInButton!
- 將按鈕連結至您剛才宣告的
signInButton屬性。 - 設定 GIDSignInButton 物件的屬性,即可自訂按鈕。
Objective-C
- 在檢視畫面控制器的標頭檔案中,將登入按鈕宣告為屬性。
@property(weak, nonatomic) IBOutlet GIDSignInButton *signInButton;
- 將按鈕連結至您剛才宣告的
signInButton屬性。 - 設定 GIDSignInButton 物件的屬性,即可自訂按鈕。
- 在檢視畫面控制器中,將登入按鈕宣告為屬性。
使用 Firebase 進行驗證
最後,使用上一個步驟中建立的驗證憑證,完成 Firebase 登入程序。
Swift
Auth.auth().signIn(with: credential) { result, error in
  guard error == nil else {
    // ...
    return
  }

  // At this point, our user is signed in
}
Objective-C
[[FIRAuth auth] signInWithCredential:credential
                          completion:^(FIRAuthDataResult * _Nullable authResult,
                                       NSError * _Nullable error) {
    if (isMFAEnabled && error && error.code == FIRAuthErrorCodeSecondFactorRequired) {
      FIRMultiFactorResolver *resolver = error.userInfo[FIRAuthErrorUserInfoMultiFactorResolverKey];
      NSMutableString *displayNameString = [NSMutableString string];
      for (FIRMultiFactorInfo *tmpFactorInfo in resolver.hints) {
        [displayNameString appendString:tmpFactorInfo.displayName];
        [displayNameString appendString:@" "];
      }
      [self showTextInputPromptWithMessage:[NSString stringWithFormat:@"Select factor to sign in\n%@", displayNameString]
                           completionBlock:^(BOOL userPressedOK, NSString *_Nullable displayName) {
       FIRPhoneMultiFactorInfo* selectedHint;
       for (FIRMultiFactorInfo *tmpFactorInfo in resolver.hints) {
         if ([displayName isEqualToString:tmpFactorInfo.displayName]) {
           selectedHint = (FIRPhoneMultiFactorInfo *)tmpFactorInfo;
         }
       }
       [FIRPhoneAuthProvider.provider
        verifyPhoneNumberWithMultiFactorInfo:selectedHint
        UIDelegate:nil
        multiFactorSession:resolver.session
        completion:^(NSString * _Nullable verificationID, NSError * _Nullable error) {
          if (error) {
            [self showMessagePrompt:error.localizedDescription];
          } else {
            [self showTextInputPromptWithMessage:[NSString stringWithFormat:@"Verification code for %@", selectedHint.displayName]
                                 completionBlock:^(BOOL userPressedOK, NSString *_Nullable verificationCode) {
             FIRPhoneAuthCredential *credential =
                 [[FIRPhoneAuthProvider provider] credentialWithVerificationID:verificationID
                                                              verificationCode:verificationCode];
             FIRMultiFactorAssertion *assertion = [FIRPhoneMultiFactorGenerator assertionWithCredential:credential];
             [resolver resolveSignInWithAssertion:assertion completion:^(FIRAuthDataResult * _Nullable authResult, NSError * _Nullable error) {
               if (error) {
                 [self showMessagePrompt:error.localizedDescription];
               } else {
                 NSLog(@"Multi factor finanlize sign in succeeded.");
               }
             }];
           }];
          }
        }];
     }];
    }
  else if (error) {
    // ...
    return;
  }
  // User successfully signed in. Get user data from the FIRUser object
  if (authResult == nil) { return; }
  FIRUser *user = authResult.user;
  // ...
}];
後續步驟
使用者首次登入後,系統會建立新的使用者帳戶,並連結至使用者登入時使用的憑證 (即使用者名稱和密碼、電話號碼或驗證供應商資訊)。這個新帳戶會儲存在 Firebase 專案中,可用於識別專案中每個應用程式的使用者,無論使用者登入方式為何。
在 Firebase Realtime Database 和 Cloud Storage 安全規則中,您可以從
auth變數取得已登入使用者的專屬使用者 ID, 並使用該 ID 控制使用者可存取的資料。
您可以將驗證供應商憑證連結至現有使用者帳戶,允許使用者透過多個驗證供應商登入應用程式。
如要登出使用者,請呼叫
signOut:。
Swift
let firebaseAuth = Auth.auth()
do {
  try firebaseAuth.signOut()
} catch let signOutError as NSError {
  print("Error signing out: %@", signOutError)
}
Objective-C
NSError *signOutError;
BOOL status = [[FIRAuth auth] signOut:&signOutError];
if (!status) {
  NSLog(@"Error signing out: %@", signOutError);
  return;
}
您也可以新增錯誤處理程式碼,處理各種驗證錯誤。請參閱「處理錯誤」。