
您可以将 Google 登录服务集成到您的应用中,让您的用户使用自己的 Google 账号进行 Firebase 身份验证。
准备工作
使用 Swift Package Manager 安装和管理 Firebase 依赖项。
- 在 Xcode 中打开您的应用项目,依次点击 File(文件)> Add Packages(添加软件包)。
- 出现提示时,添加 Firebase Apple 平台 SDK 代码库:
- 选择 Firebase Authentication 库。
- 将
-ObjC标志添加到目标 build 设置的“其他链接器标志”部分。 - 完成之后,Xcode 将会自动开始在后台解析和下载您的依赖项。
https://github.com/firebase/firebase-ios-sdk.git
将 Google 登录 SDK 添加到您的项目中
在 Xcode 中打开您的应用项目,依次点击 File(文件)> Add Packages(添加软件包)。
出现提示时,添加 Google 登录 SDK 代码库:
https://github.com/google/GoogleSignIn-iOS完成之后,Xcode 将会自动开始在后台解析和下载您的依赖项。
为您的 Firebase 项目启用 Google 登录服务
若要允许用户使用 Google 登录服务进行登录,您必须先为自己的 Firebase 项目启用 Google 登录提供方:
- 在 Firebase 控制台中,打开 Authentication 部分。
- 在 Sign in method(登录方法)标签页中,启用 Google 提供方。
点击保存。
重新下载项目
GoogleService-Info.plist文件的副本,并将其复制到您的 Xcode 项目。用这个最新版本的文件覆盖任何现有的旧版本。(请参阅将 Firebase 添加到您的 iOS 项目。)
导入所需的头文件
首先,您必须将 Firebase SDK 和 Google Sign-In SDK 的头文件导入到您的应用中。
Swift
import FirebaseAuth
import GoogleSignIn
Objective-C
@import FirebaseCore;
@import GoogleSignIn;
实现 Google 登录
按下列步骤实现 Google 登录。如需详细了解如何在 iOS 设备上使用 Google 登录服务,请参阅 Google 登录开发者文档。
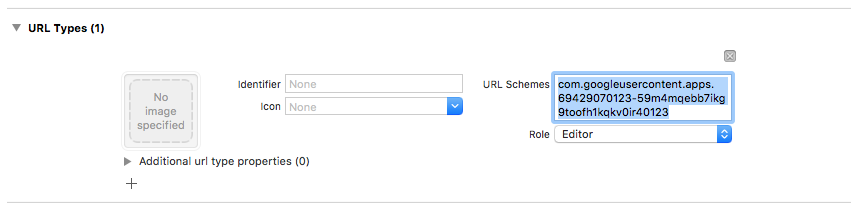
- 将自定义网址方案添加到您的 Xcode 项目中:
- 打开项目配置:在左侧的树状视图中点击项目名称。在目标部分中选择您的应用,然后选择信息标签页,并展开网址类型部分。
- 点击 + 按钮,并为您的倒序客户端 ID 添加一个网址方案。您可以打开
GoogleService-Info.plist REVERSED_CLIENT_ID键,来查看这个值。复制该键的值,并将其粘贴到配置页面上的网址方案框中。 其他字段保持不变即可。完成上述操作后,您的配置应显示如下(但其中的值应替换为您的应用的值):
- 在应用委托 (app delegate) 的
application:didFinishLaunchingWithOptions:方法中,配置FirebaseApp对象。Swift
// Use Firebase library to configure APIs
FirebaseApp.configure()
Objective-C
// Use Firebase library to configure APIs
[FIRApp configure];
- 实现您的应用委托中的
application:openURL:options:方法。此方法应该调用GIDSignIn实例的handleURL方法,该方法将对您的应用在身份验证过程结束时收到的网址进行适当处理。Swift
func scene(_ scene: UIScene, openURLContexts URLContexts: Set<UIOpenURLContext>) {
  // ...
}
  return GIDSignIn.sharedInstance.handle(url)
}
Objective-C
- (BOOL)application:(nonnull UIApplication *)application
            openURL:(nonnull NSURL *)url
            options:(nonnull NSDictionary<NSString *, id> *)options {
  return [[GIDSignIn sharedInstance] handleURL:url];
}
- 将应用的演示视图控制器和客户端 ID 传递给 Google 登录提供方的
signIn方法,并根据生成的 Google 身份验证令牌创建 Firebase Authentication 凭据:Swift
guard let clientID = FirebaseApp.app()?.options.clientID else { return }

// Create Google Sign In configuration object.
let config = GIDConfiguration(clientID: clientID)
GIDSignIn.sharedInstance.configuration = config

// Start the sign in flow!
GIDSignIn.sharedInstance.signIn(withPresenting: viewController) { result, error in
  guard error == nil else {
    // ...
    return
  }

  guard let user = result?.user,
        let idToken = user.idToken?.tokenString
  else {
    // ...
    return
  }

  let credential = GoogleAuthProvider.credential(withIDToken: idToken,
                                                 accessToken: user.accessToken.tokenString)
  self.signIn(with: credential)
}
Objective-C
GIDConfiguration *config = [[GIDConfiguration alloc] initWithClientID:[FIRApp defaultApp].options.clientID];
[GIDSignIn.sharedInstance setConfiguration:config];

__weak __auto_type weakSelf = self;
[GIDSignIn.sharedInstance signInWithPresentingViewController:self
      completion:^(GIDSignInResult * _Nullable result, NSError * _Nullable error) {
  __auto_type strongSelf = weakSelf;
  if (strongSelf == nil) { return; }

  if (error == nil) {
    FIRAuthCredential *credential =
    [FIRGoogleAuthProvider credentialWithIDToken:result.user.idToken.tokenString
                                     accessToken:result.user.accessToken.tokenString];
    // ...
  } else {
    // ...
  }
}];
- 将
GIDSignInButton添加到您的故事板 (storyboard) 或 XIB 文件中,或以编程方式将其实例化。如需将该按钮添加到您的故事板或 XIB 文件中,可添加一个视图,并将其自定义类设置为GIDSignInButton。 - 可选:如果需要自定义该按钮,请执行以下操作:
Swift
- 在您的视图控制器中,将登录按钮声明为一个属性。
@IBOutlet weak var signInButton: GIDSignInButton!
- 将该按钮关联到您刚才声明的
signInButton属性。 - 通过设置 GIDSignInButton 对象的属性来自定义该按钮。
Objective-C
- 在您的视图控制器的头文件中,将登录按钮声明为一个属性。
@property(weak, nonatomic) IBOutlet GIDSignInButton *signInButton;
- 将该按钮关联到您刚才声明的
signInButton属性。 - 通过设置 GIDSignInButton 对象的属性来自定义该按钮。
- 在您的视图控制器中,将登录按钮声明为一个属性。
进行 Firebase 身份验证
最后,使用上一步中创建的身份验证凭据完成 Firebase 登录过程。
Swift
Auth.auth().signIn(with: credential) { result, error in
  guard error == nil else {
    // ...
    return
  }

  // At this point, our user is signed in
}
Objective-C
[[FIRAuth auth] signInWithCredential:credential
                          completion:^(FIRAuthDataResult * _Nullable authResult,
                                       NSError * _Nullable error) {
    if (isMFAEnabled && error && error.code == FIRAuthErrorCodeSecondFactorRequired) {
      FIRMultiFactorResolver *resolver = error.userInfo[FIRAuthErrorUserInfoMultiFactorResolverKey];
      NSMutableString *displayNameString = [NSMutableString string];
      for (FIRMultiFactorInfo *tmpFactorInfo in resolver.hints) {
        [displayNameString appendString:tmpFactorInfo.displayName];
        [displayNameString appendString:@" "];
      }
      [self showTextInputPromptWithMessage:[NSString stringWithFormat:@"Select factor to sign in\n%@", displayNameString]
                           completionBlock:^(BOOL userPressedOK, NSString *_Nullable displayName) {
       FIRPhoneMultiFactorInfo* selectedHint;
       for (FIRMultiFactorInfo *tmpFactorInfo in resolver.hints) {
         if ([displayName isEqualToString:tmpFactorInfo.displayName]) {
           selectedHint = (FIRPhoneMultiFactorInfo *)tmpFactorInfo;
         }
       }
       [FIRPhoneAuthProvider.provider
        verifyPhoneNumberWithMultiFactorInfo:selectedHint
        UIDelegate:nil
        multiFactorSession:resolver.session
        completion:^(NSString * _Nullable verificationID, NSError * _Nullable error) {
          if (error) {
            [self showMessagePrompt:error.localizedDescription];
          } else {
            [self showTextInputPromptWithMessage:[NSString stringWithFormat:@"Verification code for %@", selectedHint.displayName]
                                 completionBlock:^(BOOL userPressedOK, NSString *_Nullable verificationCode) {
             FIRPhoneAuthCredential *credential =
                 [[FIRPhoneAuthProvider provider] credentialWithVerificationID:verificationID
                                                              verificationCode:verificationCode];
             FIRMultiFactorAssertion *assertion = [FIRPhoneMultiFactorGenerator assertionWithCredential:credential];
             [resolver resolveSignInWithAssertion:assertion completion:^(FIRAuthDataResult * _Nullable authResult, NSError * _Nullable error) {
               if (error) {
                 [self showMessagePrompt:error.localizedDescription];
               } else {
                 NSLog(@"Multi factor finanlize sign in succeeded.");
               }
             }];
           }];
          }
        }];
     }];
    }
  else if (error) {
    // ...
    return;
  }
  // User successfully signed in. Get user data from the FIRUser object
  if (authResult == nil) { return; }
  FIRUser *user = authResult.user;
  // ...
}];
后续步骤
在用户首次登录后,系统会创建一个新的用户账号,并将其与该用户登录时使用的凭据(即用户名和密码、电话号码或者身份验证提供方信息)相关联。此新账号存储在您的 Firebase 项目中,无论用户采用何种方式登录,您项目中的每个应用都可以使用此账号来识别用户。
在您的 Firebase Realtime Database 和 Cloud Storage 安全规则中,您可以从
auth变量获取已登录用户的唯一用户 ID,然后利用此 ID 来控制用户可以访问哪些数据。
您可以通过将身份验证提供方凭据关联至现有用户账号,让用户可以使用多个身份验证提供方登录您的应用。
如需将用户退出登录,请调用 signOut:。
Swift
let firebaseAuth = Auth.auth()
do {
  try firebaseAuth.signOut()
} catch let signOutError as NSError {
  print("Error signing out: %@", signOutError)
}
Objective-C
NSError *signOutError;
BOOL status = [[FIRAuth auth] signOut:&signOutError];
if (!status) {
  NSLog(@"Error signing out: %@", signOutError);
  return;
}
您可能还需要为所有身份验证错误添加错误处理代码。请参阅处理错误。