

คุณสามารถอนุญาตให้ผู้ใช้ตรวจสอบสิทธิ์กับ Firebase โดยใช้ผู้ให้บริการ OAuth เช่น Microsoft Azure Active Directory ได้ด้วยการผสานรวมการเข้าสู่ระบบ OAuth ทั่วไปที่อิงตามเว็บลงในแอปโดยใช้ Firebase SDK เพื่อดำเนินการขั้นตอนการลงชื่อเข้าใช้ตั้งแต่ต้นจนจบ
ก่อนเริ่มต้น
หากต้องการให้ผู้ใช้ลงชื่อเข้าใช้โดยใช้บัญชี Microsoft (Azure Active Directory และบัญชี Microsoft ส่วนบุคคล) คุณต้องเปิดใช้ Microsoft เป็นผู้ให้บริการลงชื่อเข้าใช้สำหรับโปรเจ็กต์ Firebase ก่อน โดยทำดังนี้
- เพิ่ม Firebase ในโปรเจ็กต์ Apple
- ในคอนโซล Firebase ให้ไปที่ ความปลอดภัย > การตรวจสอบสิทธิ์
- ในแท็บวิธีการลงชื่อเข้าใช้ ให้เปิดใช้ผู้ให้บริการลงชื่อเข้าใช้ Microsoft
-
เพิ่มรหัสไคลเอ็นต์ และข้อมูลลับของไคลเอ็นต์ จากคอนโซลนักพัฒนาแอปของผู้ให้บริการรายนั้น
ลงในการกำหนดค่าของผู้ให้บริการ โดยทำดังนี้
- หากต้องการลงทะเบียนไคลเอ็นต์ Microsoft OAuth ให้ทำตามวิธีการใน คู่มือเริ่มต้นฉบับย่อ: ลงทะเบียนแอปกับปลายทาง Azure Active Directory v2.0 โปรดทราบว่าปลายทางนี้รองรับการลงชื่อเข้าใช้โดยใช้บัญชี Microsoft ส่วนบุคคล รวมถึงบัญชี Azure Active Directory ดูข้อมูลเพิ่มเติมเกี่ยวกับ Azure Active Directory v2.0.
-
เมื่อลงทะเบียนแอปกับผู้ให้บริการเหล่านี้ โปรดลงทะเบียนโดเมน
*.firebaseapp.comสำหรับโปรเจ็กต์เป็นโดเมนเปลี่ยนเส้นทาง สำหรับแอป
- คลิกบันทึก
จัดการขั้นตอนการลงชื่อเข้าใช้ด้วย Firebase SDK
หากต้องการจัดการขั้นตอนการลงชื่อเข้าใช้ด้วย Firebase Apple Platforms SDK ให้ทำตามขั้นตอนต่อไปนี้
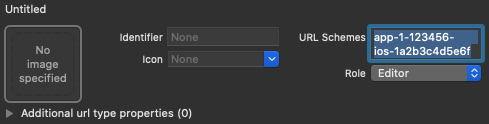
เพิ่ม URL Scheme ที่กำหนดเองลงในโปรเจ็กต์ Xcode โดยทำดังนี้
- เปิดการกำหนดค่าโปรเจ็กต์โดยดับเบิลคลิกชื่อโปรเจ็กต์ใน มุมมองแบบต้นไม้ทางด้านซ้าย เลือกแอปจากส่วน TARGETS จากนั้น เลือกแท็บ Info แล้วขยายส่วน URL Types
-
คลิกปุ่ม + แล้วเพิ่มรหัสแอปที่เข้ารหัสเป็น URL Scheme
ปล่อยให้ช่องอื่นๆ ว่างไว้
คุณดูรหัสแอปที่เข้ารหัสได้ในคอนโซล Firebase โดยไปที่
Settings > แท็บGeneral, จากนั้นเลื่อนลงไปที่ส่วน Your apps เพื่อดูรายละเอียดเกี่ยวกับ แอป iOSเมื่อเสร็จแล้ว การกำหนดค่าควรมีลักษณะคล้ายกับตัวอย่างต่อไปนี้ (แต่มีค่าเฉพาะของแอปพลิเคชัน)
สร้างอินสแตนซ์ของ OAuthProvider โดยใช้รหัสผู้ให้บริการ microsoft.com
Swift
var provider = OAuthProvider(providerID: "microsoft.com")
Objective-C
FIROAuthProvider *provider = [FIROAuthProvider providerWithProviderID:@"microsoft.com"];
ไม่บังคับ: ระบุพารามิเตอร์ OAuth ที่กำหนดเองเพิ่มเติมที่คุณต้องการ ส่งพร้อมกับคำขอ OAuth
Swift
    provider.customParameters = [
      "prompt": "consent",
      "login_hint": "user@firstadd.onmicrosoft.com"
    ]
Objective-C
[provider setCustomParameters:@{@"prompt": @"consent", @"login_hint": @"user@firstadd.onmicrosoft.com"}];
ดูพารามิเตอร์ที่ Microsoft รองรับได้ใน เอกสารประกอบเกี่ยวกับ Microsoft OAuth โปรดทราบว่าคุณไม่สามารถส่งพารามิเตอร์ที่ Firebase กำหนดไว้ด้วย
setCustomParametersพารามิเตอร์เหล่านี้คือ client_id, response_type, redirect_uri, state, scope และ response_modeหากต้องการอนุญาตให้เฉพาะผู้ใช้จากกลุ่มผู้ใช้ Azure AD ที่เฉพาะเจาะจงลงชื่อเข้าใช้แอปพลิเคชัน คุณสามารถใช้ชื่อโดเมนที่เหมาะสมของกลุ่มผู้ใช้ Azure AD หรือตัวระบุ GUID ของกลุ่มผู้ใช้ก็ได้ โดยระบุช่อง "tenant" ในออบเจ็กต์พารามิเตอร์ที่กำหนดเอง
Swift
    provider.customParameters = [
      // Optional "tenant" parameter in case you are using an Azure AD
      // tenant. eg. '8eaef023-2b34-4da1-9baa-8bc8c9d6a490' or
      // 'contoso.onmicrosoft.com' or "common" for tenant-independent
      // tokens. The default value is "common".
      "tenant": "TENANT_ID"
    ]
Objective-C
    // Optional "tenant" parameter in case you are using an Azure AD tenant.
    // eg. '8eaef023-2b34-4da1-9baa-8bc8c9d6a490' or
    // 'contoso.onmicrosoft.com' or "common" for tenant-independent tokens.
    // The default value is "common".
    provider.customParameters = @{@"tenant": @"TENANT_ID"};
ไม่บังคับ: ระบุขอบเขต OAuth 2.0 เพิ่มเติมจากโปรไฟล์พื้นฐานที่คุณต้องการขอจากผู้ให้บริการตรวจสอบสิทธิ์
Swift
provider.scopes = ["mail.read", "calendars.read"]
Objective-C
[provider setScopes:@[@"mail.read", @"calendars.read"]];
ดูข้อมูลเพิ่มเติมได้ใน เอกสารประกอบเกี่ยวกับสิทธิ์และการให้ความยินยอมของ Microsoft
ไม่บังคับ: หากต้องการปรับแต่งวิธีที่แอปแสดง
SFSafariViewControllerหรือUIWebViewเมื่อ แสดง reCAPTCHA ให้ผู้ใช้ ให้สร้างคลาสที่กำหนดเองซึ่งเป็นไปตาม โปรโตคอลAuthUIDelegateแล้วส่งไปยังcredentialWithUIDelegateตรวจสอบสิทธิ์กับ Firebase โดยใช้ออบเจ็กต์ผู้ให้บริการ OAuth
Swift
    // Replace nil with the custom class that conforms to AuthUIDelegate
    // you created in last step to use a customized web view.
    provider.getCredentialWith(nil) { credential, error in
      if error != nil {
        // Handle error.
      }
      if credential != nil {
        Auth().signIn(with: credential) { authResult, error in
          if error != nil {
            // Handle error.
          }
          // User is signed in.
          // IdP data available in authResult.additionalUserInfo.profile.
          // OAuth access token can also be retrieved:
          // (authResult.credential as? OAuthCredential)?.accessToken
          // OAuth ID token can also be retrieved:
          // (authResult.credential as? OAuthCredential)?.idToken
        }
      }
    }
Objective-C
    [provider getCredentialWithUIDelegate:nil
                               completion:^(FIRAuthCredential *_Nullable credential, NSError *_Nullable error) {
      if (error) {
       // Handle error.
      }
      if (credential) {
        [[FIRAuth auth] signInWithCredential:credential
                                  completion:^(FIRAuthDataResult *_Nullable authResult, NSError *_Nullable error) {
          if (error) {
            // Handle error.
          }
          // User is signed in.
          // IdP data available in authResult.additionalUserInfo.profile.
          // OAuth access token can also be retrieved:
          // ((FIROAuthCredential *)authResult.credential).accessToken
          // OAuth ID token can also be retrieved:
          // ((FIROAuthCredential *)authResult.credential).idToken
        }];
      }
    }];
คุณสามารถเรียกใช้ Microsoft Graph API ได้โดยใช้โทเค็นเพื่อการเข้าถึง OAuth
ตัวอย่างเช่น หากต้องการรับข้อมูลโปรไฟล์พื้นฐาน คุณสามารถเรียกใช้ REST API โดยส่งโทเค็นเพื่อการเข้าถึงในส่วนหัว
Authorizationดังนี้https://graph.microsoft.com/v1.0/me
Microsoft ไม่ได้ให้ URL รูปภาพเหมือนกับผู้ให้บริการอื่นๆ ที่ Firebase Auth รองรับ แต่ต้องขอข้อมูลไบนารีสำหรับรูปโปรไฟล์ผ่าน Microsoft Graph API
นอกจากโทเค็นเพื่อการเข้าถึง OAuth แล้ว คุณยังดึงโทเค็นรหัส OAuth ของผู้ใช้ได้จากออบเจ็กต์
OAuthCredentialการอ้างสิทธิ์subในโทเค็นรหัสเป็นแบบเฉพาะแอปและจะไม่ตรงกับตัวระบุผู้ใช้แบบรวมศูนย์ที่ Firebase Auth ใช้และเข้าถึงได้ผ่านuser.providerData[0].uidคุณควรใช้ช่องการอ้างสิทธิ์oidแทน เมื่อใช้กลุ่มผู้ใช้ Azure AD เพื่อลงชื่อเข้าใช้ การอ้างสิทธิ์oidจะตรงกันทุกประการ แต่ในกรณีที่ไม่ได้ใช้กลุ่มผู้ใช้ ระบบจะเพิ่มข้อมูลลงในช่องoidสำหรับรหัสแบบรวมศูนย์4b2eabcdefghijklรหัสoidจะมีรูปแบบ00000000-0000-0000-4b2e-abcdefghijklแม้ว่าตัวอย่างข้างต้นจะเน้นที่ขั้นตอนการลงชื่อเข้าใช้ แต่คุณก็สามารถลิงก์ผู้ให้บริการ Microsoft กับผู้ใช้ที่มีอยู่ได้โดยใช้
linkWithCredentialเช่น คุณสามารถลิงก์ผู้ให้บริการหลายรายกับผู้ใช้รายเดียวกันเพื่อให้ผู้ใช้ลงชื่อเข้าใช้ด้วยผู้ให้บริการรายใดก็ได้Swift
    Auth().currentUser.link(withCredential: credential) { authResult, error in
      if error != nil {
        // Handle error.
      }
      // Microsoft credential is linked to the current user.
      // IdP data available in authResult.additionalUserInfo.profile.
      // OAuth access token can also be retrieved:
      // (authResult.credential as? OAuthCredential)?.accessToken
      // OAuth ID token can also be retrieved:
      // (authResult.credential as? OAuthCredential)?.idToken
    }
Objective-C
    [[FIRAuth auth].currentUser
        linkWithCredential:credential
                completion:^(FIRAuthDataResult * _Nullable authResult, NSError * _Nullable error) {
      if (error) {
        // Handle error.
      }
      // Microsoft credential is linked to the current user.
      // IdP data available in authResult.additionalUserInfo.profile.
      // OAuth access token can also be retrieved:
      // ((FIROAuthCredential *)authResult.credential).accessToken
      // OAuth ID token can also be retrieved:
      // ((FIROAuthCredential *)authResult.credential).idToken
    }];
คุณสามารถใช้รูปแบบเดียวกันกับ
reauthenticateWithCredentialซึ่งใช้เพื่อดึงข้อมูลเข้าสู่ระบบใหม่สำหรับการดำเนินการที่ละเอียดอ่อนซึ่งต้องมีการเข้าสู่ระบบล่าสุดSwift
    Auth().currentUser.reauthenticateWithCredential(withCredential: credential) { authResult, error in
      if error != nil {
        // Handle error.
      }
      // User is re-authenticated with fresh tokens minted and
      // should be able to perform sensitive operations like account
      // deletion and email or password update.
      // IdP data available in result.additionalUserInfo.profile.
      // Additional OAuth access token can also be retrieved:
      // (authResult.credential as? OAuthCredential)?.accessToken
      // OAuth ID token can also be retrieved:
      // (authResult.credential as? OAuthCredential)?.idToken
    }
Objective-C
    [[FIRAuth auth].currentUser
        reauthenticateWithCredential:credential
                          completion:^(FIRAuthDataResult * _Nullable authResult, NSError * _Nullable error) {
      if (error) {
        // Handle error.
      }
      // User is re-authenticated with fresh tokens minted and
      // should be able to perform sensitive operations like account
      // deletion and email or password update.
      // IdP data available in result.additionalUserInfo.profile.
      // Additional OAuth access token can also be retrieved:
      // ((FIROAuthCredential *)authResult.credential).accessToken
      // OAuth ID token can also be retrieved:
      // ((FIROAuthCredential *)authResult.credential).idToken
    }];
หลังจากที่ผู้ใช้ลงชื่อเข้าใช้เป็นครั้งแรก ระบบจะสร้างบัญชีผู้ใช้ใหม่และลิงก์กับข้อมูลเข้าสู่ระบบที่ผู้ใช้ใช้ลงชื่อเข้าใช้ เช่น ชื่อผู้ใช้และรหัสผ่าน หมายเลขโทรศัพท์ หรือข้อมูลผู้ให้บริการตรวจสอบสิทธิ์ บัญชีใหม่นี้จะจัดเก็บไว้เป็นส่วนหนึ่งของโปรเจ็กต์ Firebase และใช้เพื่อระบุผู้ใช้ในทุกแอปของโปรเจ็กต์ได้ ไม่ว่าผู้ใช้จะลงชื่อเข้าใช้ด้วยวิธีใดก็ตาม
-
ในแอป คุณสามารถรับข้อมูลโปรไฟล์พื้นฐานของผู้ใช้ได้จากออบเจ็กต์
Userดูหัวข้อจัดการผู้ใช้ ใน Firebase Realtime Database และ Cloud Storage กฎความปลอดภัย คุณสามารถ รับรหัสผู้ใช้ที่ไม่ซ้ำกันของผู้ใช้ที่ลงชื่อเข้าใช้ได้จากตัวแปร
authและใช้ตัวแปรนี้เพื่อควบคุมข้อมูลที่ผู้ใช้เข้าถึงได้
คุณสามารถอนุญาตให้ผู้ใช้ลงชื่อเข้าใช้แอปโดยใช้ผู้ให้บริการตรวจสอบสิทธิ์หลายรายได้ด้วยการลิงก์ข้อมูลเข้าสู่ระบบของผู้ให้บริการตรวจสอบสิทธิ์กับบัญชีผู้ใช้ที่มีอยู่
หากต้องการออกจากระบบของผู้ใช้ ให้เรียกใช้
signOut:
Swift
let firebaseAuth = Auth.auth()
do {
  try firebaseAuth.signOut()
} catch let signOutError as NSError {
  print("Error signing out: %@", signOutError)
}
Objective-C
NSError *signOutError;
BOOL status = [[FIRAuth auth] signOut:&signOutError];
if (!status) {
  NSLog(@"Error signing out: %@", signOutError);
  return;
}
นอกจากนี้ คุณอาจต้องการเพิ่มโค้ดการจัดการข้อผิดพลาดสำหรับข้อผิดพลาดในการตรวจสอบสิทธิ์ทั้งหมด ดูหัวข้อจัดการข้อผิดพลาด