

คุณอนุญาตให้ผู้ใช้ตรวจสอบสิทธิ์กับ Firebase โดยใช้ผู้ให้บริการ OAuth เช่น Microsoft Azure Active Directory ได้โดยการผสานรวมการเข้าสู่ระบบ OAuth ทั่วไปบนเว็บ เข้ากับแอปโดยใช้ Firebase SDK เพื่อดำเนินการขั้นตอนการลงชื่อเข้าใช้แบบครบวงจร
ก่อนเริ่มต้น
หากต้องการให้ผู้ใช้ลงชื่อเข้าใช้โดยใช้บัญชี Microsoft (Azure Active Directory และบัญชี Microsoft ส่วนตัว) คุณต้องเปิดใช้ Microsoft เป็นผู้ให้บริการลงชื่อเข้าใช้สำหรับโปรเจ็กต์ Firebase ก่อน โดยทำดังนี้
- เพิ่ม Firebase ในโปรเจ็กต์ Apple
- ในคอนโซล Firebase ให้ไปที่ ความปลอดภัย > การตรวจสอบสิทธิ์
- ในแท็บวิธีการลงชื่อเข้าใช้ ให้เปิดใช้ผู้ให้บริการลงชื่อเข้าใช้ Microsoft
-
เพิ่ม Client ID และ Client Secret จาก
Developer Console ของผู้ให้บริการรายนั้นลงในการกำหนดค่าผู้ให้บริการ
- หากต้องการลงทะเบียนไคลเอ็นต์ OAuth ของ Microsoft ให้ทำตามวิธีการใน Quickstart: Register an app with the Azure Active Directory v2.0 endpoint โปรดทราบว่าปลายทางนี้รองรับการลงชื่อเข้าใช้โดยใช้บัญชีส่วนตัวของ Microsoft รวมถึงบัญชี Azure Active Directory ดูข้อมูลเพิ่มเติมเกี่ยวกับ Azure Active Directory v2.0
-
เมื่อลงทะเบียนแอปกับผู้ให้บริการเหล่านี้ โปรดลงทะเบียนโดเมน
*.firebaseapp.comสำหรับโปรเจ็กต์เป็นโดเมนเปลี่ยนเส้นทางสำหรับแอป
- คลิกบันทึก
จัดการขั้นตอนการลงชื่อเข้าใช้ด้วย Firebase SDK
หากต้องการจัดการขั้นตอนการลงชื่อเข้าใช้ด้วย Firebase Apple Platforms SDK ให้ทำตามขั้นตอนต่อไปนี้
เพิ่มรูปแบบ URL ที่กำหนดเองลงในโปรเจ็กต์ Xcode โดยทำดังนี้
- เปิดการกำหนดค่าโปรเจ็กต์โดยดับเบิลคลิกชื่อโปรเจ็กต์ในมุมมองแบบต้นไม้ทางด้านซ้าย เลือกแอปจากส่วนเป้าหมาย จากนั้น เลือกแท็บข้อมูล แล้วขยายส่วนประเภท URL
-
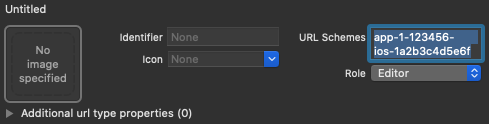
คลิกปุ่ม + แล้วเพิ่มรหัสแอปที่เข้ารหัสเป็น URL Scheme
เว้นช่องอื่นๆ ว่างไว้
คุณดูรหัสแอปที่เข้ารหัสได้ในFirebase Console โดยไปที่
การตั้งค่า > แท็บทั่วไป จากนั้นเลื่อนลงไปที่ส่วนแอปของคุณเพื่อดูรายละเอียดเกี่ยวกับ แอป iOSเมื่อเสร็จแล้ว การกำหนดค่าควรมีลักษณะคล้ายกับ ต่อไปนี้ (แต่มีค่าเฉพาะแอปพลิเคชันของคุณ)
สร้างอินสแตนซ์ของ OAuthProvider โดยใช้รหัสผู้ให้บริการ microsoft.com
Swift
var provider = OAuthProvider(providerID: "microsoft.com")
Objective-C
FIROAuthProvider *provider = [FIROAuthProvider providerWithProviderID:@"microsoft.com"];
ไม่บังคับ: ระบุพารามิเตอร์ OAuth ที่กำหนดเองเพิ่มเติมที่ต้องการ ส่งพร้อมกับคำขอ OAuth
Swift
    provider.customParameters = [
      "prompt": "consent",
      "login_hint": "user@firstadd.onmicrosoft.com"
    ]
Objective-C
[provider setCustomParameters:@{@"prompt": @"consent", @"login_hint": @"user@firstadd.onmicrosoft.com"}];
ดูพารามิเตอร์ที่ Microsoft รองรับได้ที่เอกสารประกอบเกี่ยวกับ OAuth ของ Microsoft โปรดทราบว่าคุณไม่สามารถส่งพารามิเตอร์ที่ Firebase กําหนดด้วย
setCustomParametersพารามิเตอร์เหล่านี้คือ client_id, response_type, redirect_uri, state, scope และ response_modeหากต้องการอนุญาตให้เฉพาะผู้ใช้จากกลุ่มผู้ใช้ Azure AD ที่เฉพาะเจาะจงลงชื่อเข้าใช้แอปพลิเคชัน คุณสามารถใช้ชื่อโดเมนที่จำง่ายของกลุ่มผู้ใช้ Azure AD หรือตัวระบุ GUID ของกลุ่มผู้ใช้ โดยระบุฟิลด์ "กลุ่มผู้ใช้" ในออบเจ็กต์พารามิเตอร์ที่กำหนดเอง
Swift
    provider.customParameters = [
      // Optional "tenant" parameter in case you are using an Azure AD
      // tenant. eg. '8eaef023-2b34-4da1-9baa-8bc8c9d6a490' or
      // 'contoso.onmicrosoft.com' or "common" for tenant-independent
      // tokens. The default value is "common".
      "tenant": "TENANT_ID"
    ]
Objective-C
    // Optional "tenant" parameter in case you are using an Azure AD tenant.
    // eg. '8eaef023-2b34-4da1-9baa-8bc8c9d6a490' or
    // 'contoso.onmicrosoft.com' or "common" for tenant-independent tokens.
    // The default value is "common".
    provider.customParameters = @{@"tenant": @"TENANT_ID"};
ไม่บังคับ: ระบุขอบเขต OAuth 2.0 เพิ่มเติมที่นอกเหนือจากโปรไฟล์พื้นฐานซึ่ง คุณต้องการขอจากผู้ให้บริการตรวจสอบสิทธิ์
Swift
provider.scopes = ["mail.read", "calendars.read"]
Objective-C
[provider setScopes:@[@"mail.read", @"calendars.read"]];
ดูข้อมูลเพิ่มเติมได้ที่เอกสารประกอบเกี่ยวกับสิทธิ์และความยินยอมของ Microsoft
ไม่บังคับ: หากต้องการปรับแต่งวิธีที่แอปแสดง
SFSafariViewControllerหรือUIWebViewเมื่อ แสดง reCAPTCHA ต่อผู้ใช้ ให้สร้างคลาสที่กำหนดเองซึ่งเป็นไปตาม โปรโตคอลAuthUIDelegateแล้วส่งไปยังcredentialWithUIDelegateตรวจสอบสิทธิ์ด้วย Firebase โดยใช้ออบเจ็กต์ผู้ให้บริการ OAuth
Swift
    // Replace nil with the custom class that conforms to AuthUIDelegate
    // you created in last step to use a customized web view.
    provider.getCredentialWith(nil) { credential, error in
      if error != nil {
        // Handle error.
      }
      if credential != nil {
        Auth().signIn(with: credential) { authResult, error in
          if error != nil {
            // Handle error.
          }
          // User is signed in.
          // IdP data available in authResult.additionalUserInfo.profile.
          // OAuth access token can also be retrieved:
          // (authResult.credential as? OAuthCredential)?.accessToken
          // OAuth ID token can also be retrieved:
          // (authResult.credential as? OAuthCredential)?.idToken
        }
      }
    }
Objective-C
    [provider getCredentialWithUIDelegate:nil
                               completion:^(FIRAuthCredential *_Nullable credential, NSError *_Nullable error) {
      if (error) {
       // Handle error.
      }
      if (credential) {
        [[FIRAuth auth] signInWithCredential:credential
                                  completion:^(FIRAuthDataResult *_Nullable authResult, NSError *_Nullable error) {
          if (error) {
            // Handle error.
          }
          // User is signed in.
          // IdP data available in authResult.additionalUserInfo.profile.
          // OAuth access token can also be retrieved:
          // ((FIROAuthCredential *)authResult.credential).accessToken
          // OAuth ID token can also be retrieved:
          // ((FIROAuthCredential *)authResult.credential).idToken
        }];
      }
    }];
คุณสามารถเรียก Microsoft Graph API โดยใช้โทเค็นเพื่อการเข้าถึง OAuth ได้
เช่น หากต้องการรับข้อมูลโปรไฟล์พื้นฐาน คุณสามารถเรียกใช้ REST API โดยส่งโทเค็นเพื่อการเข้าถึงในส่วนหัว
Authorizationดังนี้https://graph.microsoft.com/v1.0/me
Microsoft ไม่ได้ให้ URL ของรูปภาพเหมือนกับผู้ให้บริการรายอื่นๆ ที่ Firebase Auth รองรับ แต่ต้องขอข้อมูลไบนารีสำหรับรูปโปรไฟล์ผ่าน Microsoft Graph API แทน
นอกจากโทเค็นเพื่อการเข้าถึง OAuth แล้ว คุณยังเรียกข้อมูลโทเค็นรหัส OAuth ของผู้ใช้จากออบเจ็กต์
OAuthCredentialได้ด้วยsubในโทเค็นรหัสจะเฉพาะเจาะจงแอปและจะไม่ตรงกับตัวระบุผู้ใช้ที่เชื่อมโยงที่ Firebase Auth ใช้และเข้าถึงได้ผ่านuser.providerData[0].uidโปรดใช้ฟิลด์การอ้างสิทธิ์oidแทน เมื่อใช้ผู้เช่า Azure AD เพื่อลงชื่อเข้าใช้oidการอ้างสิทธิ์จะตรงกันทุกประการ แต่ในกรณีที่ไม่ใช่ผู้เช่า ระบบจะเพิ่มช่องoidสำหรับรหัสที่เชื่อมโยง4b2eabcdefghijkloidจะมีแบบฟอร์ม00000000-0000-0000-4b2e-abcdefghijklแม้ว่าตัวอย่างข้างต้นจะเน้นที่ขั้นตอนการลงชื่อเข้าใช้ แต่คุณก็ยังมีความสามารถในการลิงก์ผู้ให้บริการ Microsoft กับผู้ใช้ที่มีอยู่โดยใช้
linkWithCredentialเช่น คุณสามารถลิงก์ผู้ให้บริการหลายรายกับผู้ใช้รายเดียวกันเพื่อให้ผู้ใช้ลงชื่อเข้าใช้ด้วยผู้ให้บริการรายใดก็ได้Swift
    Auth().currentUser.link(withCredential: credential) { authResult, error in
      if error != nil {
        // Handle error.
      }
      // Microsoft credential is linked to the current user.
      // IdP data available in authResult.additionalUserInfo.profile.
      // OAuth access token can also be retrieved:
      // (authResult.credential as? OAuthCredential)?.accessToken
      // OAuth ID token can also be retrieved:
      // (authResult.credential as? OAuthCredential)?.idToken
    }
Objective-C
    [[FIRAuth auth].currentUser
        linkWithCredential:credential
                completion:^(FIRAuthDataResult * _Nullable authResult, NSError * _Nullable error) {
      if (error) {
        // Handle error.
      }
      // Microsoft credential is linked to the current user.
      // IdP data available in authResult.additionalUserInfo.profile.
      // OAuth access token can also be retrieved:
      // ((FIROAuthCredential *)authResult.credential).accessToken
      // OAuth ID token can also be retrieved:
      // ((FIROAuthCredential *)authResult.credential).idToken
    }];
คุณสามารถใช้รูปแบบเดียวกันกับ
reauthenticateWithCredentialซึ่งใช้เพื่อ ดึงข้อมูลเข้าสู่ระบบล่าสุดสำหรับการดำเนินการที่ละเอียดอ่อนซึ่งต้องมีการ เข้าสู่ระบบล่าสุดSwift
    Auth().currentUser.reauthenticateWithCredential(withCredential: credential) { authResult, error in
      if error != nil {
        // Handle error.
      }
      // User is re-authenticated with fresh tokens minted and
      // should be able to perform sensitive operations like account
      // deletion and email or password update.
      // IdP data available in result.additionalUserInfo.profile.
      // Additional OAuth access token can also be retrieved:
      // (authResult.credential as? OAuthCredential)?.accessToken
      // OAuth ID token can also be retrieved:
      // (authResult.credential as? OAuthCredential)?.idToken
    }
Objective-C
    [[FIRAuth auth].currentUser
        reauthenticateWithCredential:credential
                          completion:^(FIRAuthDataResult * _Nullable authResult, NSError * _Nullable error) {
      if (error) {
        // Handle error.
      }
      // User is re-authenticated with fresh tokens minted and
      // should be able to perform sensitive operations like account
      // deletion and email or password update.
      // IdP data available in result.additionalUserInfo.profile.
      // Additional OAuth access token can also be retrieved:
      // ((FIROAuthCredential *)authResult.credential).accessToken
      // OAuth ID token can also be retrieved:
      // ((FIROAuthCredential *)authResult.credential).idToken
    }];
หลังจากที่ผู้ใช้ลงชื่อเข้าใช้เป็นครั้งแรก ระบบจะสร้างบัญชีผู้ใช้ใหม่และ ลิงก์กับข้อมูลเข้าสู่ระบบ ซึ่งได้แก่ ชื่อผู้ใช้และรหัสผ่าน หมายเลขโทรศัพท์ หรือข้อมูลผู้ให้บริการตรวจสอบสิทธิ์ที่ผู้ใช้ลงชื่อเข้าใช้ ระบบจะจัดเก็บบัญชีใหม่นี้เป็นส่วนหนึ่งของโปรเจ็กต์ Firebase และสามารถใช้เพื่อระบุผู้ใช้ในทุกแอปในโปรเจ็กต์ได้ ไม่ว่าผู้ใช้จะลงชื่อเข้าใช้ด้วยวิธีใดก็ตาม
-
ในแอป คุณสามารถรับข้อมูลโปรไฟล์พื้นฐานของผู้ใช้จากออบเจ็กต์
Userดูจัดการผู้ใช้ ใน Firebase Realtime Database และ Cloud Storage กฎความปลอดภัย คุณสามารถ รับรหัสผู้ใช้ที่ไม่ซ้ำของผู้ใช้ที่ลงชื่อเข้าใช้จากตัวแปร
authและใช้รหัสดังกล่าวเพื่อควบคุมข้อมูลที่ผู้ใช้เข้าถึงได้
คุณอนุญาตให้ผู้ใช้ลงชื่อเข้าใช้แอปโดยใช้ผู้ให้บริการการตรวจสอบสิทธิ์หลายรายได้โดยลิงก์ข้อมูลเข้าสู่ระบบของผู้ให้บริการการตรวจสอบสิทธิ์กับบัญชีผู้ใช้ที่มีอยู่
หากต้องการนำผู้ใช้ออกจากระบบ ให้เรียกใช้
signOut:
Swift
let firebaseAuth = Auth.auth()
do {
  try firebaseAuth.signOut()
} catch let signOutError as NSError {
  print("Error signing out: %@", signOutError)
}
Objective-C
NSError *signOutError;
BOOL status = [[FIRAuth auth] signOut:&signOutError];
if (!status) {
  NSLog(@"Error signing out: %@", signOutError);
  return;
}
นอกจากนี้ คุณอาจต้องเพิ่มโค้ดการจัดการข้อผิดพลาดสำหรับข้อผิดพลาดในการตรวจสอบสิทธิ์ทั้งหมดด้วย ดูจัดการข้อผิดพลาด