

คุณอนุญาตให้ผู้ใช้ตรวจสอบสิทธิ์ด้วย Firebase โดยใช้ผู้ให้บริการ OAuth เช่น Twitter ได้โดยการผสานรวมการเข้าสู่ระบบ OAuth ทั่วไปเข้ากับแอปโดยใช้ Firebase SDK เพื่อดำเนินการขั้นตอนการลงชื่อเข้าใช้แบบครบวงจร
ก่อนเริ่มต้น
ใช้ Swift Package Manager เพื่อติดตั้งและจัดการทรัพยากร Dependency ของ Firebase
- เปิดโปรเจ็กต์แอปใน Xcode แล้วไปที่File > Add Packages
- เมื่อได้รับข้อความแจ้ง ให้เพิ่มที่เก็บ Firebase Apple Platforms SDK ดังนี้
- เลือกFirebase Authentication คลัง
- เพิ่มแฟล็ก
-ObjCลงในส่วนแฟล็ก Linker อื่นๆ ของการตั้งค่าบิลด์ของเป้าหมาย - เมื่อเสร็จแล้ว Xcode จะเริ่มจับคู่ข้อมูลและดาวน์โหลดทรัพยากร Dependency ในเบื้องหลังโดยอัตโนมัติ
https://github.com/firebase/firebase-ios-sdk.git
หากต้องการให้ผู้ใช้ลงชื่อเข้าใช้โดยใช้บัญชี Twitter คุณต้องเปิดใช้ Twitter เป็นผู้ให้บริการลงชื่อเข้าใช้สำหรับโปรเจ็กต์ Firebase ก่อน โดยทำดังนี้
รวมพ็อดต่อไปนี้ไว้ใน
Podfilepod 'FirebaseAuth'
- ในFirebaseคอนโซล ให้ไปที่ ความปลอดภัย > การตรวจสอบสิทธิ์
- ในแท็บวิธีการลงชื่อเข้าใช้ ให้เปิดใช้ผู้ให้บริการลงชื่อเข้าใช้ Twitter
-
เพิ่มคีย์ API และรหัสลับ API จากคอนโซลนักพัฒนาซอฟต์แวร์ของผู้ให้บริการรายนั้น
ลงในการกำหนดค่าผู้ให้บริการ
- ลงทะเบียนแอป เป็นแอปพลิเคชันสำหรับนักพัฒนาซอฟต์แวร์บน Twitter และรับ คีย์ API และข้อมูลลับของ API OAuth ของแอป
-
ตรวจสอบว่าได้ตั้งค่า URI การเปลี่ยนเส้นทาง OAuth ของ Firebase (เช่น
my-app-12345.firebaseapp.com/__/auth/handler) เป็น URL เรียกกลับการให้สิทธิ์ในการตั้งค่าของแอป ในหน้า การกำหนดค่าของแอป Twitter
- คลิกบันทึก
จัดการขั้นตอนการลงชื่อเข้าใช้ด้วย Firebase SDK
หากต้องการจัดการขั้นตอนการลงชื่อเข้าใช้ด้วย Firebase Apple Platforms SDK ให้ทำตามขั้นตอนต่อไปนี้
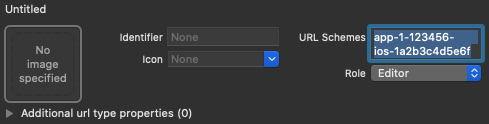
เพิ่มรูปแบบ URL ที่กำหนดเองลงในโปรเจ็กต์ Xcode โดยทำดังนี้
- เปิดการกำหนดค่าโปรเจ็กต์โดยดับเบิลคลิกชื่อโปรเจ็กต์ในมุมมองแบบต้นไม้ทางด้านซ้าย เลือกแอปจากส่วนเป้าหมาย จากนั้น เลือกแท็บข้อมูล แล้วขยายส่วนประเภท URL
-
คลิกปุ่ม + แล้วเพิ่มรหัสแอปที่เข้ารหัสเป็น URL Scheme
เว้นช่องอื่นๆ ว่างไว้
คุณดูรหัสแอปที่เข้ารหัสได้ในFirebaseคอนโซล โดยไปที่
การตั้งค่า > แท็บทั่วไป จากนั้นเลื่อนลงไปที่ส่วนแอปของคุณเพื่อดูรายละเอียดเกี่ยวกับ แอป iOSเมื่อเสร็จแล้ว การกำหนดค่าควรมีลักษณะคล้ายกับ ต่อไปนี้ (แต่มีค่าเฉพาะแอปพลิเคชันของคุณ)
สร้างอินสแตนซ์ของ OAuthProvider โดยใช้รหัสผู้ให้บริการ twitter.com
Swift
var provider = OAuthProvider(providerID: "twitter.com")
Objective-C
FIROAuthProvider *provider = [FIROAuthProvider providerWithProviderID:@"twitter.com"];
ไม่บังคับ: ระบุพารามิเตอร์ OAuth ที่กำหนดเองเพิ่มเติมที่ต้องการ ส่งพร้อมกับคำขอ OAuth
Swift
    provider.customParameters = [
      "lang": "fr"
      ]
Objective-C
[provider setCustomParameters:@{@"lang": @"fr"}];
ดูพารามิเตอร์ที่ Twitter รองรับได้ในเอกสารประกอบ OAuth ของ Twitter โปรดทราบว่าคุณไม่สามารถส่งพารามิเตอร์ที่ Firebase กําหนดด้วย
setCustomParametersพารามิเตอร์เหล่านี้คือ client_id, redirect_uri, response_type, scope และ stateไม่บังคับ: หากต้องการปรับแต่งวิธีที่แอปแสดง
SFSafariViewControllerหรือUIWebViewเมื่อแสดง reCAPTCHA ต่อผู้ใช้ ให้สร้างคลาสที่กำหนดเองซึ่งเป็นไปตามโปรโตคอลAuthUIDelegateแล้วส่งไปยังcredentialWithUIDelegateตรวจสอบสิทธิ์ด้วย Firebase โดยใช้ออบเจ็กต์ผู้ให้บริการ OAuth
Swift
    provider.getCredentialWith(nil) { credential, error in
      if error != nil {
        // Handle error.
      }
      if credential != nil {
        Auth.auth().signIn(with: credential) { authResult, error in
          if error != nil {
            // Handle error.
          }
          // User is signed in.
          // IdP data available in authResult.additionalUserInfo.profile.
          // Twitter OAuth access token can also be retrieved by:
          // (authResult.credential as? OAuthCredential)?.accessToken
          // Twitter OAuth ID token can be retrieved by calling:
          // (authResult.credential as? OAuthCredential)?.idToken
          // Twitter OAuth secret can be retrieved by calling:
          // (authResult.credential as? OAuthCredential)?.secret
        }
      }
    }
Objective-C
    [provider getCredentialWithUIDelegate:nil
                               completion:^(FIRAuthCredential *_Nullable credential, NSError *_Nullable error) {
      if (error) {
       // Handle error.
      }
      if (credential) {
        [[FIRAuth auth] signInWithCredential:credential
                                  completion:^(FIRAuthDataResult *_Nullable authResult, NSError *_Nullable error) {
          if (error) {
            // Handle error.
          }
          // User is signed in.
          // IdP data available in authResult.additionalUserInfo.profile.
          // Twitter OAuth access token can also be retrieved by:
          // authResult.credential.accessToken
          // Twitter OAuth ID token can be retrieved by calling:
          // authResult.credential.idToken
          // Twitter OAuth secret can be retrieved by calling:
          // authResult.credential.secret
        }];
      }
    }];
คุณสามารถเรียกใช้ Twitter API ได้โดยใช้โทเค็นเพื่อการเข้าถึง OAuth
เช่น หากต้องการรับข้อมูลโปรไฟล์พื้นฐาน คุณสามารถเรียกใช้ REST API โดยส่งโทเค็นเพื่อการเข้าถึงในส่วนหัว
Authorizationได้ดังนี้https://api.twitter.com/labs/1/users?usernames=TwitterDev
แม้ว่าตัวอย่างข้างต้นจะเน้นที่ขั้นตอนการลงชื่อเข้าใช้ แต่คุณก็ยังสามารถ ลิงก์ผู้ให้บริการ Twitter กับผู้ใช้ที่มีอยู่ได้ เช่น คุณสามารถ ลิงก์ผู้ให้บริการหลายรายกับผู้ใช้รายเดียวกันเพื่อให้ผู้ใช้ลงชื่อเข้าใช้ด้วยผู้ให้บริการรายใดก็ได้
Swift
    Auth().currentUser.link(withCredential: credential) { authResult, error in
      if error != nil {
        // Handle error.
      }
      // Twitter credential is linked to the current user.
      // IdP data available in authResult.additionalUserInfo.profile.
      // Twitter OAuth access token can also be retrieved by:
      // (authResult.credential as? OAuthCredential)?.accessToken
      // Twitter OAuth ID token can be retrieved by calling:
      // (authResult.credential as? OAuthCredential)?.idToken
      // Twitter OAuth secret can be retrieved by calling:
      // (authResult.credential as? OAuthCredential)?.secret
    }
Objective-C
    [[FIRAuth auth].currentUser
        linkWithCredential:credential
                completion:^(FIRAuthDataResult * _Nullable authResult, NSError * _Nullable error) {
      if (error) {
        // Handle error.
      }
      // Twitter credential is linked to the current user.
      // IdP data available in authResult.additionalUserInfo.profile.
      // Twitter OAuth access token is can also be retrieved by:
      // ((FIROAuthCredential *)authResult.credential).accessToken
      // Twitter OAuth ID token can be retrieved by calling:
      // ((FIROAuthCredential *)authResult.credential).idToken
      // Twitter OAuth secret can be retrieved by calling:
      // ((FIROAuthCredential *)authResult.credential).secret
    }];
คุณสามารถใช้รูปแบบเดียวกันกับ
reauthenticateWithCredentialซึ่งใช้เพื่อเรียกข้อมูลเข้าสู่ระบบใหม่สำหรับการดำเนินการที่ละเอียดอ่อนซึ่งต้องมีการเข้าสู่ระบบล่าสุดได้Swift
    Auth().currentUser.reauthenticateWithCredential(withCredential: credential) { authResult, error in
      if error != nil {
        // Handle error.
      }
      // User is re-authenticated with fresh tokens minted and
      // should be able to perform sensitive operations like account
      // deletion and email or password update.
      // IdP data available in result.additionalUserInfo.profile.
      // Additional OAuth access token is can also be retrieved by:
      // (authResult.credential as? OAuthCredential)?.accessToken
      // Twitter OAuth ID token can be retrieved by calling:
      // (authResult.credential as? OAuthCredential)?.idToken
      // Twitter OAuth secret can be retrieved by calling:
      // (authResult.credential as? OAuthCredential)?.secret
    }
Objective-C
    [[FIRAuth auth].currentUser
        reauthenticateWithCredential:credential
                          completion:^(FIRAuthDataResult * _Nullable authResult, NSError * _Nullable error) {
      if (error) {
        // Handle error.
      }
      // User is re-authenticated with fresh tokens minted and
      // should be able to perform sensitive operations like account
      // deletion and email or password update.
      // IdP data available in result.additionalUserInfo.profile.
      // Additional OAuth access token is can also be retrieved by:
      // ((FIROAuthCredential *)authResult.credential).accessToken
      // Twitter OAuth ID token can be retrieved by calling:
      // ((FIROAuthCredential *)authResult.credential).idToken
      // Twitter OAuth secret can be retrieved by calling:
      // ((FIROAuthCredential *)authResult.credential).secret
    }];
ขั้นตอนถัดไป
หลังจากที่ผู้ใช้ลงชื่อเข้าใช้เป็นครั้งแรก ระบบจะสร้างบัญชีผู้ใช้ใหม่และ ลิงก์กับข้อมูลเข้าสู่ระบบที่ผู้ใช้ลงชื่อเข้าใช้ ซึ่งได้แก่ ชื่อผู้ใช้และรหัสผ่าน หมายเลขโทรศัพท์ หรือข้อมูลผู้ให้บริการตรวจสอบสิทธิ์ ระบบจะจัดเก็บบัญชีใหม่นี้เป็นส่วนหนึ่งของโปรเจ็กต์ Firebase และสามารถใช้เพื่อระบุตัวตน ผู้ใช้ในทุกแอปในโปรเจ็กต์ได้ ไม่ว่าผู้ใช้จะลงชื่อเข้าใช้ด้วยวิธีใดก็ตาม
-
ในแอป คุณจะดูข้อมูลโปรไฟล์พื้นฐานของผู้ใช้ได้จากออบเจ็กต์
Userดูจัดการผู้ใช้ ใน Firebase Realtime Database และ Cloud Storage กฎความปลอดภัย คุณสามารถ รับรหัสผู้ใช้ที่ไม่ซ้ำของผู้ใช้ที่ลงชื่อเข้าใช้จากตัวแปร
authและใช้รหัสดังกล่าวเพื่อควบคุมข้อมูลที่ผู้ใช้เข้าถึงได้
คุณอนุญาตให้ผู้ใช้ลงชื่อเข้าใช้แอปโดยใช้ผู้ให้บริการตรวจสอบสิทธิ์หลายรายได้โดยลิงก์ข้อมูลเข้าสู่ระบบของผู้ให้บริการตรวจสอบสิทธิ์กับบัญชีผู้ใช้ที่มีอยู่
หากต้องการออกจากระบบของผู้ใช้ ให้เรียกใช้
signOut:
Swift
let firebaseAuth = Auth.auth()
do {
  try firebaseAuth.signOut()
} catch let signOutError as NSError {
  print("Error signing out: %@", signOutError)
}
Objective-C
NSError *signOutError;
BOOL status = [[FIRAuth auth] signOut:&signOutError];
if (!status) {
  NSLog(@"Error signing out: %@", signOutError);
  return;
}
นอกจากนี้ คุณอาจต้องเพิ่มโค้ดการจัดการข้อผิดพลาดสำหรับการตรวจสอบสิทธิ์ ทั้งหมดด้วย ดูจัดการข้อผิดพลาด