
App Hosting has been designed for ease of use and low maintenance, with default settings optimized for most use cases. At the same time, App Hosting provides tools for you to manage and configure backends for your specific needs. This guide describes those tools and processes.
Set and update environment variables
Sometimes you may need additional configuration for your build process.
App Hosting offers environment
configuration to store and retrieve this
type of data for your project through the Firebase console and alternatively
in apphosting.yaml.
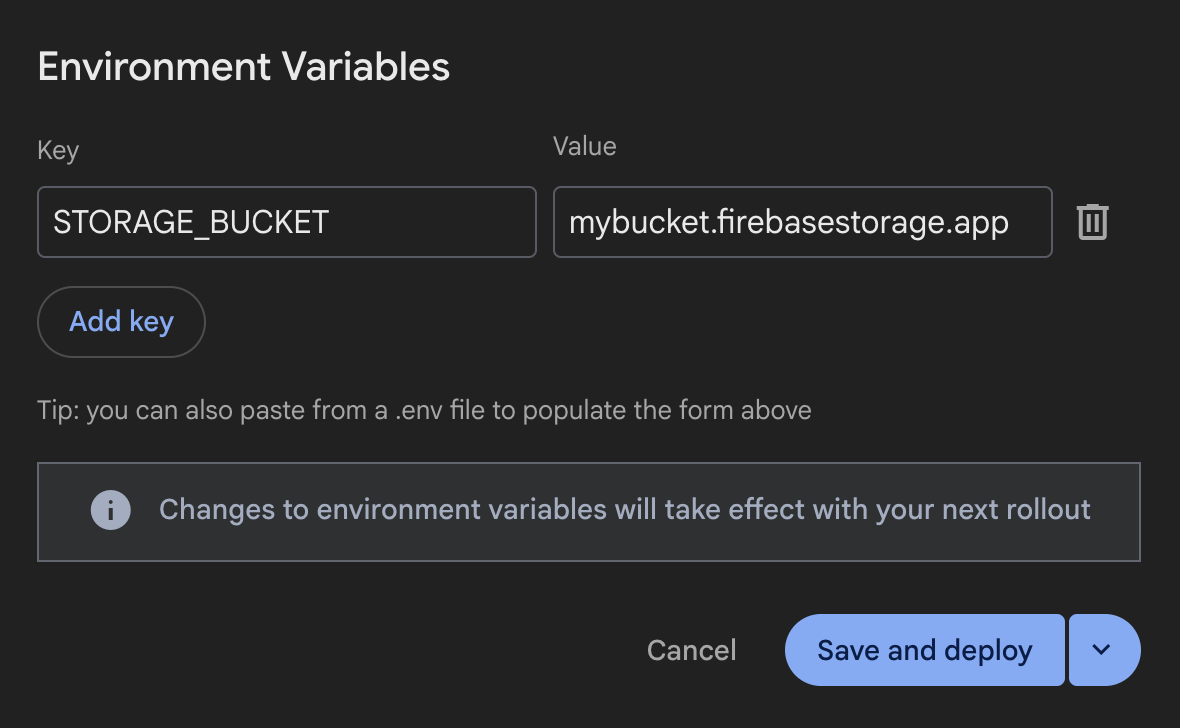
Setting environment variables in the Firebase console is the quickest way to
get started. Use apphosting.yaml if you need to
store and access secret parameters,
set variables that are only available at build or run time, or share environment
variables across multiple environments. With both the console and
apphosting.<env>.yaml, you can
set different values for different environments.
Firebase console
apphosting.yaml
env:
-   variable: STORAGE_BUCKET
    value: mybucket.firebasestorage.app
Update variables
You can add, edit, or delete environment variables in the Firebase console or
using your apphosting.yaml:
Firebase console:
In the Firebase console, navigate to Hosting & Serverless > App Hosting.
Navigate to View Backend > Settings > Environment.
Add, edit, or delete environment variables.
apphosting.yaml:Learn how to create and edit the file manually.
Your changes will only take effect with your next rollout, and won't affect the current one. Either save and create a new rollout or save your variables and deploy later.
Set variable availability
Environment variables created in the Firebase console are available at both
build time and run time. This is also the default condition for variables
defined in apphosting.yaml unless you have narrowed that scope using the
availability property. In apphosting.yaml (but not in the console),
you can restrict an environment variable to be
available to only the build environment or available only to the runtime
environment.
env:
-   variable: STORAGE_BUCKET
    value: mybucket.firebasestorage.app
    availability:
    -   BUILD
    -   RUNTIME
For Next.js apps, you can also use the NEXT_PUBLIC_ prefix the same way you
would in your dotenv file to make a variable accessible in the browser.
env:
-   variable: NEXT_PUBLIC_STORAGE_BUCKET
    value: mybucket.firebasestorage.app
    availability:
    -   BUILD
    -   RUNTIME
dotenv files for Next.js
For Next.js apps, dotenv files containing environment
variables
work with App Hosting.
When creating or updating a backend, you can transfer environment variables from
your dotenv file to the Firebase console by copy and pasting the entire
contents of the dotenv file into the first "Key" field in the "Add new" form
in Environment Variables Settings.
All the environment variables copied this way should be neatly formatted into the form with no need to enter each one individually, as long as the input has a format like the following:
KEY1=value1
KEY2=value2
KEY3=value3
For complex or granular environment variable control with any framework, we
recommend using
apphosting.yaml.
Automatically populated environment variables
There are environment variables that are automatically populated by
App Hosting. These include those populated by Google Cloud,
as well as Firebase-specific environment variables when appId
is set on the backend during setup:
FIREBASE_CONFIG: (available in the build & runtime environments) Provides the following Firebase project config info:{ "databaseURL": 'https://DATABASE_NAME.firebaseio.com', "storageBucket": '', "projectId": 'PROJECT_ID' }PROJECT_ID.This configuration is applied automatically when you initialize the Firebase Admin SDK with no arguments.
FIREBASE_WEBAPP_CONFIG: (available in the build environment only) Provides the following Firebase project config info:{ "apiKey": 'API_KEY', "appId": 'APP_ID', "authDomain": 'AUTH_DOMAIN.firebaseapp.com', "databaseURL": 'https://DATABASE_NAME.firebaseio.com', "messagingSenderId": 'PROJECT_NUMBER', "projectId": 'PROJECT_ID', "storageBucket": '', }PROJECT_ID.The Firebase JS SDK automatically checks for this
FIREBASE_WEBAPP_CONFIGenvironment variable in a postinstall script during build, allowing you also initialize the client SDK without any arguments.
See Automatically initialize Firebase Admin SDK and web SDKs for more details on how use these environment variables to initialize the SDKS.
Note that the values in your actual Firebase configuration will correspond to the particular resources you've provisioned in your project.
Variable hierarchy
Firebase App Hosting applies your variables in an order of precedence based on
their source. For example, values set in the Firebase console always
override, or take precedence over, values set in apphosting.yaml and dotenv
files.
Here is the full order of precedence:
- Firebase console → variables set in the console
apphosting.<env>.yaml→ variables specified in an environment specific yaml file such asapphosting.staging.yaml(see Deploy multiple environments)apphosting.yaml→ variables specified in theapphosting.yamlfile- Firebase system → variables set by Firebase that contain values for
firebase_config jsonorfirebase_webapp_config, as well as environment variables that set the hostnames and ports for SSR apps (set by App Hosting adapters inbundle.yaml)
Reserved names and limitations
The environment variables defined in the Cloud Run container runtime contract are reserved and cannot be set.
Environment variables that are provided by the environment, other than the ones that are set automatically, might change in future runtime versions. As a best practice, we recommend that you don't depend on or modify any environment variables that you haven't set explicitly, and consider prefixing any environment variables with a unique key to avoid conflicts.
Some environment variable keys are reserved for internal use. Don't use any of these keys in your configuration files:
- Empty strings ("")
- Keys that contain "="
- Keys beginning with
X_FIREBASE_,X_GOOGLE_, orCLOUD_RUN_ PORTK_SERVICEK_REVISIONK_CONFIGURATION- Duplicate Keys
Create and edit apphosting.yaml
For advanced configuration such as secrets or runtime settings
such as concurrency, CPU, and memory limits, you'll need to create and edit the
apphosting.yaml file in your app's root directory. This file
supports references to secrets managed
with Cloud Secret Manager, making it safe to check into source control.
To create apphosting.yaml, run the following command:
firebase init apphosting
This creates a basic starter apphosting.yaml file with example (commented)
configuration. After editing, a typical apphosting.yaml file might look like
the following, with settings for the backend's Cloud Run service, some
environment variables, and some references to secrets managed by Cloud Secret
Manager:
# Settings for Cloud Run
runConfig:
  minInstances: 2
  maxInstances: 100
  concurrency: 100
  cpu: 2
  memoryMiB: 1024

# Environment variables and secrets
env:
  - variable: STORAGE_BUCKET
    value: mybucket.firebasestorage.app
    availability:
      - BUILD
      - RUNTIME

  - variable: API_KEY
    secret: myApiKeySecret

    # Same as API_KEY above but with a pinned version.
  - variable: PINNED_API_KEY
    secret: myApiKeySecret@5

    # Same as API_KEY above but with the long form secret reference as defined by Cloud Secret Manager.
  - variable: VERBOSE_API_KEY
    secret: projects/test-project/secrets/secretID

    # Same as API_KEY above but with the long form secret reference with pinned version.
  - variable: PINNED_VERBOSE_API_KEY
    secret: projects/test-project/secrets/secretID/versions/5
The rest of this guide provides more information and context for these example settings.
Configure Cloud Run service settings
With apphosting.yaml settings, you can configure how your
Cloud Run service is
provisioned. The available settings for the
Cloud Run service are provided in the runConfig object:
cpu– Number of CPUs used for each serving instance (default 0).memoryMiB– Amount of memory allocated for each serving instance in MiB (default 512)maxInstances– Maximum number of containers to ever run at a time (default of 100 and managed by quota)minInstances– Number of containers to always keep alive (default 0).concurrency– Maximum number of requests that each serving instance can receive (default 80).
Note the important relationship between cpu and memoryMiB; memory can be set
to any integer value between 128 to 32768, but increasing the memory limit may
require increasing CPU limits:
- Over 4GiB requires at least 2 CPUs
- Over 8GiB requires at least 4 CPUs
- Over 16GiB requires at least 6 CPUs
- Over 24GiB requires at least 8 CPUs
Similarly, the value of cpu affects concurrency settings. If you set a value
less than 1 CPU, you must set concurrency to 1, and CPU will only be allocated
during request processing.
Override build and run scripts
App Hosting infers your app's build and start command based on the detected
framework. If you want to use a custom build or start command, you can override
App Hosting's defaults in apphosting.yaml.
scripts:
  buildCommand: next build --no-lint
  runCommand: node dist/index.js
The build command override takes precedence over any other build commands and
opts your app out of the framework adapters and disables any framework specific
optimizations that App Hosting provides. It's best used when your app features
are not well supported by the adapters. If you want to change your build command
but still use our provided adapters, set your build script in package.json
instead as described in App Hosting framework adapters.
Use the run command override when there is a specific command you want to use to start your app that's different from the App Hosting-inferred command.
Configure build output
App Hosting optimizes your app deploys by default by deleting unused output
files as indicated by the framework. If you want to further optimize your app
deploy size or ignore the default optimizations, you can override this in
apphosting.yaml.
outputFiles:
  serverApp:
    include: [dist, server.js]
The include parameter takes in a list of directories and files relative to the
app root directory that are necessary to deploy your app. If you want to make sure
that all files are kept, set include to [.] and all files will be deployed.
Store and access secret parameters
Sensitive information such as API keys should be stored as secrets. You can
reference secrets in apphosting.yaml to avoid checking sensitive information
into source control.
Parameters of type secret represent string parameters which have a value
stored in Cloud Secret Manager.
Instead of
deriving the value directly, secret parameters check against existence in Cloud
Secret Manager, and load the values during rollout.
  -   variable: API_KEY
      secret: myApiKeySecret
Secrets in Cloud Secret manager can have multiple versions. By default, the value of a secret parameter available to your live backend is pinned to the latest available version of the secret at the time the backend was built. If you have requirements for versioning and lifecycle management of parameters, you can pin to specific versions with Cloud Secret Manager. For example, to pin to version 5:
  - variable: PINNED_API_KEY
    secret: myApiKeySecret@5
You can create secrets with the Firebase CLI command
firebase apphosting:secrets:set, and you will be prompted to add necessary
permissions. This flow gives you the option to automatically add the secret
reference to apphosting.yaml.
To use the full suite of Cloud Secret Manager functionality, you can instead use
the Cloud Secret Manager console. If you do this, you'll need to grant
permissions to your App Hosting backend with the Firebase CLI command
firebase apphosting:secrets:grantaccess.
Configure VPC access
Your App Hosting backend can connect to a Virtual Private Cloud (VPC) network. For more information and an example, see Connect Firebase App Hosting to a VPC network.
Use the vpcAccess mapping in your apphosting.yaml file to configure access.
Use either a fully qualified network/connector name or an ID. Using IDs allows
for portability between staging and production environments with different
connectors/networks.
Direct VPC Egress Configuration (apphosting.yaml):
runConfig:
  vpcAccess:
    egress: PRIVATE_RANGES_ONLY # Default value
    networkInterfaces:
      # Specify at least one of network and/or subnetwork
      - network: my-network-id
        subnetwork: my-subnetwork-id
Serverless Connector Configuration (apphosting.yaml):
runConfig:
  vpcAccess:
    egress: ALL_TRAFFIC
    connector: connector-id
Manage backends
Commands for basic management of App Hosting backends are provided in the Firebase console and the Firebase CLI. This section describes some of the more common management tasks, including creating and deleting backends.
Create a backend
An App Hosting backend is the collection of managed resources that App Hosting creates to build and run your web app.
Firebase console: Navigate to Hosting & Serverless > App Hosting, and then click Create backend (if this is the first backend in your Firebase project, click Get started).
Firebase CLI: (v13.15.4 or later) To create a backend, run the following command from the root of your local project directory, supplying your project ID as an argument:
firebase apphosting:backends:create --project PROJECT_ID
For both console or CLI, follow the prompts to choose a region, set up a GitHub connection, and configure these basic deployment settings:
Set your app's root directory (defaults to
/)This is usually where your
package.jsonfile is located.
Set the live branch
This is the branch of your GitHub repository that gets deployed to your live URL. Often, it's the branch into which feature branches or development branches are merged.
Accept or decline automatic rollouts
Automatic rollouts are enabled by default. At completion of backend creation, you can choose for your app to be deployed to App Hosting immediately.
Assign a name to your backend.
Select your runtime environment. By default, the newest recommended Node.j version is pre-selected for you.
- Configure Automatic Base Image Updates (ABIU). ABIU is enabled by default and automatically applies security patches to your underlying environment. You can opt out of ABIU by selecting "Not specified" for your runtime.
Delete a backend
To fully remove a backend, first use the Firebase console or the Firebase CLI to delete it, and then manually remove related assets, taking special care not to delete any resources that might be used by other backends or other aspects of your Firebase project.
Firebase console: From the Setting menu, select Delete backend.
Firebase CLI: (v13.15.4 or later)
Run the following command to delete the App Hosting backend. This disables all domains for your backend and deletes the associated Cloud Run service:
firebase apphosting:backends:delete BACKEND_ID --project PROJECT_ID(Optional) In the Google Cloud console tab for Artifact Registry, delete the image for your backend in "firebaseapphosting-images".
In Cloud Secret Manager, delete any secrets with "apphosting" in the secret name, taking special care to make sure these secrets are not used by other backends or other aspects of your Firebase project.