
Bạn có thể cho phép người dùng xác thực bằng Firebase thông qua Tài khoản Google của họ bằng cách tích hợp tính năng Đăng nhập bằng Google vào ứng dụng của bạn.
Trước khi bắt đầu
Sử dụng Trình quản lý gói Swift để cài đặt và quản lý các phần phụ thuộc của Firebase.
- Trong Xcode, khi dự án ứng dụng của bạn đang mở, hãy chuyển đến File > Add Packages (Tệp > Thêm gói).
- Khi được nhắc, hãy thêm kho lưu trữ SDK nền tảng Apple của Firebase:
- Chọn thư viện Firebase Authentication.
- Thêm cờ
-ObjCvào phần Other Linker Flags (Cờ trình liên kết khác) trong phần cài đặt bản dựng của mục tiêu. - Khi hoàn tất, Xcode sẽ tự động bắt đầu phân giải và tải các phần phụ thuộc xuống ở chế độ nền.
https://github.com/firebase/firebase-ios-sdk.git
Thêm SDK Đăng nhập bằng Google vào dự án
Trong Xcode, khi dự án ứng dụng của bạn đang mở, hãy chuyển đến File > Add Packages (Tệp > Thêm gói).
Khi được nhắc, hãy thêm kho lưu trữ SDK Đăng nhập bằng Google:
https://github.com/google/GoogleSignIn-iOSKhi hoàn tất, Xcode sẽ tự động bắt đầu phân giải và tải các phần phụ thuộc xuống ở chế độ nền.
Bật tính năng Đăng nhập bằng Google cho dự án Firebase
Để cho phép người dùng đăng nhập bằng tính năng Đăng nhập bằng Google, trước tiên, bạn phải bật nhà cung cấp Đăng nhập bằng Google cho dự án Firebase:
Trong bảng điều khiển Firebase, hãy chuyển đến Security > Authentication (Bảo mật > Xác thực).
Trong thẻ Sign-in method (Phương thức đăng nhập), hãy bật nhà cung cấp Google.
Nhấp vào Lưu.
Tải một bản sao mới của tệp
GoogleService-Info.plisttrong dự án xuống và sao chép tệp đó vào dự án Xcode. Ghi đè mọi phiên bản hiện có bằng phiên bản mới. (Xem bài viết Thêm Firebase vào dự án iOS.)
Nhập các tệp tiêu đề bắt buộc
Trước tiên, bạn phải nhập các tệp tiêu đề SDK Firebase và SDK Đăng nhập bằng Google vào ứng dụng của mình.
Swift
import FirebaseAuth
import GoogleSignIn
Objective-C
@import FirebaseCore;
@import GoogleSignIn;
Triển khai tính năng Đăng nhập bằng Google
Triển khai tính năng Đăng nhập bằng Google bằng cách làm theo các bước sau. Hãy xem tài liệu dành cho nhà phát triển về tính năng Đăng nhập bằng Google để biết thông tin chi tiết về cách sử dụng tính năng Đăng nhập bằng Google với iOS.
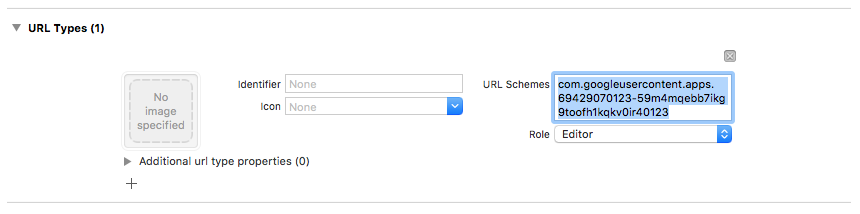
- Thêm các lược đồ URL tuỳ chỉnh vào dự án Xcode:
- Mở cấu hình dự án: nhấp vào tên dự án trong khung hiển thị dạng cây ở bên trái Chọn ứng dụng của bạn trong phần TARGETS, sau đó chọn thẻ Info và mở rộng phần URL Types.
- Nhấp vào nút + rồi thêm một lược đồ URL cho mã ứng dụng khách đảo ngược. Để tìm giá trị này, hãy mở tệp cấu hình
GoogleService-Info.plist REVERSED_CLIENT_IDSao chép giá trị của khoá đó, rồi dán vào hộp URL Schemes trên trang cấu hình. Không chỉnh sửa các trường khác.Sau khi hoàn tất, cấu hình của bạn sẽ có dạng như sau (nhưng có các giá trị dành riêng cho ứng dụng của bạn):
- Trong phương thức
application:didFinishLaunchingWithOptions:của uỷ quyền ứng dụng, hãy định cấu hình đối tượngFirebaseApp.Swift
// Use Firebase library to configure APIs
FirebaseApp.configure()
Objective-C
// Use Firebase library to configure APIs
[FIRApp configure];
- Triển khai phương thức
application:openURL:options:của uỷ quyền ứng dụng. Phương thức này sẽ gọi phương thứchandleURLcủa thực thểGIDSignIn, phương thức này sẽ xử lý đúng URL mà ứng dụng của bạn nhận được ở cuối quy trình xác thực.Swift
func scene(_ scene: UIScene, openURLContexts URLContexts: Set<UIOpenURLContext>) {
  // ...
}
  return GIDSignIn.sharedInstance.handle(url)
}
Objective-C
- (BOOL)application:(nonnull UIApplication *)application
            openURL:(nonnull NSURL *)url
            options:(nonnull NSDictionary<NSString *, id> *)options {
  return [[GIDSignIn sharedInstance] handleURL:url];
}
- Truyền bộ điều khiển khung hiển thị hiện tại và mã ứng dụng khách cho ứng dụng của bạn vào phương thức
signIncủa nhà cung cấp Đăng nhập bằng Google rồi tạo thông tin xác thực Xác thực Firebase từ mã thông báo xác thực Google kết quả:Swift
guard let clientID = FirebaseApp.app()?.options.clientID else { return }

// Create Google Sign In configuration object.
let config = GIDConfiguration(clientID: clientID)
GIDSignIn.sharedInstance.configuration = config

// Start the sign in flow!
GIDSignIn.sharedInstance.signIn(withPresenting: viewController) { result, error in
  guard error == nil else {
    // ...
    return
  }

  guard let user = result?.user,
        let idToken = user.idToken?.tokenString
  else {
    // ...
    return
  }

  let credential = GoogleAuthProvider.credential(withIDToken: idToken,
                                                 accessToken: user.accessToken.tokenString)
  self.signIn(with: credential)
}
Objective-C
GIDConfiguration *config = [[GIDConfiguration alloc] initWithClientID:[FIRApp defaultApp].options.clientID];
[GIDSignIn.sharedInstance setConfiguration:config];

__weak __auto_type weakSelf = self;
[GIDSignIn.sharedInstance signInWithPresentingViewController:self
      completion:^(GIDSignInResult * _Nullable result, NSError * _Nullable error) {
  __auto_type strongSelf = weakSelf;
  if (strongSelf == nil) { return; }

  if (error == nil) {
    FIRAuthCredential *credential =
    [FIRGoogleAuthProvider credentialWithIDToken:result.user.idToken.tokenString
                                     accessToken:result.user.accessToken.tokenString];
    // ...
  } else {
    // ...
  }
}];
- Thêm
GIDSignInButtonvào bảng phân cảnh, tệp XIB hoặc khởi tạo theo phương thức lập trình. Để thêm nút vào bảng phân cảnh hoặc tệp XIB file, hãy thêm một Khung hiển thị rồi đặt lớp tuỳ chỉnh của khung hiển thị đó thànhGIDSignInButton. - Không bắt buộc: Nếu bạn muốn tuỳ chỉnh nút, hãy làm như
sau:
Swift
- Trong bộ điều khiển khung hiển thị, hãy khai báo nút đăng nhập làm thuộc tính.
@IBOutlet weak var signInButton: GIDSignInButton!
- Kết nối nút với thuộc tính
signInButtonmà bạn vừa khai báo. - Tuỳ chỉnh nút bằng cách đặt các thuộc tính của đối tượng GIDSignInButton.
Objective-C
- Trong tệp tiêu đề của bộ điều khiển khung hiển thị, hãy khai báo nút đăng nhập làm
thuộc tính.
@property(weak, nonatomic) IBOutlet GIDSignInButton *signInButton;
- Kết nối nút với thuộc tính
signInButtonmà bạn vừa khai báo. - Tuỳ chỉnh nút bằng cách đặt các thuộc tính của đối tượng GIDSignInButton.
- Trong bộ điều khiển khung hiển thị, hãy khai báo nút đăng nhập làm thuộc tính.
Xác thực bằng Firebase
Cuối cùng, hãy hoàn tất quy trình đăng nhập Firebase bằng thông tin xác thực xác thực được tạo ở bước trước.
Swift
Auth.auth().signIn(with: credential) { result, error in
  guard error == nil else {
    // ...
    return
  }

  // At this point, our user is signed in
}
Objective-C
[[FIRAuth auth] signInWithCredential:credential
                          completion:^(FIRAuthDataResult * _Nullable authResult,
                                       NSError * _Nullable error) {
    if (isMFAEnabled && error && error.code == FIRAuthErrorCodeSecondFactorRequired) {
      FIRMultiFactorResolver *resolver = error.userInfo[FIRAuthErrorUserInfoMultiFactorResolverKey];
      NSMutableString *displayNameString = [NSMutableString string];
      for (FIRMultiFactorInfo *tmpFactorInfo in resolver.hints) {
        [displayNameString appendString:tmpFactorInfo.displayName];
        [displayNameString appendString:@" "];
      }
      [self showTextInputPromptWithMessage:[NSString stringWithFormat:@"Select factor to sign in\n%@", displayNameString]
                           completionBlock:^(BOOL userPressedOK, NSString *_Nullable displayName) {
       FIRPhoneMultiFactorInfo* selectedHint;
       for (FIRMultiFactorInfo *tmpFactorInfo in resolver.hints) {
         if ([displayName isEqualToString:tmpFactorInfo.displayName]) {
           selectedHint = (FIRPhoneMultiFactorInfo *)tmpFactorInfo;
         }
       }
       [FIRPhoneAuthProvider.provider
        verifyPhoneNumberWithMultiFactorInfo:selectedHint
        UIDelegate:nil
        multiFactorSession:resolver.session
        completion:^(NSString * _Nullable verificationID, NSError * _Nullable error) {
          if (error) {
            [self showMessagePrompt:error.localizedDescription];
          } else {
            [self showTextInputPromptWithMessage:[NSString stringWithFormat:@"Verification code for %@", selectedHint.displayName]
                                 completionBlock:^(BOOL userPressedOK, NSString *_Nullable verificationCode) {
             FIRPhoneAuthCredential *credential =
                 [[FIRPhoneAuthProvider provider] credentialWithVerificationID:verificationID
                                                              verificationCode:verificationCode];
             FIRMultiFactorAssertion *assertion = [FIRPhoneMultiFactorGenerator assertionWithCredential:credential];
             [resolver resolveSignInWithAssertion:assertion completion:^(FIRAuthDataResult * _Nullable authResult, NSError * _Nullable error) {
               if (error) {
                 [self showMessagePrompt:error.localizedDescription];
               } else {
                 NSLog(@"Multi factor finanlize sign in succeeded.");
               }
             }];
           }];
          }
        }];
     }];
    }
  else if (error) {
    // ...
    return;
  }
  // User successfully signed in. Get user data from the FIRUser object
  if (authResult == nil) { return; }
  FIRUser *user = authResult.user;
  // ...
}];
Các bước tiếp theo
Sau khi người dùng đăng nhập lần đầu tiên, một tài khoản người dùng mới sẽ được tạo và liên kết với thông tin xác thực (tức là tên người dùng và mật khẩu, số điện thoại hoặc thông tin nhà cung cấp dịch vụ xác thực) mà người dùng đã đăng nhập. Tài khoản mới này được lưu trữ trong dự án Firebase của bạn và có thể dùng để xác định người dùng trên mọi ứng dụng trong dự án của bạn, bất kể cách người dùng đăng nhập.
-
Trong ứng dụng, bạn có thể lấy thông tin cơ bản về hồ sơ của người dùng từ đối tượng
User. Xem bài viết Quản lý người dùng. Trong Firebase Realtime Database và Cloud Storage Quy tắc bảo mật, bạn có thể lấy mã người dùng riêng biệt của người dùng đã đăng nhập từ biến
authrồi dùng mã đó để kiểm soát dữ liệu mà người dùng có thể truy cập.
Bạn có thể cho phép người dùng đăng nhập vào ứng dụng của bạn bằng nhiều nhà cung cấp dịch vụ xác thực bằng cách liên kết thông tin xác thực của nhà cung cấp dịch vụ xác thực với tài khoản người dùng hiện có.
Để đăng xuất người dùng, hãy gọi
signOut:.
Swift
let firebaseAuth = Auth.auth()
do {
  try firebaseAuth.signOut()
} catch let signOutError as NSError {
  print("Error signing out: %@", signOutError)
}
Objective-C
NSError *signOutError;
BOOL status = [[FIRAuth auth] signOut:&signOutError];
if (!status) {
  NSLog(@"Error signing out: %@", signOutError);
  return;
}
Bạn cũng có thể muốn thêm mã xử lý lỗi cho toàn bộ các lỗi xác thực lỗi. Xem bài viết Xử lý lỗi.