

หากอัปเกรดเป็น Firebase Authentication with Identity Platform คุณสามารถเพิ่มการตรวจสอบสิทธิ์แบบหลายปัจจัยทาง SMS ลงในแอป iOS ได้
การตรวจสอบสิทธิ์แบบหลายปัจจัยช่วยเพิ่มความปลอดภัยให้แอปของคุณ ผู้โจมตีมักเจาะรหัสผ่านและบัญชีโซเชียล แต่การสกัดกั้นข้อความมีความซับซ้อนมากกว่า
ก่อนเริ่มต้น
เปิดใช้ผู้ให้บริการอย่างน้อย 1 รายที่รองรับการตรวจสอบสิทธิ์แบบหลายปัจจัย ผู้ให้บริการทุกรายรองรับ MFA ยกเว้น การตรวจสอบสิทธิ์ทางโทรศัพท์ การตรวจสอบสิทธิ์แบบไม่ระบุตัวตน และ Apple Game Center
ตรวจสอบว่าแอปของคุณยืนยันอีเมลของผู้ใช้ MFA ต้องมีการยืนยันอีเมล ซึ่งจะป้องกันไม่ให้ผู้ไม่ประสงค์ดีลงทะเบียนใช้บริการด้วยอีเมลที่ไม่ใช่ของตนเอง แล้วล็อกไม่ให้เจ้าของที่แท้จริงเข้าถึงบัญชีโดยการเพิ่มปัจจัยที่สอง
การเปิดใช้การตรวจสอบสิทธิ์แบบหลายปัจจัย
ในคอนโซล Firebase ให้ไปที่ความปลอดภัย > การตรวจสอบสิทธิ์
ในแท็บวิธีการลงชื่อเข้าใช้ ในส่วนขั้นสูง ให้เปิดใช้การตรวจสอบสิทธิ์แบบหลายปัจจัยทาง SMS
นอกจากนี้ คุณควรป้อนหมายเลขโทรศัพท์ที่จะใช้ทดสอบแอป แม้ว่าจะเป็นตัวเลือก แต่เราขอแนะนำให้ลงทะเบียนหมายเลขโทรศัพท์ทดสอบเพื่อหลีกเลี่ยงการจำกัดอัตราการใช้งานระหว่างการพัฒนา
หากยังไม่ได้ดำเนินการ ให้ให้สิทธิ์โดเมนของแอปโดยทำดังนี้
ในคอนโซลFirebase ให้ไปที่แท็บ ความปลอดภัย > การตรวจสอบสิทธิ์ > การตั้งค่า
ในส่วนโดเมนที่ได้รับอนุญาต ให้คลิกเพิ่มโดเมน แล้วเพิ่ม โดเมน
การยืนยันแอป
Authentication ต้องยืนยันว่าคำขอ SMS มาจากแอปของคุณ ซึ่งทำได้ 2 วิธี ดังนี้
การแจ้งเตือน APNs แบบเงียบ: เมื่อคุณลงชื่อเข้าใช้ผู้ใช้เป็นครั้งแรก Authentication จะส่งการแจ้งเตือนแบบพุชแบบเงียบไปยัง อุปกรณ์ของผู้ใช้ได้ การตรวจสอบสิทธิ์จะดำเนินการต่อได้หากแอปได้รับการแจ้งเตือน โปรดทราบว่าตั้งแต่ iOS 8.0 เป็นต้นไป คุณไม่จำเป็นต้องขอให้ผู้ใช้อนุญาตการแจ้งเตือนแบบพุชเพื่อใช้วิธีนี้
การยืนยัน reCAPTCHA: หากส่งการแจ้งเตือนแบบเงียบไม่ได้ (เช่น เนื่องจากผู้ใช้ปิดใช้การรีเฟรชเบื้องหลัง หรือคุณกำลังทดสอบแอปในโปรแกรมจำลอง iOS) คุณสามารถใช้ reCAPTCHA ได้ ในหลายๆ กรณี reCAPTCHA จะแก้ปัญหาได้เองโดยอัตโนมัติโดยไม่ต้องมีการโต้ตอบจากผู้ใช้
การใช้การแจ้งเตือนแบบเงียบ
วิธีเปิดใช้การแจ้งเตือน APNs เพื่อใช้กับ Authentication
ใน Xcode, ให้เปิดใช้การแจ้งเตือนแบบพุช สำหรับโปรเจ็กต์
อัปโหลดคีย์การตรวจสอบสิทธิ์ APNs โดยใช้คอนโซล Firebase (การเปลี่ยนแปลง จะโอนไปยัง Google Cloud Authentication โดยอัตโนมัติ) หากยังไม่มีคีย์การตรวจสอบสิทธิ์ APNs โปรดดู การกำหนดค่า APNs ด้วย FCM เพื่อเรียนรู้วิธีรับคีย์
ในคอนโซล Firebase ให้ไปที่
Settings > General จากนั้นคลิกแท็บ Cloud Messagingในส่วนคีย์การตรวจสอบสิทธิ์ APNs ในส่วนการกำหนดค่าแอป iOS ให้คลิกอัปโหลด เพื่ออัปโหลดคีย์การตรวจสอบสิทธิ์สำหรับการพัฒนา หรือคีย์การตรวจสอบสิทธิ์สำหรับการใช้งานจริง หรือทั้ง 2 อย่าง คุณต้องอัปโหลดคีย์อย่างน้อย 1 รายการ
เลือกคีย์
เพิ่มรหัสคีย์สำหรับคีย์ คุณค้นหารหัสคีย์ได้ในส่วน ใบรับรอง ตัวระบุ และโปรไฟล์ ใน Apple Developer Member Center
คลิกอัปโหลด
หากมีใบรับรอง APNs อยู่แล้ว คุณสามารถอัปโหลดใบรับรองแทนได้
การใช้การยืนยัน reCAPTCHA
วิธีเปิดใช้ Client SDK เพื่อใช้ reCAPTCHA
เปิดการกำหนดค่าโปรเจ็กต์ใน Xcode
ดับเบิลคลิกชื่อโปรเจ็กต์ในมุมมองแบบต้นไม้ทางด้านซ้าย
เลือกแอปจากส่วน Targets
เลือกแท็บ Info
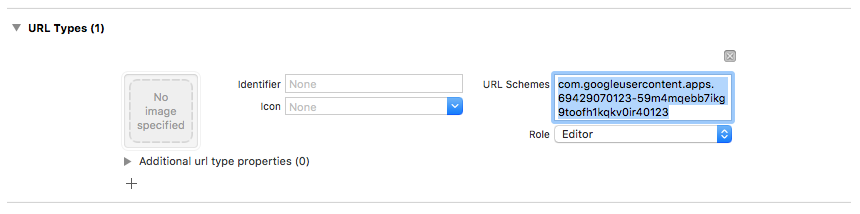
ขยายส่วน URL Types
คลิกปุ่ม +
ป้อนรหัสไคลเอ็นต์แบบย้อนกลับในช่อง URL Schemes คุณดูค่านี้ได้ในไฟล์การกำหนดค่า
GoogleService-Info.plistเป็นREVERSED_CLIENT_ID
เมื่อเสร็จแล้ว การกำหนดค่าควรมีลักษณะคล้ายกับตัวอย่างต่อไปนี้
หรือคุณจะปรับแต่งวิธีที่แอปแสดง SFSafariViewController หรือ UIWebView เมื่อแสดง reCAPTCHA ก็ได้ โดยสร้างคลาสที่กำหนดเองซึ่งเป็นไปตามโปรโตคอล FIRAuthUIDelegate แล้วส่งคลาสดังกล่าวไปยัง verifyPhoneNumber:UIDelegate:completion:
การเลือกรูปแบบการลงทะเบียน
คุณสามารถเลือกว่าแอปต้องใช้การตรวจสอบสิทธิ์แบบหลายปัจจัยหรือไม่ รวมถึงจะลงทะเบียนผู้ใช้เมื่อใดและอย่างไร รูปแบบที่ใช้กันโดยทั่วไปมีดังนี้
ลงทะเบียนปัจจัยที่สองของผู้ใช้เป็นส่วนหนึ่งของการลงทะเบียน ใช้วิธีนี้หากแอปกำหนดให้ผู้ใช้ทุกคนต้องใช้การตรวจสอบสิทธิ์แบบหลายปัจจัย โปรดทราบว่าบัญชีต้องมีอีเมลที่ยืนยันแล้วจึงจะลงทะเบียนปัจจัยที่สองได้ ดังนั้นขั้นตอนการลงทะเบียนจะต้องรองรับกรณีนี้
เสนอตัวเลือกที่ข้ามได้เพื่อลงทะเบียนปัจจัยที่สองระหว่างการลงทะเบียน แอปที่ต้องการสนับสนุนแต่ไม่บังคับให้ใช้การตรวจสอบสิทธิ์แบบหลายปัจจัยอาจชอบแนวทางนี้
ให้ความสามารถในการเพิ่มปัจจัยที่สองจากหน้าการจัดการบัญชีหรือโปรไฟล์ของผู้ใช้แทนหน้าจอลงชื่อสมัครใช้ วิธีนี้จะช่วยลดความยุ่งยากระหว่างกระบวนการลงทะเบียน ขณะเดียวกันก็ยังคงให้ผู้ใช้ที่ให้ความสำคัญกับความปลอดภัยใช้การตรวจสอบสิทธิ์แบบหลายปัจจัยได้
กำหนดให้เพิ่มปัจจัยที่สองทีละขั้นตอนเมื่อผู้ใช้ต้องการเข้าถึงฟีเจอร์ที่มีข้อกำหนดด้านความปลอดภัยที่เข้มงวดขึ้น
การลงทะเบียนปัจจัยที่สอง
วิธีลงทะเบียนปัจจัยรองใหม่สำหรับผู้ใช้
ตรวจสอบสิทธิ์ผู้ใช้อีกครั้ง
ขอให้ผู้ใช้ป้อนหมายเลขโทรศัพท์
รับเซสชันแบบหลายปัจจัยสำหรับผู้ใช้โดยทำดังนี้
Swift
authResult.user.multiFactor.getSessionWithCompletion() { (session, error) in
  // ...
}
Objective-C
[authResult.user.multiFactor
  getSessionWithCompletion:^(FIRMultiFactorSession * _Nullable session,
                            NSError * _Nullable error) {
    // ...
}];
ส่งข้อความยืนยันไปยังโทรศัพท์ของผู้ใช้ ตรวจสอบว่าหมายเลขโทรศัพท์อยู่ในรูปแบบที่มี
+นำหน้าและไม่มีเครื่องหมายวรรคตอนหรือช่องว่างอื่นๆ (เช่น+15105551234)Swift
// Send SMS verification code.
PhoneAuthProvider.provider().verifyPhoneNumber(
  phoneNumber,
  uiDelegate: nil,
  multiFactorSession: session) { (verificationId, error) in
    // verificationId will be needed for enrollment completion.
}
Objective-C
// Send SMS verification code.
[FIRPhoneAuthProvider.provider verifyPhoneNumber:phoneNumber
                                      UIDelegate:nil
                              multiFactorSession:session
                                      completion:^(NSString * _Nullable verificationID,
                                                    NSError * _Nullable error) {
    // verificationId will be needed for enrollment completion.
}];
แม้ว่าจะไม่บังคับ แต่เราขอแนะนำให้แจ้งให้ผู้ใช้ทราบล่วงหน้าว่าผู้ใช้จะได้รับข้อความ SMS และจะมีค่าบริการตามปกติ
เมธอด
verifyPhoneNumber()จะเริ่มกระบวนการยืนยันแอปในเบื้องหลังโดยใช้การแจ้งเตือนแบบพุชแบบเงียบ หากไม่มีการแจ้งเตือนแบบพุชแบบเงียบ ระบบจะแสดงภาพทดสอบ reCAPTCHA แทนเมื่อส่งรหัส SMS แล้ว ให้ขอให้ผู้ใช้ยืนยันรหัส จากนั้นใช้การตอบกลับของผู้ใช้เพื่อสร้าง
PhoneAuthCredentialโดยทำดังนี้Swift
// Ask user for the verification code. Then:
let credential = PhoneAuthProvider.provider().credential(
  withVerificationID: verificationId,
  verificationCode: verificationCode)
Objective-C
// Ask user for the SMS verification code. Then:
FIRPhoneAuthCredential *credential = [FIRPhoneAuthProvider.provider
                                       credentialWithVerificationID:verificationID
                                       verificationCode:kPhoneSecondFactorVerificationCode];
เริ่มต้นออบเจ็กต์การยืนยันโดยทำดังนี้
Swift
let assertion = PhoneMultiFactorGenerator.assertion(with: credential)Objective-C
FIRMultiFactorAssertion *assertion = [FIRPhoneMultiFactorGenerator assertionWithCredential:credential];ลงทะเบียนให้เสร็จสมบูรณ์ หรือคุณจะระบุชื่อที่แสดงสำหรับปัจจัยที่สองก็ได้ ซึ่งจะเป็นประโยชน์สำหรับผู้ใช้ที่มีปัจจัยที่สองหลายรายการ เนื่องจากระบบจะมาสก์หมายเลขโทรศัพท์ระหว่างขั้นตอนการตรวจสอบสิทธิ์ (เช่น +1******1234)
Swift
// Complete enrollment. This will update the underlying tokens
// and trigger ID token change listener.
user.multiFactor.enroll(with: assertion, displayName: displayName) { (error) in
  // ...
}
Objective-C
// Complete enrollment. This will update the underlying tokens
// and trigger ID token change listener.
[authResult.user.multiFactor enrollWithAssertion:assertion
                                     displayName:nil
                                      completion:^(NSError * _Nullable error) {
    // ...
}];
โค้ดด้านล่างแสดงตัวอย่างที่สมบูรณ์ของการลงทะเบียนปัจจัยที่สอง
Swift
let user = Auth.auth().currentUser
user?.multiFactor.getSessionWithCompletion({ (session, error) in
  // Send SMS verification code.
  PhoneAuthProvider.provider().verifyPhoneNumber(
    phoneNumber,
    uiDelegate: nil,
    multiFactorSession: session
  ) { (verificationId, error) in
    // verificationId will be needed for enrollment completion.
    // Ask user for the verification code.
    let credential = PhoneAuthProvider.provider().credential(
      withVerificationID: verificationId!,
      verificationCode: phoneSecondFactorVerificationCode)
    let assertion = PhoneMultiFactorGenerator.assertion(with: credential)
    // Complete enrollment. This will update the underlying tokens
    // and trigger ID token change listener.
    user?.multiFactor.enroll(with: assertion, displayName: displayName) { (error) in
      // ...
    }
  }
})
Objective-C
FIRUser *user = FIRAuth.auth.currentUser;
[user.multiFactor getSessionWithCompletion:^(FIRMultiFactorSession * _Nullable session,
                                              NSError * _Nullable error) {
    // Send SMS verification code.
    [FIRPhoneAuthProvider.provider
      verifyPhoneNumber:phoneNumber
      UIDelegate:nil
      multiFactorSession:session
      completion:^(NSString * _Nullable verificationID, NSError * _Nullable error) {
        // verificationId will be needed for enrollment completion.

        // Ask user for the verification code.
        // ...

        // Then:
        FIRPhoneAuthCredential *credential =
            [FIRPhoneAuthProvider.provider credentialWithVerificationID:verificationID
                                                        verificationCode:kPhoneSecondFactorVerificationCode];
        FIRMultiFactorAssertion *assertion =
            [FIRPhoneMultiFactorGenerator assertionWithCredential:credential];

        // Complete enrollment. This will update the underlying tokens
        // and trigger ID token change listener.
        [user.multiFactor enrollWithAssertion:assertion
                                  displayName:displayName
                                    completion:^(NSError * _Nullable error) {
            // ...
        }];
    }];
}];
ยินดีด้วย คุณลงทะเบียนปัจจัยการตรวจสอบสิทธิ์ที่สองสำหรับผู้ใช้เรียบร้อยแล้ว
การลงชื่อเข้าใช้ของผู้ใช้ด้วยปัจจัยที่สอง
วิธีลงชื่อเข้าใช้ของผู้ใช้ด้วยการยืนยันทาง SMS แบบ 2 ปัจจัย
ลงชื่อเข้าใช้ของผู้ใช้ด้วยปัจจัยแรก จากนั้นตรวจหาข้อผิดพลาดที่ระบุว่าต้องใช้การตรวจสอบสิทธิ์แบบหลายปัจจัย ข้อผิดพลาดนี้มีตัวแก้ ปัจจัยที่สองที่ลงทะเบียนไว้ และเซสชันพื้นฐานที่แสดงว่าผู้ใช้ตรวจสอบสิทธิ์ด้วยปัจจัยแรกสำเร็จ
ตัวอย่างเช่น หากปัจจัยแรกของผู้ใช้คืออีเมลและรหัสผ่าน ให้ทำดังนี้
Swift
Auth.auth().signIn(
  withEmail: email,
  password: password
) { (result, error) in
  let authError = error as NSError
  if authError?.code == AuthErrorCode.secondFactorRequired.rawValue {
    // The user is a multi-factor user. Second factor challenge is required.
    let resolver =
      authError!.userInfo[AuthErrorUserInfoMultiFactorResolverKey] as! MultiFactorResolver
    // ...
  } else {
    // Handle other errors such as wrong password.
  }
}
Objective-C
[FIRAuth.auth signInWithEmail:email
                     password:password
                   completion:^(FIRAuthDataResult * _Nullable authResult,
                                NSError * _Nullable error) {
    if (error == nil || error.code != FIRAuthErrorCodeSecondFactorRequired) {
        // User is not enrolled with a second factor and is successfully signed in.
        // ...
    } else {
        // The user is a multi-factor user. Second factor challenge is required.
    }
}];
หากปัจจัยแรกของผู้ใช้เป็นผู้ให้บริการแบบรวม เช่น OAuth ให้ตรวจหาข้อผิดพลาดหลังจากเรียก
getCredentialWith()หากผู้ใช้ลงทะเบียนปัจจัยรองไว้หลายรายการ ให้ถามผู้ใช้ว่าจะใช้ปัจจัยใด คุณรับหมายเลขโทรศัพท์ที่มาสก์ไว้ได้ด้วย
resolver.hints[selectedIndex].phoneNumberและชื่อที่แสดงด้วยresolver.hints[selectedIndex].displayNameSwift
// Ask user which second factor to use. Then:
if resolver.hints[selectedIndex].factorID == PhoneMultiFactorID {
  // User selected a phone second factor.
  // ...
} else if resolver.hints[selectedIndex].factorID == TotpMultiFactorID {
  // User selected a TOTP second factor.
  // ...
} else {
  // Unsupported second factor.
}
Objective-C
FIRMultiFactorResolver *resolver =
    (FIRMultiFactorResolver *) error.userInfo[FIRAuthErrorUserInfoMultiFactorResolverKey];

// Ask user which second factor to use. Then:
FIRPhoneMultiFactorInfo *hint = (FIRPhoneMultiFactorInfo *) resolver.hints[selectedIndex];
if (hint.factorID == FIRPhoneMultiFactorID) {
  // User selected a phone second factor.
  // ...
} else if (hint.factorID == FIRTOTPMultiFactorID) {
  // User selected a TOTP second factor.
  // ...
} else {
  // Unsupported second factor.
}
ส่งข้อความยืนยันไปยังโทรศัพท์ของผู้ใช้โดยทำดังนี้
Swift
// Send SMS verification code.
let hint = resolver.hints[selectedIndex] as! PhoneMultiFactorInfo
PhoneAuthProvider.provider().verifyPhoneNumber(
  with: hint,
  uiDelegate: nil,
  multiFactorSession: resolver.session
) { (verificationId, error) in
  // verificationId will be needed for sign-in completion.
}
Objective-C
// Send SMS verification code
[FIRPhoneAuthProvider.provider
  verifyPhoneNumberWithMultiFactorInfo:hint
  UIDelegate:nil
  multiFactorSession:resolver.session
  completion:^(NSString * _Nullable verificationID, NSError * _Nullable error) {
    if (error != nil) {
        // Failed to verify phone number.
    }
}];
เมื่อส่งรหัส SMS แล้ว ให้ขอให้ผู้ใช้ยืนยันรหัสและใช้รหัสดังกล่าวเพื่อสร้าง
PhoneAuthCredentialโดยทำดังนี้Swift
// Ask user for the verification code. Then:
let credential = PhoneAuthProvider.provider().credential(
  withVerificationID: verificationId!,
  verificationCode: verificationCodeFromUser)
Objective-C
// Ask user for the SMS verification code. Then:
FIRPhoneAuthCredential *credential =
    [FIRPhoneAuthProvider.provider
      credentialWithVerificationID:verificationID
                  verificationCode:verificationCodeFromUser];
เริ่มต้นออบเจ็กต์การยืนยันด้วยข้อมูลเข้าสู่ระบบโดยทำดังนี้
Swift
let assertion = PhoneMultiFactorGenerator.assertion(with: credential)Objective-C
FIRMultiFactorAssertion *assertion =
    [FIRPhoneMultiFactorGenerator assertionWithCredential:credential];
แก้ปัญหาการลงชื่อเข้าใช้ จากนั้นคุณจะเข้าถึงผลลัพธ์การลงชื่อเข้าใช้เดิมได้ ซึ่งรวมถึงข้อมูลเฉพาะของผู้ให้บริการมาตรฐานและข้อมูลเข้าสู่ระบบสำหรับการตรวจสอบสิทธิ์โดยทำดังนี้
Swift
// Complete sign-in. This will also trigger the Auth state listeners.
resolver.resolveSignIn(with: assertion) { (authResult, error) in
  // authResult will also contain the user, additionalUserInfo, optional
  // credential (null for email/password) associated with the first factor sign-in.

  // For example, if the user signed in with Google as a first factor,
  // authResult.additionalUserInfo will contain data related to Google provider that
  // the user signed in with.

  // user.credential contains the Google OAuth credential.
  // user.credential.accessToken contains the Google OAuth access token.
  // user.credential.idToken contains the Google OAuth ID token.
}
Objective-C
// Complete sign-in.
[resolver resolveSignInWithAssertion:assertion
                          completion:^(FIRAuthDataResult * _Nullable authResult,
                                        NSError * _Nullable error) {
    if (error != nil) {
        // User successfully signed in with the second factor phone number.
    }
}];
โค้ดด้านล่างแสดงตัวอย่างที่สมบูรณ์ของการลงชื่อเข้าใช้ของผู้ใช้แบบหลายปัจจัย
Swift
Auth.auth().signIn(
  withEmail: email,
  password: password
) { (result, error) in
  let authError = error as NSError?
  if authError?.code == AuthErrorCode.secondFactorRequired.rawValue {
    let resolver =
      authError!.userInfo[AuthErrorUserInfoMultiFactorResolverKey] as! MultiFactorResolver

    // Ask user which second factor to use.
    // ...

    // Then:
    let hint = resolver.hints[selectedIndex] as! PhoneMultiFactorInfo

    // Send SMS verification code
    PhoneAuthProvider.provider().verifyPhoneNumber(
      with: hint,
      uiDelegate: nil,
      multiFactorSession: resolver.session
    ) { (verificationId, error) in
      if error != nil {
        // Failed to verify phone number.
      }
      // Ask user for the SMS verification code.
      // ...

      // Then:
      let credential = PhoneAuthProvider.provider().credential(
        withVerificationID: verificationId!,
        verificationCode: verificationCodeFromUser)
      let assertion = PhoneMultiFactorGenerator.assertion(with: credential)

      // Complete sign-in.
      resolver.resolveSignIn(with: assertion) { (authResult, error) in
        if error != nil {
          // User successfully signed in with the second factor phone number.
        }
      }
    }
  }
}
Objective-C
[FIRAuth.auth signInWithEmail:email
                     password:password
                   completion:^(FIRAuthDataResult * _Nullable authResult,
                               NSError * _Nullable error) {
    if (error == nil || error.code != FIRAuthErrorCodeSecondFactorRequired) {
        // User is not enrolled with a second factor and is successfully signed in.
        // ...
    } else {
        FIRMultiFactorResolver *resolver =
            (FIRMultiFactorResolver *) error.userInfo[FIRAuthErrorUserInfoMultiFactorResolverKey];

        // Ask user which second factor to use.
        // ...

        // Then:
        FIRPhoneMultiFactorInfo *hint = (FIRPhoneMultiFactorInfo *) resolver.hints[selectedIndex];

        // Send SMS verification code
        [FIRPhoneAuthProvider.provider
          verifyPhoneNumberWithMultiFactorInfo:hint
                                    UIDelegate:nil
                            multiFactorSession:resolver.session
                                    completion:^(NSString * _Nullable verificationID,
                                                NSError * _Nullable error) {
            if (error != nil) {
                // Failed to verify phone number.
            }

            // Ask user for the SMS verification code.
            // ...

            // Then:
            FIRPhoneAuthCredential *credential =
                [FIRPhoneAuthProvider.provider
                  credentialWithVerificationID:verificationID
                              verificationCode:kPhoneSecondFactorVerificationCode];
            FIRMultiFactorAssertion *assertion =
                [FIRPhoneMultiFactorGenerator assertionWithCredential:credential];

            // Complete sign-in.
            [resolver resolveSignInWithAssertion:assertion
                                      completion:^(FIRAuthDataResult * _Nullable authResult,
                                                    NSError * _Nullable error) {
                if (error != nil) {
                    // User successfully signed in with the second factor phone number.
                }
            }];
        }];
    }
}];
ยินดีด้วย คุณลงชื่อเข้าใช้ของผู้ใช้โดยใช้การตรวจสอบสิทธิ์แบบหลายปัจจัยเรียบร้อยแล้ว
ขั้นตอนถัดไป
- จัดการผู้ใช้แบบหลายปัจจัย แบบเป็นโปรแกรมด้วย Admin SDK