
Nếu đã nâng cấp lên Firebase Authentication with Identity Platform, bạn có thể thêm tính năng xác thực đa yếu tố bằng SMS vào ứng dụng iOS.
Tính năng xác thực đa yếu tố giúp tăng cường tính bảo mật cho ứng dụng của bạn. Mặc dù kẻ tấn công thường xâm nhập mật khẩu và tài khoản mạng xã hội, nhưng việc chặn tin nhắn văn bản sẽ khó khăn hơn.
Trước khi bắt đầu
Bật ít nhất một nhà cung cấp hỗ trợ tính năng xác thực đa yếu tố. Mọi nhà cung cấp đều hỗ trợ MFA, ngoại trừ xác thực bằng điện thoại, xác thực ẩn danh và Apple Game Center.
Đảm bảo ứng dụng của bạn đang xác minh email của người dùng. MFA yêu cầu xác minh email. Điều này ngăn chặn các đối tượng xấu đăng ký một dịch vụ bằng email mà họ không sở hữu, sau đó chặn chủ sở hữu thực sự bằng cách thêm một yếu tố thứ hai.
Bật tính năng xác thực đa yếu tố
Trong bảng điều khiển Firebase, hãy chuyển đến phần Bảo mật > Xác thực.
Trong thẻ Phương thức đăng nhập, trong phần Nâng cao, hãy bật Xác thực đa yếu tố bằng SMS.
Bạn cũng nên nhập số điện thoại mà bạn sẽ dùng để kiểm thử ứng dụng. Mặc dù không bắt buộc, nhưng bạn nên đăng ký số điện thoại kiểm thử để tránh bị điều tiết trong quá trình phát triển.
Nếu bạn chưa làm, hãy uỷ quyền cho miền của ứng dụng:
Trong bảng điều khiển Firebase, hãy chuyển đến thẻ Bảo mật > Xác thực > Cài đặt.
Trong mục Miền được uỷ quyền, hãy nhấp vào Thêm miền rồi thêm miền của bạn.
Xác minh ứng dụng
Firebase cần xác minh rằng các yêu cầu SMS đến từ ứng dụng của bạn. Bạn có thể thực hiện việc này theo hai cách:
Thông báo APNs im lặng: Khi bạn đăng nhập cho người dùng lần đầu tiên, Firebase có thể gửi thông báo đẩy im lặng đến thiết bị của người dùng. Quá trình xác thực có thể tiếp tục nếu ứng dụng nhận được thông báo. Xin lưu ý rằng kể từ iOS 8.0, bạn không cần yêu cầu người dùng cho phép thông báo đẩy để sử dụng phương thức này.
Xác minh bằng dịch vụ reCAPTCHA: Nếu không gửi được thông báo im lặng (ví dụ: vì người dùng đã tắt tính năng làm mới trong nền hoặc bạn đang kiểm thử ứng dụng trong trình mô phỏng iOS), bạn có thể sử dụng reCAPTCHA. Trong nhiều trường hợp, reCAPTCHA sẽ tự động giải quyết mà không cần lượt tương tác của người dùng.
Sử dụng thông báo im lặng
Cách bật thông báo APNs để dùng với Firebase:
Trong Xcode, hãy bật thông báo đẩy cho dự án của bạn.
Tải khoá xác thực APNs lên bằng bảng điều khiển của Firebase (các thay đổi của bạn sẽ tự động chuyển sang Google Cloud Firebase). Nếu bạn chưa có khoá xác thực APNs, hãy xem phần Định cấu hình APNs bằng FCM để tìm hiểu cách lấy khoá này.
Trong bảng điều khiển Firebase, hãy chuyển đến phần
Settings (Cài đặt) > General (Chung). Sau đó, hãy nhấp vào thẻ Gửi thông báo qua đám mây.Trong phần khoá xác thực APNs, trong phần cấu hình ứng dụng iOS, hãy nhấp vào Tải lên để tải khoá xác thực phát triển, khoá xác thực phát hành công khai hoặc cả hai. Bạn phải có ít nhất một ảnh chụp màn hình.
Chọn chìa khoá của bạn.
Thêm mã khoá cho khoá. Bạn có thể tìm thấy mã khoá trong mục Certificates, Identifiers & Profiles (Chứng chỉ, giá trị nhận dạng và hồ sơ) trong Apple Developer Member Center (Trung tâm thành viên của nhà phát triển Apple).
Nhấp vào Tải lên.
Nếu đã có chứng chỉ APNs, bạn có thể tải chứng chỉ đó lên.
Sử dụng (phương pháp) xác minh bằng dịch vụ reCAPTCHA
Cách cho phép SDK ứng dụng sử dụng reCAPTCHA:
Mở cấu hình dự án trong Xcode.
Nhấp đúp vào tên dự án trong chế độ xem dạng cây ở bên trái.
Chọn ứng dụng của bạn trong mục Targets (Mục tiêu).
Chọn thẻ Thông tin.
Mở rộng mục Loại URL.
Nhấp vào nút +.
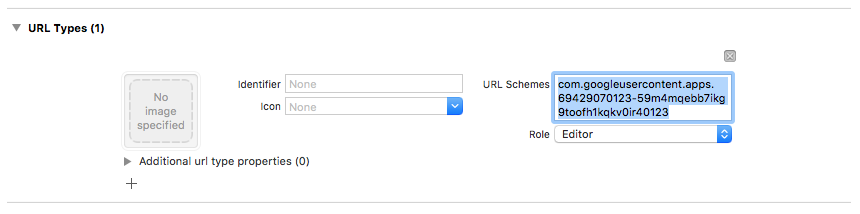
Nhập mã nhận dạng ứng dụng đảo ngược vào trường URL Schemes (Lược đồ URL). Bạn có thể tìm thấy giá trị này trong tệp cấu hình
GoogleService-Info.plistdưới dạngREVERSED_CLIENT_ID.
Sau khi hoàn tất, cấu hình của bạn sẽ có dạng như sau:
Bạn có thể tuỳ chỉnh cách ứng dụng của mình trình bày SFSafariViewController hoặc UIWebView khi hiển thị reCAPTCHA. Để thực hiện việc này, hãy tạo một lớp tuỳ chỉnh phù hợp với giao thức FIRAuthUIDelegate và truyền lớp đó đến verifyPhoneNumber:UIDelegate:completion:.
Chọn một mẫu đăng ký
Bạn có thể chọn xem ứng dụng của mình có yêu cầu xác thực đa yếu tố hay không, cũng như cách thức và thời điểm đăng ký người dùng. Một số mẫu phổ biến bao gồm:
Đăng ký yếu tố thứ hai của người dùng trong quá trình đăng ký. Sử dụng phương thức này nếu ứng dụng của bạn yêu cầu xác thực đa yếu tố cho tất cả người dùng. Xin lưu ý rằng tài khoản phải có địa chỉ email đã xác minh để đăng ký yếu tố thứ hai, vì vậy, quy trình đăng ký của bạn sẽ phải đáp ứng điều kiện này.
Cung cấp lựa chọn có thể bỏ qua để đăng ký yếu tố thứ hai trong quá trình đăng ký. Những ứng dụng muốn khuyến khích nhưng không yêu cầu xác thực đa yếu tố có thể ưu tiên phương pháp này.
Cung cấp khả năng thêm yếu tố thứ hai từ trang quản lý tài khoản hoặc hồ sơ của người dùng, thay vì màn hình đăng ký. Điều này giúp giảm thiểu phiền toái trong quá trình đăng ký, đồng thời vẫn cung cấp tính năng xác thực đa yếu tố cho những người dùng nhạy cảm về bảo mật.
Yêu cầu tăng dần việc thêm yếu tố thứ hai khi người dùng muốn truy cập vào các tính năng có yêu cầu bảo mật cao hơn.
Đăng ký yếu tố thứ hai
Cách đăng ký yếu tố phụ mới cho người dùng:
Xác thực lại người dùng.
Yêu cầu người dùng nhập số điện thoại.
Lấy một phiên nhiều yếu tố cho người dùng:
Swift
authResult.user.multiFactor.getSessionWithCompletion() { (session, error) in
  // ...
}
Objective-C
[authResult.user.multiFactor
  getSessionWithCompletion:^(FIRMultiFactorSession * _Nullable session,
                            NSError * _Nullable error) {
    // ...
}];
Gửi một tin nhắn xác minh đến điện thoại của người dùng. Đảm bảo số điện thoại được định dạng bằng dấu
+ở đầu và không có dấu chấm câu hoặc khoảng trắng nào khác (ví dụ:+15105551234)Swift
// Send SMS verification code.
PhoneAuthProvider.provider().verifyPhoneNumber(
  phoneNumber,
  uiDelegate: nil,
  multiFactorSession: session) { (verificationId, error) in
    // verificationId will be needed for enrollment completion.
}
Objective-C
// Send SMS verification code.
[FIRPhoneAuthProvider.provider verifyPhoneNumber:phoneNumber
                                      UIDelegate:nil
                              multiFactorSession:session
                                      completion:^(NSString * _Nullable verificationID,
                                                    NSError * _Nullable error) {
    // verificationId will be needed for enrollment completion.
}];
Mặc dù không bắt buộc, nhưng bạn nên thông báo trước cho người dùng rằng họ sẽ nhận được tin nhắn SMS và sẽ phải trả phí theo mức phí tiêu chuẩn.
Phương thức
verifyPhoneNumber()bắt đầu quy trình xác minh ứng dụng ở chế độ nền bằng cách sử dụng thông báo đẩy thầm lặng. Nếu thông báo đẩy thầm lặng không có sẵn,thì một hình ảnh xác thực reCAPTCHA sẽ được phát hành.Sau khi mã SMS được gửi, hãy yêu cầu người dùng xác minh mã. Sau đó, hãy dùng câu trả lời của họ để tạo
PhoneAuthCredential:Swift
// Ask user for the verification code. Then:
let credential = PhoneAuthProvider.provider().credential(
  withVerificationID: verificationId,
  verificationCode: verificationCode)
Objective-C
// Ask user for the SMS verification code. Then:
FIRPhoneAuthCredential *credential = [FIRPhoneAuthProvider.provider
                                       credentialWithVerificationID:verificationID
                                       verificationCode:kPhoneSecondFactorVerificationCode];
Khởi chạy một đối tượng xác nhận:
Swift
let assertion = PhoneMultiFactorGenerator.assertion(with: credential)Objective-C
FIRMultiFactorAssertion *assertion = [FIRPhoneMultiFactorGenerator assertionWithCredential:credential];Hoàn tất quy trình đăng ký. Bạn có thể chỉ định tên hiển thị cho yếu tố thứ hai (không bắt buộc). Điều này hữu ích cho những người dùng có nhiều yếu tố thứ hai, vì số điện thoại sẽ bị che trong quy trình xác thực (ví dụ: +1******1234).
Swift
// Complete enrollment. This will update the underlying tokens
// and trigger ID token change listener.
user.multiFactor.enroll(with: assertion, displayName: displayName) { (error) in
  // ...
}
Objective-C
// Complete enrollment. This will update the underlying tokens
// and trigger ID token change listener.
[authResult.user.multiFactor enrollWithAssertion:assertion
                                     displayName:nil
                                      completion:^(NSError * _Nullable error) {
    // ...
}];
Đoạn mã dưới đây cho thấy một ví dụ hoàn chỉnh về việc đăng ký yếu tố thứ hai:
Swift
let user = Auth.auth().currentUser
user?.multiFactor.getSessionWithCompletion({ (session, error) in
  // Send SMS verification code.
  PhoneAuthProvider.provider().verifyPhoneNumber(
    phoneNumber,
    uiDelegate: nil,
    multiFactorSession: session
  ) { (verificationId, error) in
    // verificationId will be needed for enrollment completion.
    // Ask user for the verification code.
    let credential = PhoneAuthProvider.provider().credential(
      withVerificationID: verificationId!,
      verificationCode: phoneSecondFactorVerificationCode)
    let assertion = PhoneMultiFactorGenerator.assertion(with: credential)
    // Complete enrollment. This will update the underlying tokens
    // and trigger ID token change listener.
    user?.multiFactor.enroll(with: assertion, displayName: displayName) { (error) in
      // ...
    }
  }
})
Objective-C
FIRUser *user = FIRAuth.auth.currentUser;
[user.multiFactor getSessionWithCompletion:^(FIRMultiFactorSession * _Nullable session,
                                              NSError * _Nullable error) {
    // Send SMS verification code.
    [FIRPhoneAuthProvider.provider
      verifyPhoneNumber:phoneNumber
      UIDelegate:nil
      multiFactorSession:session
      completion:^(NSString * _Nullable verificationID, NSError * _Nullable error) {
        // verificationId will be needed for enrollment completion.

        // Ask user for the verification code.
        // ...

        // Then:
        FIRPhoneAuthCredential *credential =
            [FIRPhoneAuthProvider.provider credentialWithVerificationID:verificationID
                                                        verificationCode:kPhoneSecondFactorVerificationCode];
        FIRMultiFactorAssertion *assertion =
            [FIRPhoneMultiFactorGenerator assertionWithCredential:credential];

        // Complete enrollment. This will update the underlying tokens
        // and trigger ID token change listener.
        [user.multiFactor enrollWithAssertion:assertion
                                  displayName:displayName
                                    completion:^(NSError * _Nullable error) {
            // ...
        }];
    }];
}];
Xin chúc mừng! Bạn đã đăng ký thành công yếu tố xác thực thứ hai cho một người dùng.
Đăng nhập cho người dùng bằng yếu tố thứ hai
Cách đăng nhập người dùng bằng tính năng xác minh qua SMS hai yếu tố:
Đăng nhập cho người dùng bằng yếu tố đầu tiên, sau đó bắt lỗi cho biết cần xác thực đa yếu tố. Lỗi này chứa một trình phân giải, gợi ý về các yếu tố thứ hai đã đăng ký và một phiên cơ bản chứng minh rằng người dùng đã xác thực thành công bằng yếu tố đầu tiên.
Ví dụ: nếu yếu tố đầu tiên của người dùng là email và mật khẩu:
Swift
Auth.auth().signIn(
  withEmail: email,
  password: password
) { (result, error) in
  let authError = error as NSError
  if authError?.code == AuthErrorCode.secondFactorRequired.rawValue {
    // The user is a multi-factor user. Second factor challenge is required.
    let resolver =
      authError!.userInfo[AuthErrorUserInfoMultiFactorResolverKey] as! MultiFactorResolver
    // ...
  } else {
    // Handle other errors such as wrong password.
  }
}
Objective-C
[FIRAuth.auth signInWithEmail:email
                     password:password
                   completion:^(FIRAuthDataResult * _Nullable authResult,
                                NSError * _Nullable error) {
    if (error == nil || error.code != FIRAuthErrorCodeSecondFactorRequired) {
        // User is not enrolled with a second factor and is successfully signed in.
        // ...
    } else {
        // The user is a multi-factor user. Second factor challenge is required.
    }
}];
Nếu hệ số đầu tiên của người dùng là một nhà cung cấp liên kết, chẳng hạn như OAuth, hãy nắm bắt lỗi sau khi gọi
getCredentialWith().Nếu người dùng đã đăng ký nhiều yếu tố phụ, hãy hỏi họ muốn sử dụng yếu tố nào. Bạn có thể lấy số điện thoại bị che bằng
resolver.hints[selectedIndex].phoneNumbervà tên hiển thị bằngresolver.hints[selectedIndex].displayName.Swift
// Ask user which second factor to use. Then:
if resolver.hints[selectedIndex].factorID == PhoneMultiFactorID {
  // User selected a phone second factor.
  // ...
} else if resolver.hints[selectedIndex].factorID == TotpMultiFactorID {
  // User selected a TOTP second factor.
  // ...
} else {
  // Unsupported second factor.
}
Objective-C
FIRMultiFactorResolver *resolver =
    (FIRMultiFactorResolver *) error.userInfo[FIRAuthErrorUserInfoMultiFactorResolverKey];

// Ask user which second factor to use. Then:
FIRPhoneMultiFactorInfo *hint = (FIRPhoneMultiFactorInfo *) resolver.hints[selectedIndex];
if (hint.factorID == FIRPhoneMultiFactorID) {
  // User selected a phone second factor.
  // ...
} else if (hint.factorID == FIRTOTPMultiFactorID) {
  // User selected a TOTP second factor.
  // ...
} else {
  // Unsupported second factor.
}
Gửi tin nhắn xác minh đến điện thoại của người dùng:
Swift
// Send SMS verification code.
let hint = resolver.hints[selectedIndex] as! PhoneMultiFactorInfo
PhoneAuthProvider.provider().verifyPhoneNumber(
  with: hint,
  uiDelegate: nil,
  multiFactorSession: resolver.session
) { (verificationId, error) in
  // verificationId will be needed for sign-in completion.
}
Objective-C
// Send SMS verification code
[FIRPhoneAuthProvider.provider
  verifyPhoneNumberWithMultiFactorInfo:hint
  UIDelegate:nil
  multiFactorSession:resolver.session
  completion:^(NSString * _Nullable verificationID, NSError * _Nullable error) {
    if (error != nil) {
        // Failed to verify phone number.
    }
}];
Sau khi mã SMS được gửi, hãy yêu cầu người dùng xác minh mã và sử dụng mã đó để tạo
PhoneAuthCredential:Swift
// Ask user for the verification code. Then:
let credential = PhoneAuthProvider.provider().credential(
  withVerificationID: verificationId!,
  verificationCode: verificationCodeFromUser)
Objective-C
// Ask user for the SMS verification code. Then:
FIRPhoneAuthCredential *credential =
    [FIRPhoneAuthProvider.provider
      credentialWithVerificationID:verificationID
                  verificationCode:verificationCodeFromUser];
Khởi động một đối tượng xác nhận bằng thông tin đăng nhập:
Swift
let assertion = PhoneMultiFactorGenerator.assertion(with: credential)Objective-C
FIRMultiFactorAssertion *assertion =
    [FIRPhoneMultiFactorGenerator assertionWithCredential:credential];
Giải quyết vấn đề đăng nhập. Sau đó, bạn có thể truy cập vào kết quả đăng nhập ban đầu, bao gồm dữ liệu tiêu chuẩn dành riêng cho nhà cung cấp và thông tin đăng nhập xác thực:
Swift
// Complete sign-in. This will also trigger the Auth state listeners.
resolver.resolveSignIn(with: assertion) { (authResult, error) in
  // authResult will also contain the user, additionalUserInfo, optional
  // credential (null for email/password) associated with the first factor sign-in.

  // For example, if the user signed in with Google as a first factor,
  // authResult.additionalUserInfo will contain data related to Google provider that
  // the user signed in with.

  // user.credential contains the Google OAuth credential.
  // user.credential.accessToken contains the Google OAuth access token.
  // user.credential.idToken contains the Google OAuth ID token.
}
Objective-C
// Complete sign-in.
[resolver resolveSignInWithAssertion:assertion
                          completion:^(FIRAuthDataResult * _Nullable authResult,
                                        NSError * _Nullable error) {
    if (error != nil) {
        // User successfully signed in with the second factor phone number.
    }
}];
Đoạn mã dưới đây cho thấy một ví dụ hoàn chỉnh về việc đăng nhập cho người dùng có nhiều yếu tố:
Swift
Auth.auth().signIn(
  withEmail: email,
  password: password
) { (result, error) in
  let authError = error as NSError?
  if authError?.code == AuthErrorCode.secondFactorRequired.rawValue {
    let resolver =
      authError!.userInfo[AuthErrorUserInfoMultiFactorResolverKey] as! MultiFactorResolver

    // Ask user which second factor to use.
    // ...

    // Then:
    let hint = resolver.hints[selectedIndex] as! PhoneMultiFactorInfo

    // Send SMS verification code
    PhoneAuthProvider.provider().verifyPhoneNumber(
      with: hint,
      uiDelegate: nil,
      multiFactorSession: resolver.session
    ) { (verificationId, error) in
      if error != nil {
        // Failed to verify phone number.
      }
      // Ask user for the SMS verification code.
      // ...

      // Then:
      let credential = PhoneAuthProvider.provider().credential(
        withVerificationID: verificationId!,
        verificationCode: verificationCodeFromUser)
      let assertion = PhoneMultiFactorGenerator.assertion(with: credential)

      // Complete sign-in.
      resolver.resolveSignIn(with: assertion) { (authResult, error) in
        if error != nil {
          // User successfully signed in with the second factor phone number.
        }
      }
    }
  }
}
Objective-C
[FIRAuth.auth signInWithEmail:email
                     password:password
                   completion:^(FIRAuthDataResult * _Nullable authResult,
                               NSError * _Nullable error) {
    if (error == nil || error.code != FIRAuthErrorCodeSecondFactorRequired) {
        // User is not enrolled with a second factor and is successfully signed in.
        // ...
    } else {
        FIRMultiFactorResolver *resolver =
            (FIRMultiFactorResolver *) error.userInfo[FIRAuthErrorUserInfoMultiFactorResolverKey];

        // Ask user which second factor to use.
        // ...

        // Then:
        FIRPhoneMultiFactorInfo *hint = (FIRPhoneMultiFactorInfo *) resolver.hints[selectedIndex];

        // Send SMS verification code
        [FIRPhoneAuthProvider.provider
          verifyPhoneNumberWithMultiFactorInfo:hint
                                    UIDelegate:nil
                            multiFactorSession:resolver.session
                                    completion:^(NSString * _Nullable verificationID,
                                                NSError * _Nullable error) {
            if (error != nil) {
                // Failed to verify phone number.
            }

            // Ask user for the SMS verification code.
            // ...

            // Then:
            FIRPhoneAuthCredential *credential =
                [FIRPhoneAuthProvider.provider
                  credentialWithVerificationID:verificationID
                              verificationCode:kPhoneSecondFactorVerificationCode];
            FIRMultiFactorAssertion *assertion =
                [FIRPhoneMultiFactorGenerator assertionWithCredential:credential];

            // Complete sign-in.
            [resolver resolveSignInWithAssertion:assertion
                                      completion:^(FIRAuthDataResult * _Nullable authResult,
                                                    NSError * _Nullable error) {
                if (error != nil) {
                    // User successfully signed in with the second factor phone number.
                }
            }];
        }];
    }
}];
Xin chúc mừng! Bạn đã đăng nhập thành công cho một người dùng bằng tính năng xác thực đa yếu tố.
Bước tiếp theo
- Quản lý người dùng xác thực đa yếu tố theo phương thức lập trình bằng Admin SDK.